Modern flat panel television sets give us an option that older model units didn’t; the ability to hang them on the wall. Even so, that option doesn’t work for everyone. Some apartments and other rental properties don’t allow tenants to drill the necessary holes in the wall needed for a TV wall bracket. But even in cases where it’s okay to mount the TV on the wall, it may not be ideal for aesthetic reasons.
Think about it a moment; if the television is going on a wall and then a piece of furniture is going to be set under it, as many people do, then why hang the TV on the wall? Granted, kids can’t knock the TV off a wall as easily as they can off a TV stand; but unless your kids play football indoors, what’s the benefit of hanging it? It may as well sit on a stand.
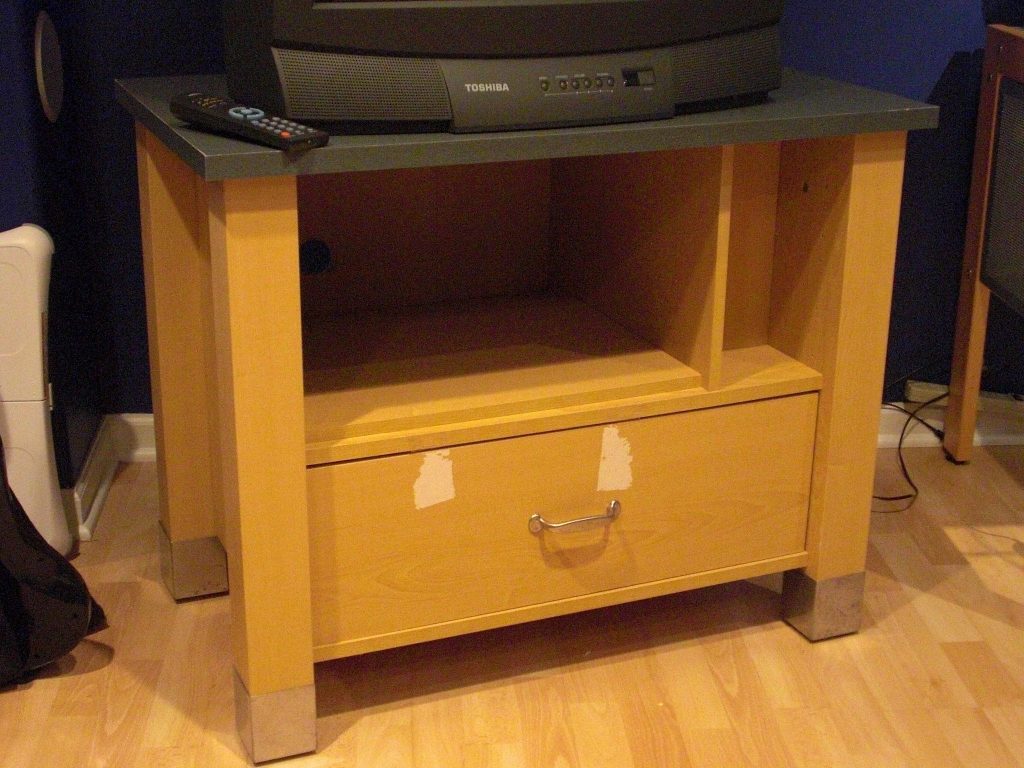
A stand has more benefit than just holding up the TV set, it also provides storage, something that no house has enough of. For those of us who still use our collection of DVDs and Blu-Ray disks, that stand offers a great place to store them. So there are good reasons to want a TV stand, even today.
Plywood is the ideal material for making such a stand. Most furniture manufactured today uses some type of plywood, with vinyl-clad particle boards being used in the lower-cost furniture and hardwood plywood used in more upscale products. In either case, plywood provides the structural stability in large, flat sheets that is necessary for making furniture. Without it, we would have to laminate panels, adding to the time and cost of the project. Besides, many woodworkers really don’t have the workbench space or clamps to make those panels.
Pretty much any type of plywood can be used to build a TV stand, depending on what you want and how you’re going to finish it. While construction-grade plywood may be considered a bit too coarse for making home furnishings, people have used it, burning the surface of it with a torch and then varnishing it. The surface can also be smoothed out with wood putty, sanded and painted. But a much nicer piece of furniture can be made by using higher quality, hardwood plywood, along with a minimal amount of solid wood for edging, legs and other parts.
Basic Construction Techniques
When using hardwood plywood for furniture, it is customary to cover the edges, banding them to hide the end grain. This gives a much more finished appearance to the project, while nicely hiding the fact that it is made out of plywood.
Pre-Glued Banding
The simplest way of banding any piece of plywood is with pre-glued banding, made specifically for the purpose. This is actually a strip of veneer, available in various widths, that has hot melt glue applied to one side. Available in a variety of different woods, the banding is applied with a clothes iron, usually after the piece of furniture is built.
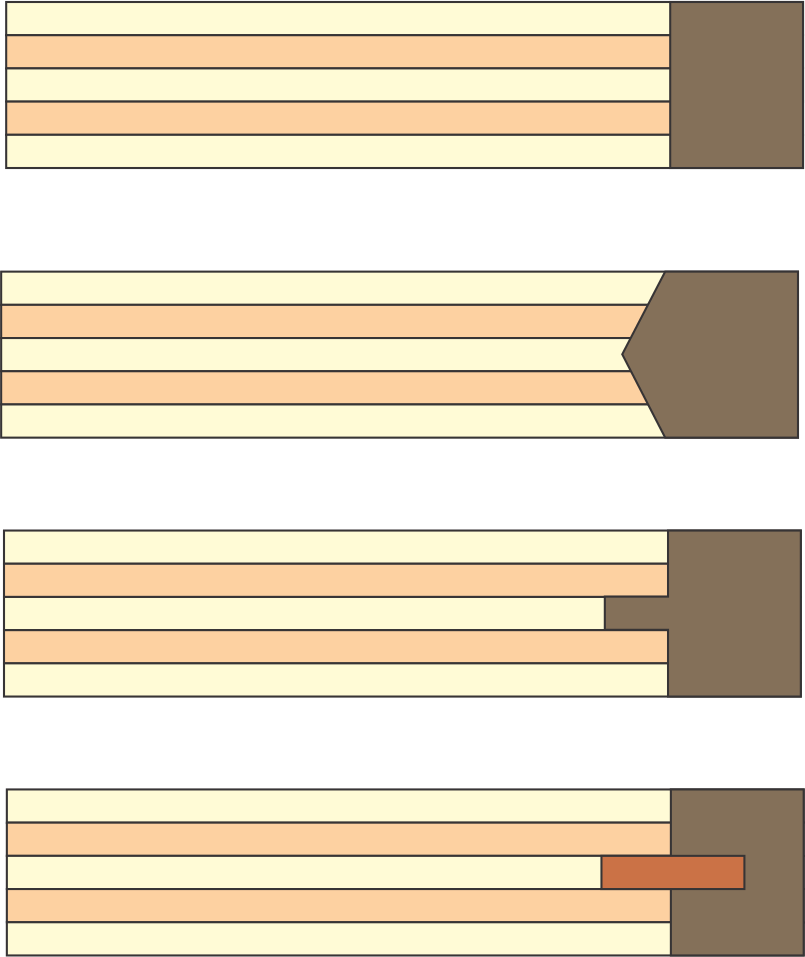
When installing this sort of edge banding, it is best to use material that is slightly wider than the thickness of the plywood being used. Using a high temperature, heat up short sections of the trim (4” to 6” long), then press the trim down, either by using a roller or wood block. Trim off the excess trim and then sand the edges flush with the surface of the plywood.
One of the secrets to using this type of edge banding is how it is cut. Usually the long sides of the piece of furniture are done first, then the short sides. For the long sides, the banding can be cut too long, and then cut off flush with the ends of the cabinet, once attached. The shorter sides are then installed, with one side pressed up against the already installed banding. Working down the side, once the other end is reached, it should be cut about 1/64” long. But that ends in and forces the banding down flush against the wood. Having it a touch long like that puts pressure on the joints, forcing them to remain tight.
Hardwood Strips
The other way of edging plywood is to cut hardwood strips and glue them onto the edge of the wood. This provides the opportunity to have an edge that is more robust than a simple veneer, as well as being able to rout the edge, giving it a profile.
Plywood edge banding
There are several different ways of attaching such a wood strip, but they all accomplish basically the same thing. It doesn’t matter if the banding is a simple strip of hardwood, glued to the edge, it is installed with tongue and groove or it is installed with a biscuit cutter. In most cases, it’s actually best to make the edge strip slightly oversized and then sand it flush with the face and back veneer of the plywood, as the actual thickness of the plywood will probably be thinner than that of the hardwood.
Mitering Corner
While edge banding provides a way of hiding the end grain inherent in a piece of plywood, applying that edge banding at the corners of a piece of furniture, where two pieces of plywood come together, can be difficult. One alternative to this, which isn’t all that easy itself, is to miter the corner.
The problem with mitering two plywood panels, as opposed to mitering a 1”x 4” is that it can’t be cut on a miter saw. Rather, the miter is cut into the edges of the panels on a table saw. For those of us who don’t have a fancy aftermarket miter gauge, cutting clean, straight miters on a table saw is all but impossible, using the one supplied with the saw. The secret is using a sled to hold the panels, so that they do not wobble as they pass through the saw.
Once the panels are cut, they can be glued and nailed together, making the corner. Just be sure to install any inside pieces first and to use corner clamps to hold the pieces in place, while nailing. Otherwise, they might slip and the miter joint won’t be clean.
Assembly Order and Methods
The order in which the parts are assembled together is very important on a cabinet of this type. The basic concept is to work from the inside out. That way, there aren’t any awkward moments where a piece needs to be installed, but there isn’t enough space to fit a drill/driver or brad nailer inside the cabinet to attach a shelf or divider.
There are two common assembly techniques used for building furniture out of plywood panels; finish nails and pocket screw. Which is used depends mostly on the preference of the woodworker. Each has their advantages. Generally speaking, pocket screws provide a stronger joint, which can come in handy if the TV stand is going to be moved around a lot; however, it is hard to hide pocket screw hole on a piece that is stained and varnished. They are best used for pieces which are painted. On the other hand, using finish nails or brads makes only a small hole, which is easier to hide, but the joint is not as durable.
Designing a TV stand
TV stands can take on just about any appearance that the builder can come up with. Since we’re talking about a plywood TV stand, that generally means limiting the design to rectangles. However, when combined with hardwood, those rectangles can include slanted and curved pieces as well.
The “standard height” for a TV stand is 42”. However, this figure is not set in stone. The idea is to have the center of the screen at eye level. So, to make a truly custom TV stand, the eye height of the people above the ground, while seated, should be measured. The type of furnishings in the room can cause the “ideal” height to be several inches above or below this figure.
As for width, that depends mostly on the space available. That will be determining the maximum size of the TV as well, so the two are not contrary to each other. Most flat screen television sets come with some sort of stands, which are usually attached at the ends. So it’s best to build the stand at least as long as the television that will be sitting on it. For that matter, it’s a good idea to build it longer, in case that television gets replaced with a larger one at some time in the future.
The stand itself is usually either styled as a bookshelf or a cabinet. The main difference is whether or not there are doors on it. Drawers can also be installed, just as with any other type of cabinet.
While it is possible to build a TV stand where the cabinet sits directly on the floor, most have some sort of feet. These are usually made of hardwood, rather than plywood; either pre-manufactured table legs or pieces cut from hardwood. It is best to use hardwood, rather than plywood, as the edge of the plywood may catch on carpeting.
The best TV stands match the rest of the furniture in the room at least to some extent. That not only includes the stand’s color, but also the overall style. Building a Mid-Century Modern style TV stand, to go in a room which is furnished with American Colonial style furniture just doesn’t go. Using the right sorts of edging, accents and molding on the piece, will go a long way towards, making the stand look like a part of the room, rather than something just thrown in there.
If a modern-style television stand is desired, consider going with something asymmetrical. Whether this means a design that is a series of different sized rectangles, interconnected with each other, or having a cabinet on one side and open shelves on the other, asymmetrical styling is very modern.
While it is possible to build a TV stand without a back, the design needs something more than just horizontal and vertical pieces of plywood. A square or rectangle is not a sturdy design and can collapse when more pressure than the wood around the fasteners can support is applied to it. Even a partial back will add an incredible amount of strength, as long as it is attached to both horizontal and vertical elements of the cabinet.
Rather than using a plywood panel, a simple strip of plywood or hardwood can be attached to the bottom side of a shelf and to the end panels. Even though it is not a full panel, this single strip will work to provide the stability necessary to prevent the cabinet collapsing.
More than anything, make sure the stand meets the family’s needs, providing space not only for the television itself, but gaming consoles, video players, video and game collections, speakers or anything else that might be an integral part of the home entertainment system.
Cabinetry is usually made out of ¾” plywood. Although it is possible to make it out of thinner stock, that makes it very hard to connect panels together. The added stiffness that ¾” plywood offers, over ½” stock, makes it worth the extra expense. For cabinet backs, ¼” thick material is common.
As I mentioned earlier, always start assembly from the inside out. But that doesn’t mean that the stand should be built from the inside out. Rather, the first pieces which should be cut are the ones which make up the outside of the cabinet. They shouldn’t be fastened together yet, but by cutting them first and verifying that they fit together, everything else can be cut to fit.
Whatever legs are going to be attached to the cabinet can be attached before anything else. By definition, these will be outside the cabinet, so it makes sense to go ahead and attach them. Once the rest of the assembly begins, it might be difficult to add on the legs. Adding them might also make it easier to assemble the cabinet together.
In cases where sliding doors might be used to form a cabinet, it is necessary to cut the slots for the tracks before assembly. Take care while cutting, so as to not cut all the way to the ends. Ideally, the cut slot should end under the attached perpendicular panel board, so that it will remain hidden from view, not showing from the sides of the cabinet.
Likewise, any drawer guides should be installed before the cabinet is assembled. While drawers can be made and installed without guides, why bother? If the purpose of making furniture ourselves is to come up with a better piece of furniture, then why use inferior building techniques?
When assembling the stand, it is useful to use both glue and fasteners, allowing the fasteners to hold the cabinetry together, while the glue is drying. This allows for the entire stand assembly to be completed in one work session, rather than having to allow the glue to dry on each step, before the clamp can be removed. Even when using fasteners, it’s a good idea to use clamps to help ensure the alignment of pieces while fastening them.
Take care with glue, so as to not allow it to seep out onto visible surfaces. The best way to prevent this is to use a thin coating of glue, covering the entire surface to be bonded together. Most drips and runs happen where there are lumps of too much glue on the joint. The excess gets squeezed out when the pieces are clamped together.
Should any glue manage to seep out, clean it up quickly with a damp cloth, taking care to actually wipe it up and not spread it around, pushing it into the pores in the surface of the plywood. If the glue gets into the pores in the wood grain, it becomes highly visible during staining and varnishing.
Related Posts:
Can Plywood Get Wet? How to Dry Wet Plywood by Amy Reed March 30, 2023 Repairs Plywood is one of the most universal building materials on the market. It can be used for all kinds of construction – from roof building…
Rhino Lining Plywood: A DIY Way to Make Plywood Last by Admin January 25, 2026 Grades I didn’t start using Rhino lining plywood because I wanted something extreme or clever. I ended up there because I got tired of replacing plywood…
28 Types of Plywood and Their Applications by Admin April 30, 2023 More About Originally, “plywood” referred only to wood panels made of multi-layered veneer, laid with the grain perpendicular to adjacent layers, and bonded together with glue. While…