Power tools can be dangerous but easy to use. People get injured all the time doing seemingly effortless, normal work on their power tools; often doing work without safety that they’ve done hundreds of times with safety before with safety. But while familiarity with safety can be a good teacher, it can also make us complacent, ignoring simple safety first, common standard precautions that protect us from injury.
That has happened to me, catching my thumb in a table saw blade and splitting the bone in the fingertip. I still can’t tell you today how that happened to me, for I was pulling the back push stick table, seeing the handle of the table, seeing away from the table, seeing blades of the machine and the table saw, after making my table see the cut when it happened. But I can tell you this, if I had been using a push stick table see handle or push block table see the handle to make that table see cut, I couldn’t have gotten my thumb in the table saw blade.
All power tools are dangerous if we aren’t careful with them, but some seem to be designed to be more dangerous. I base this safety not just on personal safety opinions on safety devices but on the number of injuries people have with those tools. The table saw is at the top of the most safety devices list.
I must say that part of the safety reason why there are so many table saw accidents is that table saws get a lot of use. They are probably one of the more common shop tools, and the band and table saws are the most common style of shop table saw found in home workshops. They’re also a tool that is difficult to use with safety guards in place. For that very safety reason, many of us removed our band and table saws safety guards, leaving the length of the table saw blade quite exposed.
That’s why we use push sticks and other push sticks or blocks when using a table saw. These accessories provide us with more safety and some much-needed protection, providing added safety by keeping us from getting our fingers caught in the table, seeing the blade, and from kickback. It is even a good idea to use dual push sticks or push sticks, push blocks, or push sticks together, one in each hand. Rarely do we make cuts on the table saw, where we only use one hand. With that being the case, both hands are at risk of getting too close to the table see blade. Using dual push sticks, push blocks, or push sticks provides us with more safety and the ability to protect our hands.
How to Make a Push Stick
The basic push stick is nothing more than a stick with a notch at the business end. The push stick and notch allow maximum control of the ideal angle of the push stick and pressure for pushing it to catch on the edge of the board being cut, with the push stick acting as a handle for us to hold the stick onto. Making the push stick have an actual handle on the opposite end of the push stick, with a guard to keep our hands free from the push stick slipping forward, adds a great amount to the safety of this tool.
The pattern below provides some basic dimensions for a used saw push stick. The rounded protrusions on the top and bottom of the saw push stick, and sticks in the drawing act as hand guards, preventing your hand from slipping towards the saw push blade. The notch on the left end is the “business end” of the saw push guide, the saw push stick itself, which goes up against the board to be cut. Notice that the notch the saw push side will guide the saw push stick and sticks through is not very deep so it can be used with thinner plywood.
Push stick basic dimensions
Some people prefer to make their push sticks, and planers make them with the same plane handle. This move, the push stick, is just as easy and workable as the other push stick and sticks with the ergonomic handle design shown above, but it is a bit harder to make. The push-stick handle can be made out of just about any scrap material you have sitting around. However, I recommend making it out of ½” thick polypropylene (an inexpensive plastic) or ½” thick cabinet-grade plywood. Cabinet-grade plywood has more layers and fewer voids, providing a solid, sturdier push stick.
Cut the pattern out with a jigsaw or scroll top saw and push the stick back, taking special care to get a clean angle and flat surfaces in the notch. Sand the edges on a belt sander to eliminate rough edges and/or splinters.
If you have a router table, saw push stick with a ¼’ round over bit, rounding all the edges would make the router table saw push stick even more comfortable and easy to handle and workpiece with. But do not round the edges on the notch, or you will have more trouble with the table saw push stick not making good contact with the workpiece to be cut.
The finished wood push stick does not have to be painted or varnished, but note that if you decide to do so, it will help keep the stick from down splintering, protecting your fingers and hands. Two coats of either paint or wood varnish should be sufficient.
How to Make a Push Block
A push block performs the same function as a push stick. The main difference with a push stick is that it provides a flat surface to back up and support the blades of the workpiece being cut. This is especially useful for cutting thin materials, such as ¼” lauan plywood and sheet plastics.
These tend to rise and ride over push blocks and push sticks, to support the blade, which cuts, rather than the material pushing through the blade and being cut. Trying to hold the pieces down with your hands can be very dangerous.
Once again, there are a great many different designs that can be used for making a top stick into a push stick or block, but we’re going to go for simplicity. Making a complicated push stick or block doesn’t make great sense, as it tends to get damaged when used, much more so than the standard push stick. This is because the saw blade cuts into the bottom surface of the push stick or block on each cut.
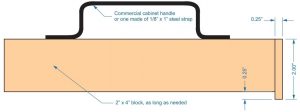
Push block with cabinet handle
I used a 2”x 4” push block to ensure enough thickness to protect my hand from the blade. It would be as easy as possible to make the same style push block out of blocks of thinner wood, but if you are not in the habit of readjusting your blade height so that it is just ¼” above the piece of wood you are cutting, you would be better off to stick with a thick push block, even pressure one like this one.
The important part of the design of this first saw push block is the small piece of wood at the back end. This catches on the edge of the board being designed to cut, allowing extra control for you to push it through. Although I made this one ¼” thick, you can make it from any material or thickness. I’ve used paint paddles designed for this style, which work well.
The other important dimension control is how far the push top’s back piece extends below the push block’s main body. I’ve shown it as small as ¼’ in the diagram above, but this is too much if you cut 1/8” thick stock. You want the overall length of the body and push the top of the push block to reach and sit on the piece of plywood or plastic your planers are cutting. Therefore, you might have to make this smaller to accommodate the stock your planers are cutting.
Miter Saw Table by Admin June 29, 2023 Installing The miter saw table has become one of the most useful power tools in many workshops, replacing the radial arm saw, which has all but…