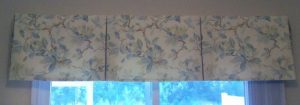
Adding valances can dress up any window or even a whole room, adding a touch of elegance to what might otherwise be considered a rather plain window dressing. Yet you rarely find them in people’s homes. Why is that? Because valances are custom additions to a window, they are something that most people can’t afford. Yet making your own box valances isn’t hard at all, and will modernize the look of your home.
Box valances are also useful for dressing up windows that don’t have curtains. Many people merely put shades or blinds on their home windows. In that case, the window can appear a bit bare. But by adding a box valance, it no longer looks like you’ve gone the cheap route, but rather, that you were going for a more modern style.
Box valances aren’t the only kind of valances there are. There are also curtain valances. The basic difference is that a curtain valance is just a short curtain, about a foot long, hung over the main curtain, at the top of the window. A box valance is solid, covered with fabric, as if the curtains were mounted directly into the box.
DIY Box Valance
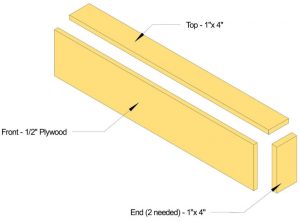
Valance box elements
To make a box valance, you have to start out with the box. This is most easily made out of a combination of ½” thick plywood and 1”x 4” dimensional lumber. If you don’t have 1”x 4”s available, you can rip a piece of plywood to 3-1/2” wide, making your own.
It’s not a good idea to use plywood any thinner than ½”, as it will be hard to nail the pieces together and anything thicker would be a bit heavy. However, you can use thicker material. Just realize that it will be a touch trickier to hang. Please note that there is no need to use cabinet-grade hardwood plywood, as it will be covered anyway.
The dimensions for your valance box depend on the size of your window. You need it to be wider than your curtain rod, giving a good inch on either side. So, if your curtain rods are hung 1” outside of a standard 30” wide window, you’d want to make your valance box 34” to 36” wide on the inside. Don’t forget to add material thickness for the 1”x 4” (3/4” additional on each end) to that for cutting the front piece.
As for height, valance boxes can range from 4” to 12” high, depending on the look you are trying to get. They can even go up to the ceiling for an ultra-modern look. A wider valance box will create a bolder statement, but a narrow one will look more sophisticated. A lot will depend on the type of fabric you are going to use to cover the box.
The four pieces of the valance box should be glued and nailed together, preferably with a pneumatic brad nailer and 1-1/4” to 1-1/2” nails. The nails are there mostly to hold the pieces together, while the glue has time to set. The top and end pieces should be fit behind the front, so that the front of the valance box is smooth. Take care when attaching them to ensure that the edges of the side and top pieces are smooth with the edge of the plywood front.
Please note that it is very important to use wood that is not warped or twisted to get a good result. Be picky about the wood you buy at the lumberyard. A lot of it has been stacked green and not allowed to dry fully, causing it to warp or twist when dries. Using plywood for the top and ends rather than 1”x 4”s can eliminate this problem.
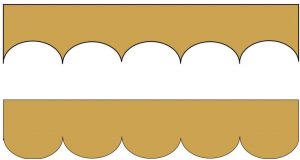
Some people prefer a scalloped edge on their valance box. This is usually done using fabric with a scalloped edge, but it can also be done with a valance box. To do it with a valance box, you must decide what sort of scallop you want and cut the front piece out with a jigsaw.
Before choosing this, please note that making a scalloped valance box is considerably more complex than making one with a straight edge. The problem is not in making the curved edge on the box but in covering it with fabric. It is unnecessary, but you can round the edges of your valance box slightly with a ¼” router roundover bit. This will give it a softer look, eliminating the sharp edges.
Covering Your Valance Box
The valance box is covered with fabric over a layer of quilt batting. The quilt batting softens the edges and helps hide any imperfections in the plywood’s surface or your assembly technique. Since it will be covered with quilt batting, there is no need to put nail holes or knots on the wood’s surface.
Start by applying the quilt batting to all exposed surfaces. If you have trouble covering the top surface, that is not critical; merely wrap the batting over the edge and attach it to the top. The batting can be attached with a staple gun and ¼” staples or even staples from a typical office stapler, but it is better to attach it with spray adhesive if available. If you use staples, only staple on hidden sides and ensure they go all the way in, so as not to cause a bulge in the fabric.
With the batting in place, all left is to cover it with fabric. Be careful to ensure that your fabric is aligned with the edge of the valance box, or it will not look right. This is especially important with geometric patterns or stripes, but even a floral print can look crooked because the pattern repeats itself.
Attach the fabric with ¼” staples from a staple gun, being sure to staple only into hidden sides of the valance box. Fold the corners so that the fold is on the top and not on the end to hide the fold and give the valance box a seamless appearance. The fabric does not need to be hemmed before attaching, but if you have a fabric that tends to unravel, using a liquid “ravel stop” edge sealer can be useful.
Valance box design
Covering the Scalloped Valance Box
Scalloped valance boxes are covered much like standard ones, with one exception. That is that a strip of matching fabric should be attached to cover the bottom edge of the scallops, before the main fabric is installed. The fabric cover will need to be slit several times, perpendicular to the edge of the scallops, so that it can be folded around and attached on the back side. If this edge is not covered, the underlying wood can show in spots.
Hanging the Valance Box
The valance box can be hung in a variety of ways. Two of the most common are to use L brackets on the inside or to mount blocks of wood to the wall and mount the valance box to them.
I personally prefer using the wood blocks, as it is easier and more secure. You can use one long block or two shorter ones, depending on what you have available in your scrap pile. 1”x 2” furring strips work extremely well for this, as they are easy to screw or nail through. The idea is to mount a strip of 1”x 2” horizontally above the window, at the right height for the top of your valance box to sit on. Keep in mind that the top piece of wood is ¾” thick when you are locating it. The strip should be slightly shorter than the valance box. Either be sure to mount it to the studs or use appropriate drywall anchors.
If you are making a short valance box, you should be able to put the screws in anywhere, as there are usually three pieces of 2”x 4” run horizontally across the top of the window frame, to act as a header. Larger windows may have 2”x 8” headers. But if your valance box is higher than this, you’ll need to find the studs running vertically above the window frame and mount into them.
With the strip in place, the valance box can be hung, placing it where you want. Check it for centering, and then attach it in place, screwing or nailing through the top, into the strip. The weight will be held by the strip you attached to the wall, so the only thing these nails or screws have to do is keep it from moving.
There you have it, your windows now look more dressed up with your curtain valance boxes!
Related Posts:
Box Spring Alternative: Easy DIY Bunkie Board Guide by Admin June 18, 2025 More About After a long day, there’s nothing better than sinking into a comfortable bed. But that comfort isn’t just about the mattress—it’s also about what’s under…
Best Plyo Box : Foam vs Wood + Top Picks by Admin April 13, 2026 DIY What Is the Best Plyo Box for Home Gyms? The best plyo box for most home gyms in 2026 is a heavy foam box with…
How to Make Barn Quilts by Admin June 3, 2025 DIY Walk through rural America and you’ll start noticing a charming trend on barns, sheds, and even garages—large, colorful quilt block patterns painted right onto the…