No matter what type of home improvement DIY’er you happen to be—from the old school master who uses only handtools, to the modern man whose every tool has a plug on it, or—more likely—someone in between, many common DIY tasks at home are much easier to complete when using a jig to help with the work. From the common workbench to miter boxes, the life of the home DIY’er has been made much easier by using a jig dedicated to helping us keep the cuts we make straight and square, the holes we drill perpendicular and centered, and the joints we make aligned and tight. This article will focus on making jigs for the hand tool user.
Making Jigs
One of the problems associated with making workshop jigs is that there is a time and monetary cost in making them. However, given their accuracy when made correctly, their ease of use and the time saved on future projects that utilize these jigs— particularly for repetitive or common jobs, the time and money spent initially to make these jigs repeatedly pays dividends in the future. The jigs discussed here will mainly focus on devices to improve the utility of hand tools— a crosscut/miter jig and a shooting board. These jigs can all be made using a variety of materials: MDF, hard or soft woods, particleboard or melamine. However, the best material for making these jigs is plywood—with some components made from solid woods. Plywood is dimensionally stable, comes in larger sheets and doesn’t warp. Solid wood expands and contracts with changing humidity and temperature, the edges of MDF swell when exposed to water and melamine tends to be a little too slick for holding materials in place while they’re being worked.
Dimensions and Material
DIY Jigs
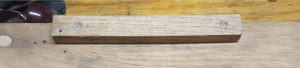
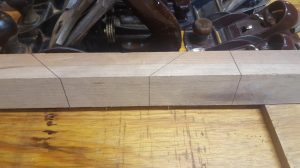
The crosscut/miter box described here is an improvement over inexpensive options available commercially which do not allow cuts of boards more than a few inches (12–15 cm) wide or thick. Cut a larger piece of plywood 24” long by 15” wide (60 x 37 cm dimensions are approximate); the thickness needs to be at least ½” (12 mm). On the bottom side, attach a strip of solid wood to act as a register against your workbench— the dimensions are, again, approximate. For the top side, cut a 2.5” x 2.5” (6 x 6 cm) length of solid wood (hardwoods such as oak, maple and cherry work better than soft woods such as pine and cedar). Using a larger piece of solid wood here makes sense as it provides additional stability for the saw during cuts. Before attaching the strip on the top, you will need to mark the cuts for the two common angles used in a miter box, 90° and 45°, both left and right side cuts. Trace the 90° cut marks on the top and both sides, mark out the 45° cuts—left and right—and mark the perpendicular cut positions as well. See the photo below; note the perpendicular marks in the front are also on the back. Attach both strips of wood using glue and screws and make sure that each section of the hardwood top section, delineated by the pencil marks, has a screw inserted into it. Perpendicular cut
Cutting
Making cuts
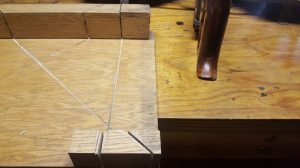
Once the two strips have been attached to the larger piece of plywood, it’s now time to make the cuts in the hardwood strip. Taking care at this step is critical; using a tenon saw (or larger, if you have access to one), cut along your layout lines and constantly check to make sure you’re parallel front and back. If you’re careful at this stage, your subsequent cuts made using this jig will be straight and square and/or perfectly 45°. For added stability for your saw, a second hardwood strip may be attached to the board; use a framing square to perfectly align and ensure a 90° cut as well as the 45° cuts— see the photo on the right and note the well-worn nature of the second piece is the result of years of use.
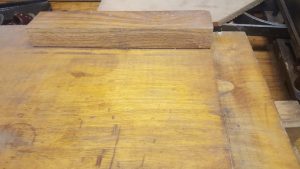
Often, the cuts that comes off of the miter box outlined above are a little ragged and need to be cleaned up, especially for exacting joinery work. The challenge of this task is exacerbated since you’re dealing with endgrain wood, much more difficult to cut using a hand plane. However, a sharp low-angle block plane in combination with a shooting board makes quick work of the ragged edges of the cuts left behind from the miter box.
Attaching top piece
A shooting board is little more than a simple jig that holds work at a 90° angle while providing a guide for a hand plane to travel as it slices through the ragged endgrain edges. It is composed of two pieces of plywood (again, plywood is the better choice for this jig for the reasons mentioned above), a strip fastened to the bottom to act as a register to your workbench and a larger hardwood strip that acts as support for the wood itself. First, cut two pieces of plywood at least ½” thick (12 mm) approximately 18” x 30” (27 x 75 cm). The second piece, which will go on top, should be shorter than the first by approximately 4–6” (10–15 cm) to allow space for the plane to run. Make sure the second piece incorporates a factory edge to perfectly align the plane at 90° vertically. Attach the two pieces of plywood together as well as the register strip on the bottom. Then cut a thick block of hardwood (again 2.5” or 6 cm square) approximately 24” long (60 cm) and attach it to the top piece of plywood— see the picture on the right. This stage is critical for the proper operation of this jig; make absolutely sure that this block is perfectly perpendicular to the factory edge, use a framing square to ensure this perfect 90° alignment. Also, chamfer a small channel in the bottom of this block to allow for some sawdust that might be trapped when using this jig; such debris can occasionally throw the jig slightly out of square during use. Finish each jig with a couple of coats of one-pound shellac for moderate protection, looks and easy clean up— glue spills and such.
Miter Clamps: Perfect Corners Made Easy by Admin March 3, 2025 Joints One of the first lessons every woodworker learns is that miter clamps turn good corners into great ones. These specialized tools squeeze freshly cut angles…


")


")