Woodworking can be a very rewarding hobby. One can make nearly anything that they can imagine as long as they have the skills to get the job done. For example, instead of purchasing a new bookshelf or bedside table you can build your own using plywood. This may sound easy to many people. I, for example, originally thought to myself “That’s not to difficult. Get some plywood, some nails and some wood glue.” Anyone that knows anything about building furniture such as this immediately knows my mistake. In most cases, simply having nails and wood glue isn’t even nearly enough to provide the structural integrity needed for load bearing equipment. My first bookshelf fell apart before I even got the shelves fully loaded. It was a catastrophe! I only wish that I knew about using dowel joints beforehand.
If you aren’t familiar with the terminology, a dowel joint is a small wooden dowel that is used to connect the pieces of plywood together, allowing it to support much more weight then you would be able to achieve with simple nails and wood glue. If you have ever put together any wooden Ikea furniture, you may have worked with these dowels before. They are usually between 1/4” and 1/2” in diameter and come in a variety of lengths. These dowels are inserted into predrilled holes and often used by first coating the dowel in wood glue.
It can seem that such a small piece of wood couldn’t possible compare to a solid steel nail, but the truth is that it provides wonderful support for the furniture. Want to see for yourself just how big of a difference it can make? Get one old-school number 2 wooden pencil, preferably one that you don’t mind ruining. Now break it in half, and then break it in half again. Once you have it in quarters, try to break one of the smaller pieces in half as well. It becomes much more difficult the shorter the piece of wood becomes. Now imagine that your left hand is a piece of plywood and your right hand is the other. The resistance that you feel in your hands will be felt by the two pieces of plywood make for a stable connection. The benefit of using the dowels isn’t only structural integrity, but also appearance. Using nails or screws can often leave visible marks or holes that are visible, however the dowel joint is completely internal and not visible to the naked eye.
So now you might be thinking to yourself “I like how this sounds, but how exactly do I get started with dowel joints?” Well, that is what I am here for! To answer this question, we first need to determine exactly how you want to go about this. You can either purchase these dowels or make them yourself.
Purchasing Wooden Dowels
Purchasing such a set of dowels can be a bit confusing when getting started. The most common sizes of dowels are 1/4”, 5/16”, 3/8”, 7/16”, as well as 1/2”. Having this large variety of sizes can be confusing when you are trying to figure out what you need. That being said, for most jobs the 1/4” and 3/8” diameters of dowels are sufficient. “That’s great,” you may ask, “but what about the length?” In most cases, the dowel only needs to be 1 1/2” or 2” long. If you are using ¾ inch plywood, I would recommend the 1 1/2” length dowels. If you go larger, you can use up to 2” long dowels.
The diameter and the length aren’t the only features of the dowel to consider. There are also fluted dowels, which I personally prefer. Often times, when you are putting the dowel into the predrilled holes you either coat the dowel in wood glue or put wood glue directly into the holes. As the wood glue dries, it expands and helps to hold the dowel in place. This is why I prefer the fluted dowels. These dowels have grooves running the length of the dowel. This provides a channel that the wood glue can run through while it expands, making for a much better hold.
Wooden Dowels DIY
Maybe you don’t want to purchase these dowels. Maybe you are the ultimate DIY master and you want to make these dowels yourself with some kind of dowel joint kit. If that is the case, I have great news. You can actually purchase jigs that will allow you to fabricate these dowels at home. There is a very large variety of these jigs available online. These can range from a $12 jig that is not adjustable all the way to a $300 jig that is capable of multiple adjustments. Most people spend $60 or less for a self-centering jig. Often times, these dowel jigs come with drill guides that are removable.
So now I hear you asking “How about those fluted dowels?” You can make those by hand as well. All you have to do is sufficiently score the dowel lengthwise to allow the glue to flow while expanding. Now, this can be very time-consuming. I personally recommend purchasing fluted dowels if those are the option you are considering.
Getting Started with Plywood and Dowels
Wooden dowels can be used in a variety of ways. They can be used with mitered joints and end to end joints, but I see them most commonly used in edge to face joints. And this doesn’t relate only to plywood, either! You can even use these dowel to connect plywood (or other wood types) to concrete as well. On top of that, you can even fasten your materials together up to as much as a forty-five-degree angle.
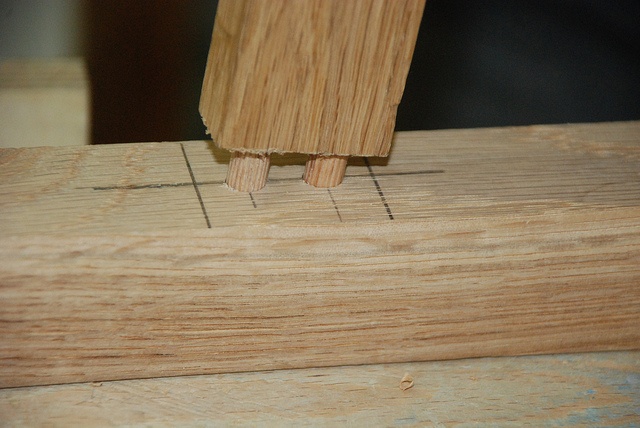
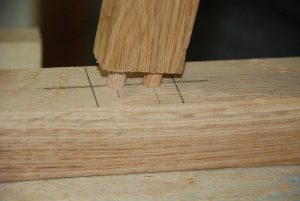
The absolute first step, after cutting all your pieces to shape, is going to be to label all of your parts and mark where you will be drilling. It is absolutely acceptable to use a large number of dowels to really give your furniture to achieve even more increased strength. I do, however, recommend that you place the dowel holes no closer together than 1/4” apart from the outside diameter of each hole. I personally stick to more than 1/2”. Once you do that, you will need to get the appropriately sized drill and mark your depth. The depth should be exactly one-half the length of the chosen dowel. When setting my drill up, I like to use a piece of tape on the drill bit to mark that depth.
Drilling the Holes
If you are new to this, I do recommend using some kind of jig. The reasoning behind this is that it is easy to mess up and damage the ends of the plywood when trying to drill these holes freehanded, and you want to make sure that the hole is perfectly straight and in line with the matching hole on the other piece of plywood. If the angles are off you can potentially split the wood when putting everything together.
When you are ready to drill out these holes, you want to ensure that you go to the correct depth, which is why we marked our depth previously. Now, one thing to keep in mind is that I feel it is better to drill a little bit deeper than shorter. The reasoning behind this is that the dowel is a set length. If you don’t drill deep enough there will be a gap, and if you are using quick dry wood glue it can be nearly impossible to get the joint back apart. So it is better to have a little extra room for the dowel rather than not enough.
Testing the Connections
Now that you have all of the holes drilled out to the proper depth, it is time to test them out. Now, I recommend that you wait to use any wood glue. We want to test the fit of the dowels in order to make sure that we don’t have any gaps (as previously mentioned). We all want our final product to look great, don’t we? So let’s go ahead and take the time to fit the dowels into the appropriate pre-drilled holes and their matching holes. If you notice any gaps you may need to drill out one or both holes a bit more. Along the way, you may find that the fit of the dowels is a bit tight. That is ok, as well. You can use a soft hammer or mallet to assist you here, but keep in mind that if it requires the use of such a tool it will be really difficult to get them back apart to apply the glue. If this is the case, you can take one spare dowel and sand it down a bit in order to test the fit of the joints.
Putting the Dowel Joint to Work
Now that we have tested the dowel joints and are confident that we are ready to move forward, it’s time to pull out that wood glue. I recommend applying the glue directly to the dowel rather than inside the hole. If you apply the glue directly into the hole it may cause excessive cleanup once it expands. So go ahead and apply that wood glue to the dowel and insert it into one of the holes. Remember, if it is a tight fit us a soft hammer or mallet to assist you. You do not want to use a hard metal hammer as it may damage the dowel, plywood, or both. It can even cause the connection to fail to go together properly. Since we already marked all of our holes and connections, we know exactly how to put the furniture together the rest of the way. Simply repeat these steps until you have a nice firm connection at all point. Once I have done this I like to get a damp wet rag and go back to clean up any expanding wood glue that may have squeezed itself out. I then go back every thirty minutes or so just to make sure that I don’t have any glue drying in a visible location. And that is it, you have now built your own furniture with dowel joints.
I can hear you asking “That all sounds great, but what’s the catch?” It’s true that we have gone over the advantages of dowel joints and have yet to mention any disadvantages. And good on you, it’s always best to be well informed. So let’s summarize the advantages and disadvantages of the use of dowel joints.
Advantages
Strength: Dowel joints are among the strongest woodworking joints that you are able to achieve at home, and that strength only increases as you use more dowels.
Easy DIY: Dowel joints are among the easiest to accomplish for all you DIYers out there.
Tools: You don’t need extra nails and screws and other equipment you would have to have with other processes.
Speed: it is quicker than other jointing processes.
Aesthetic: dowel jointing can make a much cleaner and neater finish.
Disadvantages
Strength: Even though dowel joints are among the strongest joints in woodworking, the don’t compare to the mortise and tennon joints. However the mortise and tenon joints take much longer and are more difficult to accomplish.
Learning Curve: It can be quite difficult to get started making these dowel joints if you are new to woodworking. The difficult arises specifically in aligning the dowel holes properly across multiple pieces of plywood, concrete, or metal. That is the main reason that I absolutely recommend that beginners make that one time purchase of the necessary jigs that you will need to make a professional looking final product that you and your family will enjoy for years to come.
As we have now seen, if you are interested in building load-bearing furniture, like a bedside table, speaker or night stand, dowel joinery is the way to go!