Plywood is useful as both a building material and for making various projects. But what do you do when the project you are working on is larger than a sheet of plywood? In-home building, this is dealt with by nailing sheets next to each other so that the edges of both sheets are on a structural element. But not all projects allow that. Some things, like boat building, require joining the plywood between structural elements (like slats). They also require that the joint be made in such a way as to turn the plywood structurally into one continuous sheet, as well as provide a smooth surface.
There are two ways of doing this, both commonly used in boat building; scarf and butt joints. The basic difference is that a butt joint allows the edges of the two pieces of plywood to meet and be held together by a third piece of plywood, called a scab. In scarf joining, the ends of the plywood sheets are tapered and then glued together, creating a piece of plywood that is consistent in thickness. It also retains most of the flexibility of the original plywood.
Making a Butt Joint
Butt joints are considerably easier to do than scarf joints but have two distinct disadvantages. The first of these is that they reduce the flexibility of the plywood. So, if you are attaching the plywood around a curve, such as on a boat’s hull or when making a receptionist’s desk for a large office, the joint would cause a flat spot. The other disadvantage is that screws are usually used in the butt joint, which will be visible.
To make a butt joint, a butt block or scarf is cut out of the same thickness of plywood that is being attached. It must be wide enough to extend at least four inches on either side of the joint. If thin plywood is being joined, a thicker scarf is usually used.
If epoxy adhesives are used, making a butt joint without screws is possible. Epoxy is also useful when the plywood does not have a smooth surface finish, as it is excellent for gap filling. However, most butt joints are screwed, as well as glued.
When fasteners are used for butt joints, they are placed about two inches apart and about one inch from both edges. That means at every two-inch spacing across the width of the joint; there are four screws. Two are one inch from the edges of each piece of plywood being joined, backed up by another two, one inch from the edge of the scarf block.
In the case of thinner pieces of plywood, especially 1/4″ thick plywood, screws should be used long enough so that the major diameter of the screw pierces the back of the plywood. The excess screw length is then cut off with a grinder.
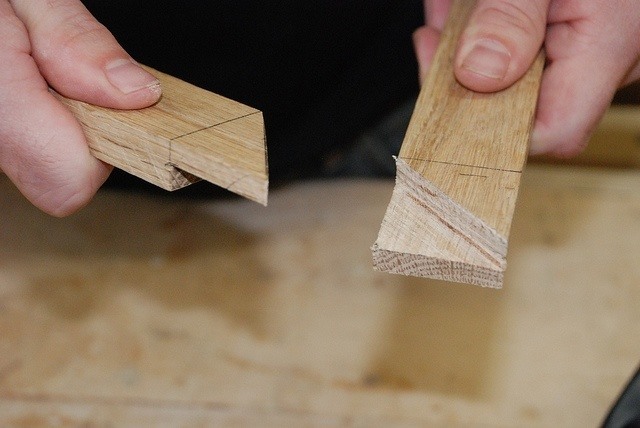
Scarf joints require tapering the edges of both pieces of plywood equally and evenly. This makes the scarf joint much harder to accomplish but provides a virtually invisible joint. The tapering angle is 1:12 or 1:10 for plywood under 1/2 inch thick and 1:8 for over 1/2 inch thick. That means a 1/4″ thick piece of plywood would have a three-inch scarf joint.
To cut the taper for the scarf joint, the two pieces of plywood are marked to show the depth of the taper. They are then stacked, with the edge of the top piece aligned with the marking on the bottom piece. Screw or clamp the pieces down to hold them in place while cutting.
The actual cutting of the taper can be accomplished with a hand, power plane, or belt sander. Extreme care must be used to keep the cut and angle consistent. Gaps in the finished joint will weaken it. The final cuts should be made with a jointer plane with a long base to ensure the cut is straight and even.
Once the taper is cut, the sheets of plywood can be unclamped, and the top one flipped over for gluing. Putting a piece of waxed paper under the glue joint while gluing and clamping is a good idea to prevent the plywood from sticking to the bench top. Epoxy or resorcinol can be used; however, epoxy is preferred for its gap-filling properties.
Coat both sides of the joint with the adhesive and overlay them, carefully aligning the two pieces of plywood. The joint needs to be clamped while the adhesive is setting. This can be done by clamping it to the bench top with a thick board on top of the joint (use another piece of waxed paper here) or by screwing through the joint and screwing the plywood to the workbench. Equal pressure must be applied across the joint. The holes caused by the fasteners can be filled after the adhesive cures.