Bunk beds are a great way to utilize space, especially for families who have a lot of children and small homes. I grew up in such a home, with my brother and I sharing bunk beds until we were teens. Using bunk beds not only frees up more floor space, which can be used as play space, but the beds themselves can easily become a play area, especially if the beds are built with a little imagination.
Let’s face it; standard bunk beds aren’t all that exciting, even if they are very useful. A triple-decker bunk bed can allow three children to sleep comfortably in the floor space which would normally be taken up by one. But with a few plywood additions to the basic frame, the same bunk beds can become a play house, giving children hours of fun.
Another useful thing you can do with bunk beds is to make a sofa-bunk. This is a bunk bed where the bottom bunk converts to a sofa, during the day. While there are commercial versions of a sofa-bunk, where the bottom bunk is a slide-out that converts to a bunk, you can accomplish the same thing with the addition of a few back cushions set on the bottom bunk, much like a day bed with a trundle under it.
Many bunk bed designs can be built with standard hand and portable power tools, making this a project that the average do-it-yourselfer can complete as a weekend project. More complex designs may require a second weekend or additional time for finishing details and painting.
Bunk Bed Dimensions
Any bunk bed plan has to start out with an understanding of the basic meausrements that are needed for a bunk bed. This is determined by the mattress, which is 38” wide by 75” long. The bottom bunk is normally placed at the same height as any other twin-sized bed, while the top bunk can be as high as 5’ 6” above the floor, leaving 30” above the bunk, with a standard 8’ ceiling height.
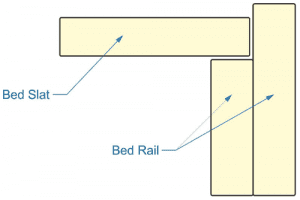
One of the things which make bunk beds possible is that the beds don’t use box springs. Instead, the mattresses sit on slates, which go between the rails, providing support. While there is no ideal number slats that need to be used, most bunk beds have between four and five of them.
One requirement for any bunk bed design is to provide some sort of protective railing for the upper bunk. While falling out of the lower bunk might not cause any problem, falling out of the upper bunk can cause injury to a child, although there have been many cases of children falling out of an upper bunk without harm (including myself as a small child), due to their bodies being so relaxed while being asleep.
Bunk Bed Steps
The standard means for reaching the upper bunk on any bunk bed is via a ladder, whether that is built into the bunks or it is a separate unit that is hung on the side of the upper bunk. A few commercial bunk beds have the railing serve double-duty as a ladder, but that is a hassle, as it requires moving the railing/ladder back and forth.
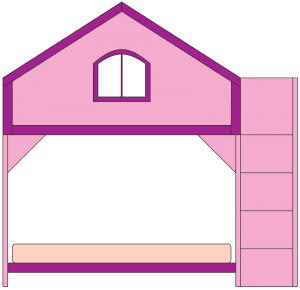
One improvement to just about any bunk bed design is to put stairs at the end of the bunk bed for the child to climb, making it safer to get in and out of the upper bunk, especially when the child is tired. This can be easily accomplished by making a series of plywood boxes (shown in purple below), which stack up to make a staircase. This is the end view of the play house bunk bed shown below.
Another nice thing about this design, is that it provides additional storage for toys or other items, something that no child’s bedroom has enough of.

It is necessary to attach the boxes together for safety, once they are built. This is best done with screws, although you need to be careful that the screw points do not protrude out the far surface of the plywood, leaving something sharp that the children can get scratched on.
The other thing that is a good idea for safety is to add a railing, such as shown above in dark pink. Be sure to make the height of the railing appropriate to the size of your children, if you choose to install one. But considering that no railing is provided when a ladder is installed, you may choose to forego this step.
Playhouse Bunk Beds
One common style for bunk beds is a play house. This is a great option for girls, who all seem to want a play house of one sort or another anyway. This design can be made entirely out of ½” plywood or MDF, depending on your preference. If plywood is used, be sure to use sanded sheets, which can be a bit expensive, but will provide you with a smooth surface. You’ll also want to fill and smooth all the edges.
The playhouse is design is actually fairly easy to make, with the upper portion of the house forming a guard rail to prevent the child sleeping there from falling out. The lower bunk can double as a bunk, or this can be left out and a study desk installed for one child alone.

To build this bunk bed, start by making the basic frame for the two bunks. This can either be a plywood sheet, cut to size, with 1”x 3” stiffeners attached to the edges or it can be a frame made of 1”x 3” boards, with a 1”x 2” attached on the inner side, making a ledge for the slats to sit on.

The rails are then attached to the headboard and footboard. These can be made out of ½” plywood, but I would recommend ¾” for added stiffness. Some children will not like it if the bed moves while they are in it. It’s not visible in the diagram, but the left headboard (or footboard) extends as high as the vertical portion of the house façade, to provide something to attach the façade to, as well as a protective railing on that side.
Note the two triangular pieces, located in the corners. Those are there to add stiffness as well, keeping the bed from moving. Another optional part that can be added, to increase the stiffness and reduce possible movement, is to put a couple of sections of 2”x 4” in the back corners, perpendicular to the headboard and footboard. This will pretty much eliminate any movement.
The house façade is made of 3/8” thick plywood to keep it light. Trim strips are cut out of the same material and glued to the plywood façade, creating the trim and the window. These should be painted a contrasting color to make them stand out.


