Plywood refers to a family of engineered wood products used to construct homes and buildings. However, the various types of plywood have found their way into many other products, including furniture, handicrafts, and industrial uses. Specialized plywood products have been developed for a wide variety of applications.
One of the ways that plywood is used in architecture is for subflooring. Per building code, most residences have ¾” thick plywood or OSB installed as the subfloor. While both have a similar overall strength, OSB is more prone to absorbing moisture along the edges and can be more easily broken by the impact. Nevertheless, OSB is commonly used for flooring and sheathing on homes due to its lower cost when compared to construction-grade softwood plywood.
When plywood is used for subflooring, most people cover the plywood floor with carpet or vinyl flooring (linoleum). Ceramic tile can also be used, although that is not our current concern. Wall-to-wall carpet or flooring on plywood is often installed using glue or some adhesive to ensure it remains in its place. The glue does its job pretty well, but when it is time to replace the carpet or change the type of flooring, removing carpet glue from plywood becomes a nightmare.
The first difficult task in this exercise is removing the carpet or flooring. If it is carpeting, it can usually be ripped out, peeling it from the plywood floor. Once you have completely removed the carpet from the floor, there will still be remnants of glue remaining. If it is yellow-colored glue, it is the more traditional type. But if it is brown or tan-colored glue, it is tar-based glue.
Removing vinyl flooring can be more challenging, as the flooring will not peel off like carpeting. Rather, it will have to be scraped off the floor. This can be good with self-stick vinyl tiles, which tend to peel off intact, complete with their adhesive. But in the case of roll flooring, chances are highly likely that it will come off in many small pieces and may not bring the glue up with it.
The big question is how important it is that the floor be smooth before the new flooring is installed. If carpeting over the pad is being installed without adhesive, removing all the adhesives may not be necessary. But just about any other type of flooring will require a smooth surface.
Scrape the Glue
Scraping off the glue is the least costly method of removing carpet glue, as you can do it without renting expensive equipment. However, removing the adhesive and making the floor smooth again is also the hardest.
The first step of this method is to make the glue softer so it can be easily worked around. Several solvents, including paint thinners, turpentine, water, and mineral spirits, can soften the glue. All these chemicals work by tearing down the enzymes found in the glue, easing the task of removing the glue from the plywood subfloor. Different solvents work better on different types of glues, so if you know the type of glue on your floor, you can do the task much more easily.
While using these solvents, you should use the appropriate personal safety equipment, including gloves and goggles. All of them are capable of causing skin irritations but are even more dangerous if they get in the eye.
These solvents should only be applied once the carpeting or vinyl has been removed. Carpeting will soak up the solvents, and vinyl flooring will resist it. In both cases, that prevents the solvent from reaching the adhesive it needs to soften.
Once you have ensured that the entire surface of the glue has been sprayed with the solvent, wait about half an hour, allowing the solvent to soften the glue, making it ready to remove. Once softened, you can use a hand scraper, a putty knife, or a floor scraper to tear away and wipe off all the glue from the floor. Ensure you are thorough so that no glue is left on the floor.
Please note that you may have to reapply solvent on the floor if it evaporates before getting to all areas. The purpose of the solvent is to soften the glue, but it will only remain soft as long as it is wet. Should the glue begin to dry, you’ll want to apply more solvent.
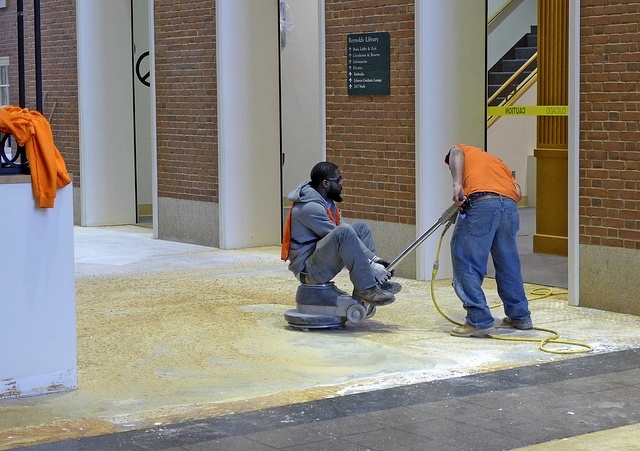
Using mineral spirits and thinners to remove glue from plywood works best for smaller floors due to the problem of the solvent drying before the scraping is done. If you must remove glue from a larger area, sanding is preferable. Sanding requires less time and labor in comparison to scraping.
The sanding process generates heat, which helps by making the glue softer, as well as the abrasive action of the sandpaper scraping the glue and breaking it down. However, too much heat can be problematic, as it will gum up the sandpaper. Ideally, you don’t want that because it will add to your cost.
You will want to rent a flooring sander for this project unless you are sanding a very small area. These come in two types, belt sanders, and vibratory sanders. The belt type is much faster but carries the risk of oversanding. It’s easy to gouge your plywood subfloor, creating areas that need to be puttied and sanded to have a smooth floor.
In addition to whatever flooring sander you use, you will probably also want a smaller sander for working around edges and in difficult to reach areas. A handheld belt sander is usually the best, as it will remove the glue faster than a disk sander or palm sander. While those other sanders can be used, they are best left for finishing work.
Before sanding, inspect the floor for nails or screws sticking out above the floor surface. Drive them in, if possible, or remove and replace them. You should never remove flooring nails or screws without replacing them, as it can leave the floor loose in that spot, leading to squeaky floors.
As you are sanding the floor, occasionally stop to sweep up or vacuum up the sanding dust. When too much dust builds up, it’s hard to tell what parts are sanded and which still need work. It can also be helpful to work in sections, dividing the floor and finishing one area before moving on to the next.
Removing the glue from a floor may not be the best option for you, especially if doing so will cause damage to the subfloor. Rather than risk that, you may consider installing underlayment over the existing subfloor and glue to provide a smooth surface for your new flooring. This is a more expensive but quicker option, especially when there is a lot of glue to deal with.
This is not to say you won’t have to deal with glue if you use underlayment. But you must only deal with high points where too much glue was applied. In those cases, a quick hit with a belt sander, bringing that high point down to the level of the rest of the glue, is usually sufficient.
Luan plywood is normally used for underlayment because it is thin and provides a smooth finish. Before attaching your underlayment, lay the individual pieces on the subfloor and check that the adjacent edges are level. If not, you may need to sand off some high points under one of the sheets.
Using construction adhesive and flooring nails for installing the underlayment is a good idea. Adding a thin layer of construction adhesive helps reduce the risk of the new underlayment squeaking from movement. It essentially ensures that the underlayment and the subfloor stay in the same place compared to one another. However, never use construction adhesive, without flooring nails, for installing underlayment.
Depending on the condition of your subfloor, how well you install your underlayment and the type of flooring you will put on top of it, you may need to putty the seams and sand them. This is especially true if you are installing any vinyl flooring. High edges or gaps between sheets can cause serious damage to vinyl flooring, eventually causing it to crack. Always sand these puttied edges smoothly so as not to create another problem. But this sanding can be done with a simple palm sander.