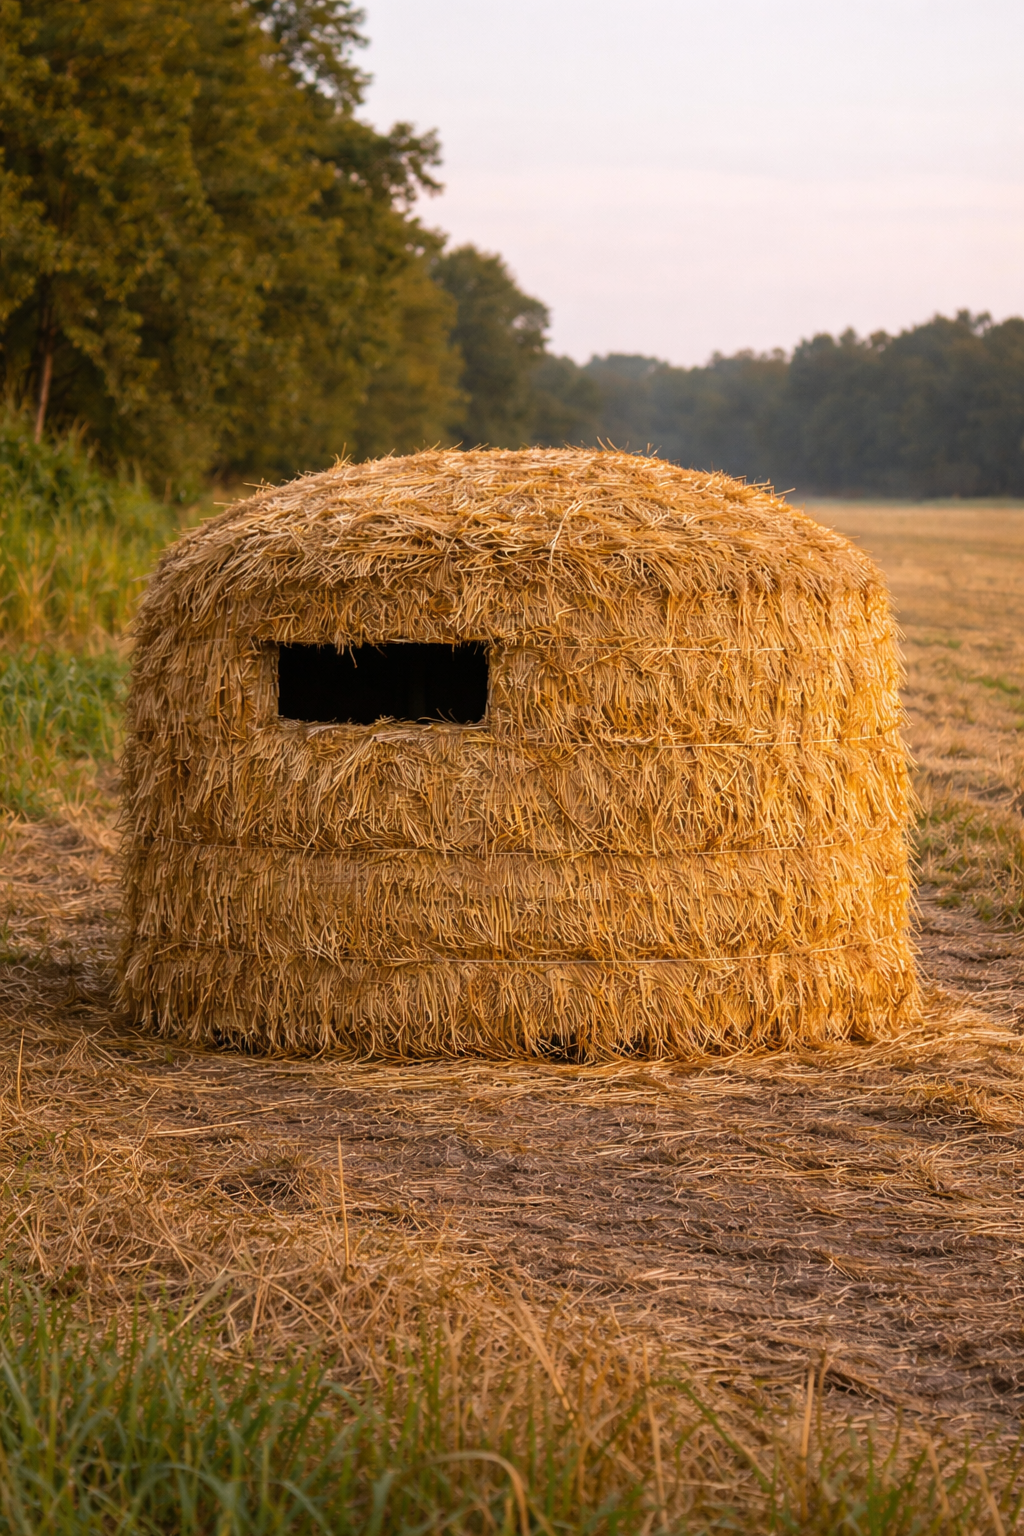
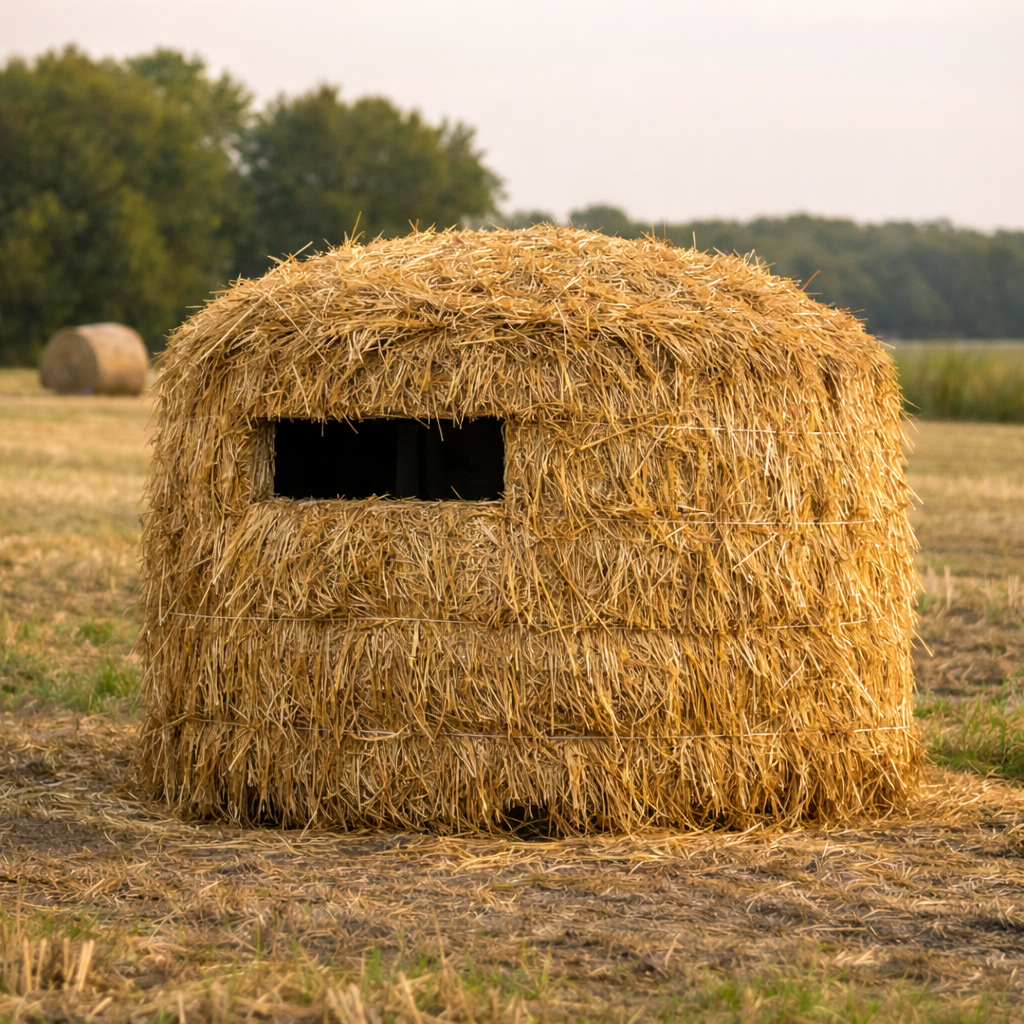
A hay bale blind is a hunting blind designed to resemble a round hay bale in a farm field. Hunters build a wooden structure and cover it with straw or hay so the blind blends naturally into agricultural landscapes where deer, turkey, and other wildlife already expect to see hay bales.
Because animals are accustomed to seeing hay bales in open farmland, this type of farm-field hunting blind allows hunters to stay hidden without alerting game.
Unlike commercial hunting blinds that often cost hundreds or even thousands of dollars, a DIY hay bale blind can usually be built for under $200 using basic lumber, plywood, and straw.
What makes this type of farm field hunting blind so effective is that animals already see hay bales every day in agricultural areas. When a blind person looks at something animals encounter regularly, they rarely view it as a threat.
Another advantage is that these straw-camouflaged hunting blinds provide better wind protection than most portable ground blinds. Once the structure is built and properly camouflaged, it becomes a stable, weather-resistant hunting shelter.
In this guide, you’ll learn how to build a hay bale blind step-by-step, including the frame design, materials needed, window placement, and the best locations to position the blind for successful hunting.
What Is a Hay Bale Blind?
A hay bale hunting blind is a hunting structure designed to imitate a round hay bale commonly found in farm fields. Hunters typically build a wooden frame and cover it with straw or hay so the structure blends naturally into the landscape.
Deer, turkey, and other wildlife regularly encounter hay bales in agricultural areas, so they rarely see them as a threat. Because of this, a round bale hunting blind can provide better concealment than portable blinds, which sometimes look unnatural in open fields.
Hunters commonly use this type of blind for:
deer hunting
turkey hunting
predator hunting
late-season rifle hunts
The enclosed structure also protects hunters from wind, rain, and cold temperatures during long sits in the field.
Typical Hay Bale Blind Dimensions
Most hunting blinds built to mimic hay bales follow the approximate size of standard round bales used on farms.
Common bale sizes include:
Bale Type
Diameter
Width
Small round bale
4 ft
4 ft
Medium round bale
5 ft
5 ft
Large round bale
6 ft
5–6 ft
A typical DIY hay bale blind is usually built around:
5–6 feet wide
5–6 feet deep
5–6 feet tall
This size provides enough space for one or two hunters, chairs, and shooting lanes while still resembling a real bale from a distance.
Materials Needed and Recommended
One reason a DIY hay bale hunting blind is so popular is that it uses simple, readily available materials from most hardware stores.
Choosing the correct plywood thickness is important when building outdoor structures. If you’re unsure what panel size to use, it’s helpful to understand how plywood thickness affects strength and durability before starting the project.
When transporting materials into the field, it can also help to know how much a sheet of plywood weighs, especially if you’re carrying panels by yourself.
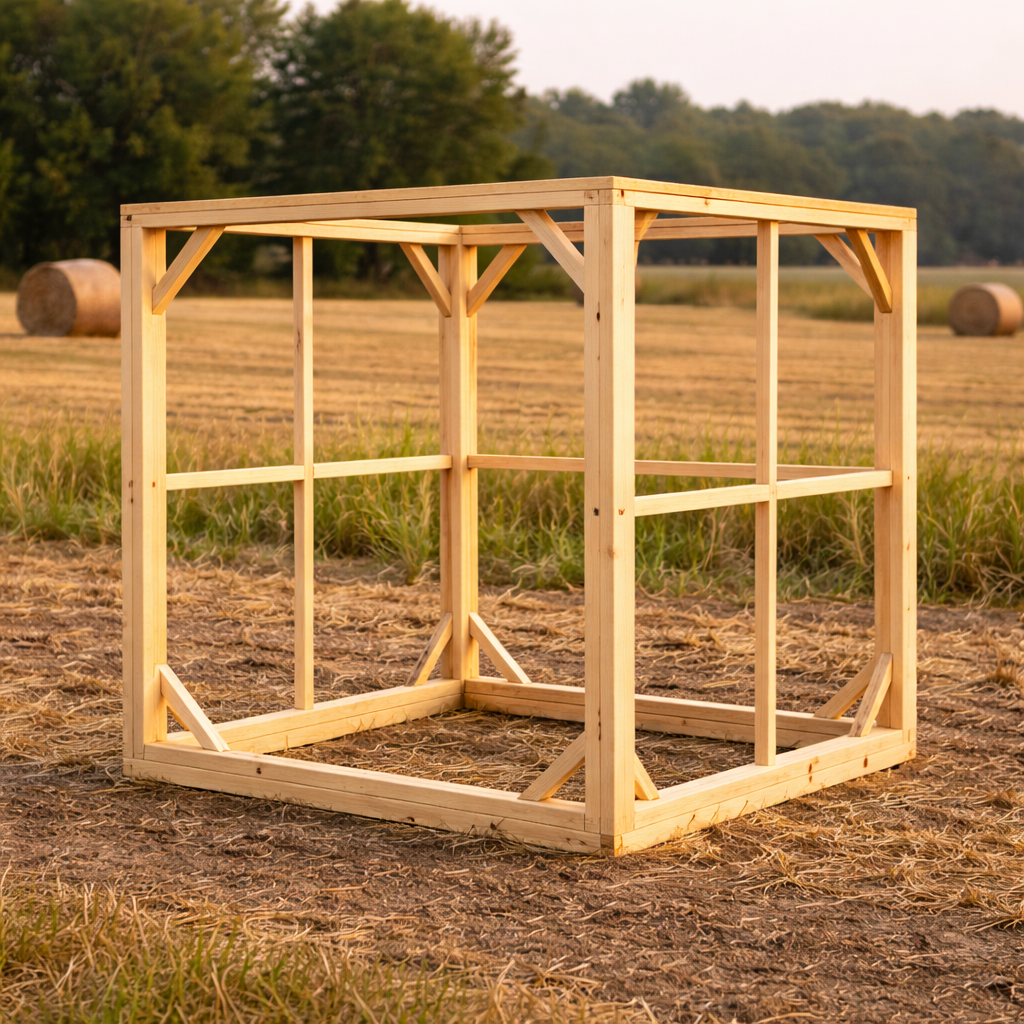
Step 1: Build the Wooden Frame
The first step in building a hay bale blind is to construct the structural frame.
Start by cutting the 2×4 lumber to create:
four vertical corner posts
a top frame rectangle
a bottom frame rectangle
When assembled, the frame should resemble a small wooden shed or box structure.
Typical frame dimensions are about 6 feet tall and 5 feet wide, though you can adjust the size to suit the size you want for the blind.
Secure the corners using exterior wood screws. If the blind will sit in an open field exposed to strong winds, adding diagonal braces will make the structure stronger.
Step 2: Install the Plywood Walls
Once the frame is complete, attach plywood panels to the lower half of the structure.
Plywood serves several purposes in a bale-style hunting blind:
strengthens the frame
blocks wind
hides movement inside the blind
provides a stable shooting rest
You do not need to cover the entire structure with plywood. Most builders install panels only on the lower half of the blind because the upper section will be covered with straw camouflage.
Secure the plywood with screws spaced roughly every 8–10 inches.
If you’re selecting panels for outdoor projects, it’s helpful to understand the different plywood grades used in construction, since exterior-rated plywood handles weather much better.
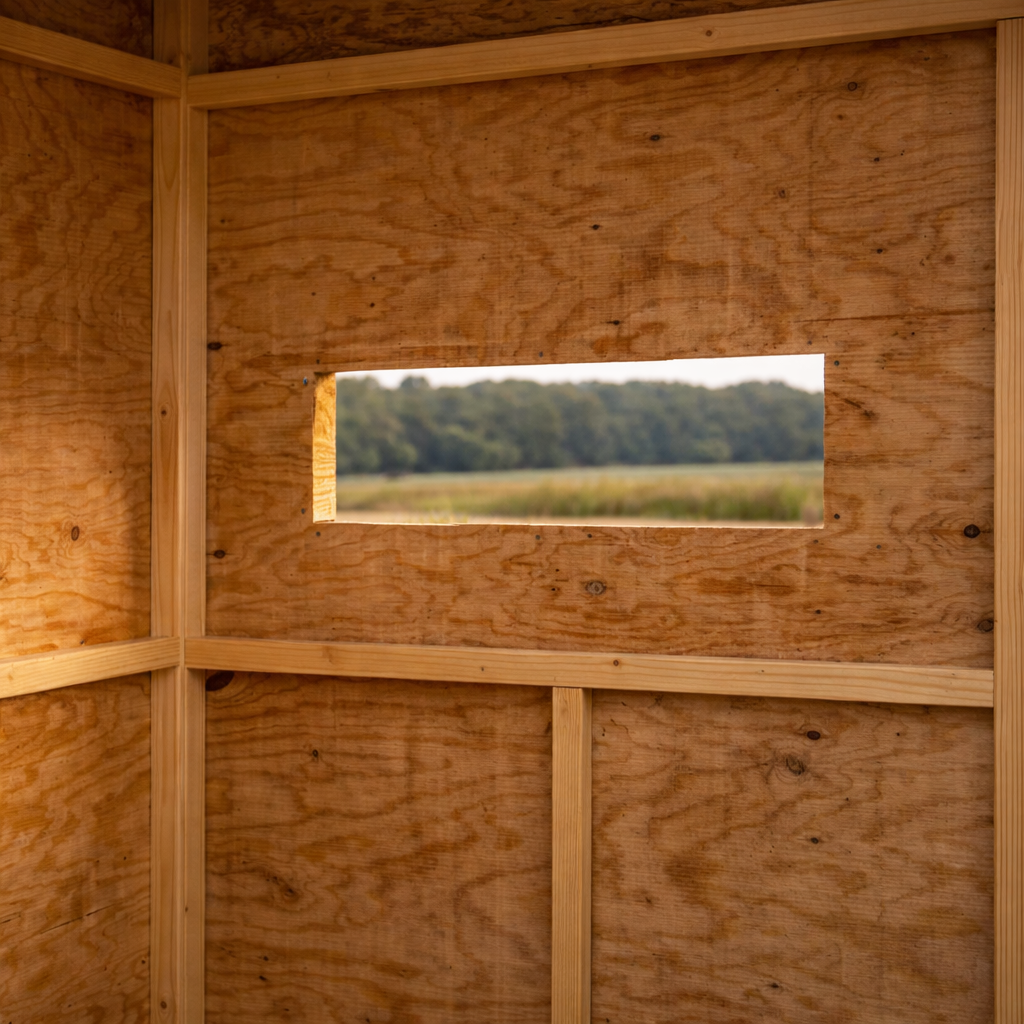
Step 3: Cut Shooting Windows
Next, cut shooting windows into the plywood walls.
Most DIY hunting blinds include:
one main front window
one or two side windows
Typical window size:
12–16 inches tall
18–24 inches wide
Some hunters install sliding covers so the openings remain closed until animals approach.
If you want to create a more realistic round bale appearance, you can experiment with bending plywood for curved surfaces, although most DIY versions remain square for simplicity.
Step 4: Waterproof the Blind
Because the blind will stay outdoors for long periods, protecting it from moisture is important.
Staple plastic sheeting or roofing felt around the exterior of the frame before adding straw camouflage. This barrier prevents rainwater from entering the blind.
You can also install a small sloped plywood roof to direct water away from the structure.
Although the straw covering adds insulation, a waterproof barrier helps keep the interior dry during storms.
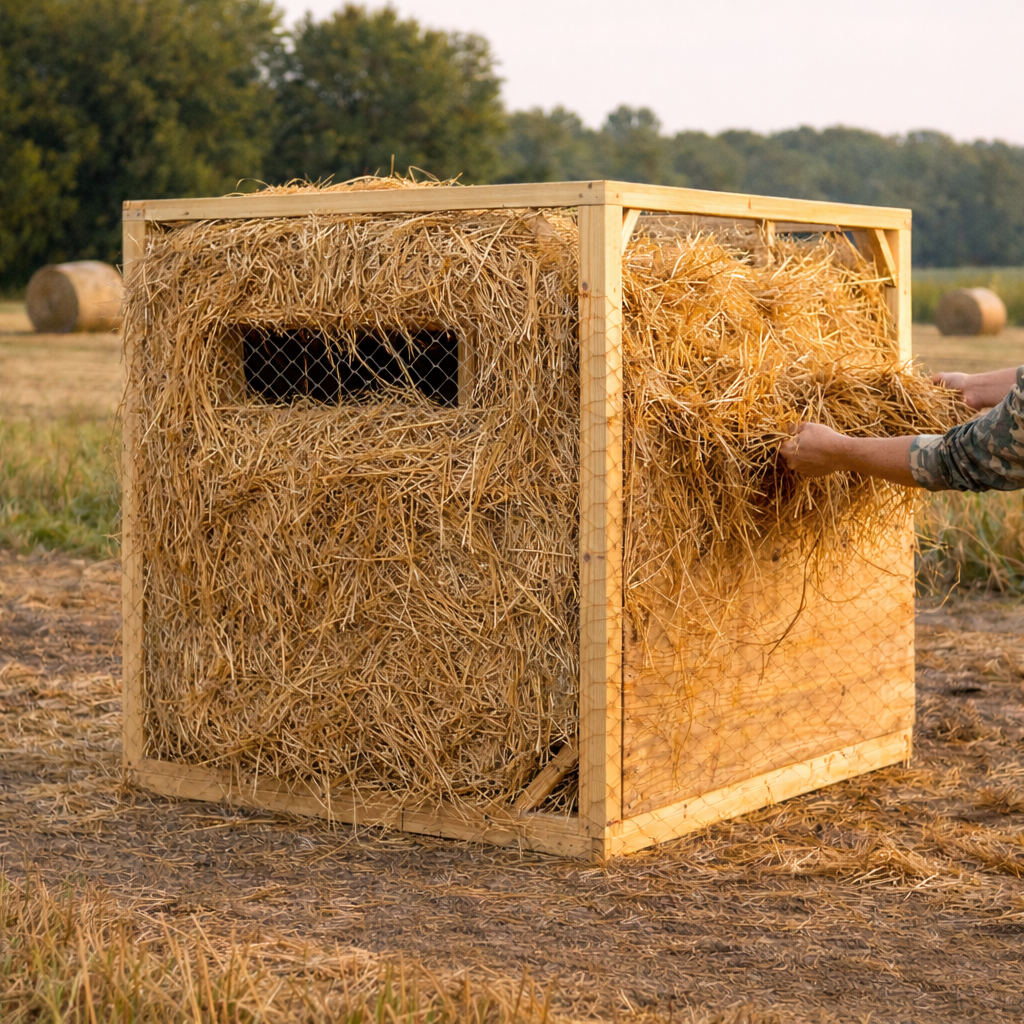
Step 5: Add Hay Camouflage
This step is what makes the structure look like a real bale.
Wrap chicken wire or fencing wire around the outside of the frame, then pack straw or loose hay between the wire and plywood panels.
From a distance, the blind should resemble a normal hay bale sitting in the field.
Try to keep the straw uneven and natural looking so the structure does not appear too symmetrical.
Interior Setup
The interior of a hay bale hunting blind can remain simple.
Most hunters include:
a folding chair
a shooting rest or sandbag
hooks for hanging gear
a small shelf for binoculars or calls
If you plan to sit for several hours, foam floor padding or rubber mats can make the space more comfortable.
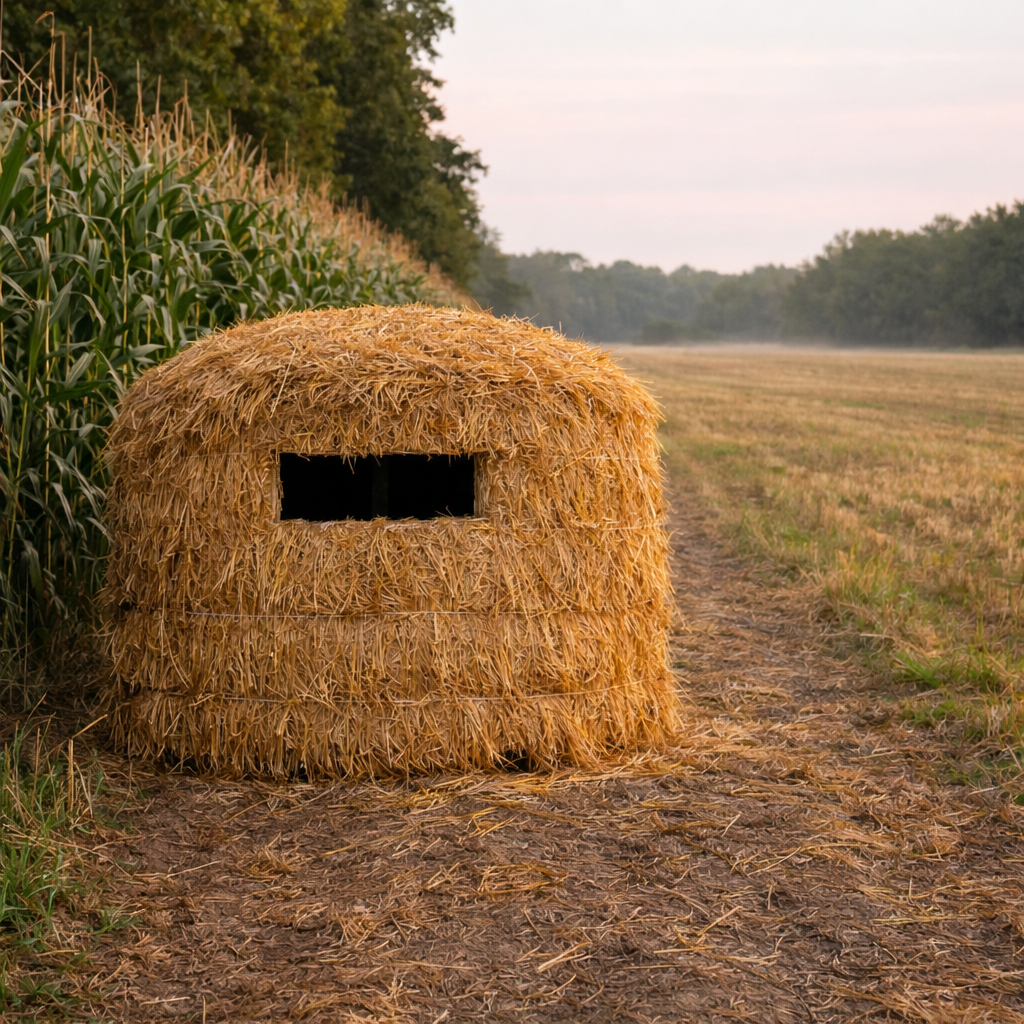
Hay bale blinds work best in areas where real hay bales already exist.
Field Edges
Deer often travel along the boundary between woods and open farmland.
Food Plots
Positioning the blind near crops or planted food plots increases the chances of seeing game.
Travel Corridors
Look for trails where deer move between bedding and feeding areas.
Agricultural Fields
Corn, soybean, and hay fields are ideal because wildlife already expects to see farm equipment and hay bales there.
Cost to Build a Hay Bale Blind
One major advantage of this project is the low cost.
Material
Estimated Cost
2×4 lumber
$40
Plywood
$40–60
Wire fencing
$20
Plastic sheeting
$15
Straw or hay
$40
Estimated total cost:
$150–200
Compared with commercial hunting blinds, which often cost more than $1,000, building your own saves a significant amount of money.
Advantages of Hay Bale Hunting Blinds
Natural Camouflage
Animals are used to seeing hay bales, so the blind blends naturally into farmland.
Low Cost
Materials are inexpensive and widely available.
Weather Protection
The enclosed design blocks the wind and helps hunters stay warm during cold hunts.
Stability
Unlike lightweight pop-up blinds, a wooden structure remains stable even in windy conditions.
Tips for Successful Hunting
Experienced hunters follow a few simple strategies when using this type of blind.
Install the blind early
Place the blind several weeks before hunting season so animals become accustomed to it.
Brush in the base
Scatter loose straw around the bottom to soften the edges.
Watch the wind direction
Even inside a blind, scent control is important.
Stay quiet
Plywood walls can amplify sound, so move slowly when animals are nearby.
Hay Bale Blind vs Pop-Up Hunting Blind
Many hunters debate whether to use a hay bale blind or a portable pop-up blind. Each option has advantages depending on the hunting location.
Feature
Hay Bale Blind
Pop-Up Blind
Camouflage
Excellent in farm fields
Moderate
Cost
$150–$200
$100–$400
Setup Time
Several hours to build
Minutes
Wind Protection
Very strong
Moderate
Durability
Several seasons
Often 1–2 seasons
In agricultural areas where hay bales are common, the hay bale blind almost always provides better concealment because animals view it as a normal object in the field.
Portable blinds work best in wooded areas where natural cover is available.
How to Make a Hay Bale Blind Look Real
The most important part of building a hay bale hunting blind is making sure it actually looks like a real bale from a distance.
Hunters often make the mistake of creating a perfectly shaped structure, which can stand out in a field.
To improve realism:
• use uneven straw layers • avoid perfectly flat sides • mix old and fresh straw • scatter loose hay around the base • place the blind near real bales if possible
Another trick is to position the blind where farm equipment has previously placed hay bales. Animals that already travel through these areas are much less likely to notice the structure.
The goal is to make the blind appear like just another bale sitting in the field.
Hay Bale Blind FAQ
What is a hay bale blind used for?
A hay bale blind is designed to resemble a round hay bale in a field, allowing hunters to stay hidden while hunting deer, turkey, or predators.
How big should a hay bale hunting blind be?
Most versions measure about 5–6 feet wide, 5–6 feet deep, and 5–6 feet tall, which allows room for one or two hunters.
How much does it cost to build one?
A homemade hay bale blind usually costs between $150 and $200, depending on the materials used.
What plywood thickness should be used?
Most builders use 1/2-inch exterior plywood because it provides good strength while keeping the structure lightweight.
The best locations include field edges, food plots, travel corridors, and open farmland where real hay bales already exist.
Can you bow hunt from a hay bale blind?
Yes. Many hunters use these blinds for bow hunting. Just make sure the shooting windows are large enough for the bow to clear the opening.
How long does a hay bale blind last?
A properly built structure can last several hunting seasons, although the straw camouflage may need to be replaced each year.
Final Thoughts
A hay bale blind is one of the most effective hunting blinds you can build for farmland environments. Because it blends naturally into fields where animals already see hay bales, this style of hunting blind provides excellent concealment for deer, turkey, and predator hunting.
With a simple wooden frame, plywood panels, and straw camouflage, you can build a durable hunting blind that lasts for multiple seasons while costing far less than commercial alternatives.
How to Build a Lean-To Shed (Step-by-Step DIY Guide) by Admin June 17, 2025 DIY If you’ve ever run out of space for your lawn tools, garden gear, or even firewood, you’re not alone. Many homeowners eventually find themselves needing…


")

")
")