Radiator covers weren’t even on my radar until I realized just how much that old radiator was dragging down the room. It lived under the living room window like an old cast iron dinosaur—paint flaking, metal humming, and not doing much for the vibe. It worked fine, sure, but it looked like it came with the house in 1940. And probably did.
Then one Saturday morning, after stepping on a stray toy car that had rolled behind it (for the third time that week), I finally said, “That’s it.” I was going to cover it. Not just toss a throw blanket over it or shove a basket in front, but build something that felt like furniture—something that actually fit the room.
I kept it simple, used what I had, and ended up with a project I wish I’d done years earlier. If you’ve got an ugly radiator, you can do this too.
Why Cover a Radiator?
For starters, radiator covers are a great way to:
Make a room feel more finished
Create usable space (top shelf, bench, etc.)
Protect kids and pets from hot surfaces
Add airflow efficiency with the right design
And honestly, sometimes you just want the thing to disappear.
Tools & Materials I Used for Radiator Covers
I didn’t go fancy—just what I had in the garage and one quick run to the hardware store.
Step-by-Step Build Instructions for Radiator Covers
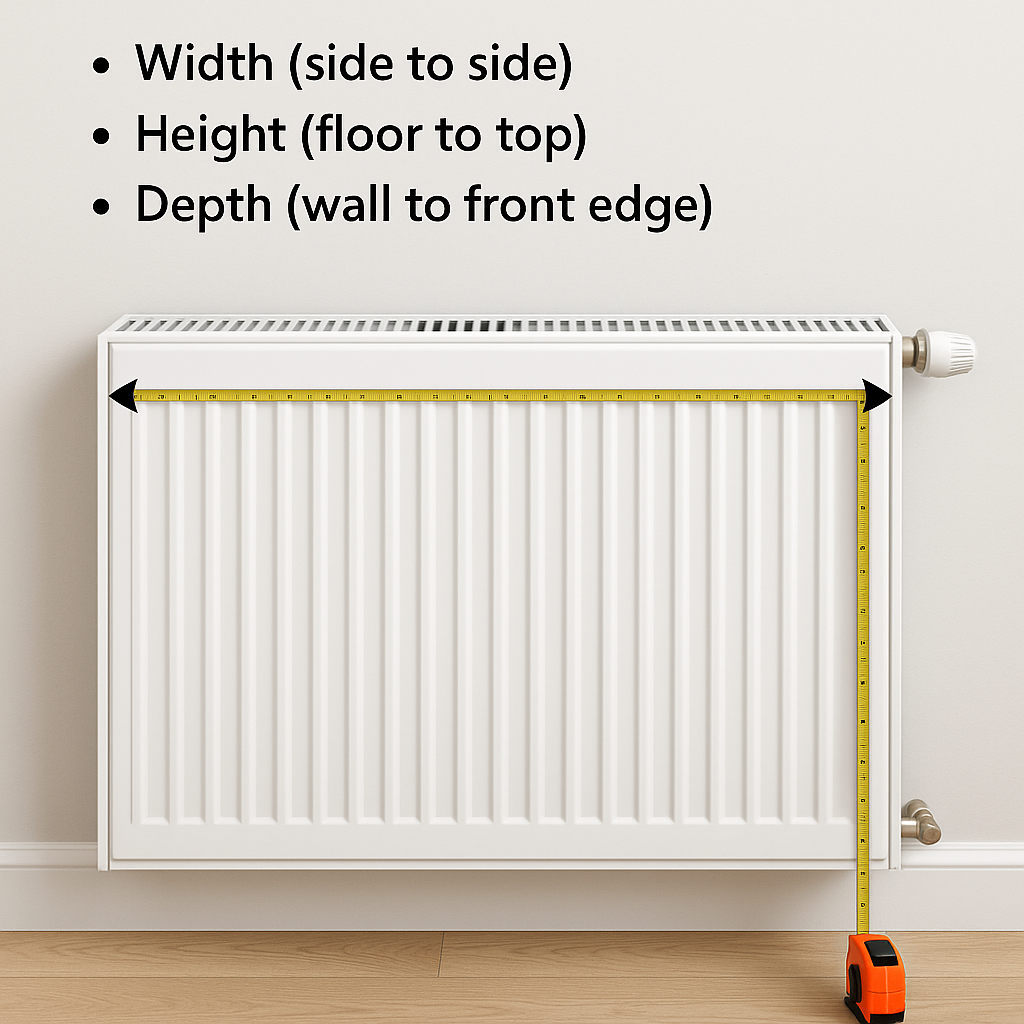
1. Measure Your Radiator (Add Space!)
Take three key measurements:
Width (side to side)
Height (floor to top)
Depth (wall to front edge)
Now add at least 2 inches to all sides. That’s your clearance for safe airflow. My radiator was 30″ wide, 24″ tall, and 6″ deep—so I built my box to be 34″ x 26″ x 9″.
Tip: Don’t block any valves—leave an access panel or notch the side if needed.
2. Cut Your Panels
I cut two side panels from plywood and one top piece that overhung by about 1″ on each side—makes it feel more like a shelf.
Then I trimmed the front grille to size. You can buy decorative wood grilles, perforated metal, or even repurpose an old cabinet door.
3. Assemble the Box
This is where it comes together.
I glued and nailed the sides to the top panel
Added a bottom brace for stability
Attach the front grille with wood glue and finish nails
If you want it more rugged, screw everything together or use pocket holes underneath.
4. Add Trim
I wanted it to look built-in, so I wrapped the base with simple 1×2 trim. You can miter the corners or just butt-joint them—it’s up to your style.
For a modern look, skip the trim and let the clean plywood edges show. I’ve seen people round over the top with a router, too.
5. Sand & Finish
Give the whole piece a good sanding, especially the edges and trim seams. I filled nail holes with wood filler and gave it two coats of paint.
Pro tip: Use a paint + primer combo for fewer coats.
I went with a semi-gloss white to match the baseboards. But natural wood with a clear matte finish looks great in modern or boho-style rooms.
Placement & Safety Tips
I didn’t screw mine to the wall, but if you have kids or pets, I suggest using L-brackets to anchor it.
Also: Don’t block heat! The front grille should allow airflow, and the top should be vented or have rear gaps if your radiator uses convection.
Want to get fancy? Add a hinged front panel or magnetic access door.
Use shiplap or beadboard front, matte black handles, and a stained wood top.
2. Modern Minimalist
Flat white box with vertical slats and no visible hardware.
3. Vintage Radiator Cover
Punch-plate metal front with antique paint finish and rounded edges.
4. IKEA Hack Version
Use a cube bookcase frame and cut out the back. Add a grille or cane webbing to the front.
5. Boho Chic
Painted plywood with cane insert and pastel tones. Easy and lightweight.
How I Turned My Radiator Cover into Real, Useful Furniture
I never planned on building furniture around a radiator—but once I saw the potential, I couldn’t stop. What started as a simple plywood box to hide a dusty metal heater turned into one of the most useful pieces in several rooms of my house. If you’re short on space like I am, a radiator cover doesn’t just clean up the look of a room—it can do actual work.
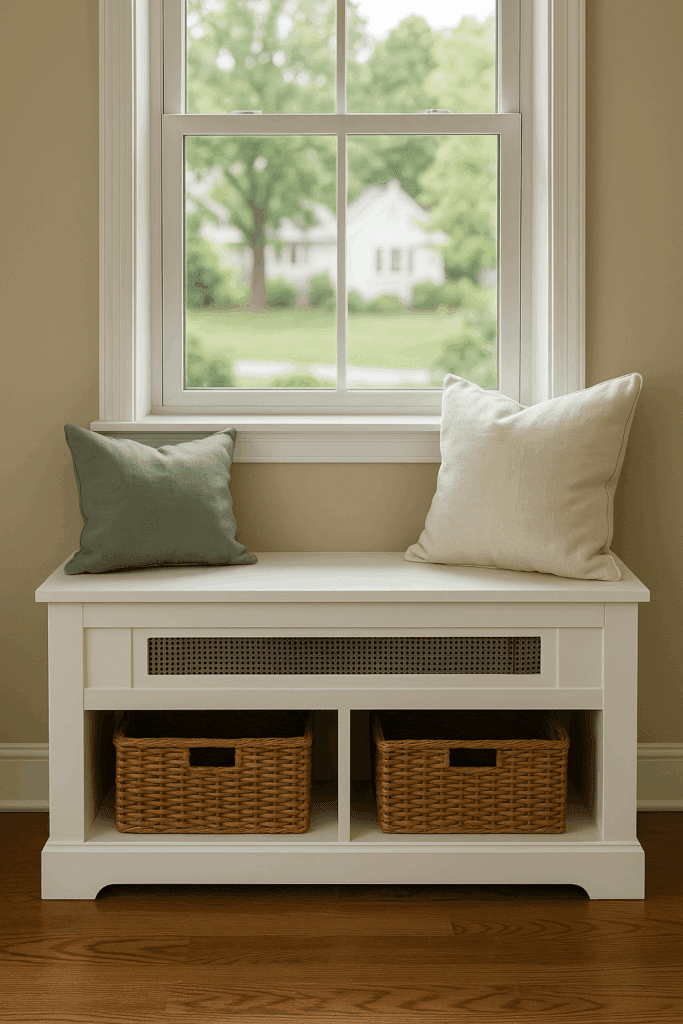
The Window Bench I Didn’t Know I Needed
We have a single old-school radiator under our front window. Ugly? Absolutely. But I didn’t want to just cover it and leave it. I measured out a design with a slatted front and decided to build a seat over it—something sturdy enough to hold a couple of kids or a tired adult with a cup of tea.
The first version was just plywood and some leftover trim. I made sure there was a vent gap along the back and drilled small holes across the top, just to keep the heat from bottling up underneath. I topped it with a piece of foam and an old canvas cushion from our patio set. It instantly became the favorite reading spot in the house.
Budget Breakdown (What I Spent) for Radiator Covers
Item
Cost
Plywood (½ sheet)
$25
Slatted wood grille
$20
Trim boards
$12
Paint
$15
Screws, nails, glue
Already had
Total
$72
You could spend less with scrap wood or go premium with hardwoods. I’ve seen designer radiator covers for $300+. This one works just fine for a fraction of that.
Before & After
Before: Bare radiator, chipped paint, messy cables, clutter nearby.
After: Clean white enclosure with a shelf for books and a small plant. The whole room felt tidier, like it belonged in a design catalog.
I get compliments on it constantly. People think I bought it at West Elm.
Common Questions (That I Had Too)
❓ Does it reduce heat?
If you leave enough space and use a grille front, it’s not necessary. Some covers help direct heat out into the room instead of up the wall.
❓ What if I rent?
Make a freestanding version with no nails in the wall. Bonus: You can take it with you.
❓ Can I stain instead of paint?
Yes! Use wood that takes stain evenly—birch or pine work well, but precondition if you’re using softwood.
❓ Can it work as a bench?
Only if you reinforce it. Radiators get hot, so not great for sitting, but great for plants or lightweight décor.
Final Thoughts
Radiator covers might seem like a small upgrade, but they change how a space feels. They hide the clunky stuff, give you storage or display space, and make your room look more finished without a full remodel.
Floating Shelves: Stylish Storage & Easy DIY Guide by Admin September 8, 2025 DIY I still remember the first time I put up floating shelves. It wasn’t some big renovation—just a Saturday project in my living room. Instead of…


")


")
