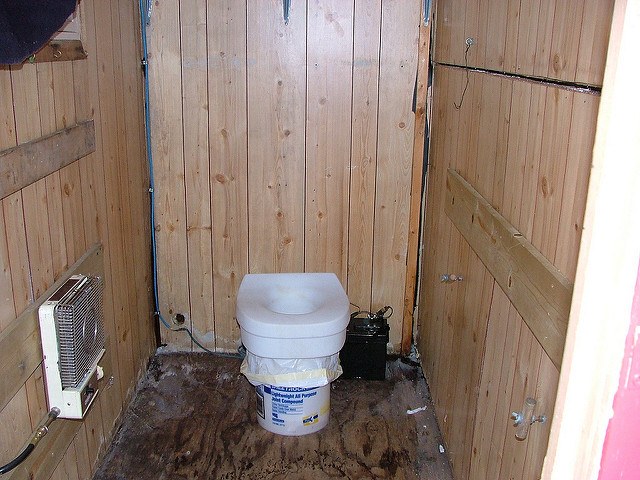
Anyone who enjoys hunting or fishing has probably seen a bucket toilet sometimes. More and more campers are using them as well. Instead of buying the expensive chemical toilets we used to use. While a bucket toilet may not be fancy, it does the job easily and efficiently without any risk of spillage or messing with expensive chemicals.
I don’t know if you’ve ever tried using one of the commercially available bucket toilets or even bought one of the commercial bucket toilet seats. If you have, then you know that if you’re any bigger than a 12-year-old girl, so they’re not really big enough. They’re made to snap onto the top of a standard five-gallon bucket, which limits their size. You’re better off making your own so that you can have a more comfortable seat.
There are many ways of making a DIY camping toilet bucket, including buying a standard toilet seat and adapting it to a bucket. I’ve done that, and it works, but it doesn’t work ideally. The problem with a standard toilet seat is that it is designed to be used with a toilet, where it has a toilet bowl rim to sit on. The bumpers that sit in that rim don’t work out well on the rim of a plastic bucket.
You’re better off making your toilet seat out of plywood. This begs the question, what plywood type should you use to make a toilet seat? Looking at the available types, I’d recommend avoiding construction grades, as you will have a problem with splinters. I’d also avoid anything like MDF or chipboard for the same reason. Rather I’d pick a ¾” thick hardwood plywood with no voids or a marine-grade plywood. Applewood, which is usually void free and has a lot of plays, is another excellent choice.
Voids are going to cause a problem in the toilet seat, making it an ideal spot for splinters. You can overcome this to some extent by filling the voids with wood filler, but there’s still a chance of having splinters form along the edges. For this reason, I prefer a void-free wood.
Surprisingly, toilet seat styles can vary considerably, just as toilets themselves can vary. I’d recommend starting out with a toilet seat from your own bathroom, as a pattern. You can take it off the toilet by removing the two plastic wingnuts on the bottom side of the bowl’s rim, at the toilet seat’s rim. Save them for reinstallation of the toilet seat after tracing it onto your plywood.
The other thing you need to trace onto your plywood is the rim of the bucket you’re going to use. This needs to be centered on the tracing of the toilet seat, perhaps shifted slightly towards the back. You’ll want the hinge portion of the seat to sit back behind the bucket so you can hinge it there.
With the toilet seat and bucket rim traced onto your plywood, you’ll need to figure out how you want to modify the seat. Cut it straight across at the back, with 1” to 1 ½” of overhang over the edge of the bucket. This is where the hinge will attach. Opposite that, at what would normally be the front of the toilet seat, you may need to shorten it to ensure that the entire opening in the toilet seat is contained within the area of the bucket. Don’t just cut off the front, as this will leave uncomfortable corners; rather, redraw the curve to ensure the opening is where it needs to be.
Cutting the Seat
You can cut out the plywood seat with a jigsaw. I recommend scoring the line through the surface veneer, with a utility knife, before cutting. This will help to eliminate any risk of splintering.
Once the seat is cut out, smooth the outer edges on a belt sander, ensuring you don’t leave any sharp corners except at the back or protrusions. The inside cut needs to be sanded with a drum sander for the same reason, to remove any protrusions. You want to end up with smooth, consistent edge lines.
To make the toilet seat more comfortable, round the top edges all the way around, with a router and a ¾” round over bit. Please note that you will need to use a 3 HP router that accepts a 12mm shank for this. If you don’t have that big a router, you’ll be limited to using a ½” roundover bit.
Most people do not bother with a seat cover for a bucket toilet. Hey, it’s roughing it, you know? Adding the toilet seat cover will just create extra work and without a toilet tank for it to lean back against, it can actually throw the bucket toilet off-balance when it is empty.
Mounting the Seat
You can use just a block of 2”x 4” lumber to make the hinge mounting for your toilet seat, but that’s likely to have the screws loosen over time. I’ve found that it’s better to make a block out of two layers of ¾” plywood, especially since you’re working with it already. Laminate two pieces together let the glue set and then trim the edges flush.
This block will need to mount just below the bucket’s rim on what will become the back side of the bucket toilet. To do this, you will need to cut the inside edge to match the curvature of the bucket. So, mark the curve on the block, using the bucket itself as the pattern. Don’t worry about the tapering of the bucket, as it is slight enough that it shouldn’t make a difference in the mounting of this block.
Cut the block and sand the inside of the cut with a drum sander to eliminate protrusions and provide you with a smooth mounting surface. Then mount the block to the edge of the bucket by running stainless steel screws through from the inside. Be sure to use stainless steel fender washers under the heads of these screws, so that they can’t pull out.
The Hinge
The toilet seat is then attached to this block with a hinge. I would recommend attaching the hinge to the underside of the seat, in the back, with the hinge knuckles pointed up and right behind the straight edge you made on the back of the toilet seat. This will mean that you will be putting the screws through from the wrong side of the hinge. So, before installing them, redo the countersinks for the screws from the other side.
You want to be careful to use stainless steel wood screws that are only ¾” long, so that they do not protrude through the top surface of the seat. That would be rather uncomfortable when sitting on the toilet.
The other leaf of the hinge will sit on the top of the block, centering the seat and aligning the hinge so it is parallel with the block. You can use longer screws here, as you have a double material thickness, and you probably should, to prevent the screws from eventually pulling out.
Using the Bucket Toilet
A bucket toilet is lined with plastic bags for use. Some people use grocery sacks, but those are too short. I would recommend using 13-gallon kitchen trash bags, the kind that have drawstring handles. It’s a good idea to use double thickness in case a bag leaks. It would be best if you also put several extra bags in the bottom of the bucket so that you have them available when it is time to change the bag.
There is a special kind of toilet paper, which is used by campers. It is highly biodegradable, breaking down much faster than normal toilet paper. While slightly more expensive, it is worth using, especially if you will compost your human waste.
Human waste makes excellent fertilizer, just like animal waste does. If you are already composting for gardening, mix the waste from your bucket toilet into your existing compost pile, spreading it out. The natural composting process will break down human waste, turning it back into nutrients for your garden. Urine is high in useful minerals, making it an excellent part of your compost.
Related Posts:
How to Make Barn Quilts by Admin June 3, 2025 DIY Walk through rural America and you’ll start noticing a charming trend on barns, sheds, and even garages—large, colorful quilt block patterns painted right onto the…
How to Make Cornhole Boards by Admin March 25, 2025 DIY I’ve built a few cornhole boards over the years — mostly for family barbecues and neighborhood game nights. It’s one of those backyard projects that’s…
How to Make an Epoxy Resin River Table by Admin March 18, 2025 DIY How to Make a DIY Epoxy River Table (Step-by-Step Guide) Creating an epoxy river table may look like an expensive and complex project, but with…