Most serious woodworkers and DIY-ers have a set of chisels in their toolbox, but all too often, those chisels aren’t sharp enough to be much more useful than glorified paint can openers. Using a dull tool is not only terribly frustrating, but also quite a safety hazard. A dull tool requires more effort to sever wood fibers and pushing too hard on a chisel can cause it to slip—once you lose that control of your chisel, you’re relying on a higher power to keep from slicing yourself open.
Sadly, too many serious DIY hobbyists and woodworkers alike don’t realize just how well a properly tuned chisel functions (or what it feels like to use one). Part of that has to do with the fact that chisels don’t come properly sharpened out of the box. What’s worse, it doesn’t take spending a small fortune for a new set of chisels nor does the equipment needed to bring a set of home-center chisels to razor sharp perfection. For a moderate investment and as your skill at sharpening progresses you will likely want to try other options, the serious DIY hobbyist and woodworker can sharpen their chisels to a sharpness that can only be described as ‘surgical’.
Some of the materials necessary include things likely already in the toolbox (sandpaper of varying grits, an angle measurement gauge and a bench grinder). The complete list of a “skeleton crew” of sharpening needs appears at the end.
Steps involved
1. lap the bottom of the blade dead-flat
2. grind a primary bevel on the chisel
3. using the honing jig bring the blade to sharpness
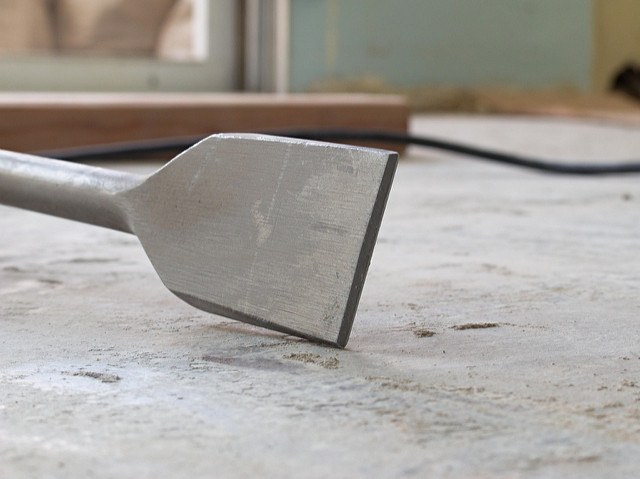
4. grind the secondary bevel on the chisel with highest grit sandpaper
5. remove the wire burr on the back and regrind the secondary bevel
6. gently hone the back and blade with the strop with added polish.
Sandpaper
This first step (lapping the back) only needs to happen once, but it has to be done right. Attach the 120 grit sandpaper to the glass plate and rub the back of the chisel for about a minute. If the back is too rough, go with the 80 grit first. Repeat for each of the sandpaper grits, going from 120 to 2000 grit.
Ensure that the scratch marks from previous grits are completely removed before progressing to the next grit—it pays to be fussy at this stage. Around the 1000 grit mark, you will probably notice the back beginning to look more mirrored in its appearance. Don’t get too impatient and jump grits! Once you’ve lapped the back flat to 2000 grit, the back of your chisel should look like a perfect mirror.
Bevel
The next step may not be necessary with a new chisel, but grinding your primary bevel is the next step. The angle of this bevel is important; too high, and the blade will not cut quite as well (but will last longer), too low and the cuts will be fantastic and easy, but you’ll need to resharpen your chisel much more often.
A good compromise angle is 25°. Once ground to the 25° bevel, the blade itself should be slightly hollow—this is normal and expected. The tip of the blade and the top of the blade should be a little pronounced. Place your chisel in the honing guide and check to make sure that both the tip and the top touch the sandpaper used to sharpen the blade itself (starting at 600 is probably ok). Run the blade over the sandpaper 4-6 times for each grit all the way to 2000. At this point, the tip of the blade should have a mirrored appearance.
The bottom of the blade (the side you initially lapped) should have a slight burr. Remove this burr, either manually or on the 2000 grit sandpaper. If you’re using a honing guide, adjust the angle so that only the tip of the blade contacts the sandpaper (only 2000 grit at this point, and it can be wet).
Run the blade over the sandpaper ~5 times and remove any microscopic burr that forms. If you have a leather strop and polishing compound, pull the chisel (stile still in the honing guide) towards you once or twice and do the same for the bottom. Carefully remove your chisel and marvel at just how sharp something can be.
To test the sharpness of your new chisel, you should be able to take a paper-thin shaving from the end grain of a softwood of like pine. Or, if you’re a little goofy, you can check the sharpness by shaving the hair off of your arm. If it’s truly sharp, you won’t even feel the chisel slice though the hair- your arm will soon be bald as you then sharpen—and test—everything in sight.
Skeleton Crew needs
Sandpaper (80, 120, 180, 220, 320, 400, 600, 100 1500 and 2000 grits) — yes, get them all, it saves time and headache later. Also, higher grits (above 1000) are often available at auto parts stores; home centers normally don’t carry grits above about 400.
Bench grinder, honing jig — several woodworking outlets have these for sale; the Veritas jig is one of the more popular and is reasonably prices at around $25 USD (~20 euro), 6 mm (1/4 inch) plate glass (30×30 cm; 12 x 12 inches), angle measurement tool and spray glue to adhere the sandpaper to the glass (optional).