Concrete has been one of mankind’s great inventions, used throughout much of history and around the world. The use of concrete as a building material goes back to roughly 6500 BC. At that time, Middle Eastern builders discovered the amazing properties of lime, seeing how it reacted chemically to produce a hard surface. This was used on the outside of structures, hardening them. Many of mankind’s greatest architectural and engineering accomplishments could not have been done, without the use of concrete.
This varies considerably with modern Portland cement, which was invented in 1824. It is created by burning finely ground chalk and clay, removing the carbon dioxide. This provides a material with roughly the same characteristics of lime.
Modern concrete consists of aggregate (rock, gravel and sand) bound together by a fluid cement that hardens by chemical reaction with water. Mixed into a slurry, concrete can be molded into a nearly infinite variety of forms, limited by the imagination of the user in creating a form or mold.
In the most recent adaptation of concrete usage in building construction, a thick form of concrete is being used for 3D printing of complex structural pieces and even entire homes. This ability is providing architects with new options for design, which never existed before.
For many structures, concrete is reinforced with steel bars, called “rebar” which is short for reinforcing bar. This is necessary because concrete, like most stone, is strong under compression, but not under tension. In other words, it is much weaker when you are trying to stretch it, than when you are trying to compress it.
This characteristic of concrete and stone is what makes it possible to cut or break these materials with a hammer and chisel. The chisel is essentially a wedge, with high leverage force. When driven into a fissure in stone or concrete, it pushes sideways, essentially stretching the stone. Since it has little to hold it together, the stone moves, expanding the fissure. In this way, stone can be quarried. The same characteristic provides the ability for demolition of concrete structures.
Planning Your Concrete Steps
Stair dimensions are defined by two terms; rise and run. The rise is how high each step is and should generally be between six to eight inches for comfort. You can go outside those dimensions, like a 5” rise, but if you go too high, the steps become hard to navigate, especially for small children and the elderly.
The run of the step is the distance from the step’s front edge to the back of the step. This should be at least 11 to 12 inches, so as to ensure that it is enough for people to get their whole foot onto.
You want to make sure that you keep both the rise and run of your steps consistent, with the exception of any landings. Uneven steps cause people to stumble. So to determine your rise, divide the total height of the stairs by 8, and then round up. Now divide the total height of the stairs by the answer you got when dividing by 8. This will give you the rise for your steps.
Typically, you can make the total run of your steps as long as you need to. So, start by figuring space for a porch or landing, if you need one. If these steps are going directly to a door, you’ll need at least a 36” deep porch or stoop, so that someone coming in or going out has someplace to stand while opening the door. Add the total number of steps you calculated when you calculated the rise to that, in order to find out what your total run will be. Check to make sure that you have room for that long a run.
In the case you don’t have enough space for the total run, you’ll need to put a landing in the stairs and then continue them in another direction. The landing itself counts as a step, as the rise for the landing is the same as the rest of the steps. However, the landing is larger, giving room to change direction.
This extra room is especially important when moving furniture and appliances into or out of your home. Splitting the landing and turning it into two triangular stairs makes it all but impossible to use a hand truck to move items into and out of the home. It can also make it very dangerous to move large, heavy pieces of furniture.
The final dimension you need is the width of the steps. If this is leading to a door, you will want a minimum of six inches of space on either side of the door. So a typical 36” exterior door should have a 48” wide staircase leading up to it. Of course, if your steps are leading up to a porch or other structure, you can make them as wide as you want. Just be sure to make them wide enough to be easily navigable.
Preparing the Site
Concrete is heavy, about 4050 pounds per cubic yard, 150 pounds per cubic foot or 2400 kilograms per cubic meter, so your steps will be heavy. Therefore, they will need to sit on solid ground. You never want to pour concrete on top of soft ground or existing grass, as that doesn’t provide a firm foundation. Rather, you want to remove the grass and the softer earth under it, so as to get to the harder ground underneath. Compact this harder ground with a hand tamper or gasoline driven vibratory compactor to give you a solid base to work with.
Before compacting, it is a good idea to dig deep enough so as to allow you 4 to 8 inches of depth that you can fill with large gravel or crushed rock. This will help protect your concrete steps from shift in the ground, caused by moisture changes and freezing. Compact the gravel, just as you did the earth beneath it. In cold climates, it’s a good idea to put down a 2 inch layer of closed cell Styrofoam, beneath the gravel. This provides a water barrier between the steps and the ground, preventing freezing water from damaging them.
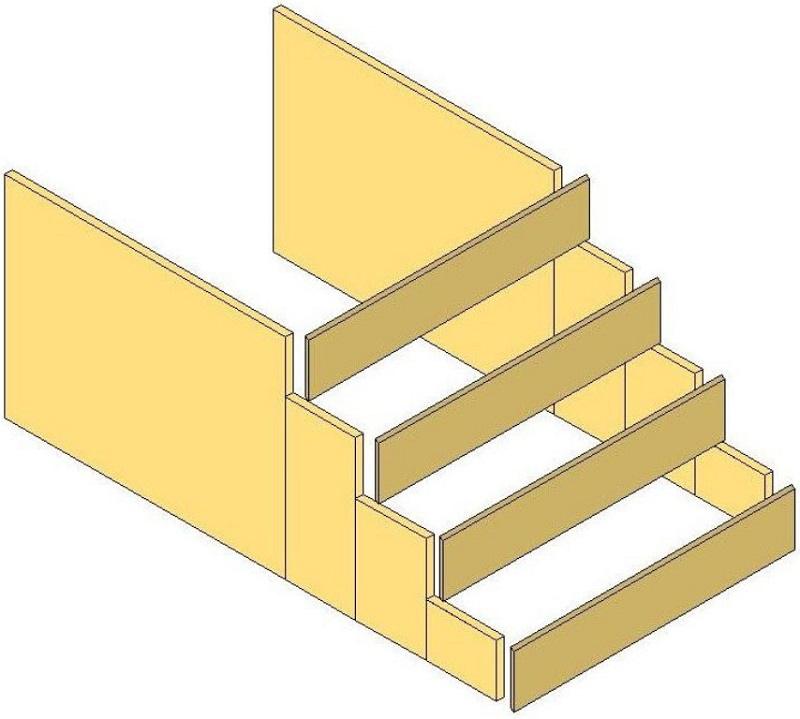
Cutting Plywood and Making the Form
With your site prepared, you are now ready to make the form for your concrete steps. Start by laying out the profile of the steps on a piece of ¾” construction grade plywood. Slope everything slightly (about 2 degrees) away from the door to help drainage. Double check your dimensions and then cut it out.
You will need two identical pieces like this. Be sure to cut exactly on the outside of our lines. If your cuts are not straight and clean, sand them to clean them up. Irregularities in the profile you are cutting out of the plywood will end up as irregularities in the top of your steps.
You will also need to cut as many strips of ¾” plywood as you have step risers; as long as your steps need to be wide, plus double the thickness of the plywood. So a 48” wide step with 7” rise will need a piece of plywood 7” x 49 ½”. These are to be screwed to the front of each step on the plywood profiles, leaving the top of the step open. Be sure to screw the form together with long screws, as it must be able to hold the weight of the concrete, while it is setting.
The form must be placed exactly where you want the steps to be and anchored in place. Use 2”x 4”s, pointed at the bottom end, to hold the form in place, with additional pieces of 2”x 4”s as angled braces, to keep the sides from spreading at the top. These angle braces will go from the top of the form to the ground, where they will be nailed to stakes, which are pounded into the ground. If anything, you want to overdo it on the bracing, as fixing any mistakes with concrete is extremely difficult.
Pouring the Concrete
Before pouring the concrete, coat the form with a heavy coating of oil to help prevent the concrete from sticking to it. Some people leave this step out, but in doing so they often end up with splinters from the wood stuck to their steps.
You may want to add some filler inside the area, to help take up space and reduce the amount of concrete you need. If you have rocks sitting around your property, they make excellent filler. You can also fill it with dirt, creating a well packed down pile in the middle, but leaving at least four inches of space all around.
Precast concrete steps will have the central area hollow, as it is not necessary to fill it in order to have sufficient structural strength. While you can’t pour it hollow, the type and amount of filler you have taking up this space won’t affect the overall structural strength of the steps. Just be sure to use hard or compacted material, so that the weight of the concrete above it doesn’t compress it.
While not a requirement for building code, it is a good idea to add some metal reinforcement inside your step, before pouring the concrete. This can be done with rebar or remesh. Remesh is a stiff, welded wire grid, which is often used in pouring concrete patios, sidewalks and other light-duty structures. It will work ideally for steps as well. The rebar or remesh needs to be suspended in the form, so that it will sit below the surface level of the steps, but not sit on the ground. Ideally, you want it 2 to 4 inches below the surface.
Be sure to use remesh or rebar on all horizontal surfaces of the steps, as those are the ones most likely to break, not the vertical step risers. This is especially true of the stoop or landing, as it is a bigger area.
Now that everything is ready, you can mix your concrete and pour it into your form or call for a truck to deliver ready-mix concrete to your home. As a general rule of thumb, if you need more than 20 bags of concrete, you’re better off getting ready-mix, than trying to mix it yourself.
Fill the form all the way, flush with the top, starting with the bottom step and working your way up. You want to get rid of any air pockets, by a combination of spading the concrete, inside the form (to break open air bubbles) and tapping the outside of the form with a hammer, to vibrate it and get the concrete to settle.
The concrete may settle, leaving low spots, as you pour it and tap the form. That’s okay, continue filling the form, then go back and top off any low spots with more concrete. By this time, the concrete will have started to stiffen up and should not sag again.
Finishing & Curing the Concrete
With your form fully filled, use a hand float to smooth out and level the surface of the concrete. You want to float it enough that the “cream” (excess water) rises to the top. Allow the bleed water to dissipate, then texture the top of the concrete by brushing over it with a stiff broom. This will help keep the surface of the concrete from becoming slippery when wet.
If you are planning on edging your concrete, to give it a radiused edge, it is done at this time, using a steel hand edger. This is not a requirement, but will provide a more professional looking finish to your concrete step.
Once the concrete has set to the point where it will no longer run, disassemble the form and remove it, starting by removing the riser boards. You should be able to do this about one hour after finishing your pour. Wait until the next morning to remove the side boards. If there are any air pockets or voids in your concrete, fill them with concrete patch material.
Concrete does not dry, but rather cures. It hardens by a chemical reaction between the minerals in the cement and water. So you need to keep the concrete wet, while it is setting. It is best to keep it constantly wet for two to five days after pouring. By then, it should be fully cured.
Concrete steps form
Filling a Void Under Your Concrete Steps
It is not unusual for the dirt filler in the space under concrete steps to wash away over time. This is nothing more than natural erosion. However, it can cause problems in that it provides a space for wild animals to take up residence. Even more serious than that is that it can provide an unseen path for water to get into your foundation.
Checking for these voids and filling them should be a normal part of your home maintenance, every few years. Filling can be done with a variety of different materials, such as clay and stone. Clay is an excellent choice, as it will absorb some water, but will not wash away easily. However, it is a difficult material to fill the space with. Stone is considerably easier.
Always fill this space to well above grade, capping it with packed soil. This will help ensure that any water seeping into this area flows out of it, rather than seeping down to the foundation.
Repairing Concrete Steps
Aged concrete can chip and flake, making owners think they need to replace it. But if the concrete is still structurally sound, there is no need to replace it. Rather, the concrete can be repaired, giving it a new finish and cleaning up any cracks or edges that are worn away.
In order to do this, you will need a special concrete patching product. While similar in appearance to concrete, these products have a higher strength and surface tension. If you were to skim coat existing concrete with normal Portland cement, it would crack and break off. Concrete patch material will not; that’s the basic difference.
Before applying the concrete patch, you’ll want to remove any loose or flaking pieces of the existing concrete step. Widen out the opening of any cracks or fissures, so that you can press the patch material into those cracks. Pressure wash the surface to remove any grease or other foreign matter, brushing it as well, with a wire brush.
For the first application, mix the concrete patch to a thick consistency; thick enough so that if you apply it to the vertical surfaces of your steps, it will not fall off. Use this thick coat to fill in cracks, uneven areas, build up worn areas of the steps and fill any missing areas. Allow to cure, then mix a second batch that’s roughly the consistency of pancake batter. This batch should be spread across the entire surface of the steps and any landings, covering both rise and run.
Smooth out this second coat of concrete patch, as if you were finishing new concrete. You won’t have any cream floating to the surface. Be sure to brush the surface with a broom to texture it and round edges with edge rounders if you so desire. Brushing is necessary so that the surface won’t be slick when wet.
Related Posts:
How to Pour Concrete Ramp by Admin April 1, 2025 More About There are times when a ramp just makes more sense than stairs—especially if you’re moving heavy tools, lawn mowers, or even a wheelchair. For something…
Precast Concrete Steps: Costs, Benefits & Installation Guide by Amy Reed March 21, 2025 More About Precast concrete steps are ready-made cement stairs, staircases, or hollow cement steps that can be installed outside existing staircases on a property or business premise.…
How to Install Plywood Flooring Over Concrete Guide by Admin July 1, 2025 Installing If your home is built on a concrete slab and you’re dreaming of installing real hardwood floors, you’ll need a sturdy plywood subfloor in place…