Nails or Screws for Plywood – Which one is More Suitable
Plywood, in its various forms, is one of the world’s most extensively used wood products today. It is used in constructing houses, crates, furniture, and store fixtures. You would find the use of plywood in most of the wooden furniture in your home and even the floorboards installed in your flooring. Additionally, the various types of plywood and other engineered wood materials give hobbyists, manufacturers, and carpenters a variety of sheet wood materials they can use in various ways.
You can find plywood used in the subfloors, exterior sheathing, and roof sheathing of your home, as well as in many pieces of furniture. Today, vinyl-clad particle board, another engineered wood product, is the most commonly used wood product in low-cost furniture. Since these are engineered wood products, working with them slightly differs from what you might expect when working with solid wood.
It is important to remember these differences when working with these engineered materials, especially when repairing furniture made from plywood. One big debate between those working with plywood is the fasteners used for plywood: nails or screws. To add confusion to that debate, many engineered fasteners for assembling furniture made from particle board are now available to consumers.
Why Nails are Not Suitable for Plywood
To settle this debate, let us consider nails and screws for plywood and then decide which one is more suited for fastening plywood joints together. Consider the nails first. Splitting the wood is the biggest issue you might encounter when using a nail for plywood projects. Nails for plywood have to be hammered in, and a slightly careless blow can get the nail bent or, even worse, split the wood. This is the reason why most professionals don’t recommend the use of nails as fasteners for plywood.
What’s Wrong with Nails in Plywood Projects?
To start with, most experts recommend screws over nails when working with plywood. Nevertheless, there are many projects built using nails with plywood. In most cases, the nails used are from a pneumatic finish nailer and are used in conjunction with wood glue.
To understand the problems with using nails when building with plywood, we must understand how nails hold wood together. Nails are compression fasteners, meaning they depend on the wood they are driven into, gripping or squeezing the shaft of the nail itself. When the nail is driven into the wood, it punctures it, pushing wood fibers aside to make a hole. Those wood fibers spring back against the nail, creating compression.
In cases where the wood in question weathers and becomes water damaged, one of the first places that damage occurs is where the fasteners are. In the case of nails, that eliminates the compression against the nail, thereby eliminating the usefulness of the nail.
But that’s not the only way that compression can be lost. In most cases, nailing plywood means nailing into the edge of the sheet, often with a nail going through the thickness of one sheet of plywood and then going into the edge of the other. Unless the nail happens to go into a void in the edge of the plywood, it will probably cause the plywood to split, eliminating the compression needed to make the nail hold the wood together.
Tips for Using Nails
Even with the problems, sometimes using nails to hold plywood projects together is more appropriate than screws. Specifically, we find this in cabinet making and carpentry, when nails hold cabinets together while the glue is drying. The compression needed for the nails to hold is only for a limited time, as the glue will hold the project together over the long term. Once the glue is set, the nail acts to help protect the glue joint from shear.
Wood glue has its limitations too. Gluing the end grain doesn’t work, as the glue can pull out of the end grain rather easily. Rather, the gluing of the side grain makes strong projects. Fortunately, plywood offers us both end and side grain on each edge. The only exception would be the lumber core. In that case, there are distinct end-grain edges and side-grain edges. For this reason, it’s not a good idea to depend on gluing lumber-core plywood.
When using nails in conjunction with wood glue, it is best to use a pneumatic nail gun and brads. Generally speaking, brands are usually 18 gauge (0.0403” dia.), whereas 4 penny finish nails are 0.072” in diameter, almost twice the size and over three times the area. The smaller hole that the pneumatically driven nail makes is less likely to split the plywood, just as driving the nail in one smooth, rapid motion is less likely to split it than several blows with a hammer.
It is important to always center the nails at the end of the boards carefully, as the closer the nail is to the face of the plywood, the greater the chance of it splitting the wood. Keep it away from the ends of the edge as well, as it is more likely to split the edge there than towards the center of the board. Also, the closer the nails are bunched together, the greater stress they will produce inside the layers of the plywood, which might eventually lead to cracking of the wood.
Nails in Construction
Screws are rarely used with plywood in the construction of homes. That’s because the ways that plywood is used in the construction of a home do not require fastening into the edge of a sheet of plywood, eliminating the normal problems associated with using nails and plywood together.
Plywood in home construction is almost always supported by 2”x 4” framing, with the plywood being nailed to the framing through the thickness of the plywood. There is no risk of the plywood splitting in this case because the nails are not entering the edge of the plywood. Nor is there a risk of the compression holding the nail being released because that compression is being provided by the 2”x 4” framing member. Unless that framing becomes wet and rot, there is no reason why it will loosen on the nail.
When nailing plywood to 2”x 4” structural elements, 8d (eight pence) common nails are almost always used. It is not necessary to use the longer 16d nails that are commonly used in attaching 2”x 4” studs and other 2” thick structural elements, as the plywood is thinner than that. Except for subflooring, most of the plywood used in the construction of homes is 1/2” or 3/8” thick.
Even though common nails don’t pull out easily and are unlikely to loosen, it is recommended to use coated nails for construction. These have a dry glue coating on the outside of the nail. When the nail is pounded in, the glue provides an extra seal between the glue and the wood, preventing moisture from seeping in and ensuring the nail cannot pull out. If you have to pull out a coated nail in a project you are working on, you will have a lot of trouble doing so.
For construction outdoors, such as an exterior stairway, zinc-coated nails or decking screws should be used to attach the plywood. These are designed to prevent rusting, which destroys the fastener.
Subflooring is thicker than sheathing to provide a solid floor, which can support the appropriate amount of weight without excessive flexing. While it can be installed with normal 8d nails, it is recommended that you use flooring nails instead. These differ from normal nails because they have a square cross-section with a slight twist. When the nails are pounded through the subfloor into the floor joists, they enter, twisting slightly, somewhat like screws. This provides added protection against the nails pulling out.
Other options for installing plywood subflooring include rings hank nails with several ridges running around the nail, forming “rings.” These interface with the wood fiber, much like a smaller screw thread, making it harder for the nail to back out. The final option is to install the subfloor with screws, the most secure way to attach the subflooring.
Why Screws are Recommended for Plywood Projects
Screws don’t require compression to hold them into the wood. Rather, the threads on the screw cut into the wood fibers, creating their channels. In doing this, they lock themselves to the wood. Even if the wood were to decay, the bond between the screw and the wood would last much longer than between a nail and the wood.
However, screws do not make as good a mechanical connection with the end grain as they do when going across the grain. The screw can sever the grain in the end grain, allowing the screw and broken wood fibers to fall out of the hole. This can happen no matter how thick and heavy the plywood is. When going across the grain, each thread turn engages new wood fibers, strengthening the bond—the longer the screw, the stronger the mechanical bond formed.
Fortunately, plywood offers cross grain and not only end grain. Therefore, when screws are used in plywood, even in the edge of the board, they make a good mechanical connection, supported by the wood grain in the plywood. Screws also offer a wider head than finish nails, reducing the chance for them to pull through the face of the plywood, even if there is a void in the layers of the core.
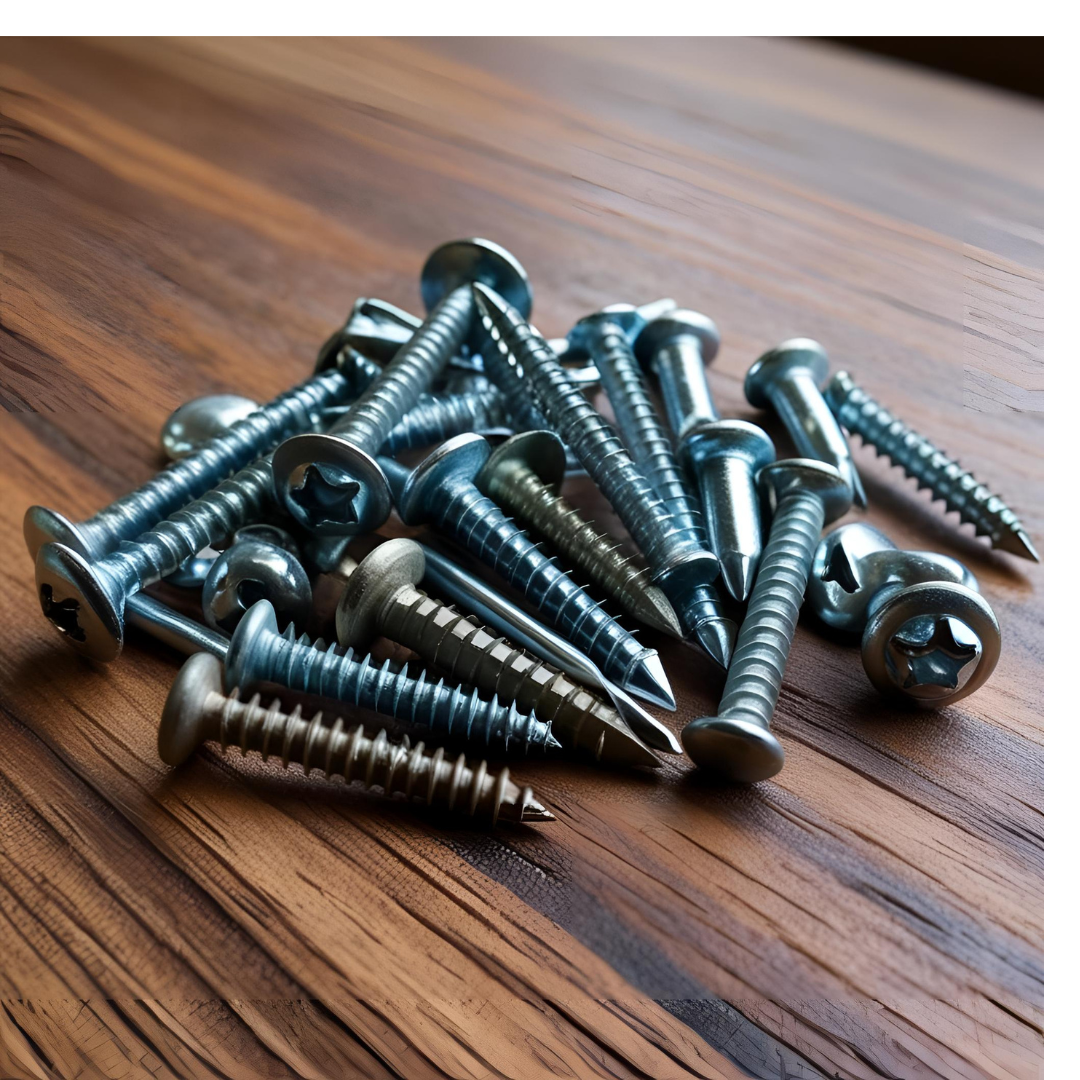
You can choose to use several different kinds of screws for plywood. Common wood screws are still used, although many have switched to drywall screws. Even those are rapidly being replaced by a new generation of wood screws, made especially for power tools and plywood use. These screws do not have the taper of drywall screws, which allows for a better grip all through the length of the screw.
Always select screws that are long enough to ensure that the screw thread will go through the first piece and sufficiently into the second piece to ensure a good grip. For most applications, the screws should be a minimum of twice the length as the thickness of the plywood being attached.
While screws are available in various materials, only steel screws should be used, not softer metals. Modern “production screws” are the most common variant replacing drywall screws. They are made of hardened steel, designed to handle the stress of being driven by power tools. When compared side-by-side with drywall screws, drywall screws might break in applications where production screws won’t.
The various types of screws you might use with plywood come in four basic head styles:
Bugle head – Has a curved underside to the head, commonly used for plywood. Will usually sink into the wood, without a countersink, just to the depth of the head
Trim head – Has a smaller diameter head with a more gradual angle. Designed always to sink flush or below flush
Standard flathead – An angled head designed to sit into a countersink. Normally will not sink in unless the wood is already countersunk
Oval head – Similar to a flathead, but with the top surfaced domed upwards. It is considered a decorative screw and will often be polished, plated, or painted
All of these designs should be available in steel screws. These are intended for indoor use. When building projects for outdoor use, it is best to use deck screws, which are essentially drywall screws that have been coated, making them resistant to rusting. For extremely wet applications, stainless steel screws are becoming more commonplace.
There is a gradual change in the design of screw heads as well. Forty years ago, most wood screws were designed to be used with a straight-blade screwdriver. Since then, they have been largely replaced by Phillips bits. This changeover was necessitated by using power tools to drive the screws. But the Phillips head screw was never an easy design to work with, as the sloping sides of the pocket would cause the screwdriver to slip, “camming out” the hole. That was intentional, as the Phillips’s head was designed when the electric drills used as drivers had no clutch. The cam out feature allowed torque limiting so the screw wouldn’t be over-tightened and break.
Today, more and more screw manufacturers are switching from Phillips heads to Torx (star) heads or Robertson square heads. At this time, the square head appears to be the new standard for woodworking. This provides a solid interconnection between the driver and the screw head, preventing stripping out the screw and ensuring the screw gets driven solidly into the wood.
The heads of some of these screws are designed so that you don’t have to bother drilling the countersink for the screws. These are easily recognized, as the bottom side of the screw head will have some lines molded into the screw, which work to cut out the wood, forming the countersink. The underside of the heads on screws that do not incorporate this feature is always smooth.
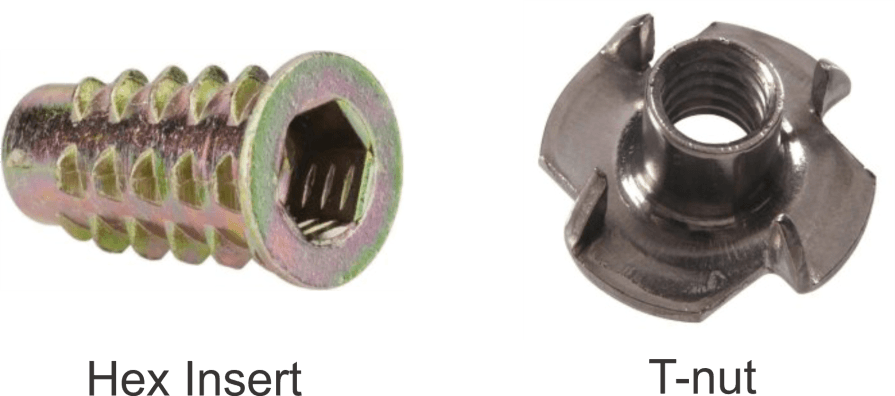
Using threaded inserts
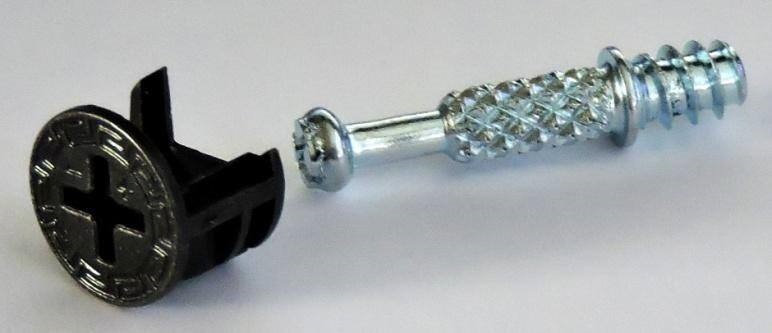
Another option for attaching plywood project parts is to use threaded inserts. While some different types of threaded inserts fall into two basic categories: T-nuts and hex-flanged. These come in various thread sizes to match the screws used with them.
Hex and T-nut insert
Hex inserts are so named because they are inserted into a hole and drilled into the plywood with a hex wrench. The hole size must be the diameter of the insert’s body without the threads. As it is inserted, the threads on the outside of the insert cut into the wood fiber, making a strong bond with it. Once fully inserted, the flange is the only visible part on the face of the wood.
T-nuts are designed to be inserted from the opposite side of the panel as the screw that will be threaded into them. They require a hole the same size as the threaded shank in the middle. The T-nut is then pounded into the back of the panel, allowing the prongs to dig into it. They cannot be inserted from the front of the panel, as they depend on the clamping action of the screw from the front and the T-nut’s flange on the back to hold them in place.
In both cases, these fasteners can’t be inserted into the edge of a plywood panel but only into the face or reverse face. Once inserted, various machine thread screws can be used in conjunction with the insert, allowing the project to be assembled and unassembled as needed.
Tips for Using Screws
Even though screws are better fasteners with plywood than nails, precautions must be taken to ensure the most solid bond possible. If not used properly, the screws can split the edge of a sheet of plywood, especially when used with a thinner sheet of plywood or when not properly centered in the edge of the board.
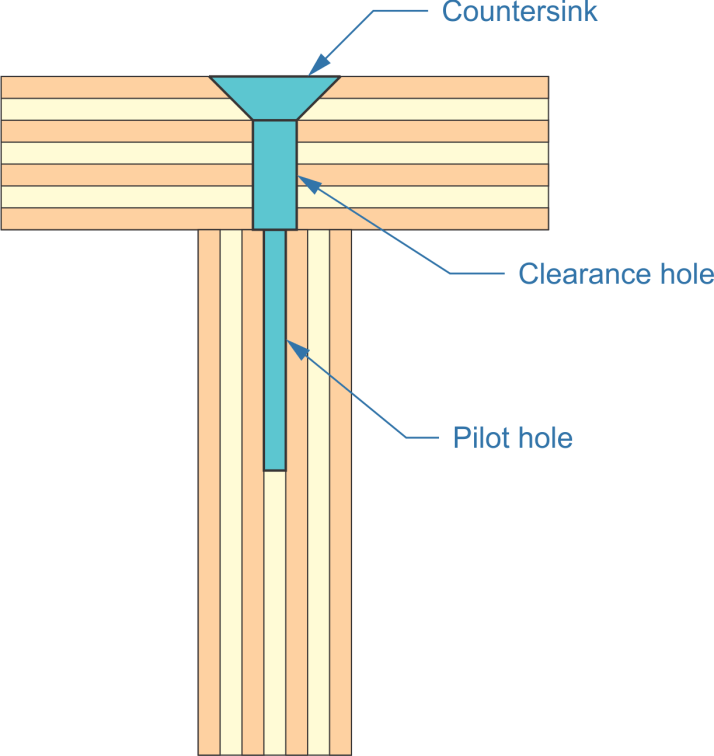
Before running screws into plywood for assembly, it is advisable to drill a pilot hole into the edge of the panel. A clearance hole should be drilled through the face board to be attached and then countersunk if you want to make sure that the head of the screw is flush with or below the face of the plywood and are not using screws that cut their countersink.
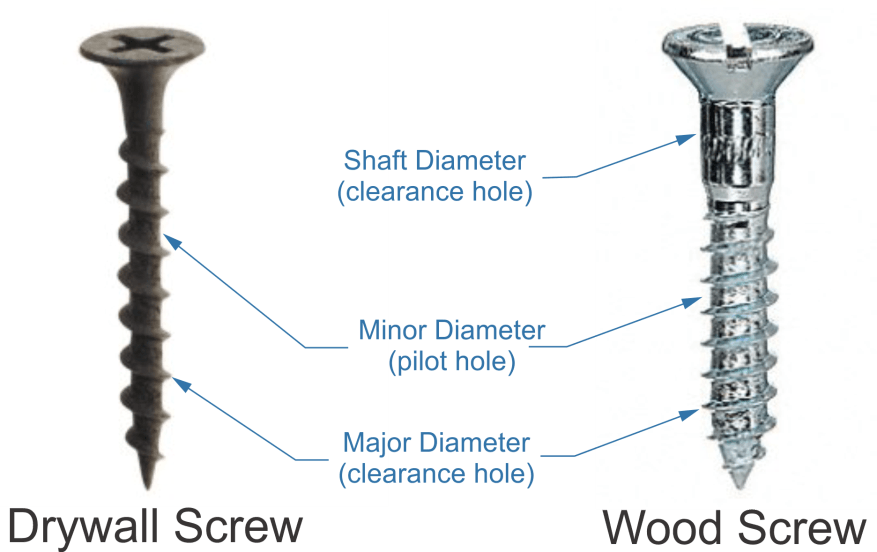
Pilot hole for screws
We can see in the diagram above that the pilot hole is smaller than the clearance hole. The ideal size for the pilot hole is 7/64,” and the ideal size for the clearance hole is 5/32” for #6 screws (the most common size of drywall screws). Depending on how you want to finish your project, you might make the countersink exactly the size of the screw head, leaving the screw head visible, or make it slightly larger to fill the hole and sand it smoothly.
Drywall and wood screws
You can buy combination wood screw drill bits that provide all three sizes in one; make sure to buy the right size to match the screw size you are using. Your other options are to use multiple drills (which many people do) or to change your bits a lot. Rather than driving the screws by hand or with a drill/driver, you can secure them more tightly, with less chance of cam out if you use an impact driver.
When driving long screws into drywall or other wood products, it is a good idea to dip the point of the screw into liquid soap so that the soap can act as a lubricant. Care must be taken, especially for stained and varnished pieces, as any liquid soap on the plywood’s surface will prevent the wood veneer from accepting the stain.
Hiding screws
Two basic ways of hiding screws are used for connecting the various parts of a plywood project. The first is to sink the screw head below the surface of the wood, then fill above it with wood putty. Once the putty is dry, it can be sanded smooth and painted.
The other way of hiding screws is to countersink them far enough below the wood’s surface to allow a plug insertion. Simple plugs are tapered and are cut off flush with the surface of the wood with a chisel, then sanded and finished. More complex plug designs include domed plugs, four-sided pyramids, and others which become part of the design of the finished piece, much like the end of a wood dowel pin might be a decorative item on a pinned piece of work.
Other Fasteners
Various newer fasteners have been developed for the furniture industry, specifically the part of the furniture industry which makes low-cost furniture that the purchaser needs to assemble at home. Many of these fasteners are now available for use by consumers in their projects.
Of these, the most popular is the cam lock. If you’ve ever assembled the sort of furniture I’m referring to, you’ve undoubtedly encountered these. They are designed to attach two pieces of sheet wood products, like plywood, together at a right angle. The real advantage of these is that the finished piece can be easily broken down for moving.
Cam lock
Another common piece of hardware intended for use with plywood is the plywood clip. This bent sheet-metal fastener has the cross-section of a “H.” It is designed to connect two pieces of plywood, extending a sheet. They provide alignment for the two pieces, allowing one to slip in from one side and the other from the opposite side, but cannot provide any structural strength. The plywood pieces must be supported in another way.
Plywood vs Hardboard: Which One Is Right for Your Project? by Amy Reed September 8, 2025 More About Whether you're building a cabinet, designing wall panels, or installing subflooring, choosing the right type of wood product is essential. Two popular options, plywood and…


")