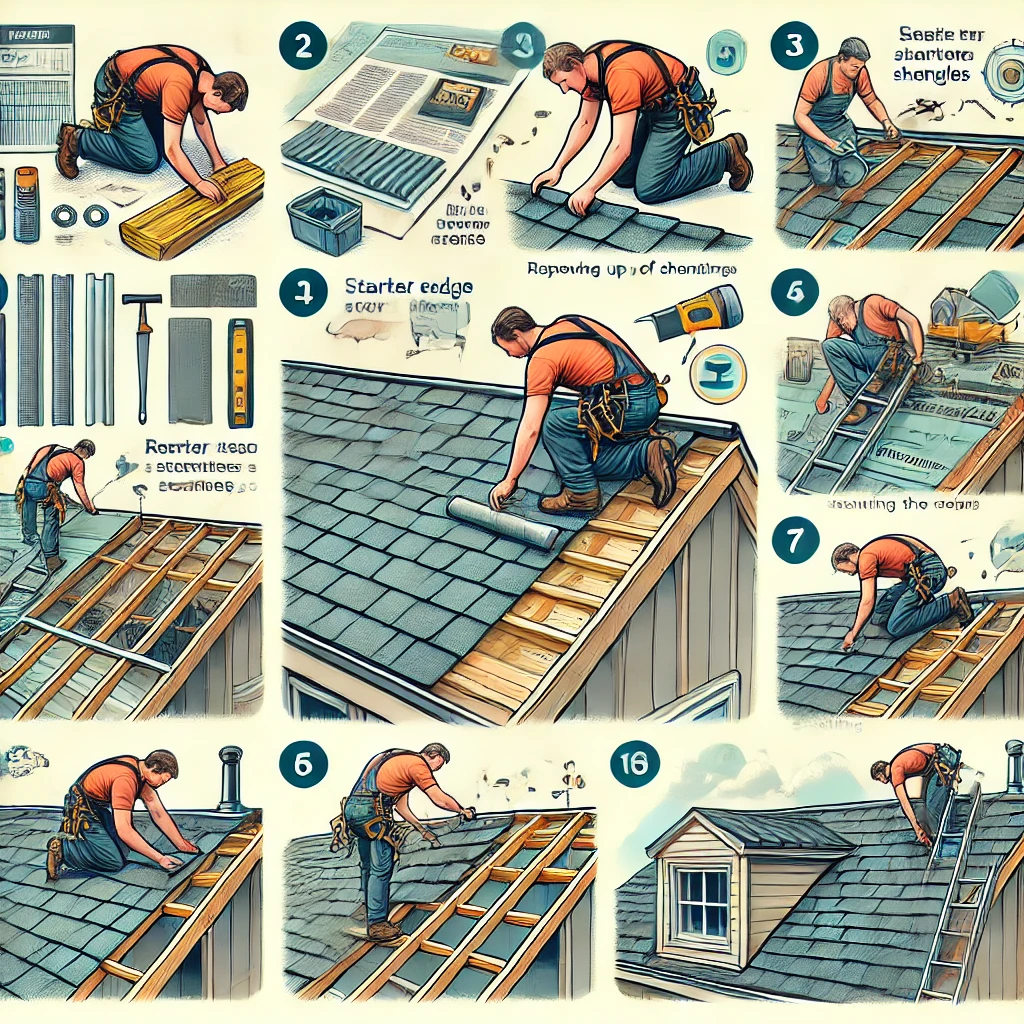
How to Install/Lay Shingles

Most people are afraid to install shingles on their own roofs, and with good reason. A full third of fatal construction accidents happen from people falling off of roofs; so proper safety is essential when installing any sort of roof. But with the right safety precautions in place, installing a roof really isn’t all that hard to do.

The most common type of roof is three-tab asphalt shingles. The popularity of these types of shingles comes from a combination of their low cost and long life. Today’s asphalt shingles are rated to last 30 years, much longer than the average homeowner keeps their home.

These shingles need to be installed on a roof that has at least a 2/12 pitch (that’s two feet of rise for every twelve feet of run), if special techniques are used, but work best on roofs with at least a 4/12 pitch. They do not work on flat or nearly flat roofs, due to basic physics. Any sort of shingles are counting on the water flowing downhill. If there is no “down” in the hill, the water can’t be controlled and may seep under the shingles.

All materials used in the roofing process, except for the roofing felt, are installed with standard 1 ¼” or 1 ½” roofing nails, regardless of whether they are pounded in with a hammer or a roofing nailer is used. Roofing nails have a larger head than other construction nails, helping to prevent them from tearing through the shingles in high winds.

Roofing of this type depends on the water flowing downhill. So it is essential that all roofing components are installed in such a way that pieces farther up the roof are overlapped onto pieces which are lower down. For this reason, roofs are installed starting at the eaves and working your way upwards.

Managing water flow can be tricky with some pieces, like roof vent seals and flashing, but if you are careful to install these pieces as you work your way up the roof, rather than leaving them for later, it is actually rather easy to ensure that the watertight integrity of the roof is maintained.

shingles, roof, house
Shingled roof, Sodai Gomi

Roofing Safety

Due to the high risk involved with roofing, it is essential that you apply proper safety techniques whenever working on a roof. These include using a safety line, which is tethered to the roof peak and a safety rail at the bottom edge of the roof. While you may only get slightly injured from falling off a one-story roof, falling off a two-story roof can prove fatal.

When working on roofs which are steep enough to make it difficult to maintain your footing, install roof jacks and a plank to stand on. This will provide you with a firm purchase, preventing you from slipping and allowing you to concentrate on the work you are doing, rather than having to spend all your concentration on keeping from falling off.

Preparing the Roof

Depending on whether you are roofing new construction or re-roofing a home, your roof and the roof structure may need some work, before you are ready to install the shingles. The UBC (Universal Building Code) allows for a home to have up to three roofs. However, local building codes may modify that, especially in high-snow areas. Check to see if you need to remove existing roofing shingles, before installing your new roof.

Of course, if your existing roof is extremely worn, damaged or leaking, you will need to remove the existing roofing, so as to get to the roof sheathing and make any necessary repairs. Shingles are normally removed using a pitchfork, which allows you to get under the shingles easily and pry them up. Leftover nails are either pounded down or removed, leaving a smooth surface.

Once the roofing has been removed, check the condition of your existing sheathing. Be especially careful checking around the edges of boards, as plywood and chipboard more readily soak up water along these edges, rather than in the flat side. Also check around any roof penetrations, such as vent pipes, as it is common to have leaks form at those points. Water damaged sheathing and understructure should be replaced.

Drip Edge, Flashing & Felt

With your roof now prepared, you can start installing the new roof. Sweep off the roof surface, to remove leaves, wood chips and any leftover pieces of shingles. This will also help you to catch any nails that have not been removed or pounded down.

Drip Edge

Drip edge is a bent aluminum strip, which is attached to all edges of the roof. The purpose of the drip edge is to protect the edges of the roof sheathing from water that would otherwise try and soak into the edge, causing structural failure. Installing drip edging causes water running down the roof to form droplets which will drip off the roof, rather than soaking into it.

To install the drip edge, slide it up against the bottom edge of the roof sheathing and mark the sheathing along the top edge. Then pull the drip edge down ½ inch from your mark, ensuring that the bottom edge isn’t in contact with the fascia. Nail it in place. Add additional pieces, butting the edges tightly together, for the full length of the roof.

You also want to install drip edge on the gable ends of your roof, following the same procedure and leaving the same gap between the bottom edge of the drip edge and the fascia.

Flashing

The valleys formed where two roof sections come together at 90 degrees can be problematic, causing leaks, if not properly handled. The easiest way to do this, is to install a 24” wide piece of 28 gauge galvanized or aluminum flashing.

Before installing the flashing itself, center a 36” wide strip of ice and water protector in the valley, temporarily tacking it in place along one edge. Carefully pull away the protective backing and smooth it in place, removing any wrinkles and adhering it to the roof. If more than one piece of this material is needed, always start from the eaves and work your way upwards, overlapping each successive piece at least six inches over the lower one. Once in place, the temporary nails can be removed.

The flashing itself is installed over this protector, only nailing it with the minimum number of nails necessary, along the edges, to hold it in place. The flashing will be nailed in place more thoroughly, as the shingles are installed.

In cases where the valley is long enough that more than one piece of flashing is required, always overlap the upper piece over the lower by at least six inches, applying asphalt plastic cement under each section of overlap. Embed both ends of the valley into a band of asphalt plastic cement that is at least three inches wide.

Flashing should also be installed wherever your shingles will meet walls, skylights or chimneys as well, using it in conjunction with the same ice and water protector used in the valleys.

Roofing Felt

The entire roof should be covered with 30 lb. roofing felt, starting from the bottom and working your way up. The felt can be attached to the roof with staples, rather than nails. If you have a hammer stapler, this is much easier, than working with a normal staple gun. Overlap each successive course of felt by at least 3 inches over the one below it.

If your felt is not already marked with guidelines for the shingles, you’ll want to do that. The first line should start 12” above the eaves of your roof and each successive guideline should be five inches above that. Mark the necessary points and snap a line with a chalkline to make these guidelines.

Guidelines should also be drawn vertically at every six inches, for locating the shingles horizontally. Three-tab shingles are 36” wide, so these markings will help to ensure that the splits between the taps are exactly in the center of the shingle below, providing maximum protection from water seeping under the shingles.

Installing the Shingles

Standard three-tab roofing shingles are 12” x 36”, with two 5” slits, which divide them into three shingles or what will look like three shingles when properly installed. A line of tar is applied by the manufacturer to the bottom side of the shingle, just above the slits, to act as a heat-activated adhesives. When sunlight heats the shingles, this tar softens, adhering the shingle to the one below it and helping to prevent the shingles from blowing up from the wind.

These shingles are designed to be attached to the roof with eight nails per shingle. As you install each shingle, you will be putting four nails into it. Those four nails will also go through the top edge of the shingle below, making a total of eight nails per shingle.

The first or starter course of shingles is made by cutting the tabs off of 3-tab shingles. Some manufacturers actually create starter shingles for use, but most contractors prefer just buying standard 3-tab shingles and using those, so as to avoid having two types of shingles to work with.

The starter course needs to be nailed to the roof, overhanging the drip edge by ½”. One of the more common roofing problems that people have is to overlap this edge by too much, causing it to crumble and break off over time.

It is normal to lay a roof starting from the left side and working towards the right. Since it is necessary to keep the seams between the shingles staggered, not just the tab slits, we will need to cut the first shingle in each course before installing it. So, cut a half tab off the first shingle in the first course and install it, lining the top edge of the shingle up with the line you snapped on the roofing felt.

The various courses of shingles should be cut as follows; a utility knife is normally used to cut the shingles:

  • First course – cut off ½ tab
  • Second course – cut off 1 full tab
  • Third course – cut off 1 ½ tabs
  • Fourth course – cut off two tabs
  • Fifth course – cut off ½ of the final tab (towards the center of the roof, not at the gable edge)
  • Sixth course – use the shingle intact

Keep repeating this pattern as you work your way up the roof. You will be able to use some of the pieces you cut off. For example, the 1 ½ tab scrap from your third course can be used for your ninth course of shingles.

At the right end of the roof, where you terminate your course, you can either cut the shingles off flush with the drip edge before installing them, or cut them all off together, once the roof is installed.

Nail the shingle to the roof with one nail 1 ½” above each of the slots and one 2 ½” from each end. These nails should not go through the tar strip. For shorter shingles that have been cut off, always follow the same pattern, even if that means your nails are closer together.

Dealing with Roof Penetrations

As you are installing your roof, you will undoubtedly encounter a number of things penetrating the roof, such as vents, skylights and dormers. These are the most likely place for roofs to start leaking, with those leaks being caused by improper installation of the necessary flashing.

It is essential to maintain the same pattern of overlap with the flashing for any roof penetration. This means that the flashing should overlap shingles that are downhill from it and be overlapped by shingles that are uphill of it.

In cases where the shingles butt up against a vertical surface, such as walls, dormers and skylights, the flashing should be installed with each course of shingles, so that the flashing overlaps the upper (hidden) portion of the shingle, but is under the visible portion of the shingle. Each piece of flashing must overlap the next one down by at least two inches. When properly installed, the flashing should look like it is only on the vertical surface, not on the roof.

Embed these piece of flashing in a three inch wide band of asphaltic plastic cement and nail it in place. Ensure that the nails into the roof are placed in such a way that they will be covered by the shingle. The ends of the shingles which overlap this flashing should also be embedded into asphaltic plastic cement.

One of the biggest errors that are made in installing flashing for vent pipes is to nail them too close to the edges, creating excessive stress and eventual tearing of the flashing.

Ridge Capping

The final course of shingles is not bent over the roof and nailed to the other side, forming a cap. Rather, it is cut off flush with the peak of the roof and a cap is installed. This cap is made by cutting the shingles apart at the tab slits, turning each shingle into three 12” square pieces.

Ridge capping is installed starting from the downwind end of the roof, based upon the prevailing wind. The cap shingle is bent over the roof peak, with half of the shingle being on each side. It is then nailed in place, with one nail on either slope of the roof, close to the center, but not so close that it will be exposed when the next cap shingle is installed.

Each succeeding cap shingle is overlapped over the previous shingle, leaving only 5 1/8” of the previous shingle exposed. You can use the factory-cut slits in the shingles for a gauge to determine this distance. The last cap shingle is installed flush with the far end of the roof.

Apply a bead of asphalt cement around the edges of the ridge cap, to seal it to the top course of shingles. Dabs of this same cement can be used on the nail heads of the last shingle, to help camouflage it.

Ridge Vents

If the roof of the home was designed to use a ridge vent, the top course of shingles will have to be trimmed around the opening for the vent. The vent is then installed, overlapping the shingles. The ridge cap is installed like normal, except that it stops at both ends of the ridge vent.