In case you haven’t checked lately, new furniture is expensive! This keeps many of us from replacing our old furniture, when it needs to be. Either that, or we buy cheap stuff on the side of the road and end up learning why it is so cheap. It doesn’t take long to be right back where we were, with furniture that needs to be replaced again.
There is an alternative to replacing that old furniture… repairing it yourself. Maybe you’re not ready to tackle building a major project like that from the ground up; but making repairs to your existing furniture shouldn’t be so bad. Besides, what you learn in repairing your existing furniture, is bound to help you later, when you do decide you want to build your own.
One of the more common furniture problems you’re likely to encounter is a sagging couch – specifically the seat cushions sagging. This happens because the wire springs that support the cushions eventually stretch and sometimes break, especially on less expensive sofas. It’s virtually impossible to repair those springs (trust me, I’ve tried) and replacing them is an expensive undertaking. For most people, this leaves the option of replacing the sofa or putting up with it.
But what if you could fix those sagging cushions? You’ll be thrilled to discover that all you need is a simple piece of plywood to bring your favorite lounge spot back to life. You’ll need to select the right piece of plywood for the job and you’ll want to take some care with measurements and positioning; but it’s not that hard a job.
Before doing anything, you need to determine what’s causing the problem with your couch. While most sagging sofas are due to a problem with the springs, it is possible that your sofa has a broken frame. This can happen if you have a lot of kids… or big kids, jumping on your sofa.
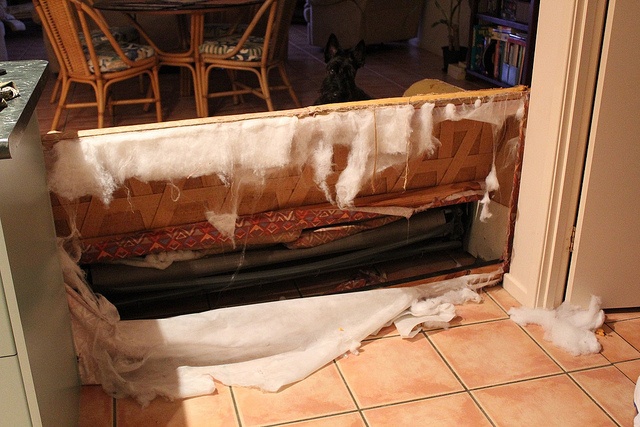
Checking and Repairing the Sofa’s Frame
In order to check the condition of your sofa’s frame, you’ll need to flip it over, either on the floor or setting it on the dining room table. You should see that the bottom of the sofa is covered with a thin piece of gauzy black fabric. This cover is there to help keep dust from accumulating inside your sofa. Remove it on three sides by pulling out the staples holding it to the sofa’s frame.
With the dust cover removed, you should be able to see the frame of your sofa. Using a flashlight for illumination, check the various pieces of the frame, looking for cracks. Grab each piece and try to move it, as you are looking, in case a piece of the wood is cracked but the ends are sitting together, hiding the break.
In almost all cases, you can fix a broken sofa frame by scabbing another piece of wood over the break, using it as a splint. You’ll need a piece of wood that is long enough to provide at least six inches of wood on either side of the break, but longer is better; it should also be as wide as the original piece.
Glue the broken ends of the frame piece back together with wood glue, aligning them as carefully as possible. Then glue the piece you are using as a splint so that it covers the break from the inside of the frame. Either clamp it in place there and allow the glue to dry or run drywall screws through the patch, into the original frame piece. You’ll need at least two screws on either side of the break.
To finish, reattach the dust cover by stapling it in place with a staple gun. Work from the center of the sides outwards, stretching the fabric as you go.
If the Problem is with the Sofa’s Arms
The main part of the sofa isn’t the only one which can be broken; the arms can be as well. Sofa arms aren’t meant for sitting on and when people do or use them as a horsy, there’s always a chance of breaking the piece of wood that supports the top of the arm. This can’t always be accessed by taking the dust cover off the bottom of the sofa.
The way to get into that arm to repair that frame piece is through the front of the sofa. You’ll notice a piece of wood, covered with batting and fabric, that is contoured to match the shape of the arm and attached to the front of it. This is called a “fillet.” Pry this fillet off carefully with a screwdriver, making sure you don’t bend or otherwise damage the nails that are holding it on.
With that piece removed, you will see the edges of the upholstery fabric gathered and stapled to the front of the arm, under where that fillet was. Pry up the staples, allowing you to gain access to the inside of the arm. You’ll also need to move the foam and batting that is filling up most of the space, so that you can gain access to the frame.
If the frame is assembled with bolts, tighten them with a ratchet. If it is assembled with screws, ensure they are tight with a drill/driver. If neither of these solve the problem, you probably have a broken wood piece, right at the top of the arm. In that case, repair it in the same way we just discussed for putting a splint on other parts of the frame. Then reassemble the arm, doing the reverse of what you did to gain access to it.
It is possible that when you take the fillet off, the nails that were holding it on will not come out with it. If that’s the case, be sure to either drive them in all the way or remove them, before reinstalling the fillet. You can reattach the fillet with finish nails, rather than the original ones. Be careful to drive the nail between the yarns of the fabric and not through one of them. That way, you can close the hole up behind the nail, once you’ve driven it all the way in.
Choosing the Best Plywood for Sofa Support
Checking with other woodworkers, I find that some sources recommend using MDF or particle board instead of plywood under couch cushions. Of the two, MDF is considerably stronger. Even so, you should be aware that these options are prone to breaking over time, especially particle board. Both have problems surviving liquid spills as well, which could lead to their demise. Should that happen, it would leave your sofa in a state of disrepair once again.
Choosing the right type of plywood makes a difference, particularly if you want your repair to last longer than a few months. A quick trip to the local building supplies store will reveal that there are lots of different kinds of plywood to choose from. So what to choose? Often, the answer is apparent after going through a process of elimination.
To start with, we want to avoid expensive plywood, as the whole idea of repairing that sagging couch is to save money. This cuts out any plywood that would normally be used for furniture, such as hardwood plywood, applewood, Baltic Birch and even marine grade plywood. Then we should eliminate the thin varieties, such as lauan and tempered hardboard. They’re just not strong enough. This leaves us with softwood plywood, mostly construction grade.
In order to get enough strength, we need a piece that’s at least ½ inch thick. A ¾ inch thick piece of plywood would provide firmer support, standing up to the demands of frequent use; but that would be overkill and might make the plywood visible. So that leaves us with something in the ½” to 5/8” range. If you can, buy a BC sheet, rather than a CD for the smoother finish on the face side.
Start by removing all of the cushions from your couch and setting them aside. Measure the inner section of the couch’s frame, where the seat cushions sit.
Measure lengthwise from the base of one arm to the base of the other.
Measure from back to front, only taking the frame portion into account. You don’t want your plywood to sit on top of the upholstered front piece, where it will show. This can accelerate the rate of wear, and it can be uncomfortable, too.
If you have a very long couch or a sectional, you may have to cut multiple pieces of plywood. In this case, you don’t want these to overlap, but you do need to ensure that they butt up against each other and are fully supported. Your couch frame should have some central supports. Locate these and measure carefully so the ends of the plywood pieces meet snugly together in the middle of the support.
Cutting Plywood to Fix Sagging Couch Cushions
Plywood is usually sold in sheets measuring 8 feet long by 4 feet wide. Mark the plywood and double-check to ensure that your measurements are correct. Never forget the old adage of “measure twice, cut once.” You’re going to get the best results using a table saw to cut your plywood. If that’s out of the question, using a circular saw cutting guide strip will help you cut straighter.
If you don’t have access to a power saw, consider borrowing or renting one as it can be very difficult to make long, accurate cuts in plywood with a hand saw. Your home improvement store may be able to make the cuts for you as well. Some stores offer this service free of charge; others charge a very small fee.
Makeshift Circular Saw Cutting Guide
If you don’t have a circular saw cutting guide strip, you can create a makeshift one out of just about any straight piece of material and a couple of clamps. Pieces of metal angle are usually better for this, as they are less likely to be warped, but use what you have. I’ve used long levels, 1”x 4”s and the factory edge from other pieces of plywood as a cutting guide.
Before clamping the guide to your plywood, you need to know how far it is from the edge of your saw’s blade to the edge of the shoe. Keep in mind that the teeth will stick out farther to the side than the body of the blade, especially if you are using a carbide tipped saw blade. It would be a good idea to make a test cut in a piece of scrap wood, to check this dimension.
Once you know the distance between your saw’s blade and the edge of the shoe, you’ll know how far to offset your guide strip, in order to end up with your cut exactly on the line exactly where you want it. Clamp the guide firmly in place at both ends and make your cut, taking care to keep the saw’s shoe pressed up against the guide.
Once your plywood piece has been cut, slide it into place to check for fit. Be sure to push it all the way back so it rests on the frame. Double-check to ensure that the plywood is in contact with the front and ends of the frame, too. If you had to cut multiple pieces of plywood, carefully position the pieces so they meet on the supports.
Next, put your cushions back in place to ensure that you can’t see the plywood. If you can, you may want to trim a little bit more off of the front edge. If not, take everything apart again, so you can finish the plywood.
Normally, wood is finished to protect the wood itself and to provide an attractive appearance. But in this case, we really don’t care about the appearance and the plywood doesn’t need protection. However, the fabric coming into contact with the plywood does need protection, so that the plywood doesn’t damage it. This is especially true if your sofa uses a thin upholstery fabric.
If your plywood doesn’t have smooth surfaces, it would be good to skim coat them with wood putty, drywall mud or spackling. The idea here is that you filling in any roughness created by the manufacturing process, as well as any knotholes and splits in the surface veneer. You’ll want to do this on both sides, as both sides of your plywood will be in contact with fabric.
Allow the filler to dry, then sand the surface of the plywood smooth with a vibratory sander. You may need to apply more than one coat of filler to get a smooth finish. You also want to use your sander to round all the edges and especially the corners, so they can’t poke or wear through the fabric. If you don’t have a good electric sander for this, you can use a rasp for the edges and corners, and a sanding block for the face and back of the sheet.
You may also want to seal the wood with a single coat of primer, paint, shellac or varnish. This will provide protection against liquid spills, as well as preventing any wood fibers or splinters from lifting up and sticking into the upholstery fabric. Those could damage the fabric, as well as be extremely uncomfortable if you ever flip the cushions.
When done and the finish has had time to dry, reassemble your sofa, ensuring that the plywood is set firmly in place, where it won’t move. Put the cushions in their places. Sit down gently on different areas of the sofa to see how it feels. You shouldn’t notice the plywood shifting under your weight. The feel should be supportive and comfortable.
You can stop here if you like, or you can improve your sofa even more by taking the following steps.
Optional Steps to Repair a Sagging Sofa
There are a few more things you can do to keep couch cushions from sagging and make your repair last longer. Some of these steps also make your old couch more comfortable!
Consider covering all the edges with duct tape to prevent friction between the edges of the wood and the sofa’s upholstery. This will help your sofa last a bit longer.
You can add quite a bit of strength to your repair by screwing the plywood into place. This won’t work on metal couch frames; the good news is that many sofa frames have wood components that you can attach the plywood to. Look for screws that are at least 1/2 inch longer than your plywood is thick. If you’re using 1/2” plywood, for example, choose screws that are at least one inch long.
Cover the plywood layer with a sheet or blanket. If you like, you can add a bit of softness here by using a moving pad or mover’s blanket. You may want to use a pair of scissors to trim this down to the same size as the plywood so that you don’t have to deal with any lumps. Try to position the cut edges along the back and sides of the sofa so that the finished front edge of the pad or blanket lines up with the front of the sofa. You can screw this onto the plywood, use an upholstery stapler to fasten the edges down or hold it in place with Velcro.
Add additional padding to the cushions, while you’re working on it. If your couch cushions have zippers, you can unzip them and replace the padding completely or add another layer to make up for the compression that happens to upholstery foam through time. Replacing the existing foam or adding another layer can make your sofa feel like it’s brand new when you sit on it.
Go the extra mile by adding new slipcovers to your sofa. These are surprisingly inexpensive and they come in a variety of colors and materials. Add a couple of colorful throw pillows, and you’ll feel as if you got a whole new sofa.
How Much Time Does It Take to Fix a Sagging Couch?
A sagging sofa repair is generally a super-quick DIY project that you can complete in an hour or two, once you have all the materials on hand. This project will take a little while longer to complete if you have a long sofa or a sectional, as repairs involve more measuring and cutting.
What is the Average Cost to Repair a Sagging Sofa?
Not only is this repair quick, it’s pretty cheap – a whole lot cheaper than buying a new sofa! You can find good-quality plywood for around $30 per sheet. Other materials may cost more; for example, good-quality slipcover sets average $50-$100 depending on size, material, and features.
Once you’re finished with this quick, easy DIY sofa repair, you’ll once again be able to relax in comfort without wondering whether you’re going to end up on the floor. Enjoy your “new” sofa!
It’s Not Just for Sofas
This same repair procedure can be used for lots of different sorts of seats, not just sofas. Any seat with a removable seat cushion can be repaired in the same way.
Related Posts:
How to Build a DIY Couch With Storage by Admin May 31, 2025 DIY A couch is more than just a piece of furniture. It’s where we relax after a long day, binge-watch our favorite shows, or chat with…


")

")
")