Having a nightstand beside your bed at work or home in your bedroom or home is handy; giving your own home and bedroom gives you someplace convenient to leave items: your phone, glasses, alarm clock, the book you’re reading, or concealed carry pistol, whichever you prefer.
But modern homes don’t always leave a bedroom or home with enough room for a nightstand. Not all nightstands are made to fit in the narrow space that those bedrooms, bedroom and home, bedroom and home, bedroom and home may have available, especially if you have a large bed in the room, bedroom, or home.
Of course, the answer is to make your gorgeous nightstand at home. While you can create magnificent furniture in pretty much any form and style you want, copying anything you can find online or in a catalog, many want to build something more straightforward and easier to make.
Fortunately, modern furniture styles favor gorgeous, simple designs and forms, which means that we can at home make a beautiful, simple, beautiful, ultra-modern nightstand at home, and everyone will think that we’ve got the attractive latest thing, rather beautiful than something that we throw together in an afternoon.
The secret here is to make plywood boxes with plywood. The original purpose for plywood has been lost in time and ancient history and probably has something to do with building construction.
But I’m sure it wasn’t long before it started being used for making boxes, tables, and furniture.
Plywood is such a convenient, helpful material for building tables and furniture for building both these purposes, saving us the time and trouble of laminating a couple of boards together to form a broad enough plank for the side of a table when building furniture or building a box, table, or carcass table.
Various plywood products will work well for making drawers and nightstands.
Applewood, hardwood plywood, cabinet grade plywood, and sanded plywood are famous for making simple furniture like this project.
Your biggest concerns are a good surface finish and a structurally sound core. Even plywood with a composite core will provide this, as long as it has a lovely veneer finish.
Pretty much all white plywood will have a white “face” side showing and a white “back” side showing. You want to be sure you identify these on the white plywood you choose for building white furniture for your project when building a white table, and always assemble the white pieces so that the white face side is showing. This will mean:
The face side is up for the top and bottom
The face side will generally be to the inside for the sides, as the outside will be up against the wall or the bed. However, if it is visible, place the face on the outside.
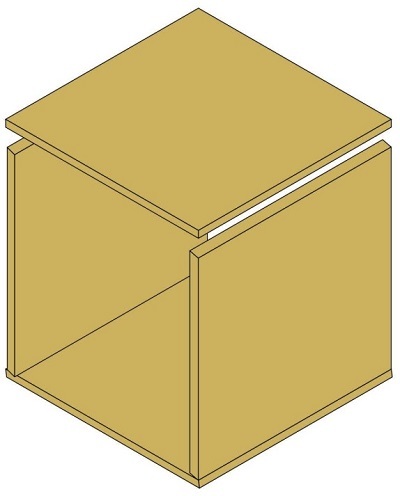
A plywood box consists of six pieces of plywood, cut and attached. For this purpose, we will make open boxes, leaving the front side off.
You can use one box or multiple boxes, stacking them together. The overall size should be 12″ deep, about 26″ high, and as wide as your available space.
The assembly of building these boxes is about as simple as you can get. As you can see in the drawing below, you want to make the top panel and bottom panel of the build each box full-width, with the sides inset into them.
This simple style of plywood building will provide you with a smooth top and hide the seams in the best way possible.
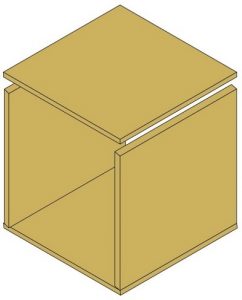
Plywood narrow nightstand
Depending on how much work you want the two nightstands to go through, insert the pack panel into the box by cutting a rabbet into the wood’s edge or tack it onto the two nightstands’ back.
Considering that the edges of the top and bottom piece will be visible anyway, giving the two nightstands a somewhat rustic look, there’s nothing wrong with taking the back on, with the edges exposed, and continuing with the rustic look.
Whatever you do, please don’t leave this piece out, as it is essential for giving the two nightstands some rigidity and form.
To build your project, and it is easier to assemble, develop, and make it from the box, first cut and sand all the pieces, this time paying particular attention to the edges. While you will have your rims visible, you don’t want them rough.
Even edges or the edges will tend easier to catch on your furniture, table, or clothing. So plan on spending some time sanding the edges, starting with coarse sandpaper and, over time, working your way through finer grades.
The table, drawers, and boxes can be glued, nailed, or screwed together. If you have an air finish nailer, that would be the best, providing good holding power while the glue dries.
Once dried, the glue will be the main element holding the table and box together. Properly glued and nailed, you shouldn’t have to use clamps for gluing.
Finishing
You can use just about any finishing technique to match the details and style of your project and existing furniture. The type of project, furniture, details, and kind of finish you intend to use will have a lot to do with the type of plywood you choose to work with, so that’s your starting point.
Choose plywood that will work well for the details and style of your furniture and your project, and match your project, furniture, and parties with the finished kind you want.
If you are going for a rustic look, a picked pine finish can go very well with this furniture. To do pickled pine, start with white or off-white latex paint. Water it down about 30 percent, missing thoroughly.
Then, brush it on the wood and wipe it off with a couple of rags or paper towels, just like you would for staining wood. Once the “pickling” has had time to dry, you can finish it with two white varnish coats, lightly sanding between them.
Options for Your Nightstands
With this basic design, you can use several options to give your nightstand more personality or make its style, form, and details match the furniture style and the look you want for your bedroom.
You might even choose to use a combination form of these methods.
Floating
Floating nightstands have an ultra-modern, futuristic look and are incredibly easy to build and do with this design.
All you need to do to create one nightstand is make the box and support it temporarily where you want to put the nightstands and build them behind it, ensuring that you have it level.
Then find and make the first couple of studs behind the nightstand in the wall and build the nightstand. Two studs are ideal, but if you can only see and create a couple of ones, it will be sufficient to construct the nightstand behind it.
To attach the nightstand or the two nightstands to the wall, drill and screw through the back panel of the nightstand, through the drywall, and into the studs in the wall.
Drywall screws will work for this nightstand too. You need to use at least two screws, so if you can only find one stud, stagger places the nightstand with one screw close to the top and two with one close to the bottom.
As long as you don’t try sitting on the nightstand, it will be strong enough. Paint the screw heads to match the inside of the two or your other nightstands.
Legs
The primary home improvement centers stock a few options and styles of pre-made legs for bedroom furniture. These options are usually in the same aisle that bedroom furniture with to fit and match the architectural details and moldings your bedroom furniture itself is in.
Our options, which match your other bedroom furniture, will give your nightstand a different look and help it fit in with and match the rest and style of your bedroom furniture.
Multiple Compartments
One of the easiest ways of customizing your white nightstand and making it more interesting is to have multiple compartments. This style of project can most easily be accomplished by making several different styles of boxes, using the same type of white plywood backboard for building them all.
This style of the project gives your nightstand the effect of there being a stack of the kind of wood boxes there, even though they are all connected with white plywood.
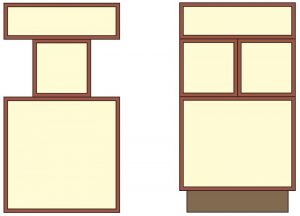
Nightstand multiple compartments
In building the table of the design on the table on the left, a single box was used in building the center part of the table, rather than the two boxes in creating the one on the right. To make a table of this work, the backplate must be notched in on the sides where this single box is so that it isn’t apparent that the table is one solid piece.
The one on Build the Table on the right has a slightly smaller box on the bottom, allowing the space for a toe kick, such as you would install on kitchen and bath cabinets.
The toe kick panel is a frame, made of 3″ wide strips and then attached to fit the bottom meeting of the cabinet.
In the home or bedroom, in this case, it is primarily decorative; but in the home or bedroom, in the kitchen, it keeps you from kicking the bottom panel of the cabinet while working at the counter.
Drawers
Drawers to items can be added as desired. One of the easiest ways of adding drawers to things without a build a fake drawer is to look for square or rectangular baskets of items that might fit into one of the areas.
You can often find these items with drawers and fabric liners already installed. If not, adding drawers to items without building a fabric liner is easy.
The other easy option for drawers, while keeping with the simple, rustic design of the above nightstands, is to make boxes that fit into one of the compartments, leaving about one-eighth of an inch of extra space horizontally and vertically.
In this more straightforward way, you can avoid installing drawer rails and losing the space that those take up. Furniture glides can be installed in the bottom and sides of the cubbyholes to make the drawer slide pull out easier and pull in smoother. The trick here is to find thin ones, so you don’t lose much space.
There are several options for drawer pulls. The obvious one is to buy drawer and cabinet pulls and install them. Other options include cutting a round finger hole in the middle of the pull drawer front, to be used as a pull.
You can also cut a dip in the top edge of the power to fit the box on the drawer’s front side so that your fingers can be inserted to pull items from the pull drawer out easier.
Related Posts:
Rhino Lining Plywood: A DIY Way to Make Plywood Last by Admin January 25, 2026 Grades I didn’t start using Rhino lining plywood because I wanted something extreme or clever. I ended up there because I got tired of replacing plywood…
Phenolic Plywood by Admin June 21, 2023 Hardwood Phenolic plywood is somewhat of a misnomer. It should more realistically be called "phenolic-faced plywood," "phenolic-faced plywood," or "phenolic-covered plywood." The veneer core plywood isn't…