Smoked meat is a favorite of many people. There’s just something about the smoke flavoring that tickles the taste buds, making the meal more enjoyable. But that’s not where smoking began. The practice of smoking meat likely dates back to the days when people lived in caves. One of the oldest methods of food preservation.
The Origins and Purpose of Smoking Meat
Smoked meat is a favorite of many people. There’s just something about the smoke flavoring that tickles the taste buds, making the meal more enjoyable. But that’s not where smoking began. The practice of smoking meat likely dates back to the days when people lived in caves. It is one of the oldest methods of food preservation.
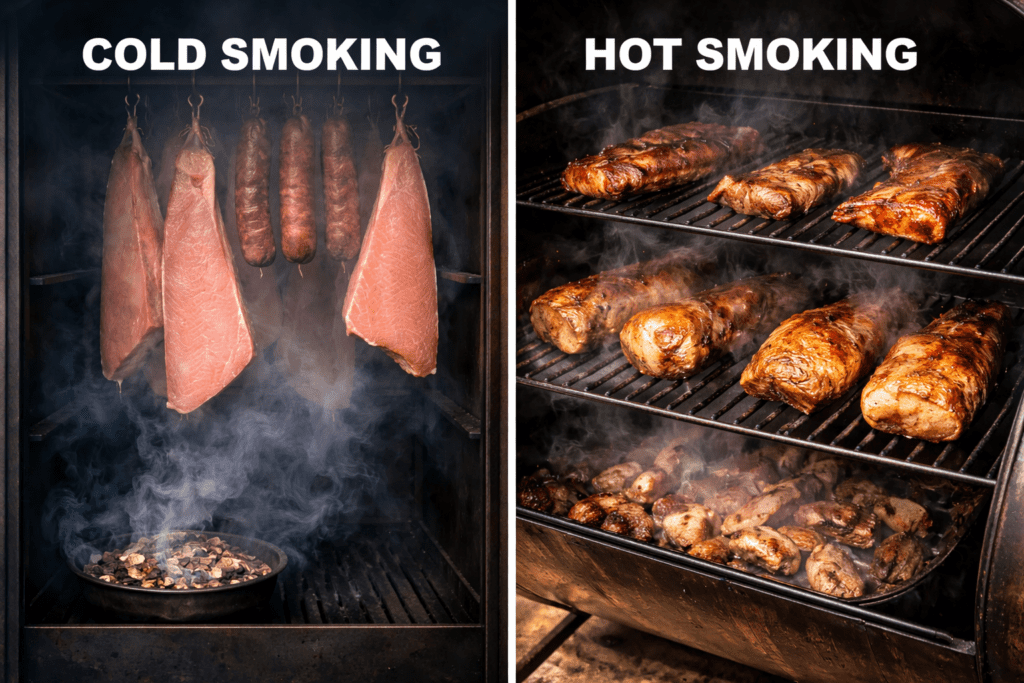
Cold Smoking vs. Hot Smoking
Much of the meat smoked today is only “cold smoked” to impart the distinctive smoky flavor. Using smoking requires “hot smoking,” allowing the smoke to raise the temperature inside the smoker hot enough to slow-cook it. This not only infuses smoke flavor into the meat but also tenderizes it, as most slow-cooking methods do.
How Smoking Preserves Meat and Led to Smokehouses
Salt, Moisture, and Bacteria Control
Smoking persists for a variety of reasons. First, the meat is soaked in a brine, infusing salt into the surface. Salt is a natural preservative because it draws moisture out of cells in a process called “osmosis.” Not only does it draw moisture out of the meat cells, but it also kills any bacteria present in the meat. The low moisture content of the meat’s surface layer creates an inhospitable environment for bacterial colonization.
Pellicle Formation and Preservation Limits
Taking this a step further, hot smoking converts the collagen in the meat’s outer layer into an impermeable “skin,” known as a pellicle. It helps retain moisture and prevent bacterial contamination. But there’s a potential problem with that, because when the meat is cut, the cut surface doesn’t have the pellicle. It either needs to be smoked again or used fairly quickly before bacteria can enter the meat.
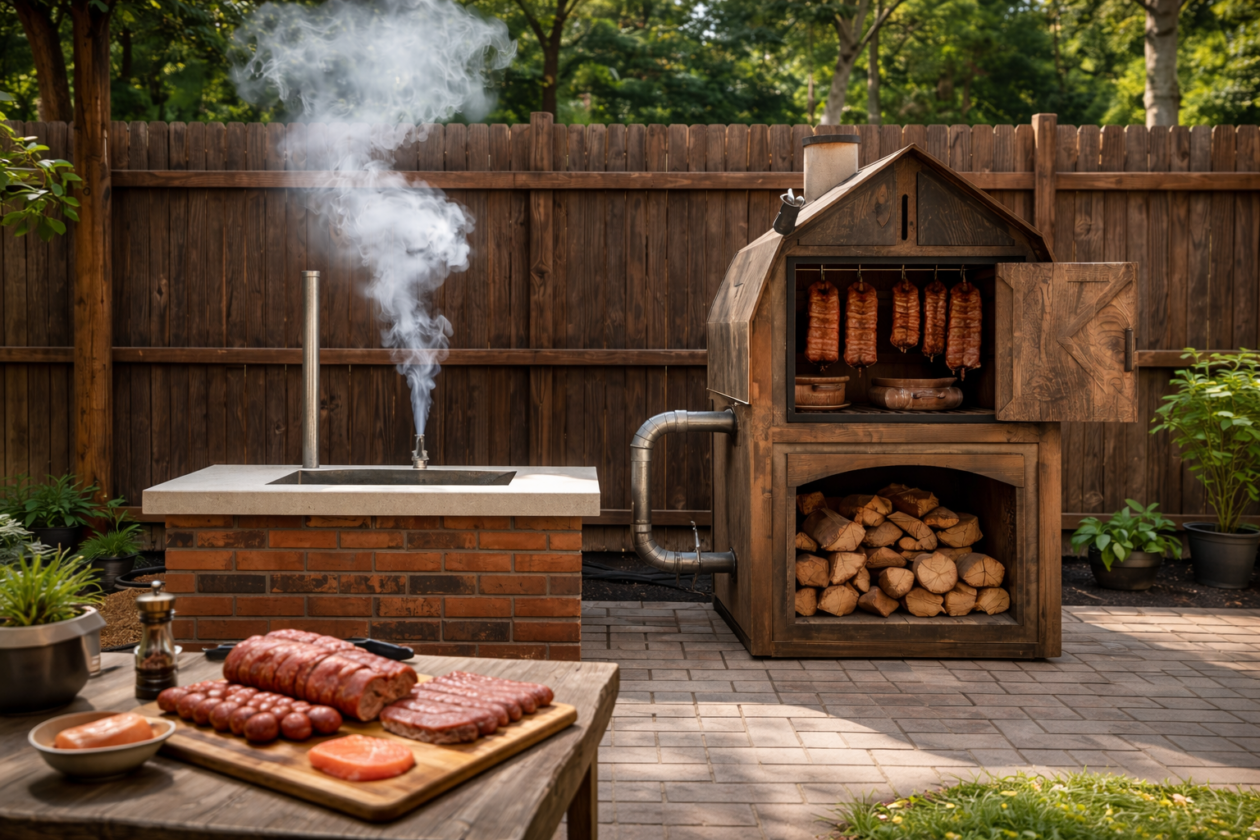
Why Smokehouses Became Necessary
Many people buy smokers or barbecue grills that have a smoker built in. This typically allows smoking a bird the size of a large turkey. But what does one do when they regularly smoke more meat than that? They need a smokehouse.
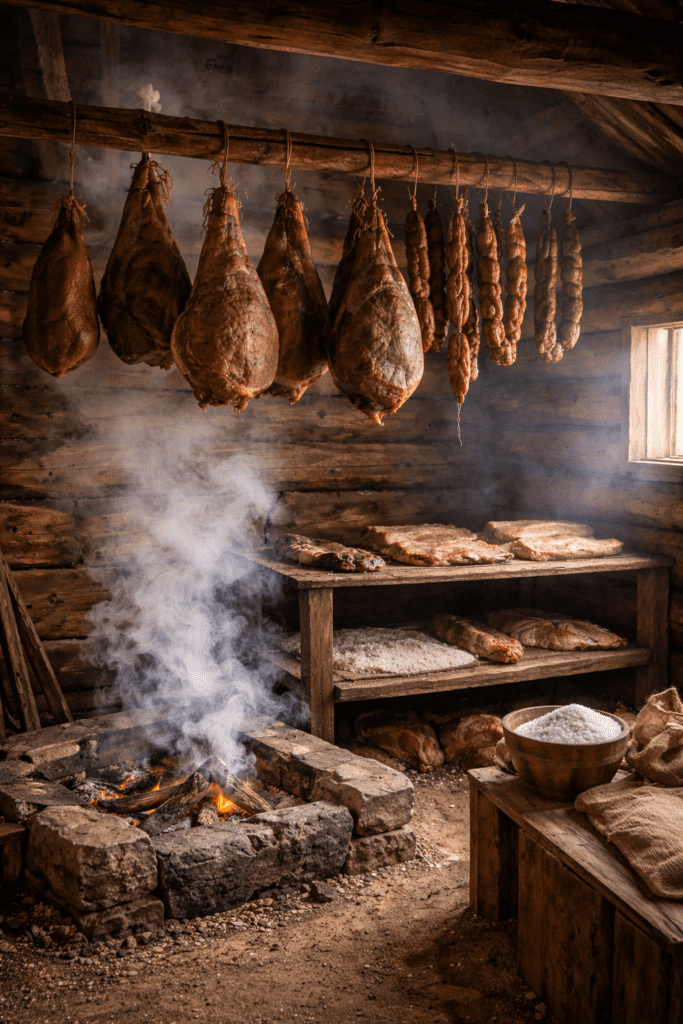
Historical Use of Smokehouses
Smokehouses were a common fixture around farmhouses and ranches throughout the 1700s and 1800s. Refrigeration was rare at the time, limited to ice boxes, and the ice box was only useful if one lived close enough to an ice house to be on its delivery route. Those who lived in the country couldn’t count on that, so they built smokehouses to preserve the meat from the animals they slaughtered. These were often rather crude affairs, as the main purpose of the smokehouse was to keep the smoke in and predators who might want to steal the meat out. Nevertheless, certain design requirements had to be met for the smokehouse to perform its function.
A Unique Chimney-Based Smokehouse
One of the most unique 19th-century smokehouses I’ve ever seen wasn’t really a smokehouse. Rather, the house’s chimney was built large enough to hang several sides of meat in it, allowing them to smoke. Not only was this extremely convenient for the family who owned the house, but hanging the meat
Keys to Effective Smoking
There are several basic keys to effective smoking, although the process itself really isn’t all that complicated. The first is the ability to control the smokehouse temperature. This is where smoking is clearly different from barbecuing. When barbecuing, the meat is directly over the fire to receive maximum heat. But in smoking, a lower temperature is used, so the fire must be off to one side, with the smoke piped into the smoker or smokehouse.
The second key step is to introduce moisture into the smoke to create a smoke-and-steam mixture. That will help keep the meat from drying out during the smoking process. While it is possible to smoke some meats without adding steam, the meat may become quite dry.
Then there’s a need to hang the meat or put it on a grate. The idea is to expose as much of the meat to the smoke as possible, so the smoke can do its work. If the meat were to sit on a shelf, rather than being hung or on a grate, then the part of the meat that was in contact with the shelf wouldn’t be touched by the smoke. Additionally, the shelf would block the smoke flow through the smoker.
Finally, the entire process has to be monitored. For most hot smoking, that means monitoring it for 24 hours or so, which is the biggest turn-off for most people when it comes to smoking. However, for those who invest that time, the results are worthwhile.
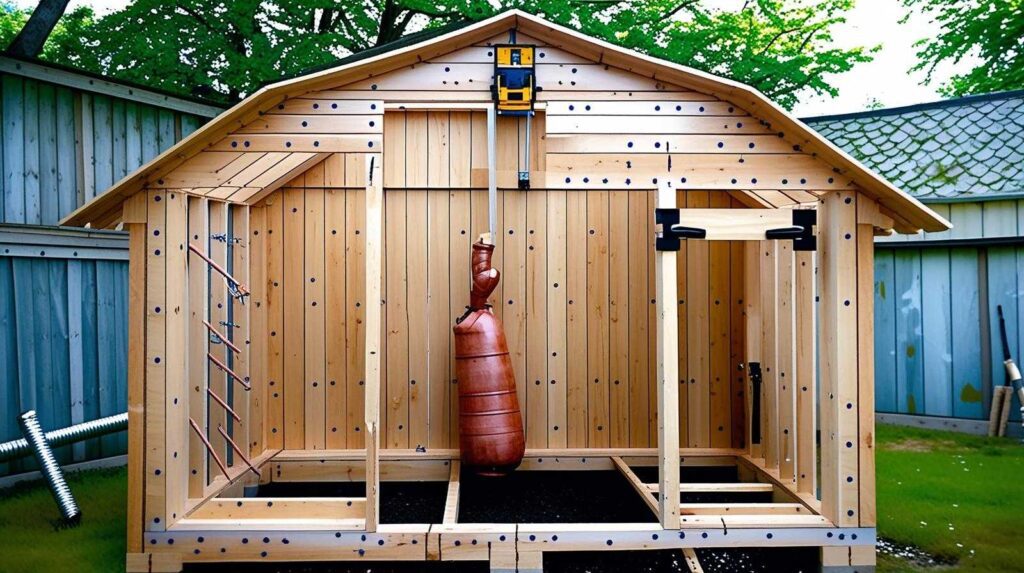
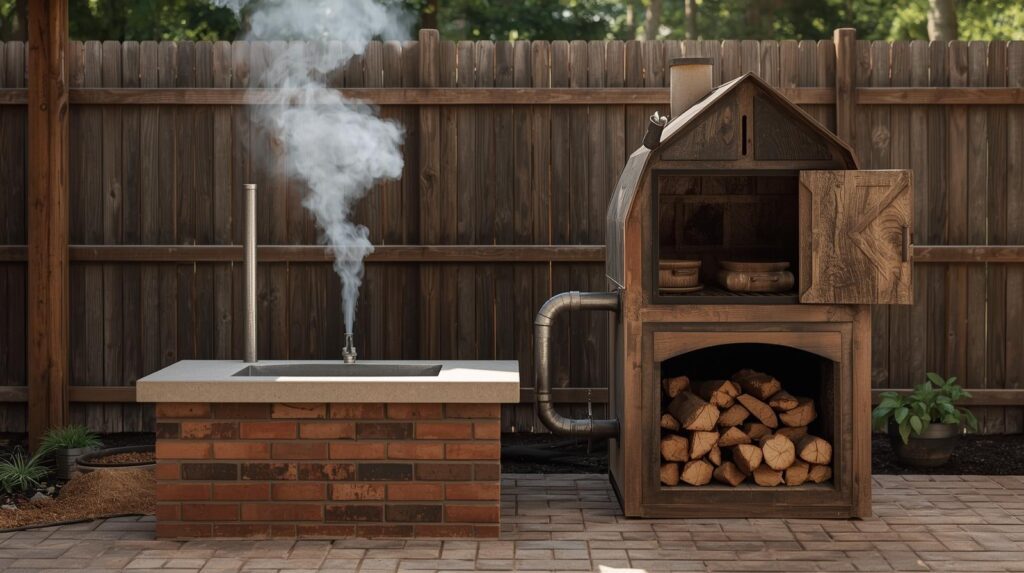
Building a Basic Smokehouse: Size, Walls, and Materials
Smokehouse Size and Layout
A smokehouse doesn’t have to be complicated to be effective. In fact, any storage shed, small garden shed, or cabinet will suffice. Don’t go too big, as it becomes harder to heat the smokehouse and fill it with smoke. As an outside limit, I wouldn’t go any bigger than four feet square for most purposes, although I’ve seen them as large as eight feet square. Even so, those larger smokehouses don’t necessarily allow smoking more meat at once, as they require space to move around inside. Smaller ones don’t need that.
Wall Construction and Sealing
The walls and roof of the smokehouse are a single layer of material attached to a framework. There is no need for further interior enhancements, as any interior enhancements will be obscured by smoke. Even so, it is important that the exterior be well sealed, preferably through the way the wood is joined, rather than by caulking or other sealers that may shrink due to heat.
Wood Selection
The smokehouse cabinet can be made out of any type of wood, including softwood plywood. Nevertheless, cedar is one of the more popular woods to build a smokehouse out of, because the natural oils contained in cedar repel wood-destroying fungi that cause rot. This is why cedar is used for fences. If another material is used (which is possible), the edges must be joined. They fit tightly together, unlike on a fence, where small gaps are permitted. Another wood option is redwood, which is also resistant to insects and rot. Finally, many people construct their smokehouses from pine because it is low-cost.
Joinery and Expansion Considerations
Regardless of the type of wood used, it’s a good idea to cut the edges, tongue, and groove on a router table, so as to help eliminate gaps through which smoke can leak. Additionally, the corner and the door frame should be lap-jointed to eliminate gaps. Note that the smokehouse will be exposed to both the elements and heat, so the boards will expand and contract slightly. So, even though the joinery needs to overlap, there needs to be gaps as well, not where air can go through, but rather where the wood pieces can slide across each other, allowing for expansion and contraction. Avoid using rubber seals, as heat will affect them.
Build the smokehouse walls to accommodate a shed-type roof, with the front side higher than the back and both side walls angled. For the roof itself, standard construction methods can be used: set joists across the span between the front and back walls, with plywood sheathing over them, covered with standard asphalt shingles. Make sure the gaps between the joists are filled to control airflow.
Ventilation and Airflow Control
Sealing the roof doesn’t mean there shouldn’t be any airflow through the smoker. Rather, a vent should be installed near the roof peak, above the doors. This should be covered with some form of screening or, perhaps, poultry cloth on the inside to prevent animals from entering the smokehouse. It also needs an external sliding cover that allows the open vent area to be adjusted to control the internal temperature.
Doors and Temperature Monitoring
A single door or double doors can be installed on the front side of the smokehouse. During construction, care should be taken to ensure that the structure is stabilized against warping and that the doors or the frame are designed to allow some overlap to maintain a sealed smokehouse.
Drill a hole in the doors or walls of the smokehouse at about head height and install a dial thermometer through it. It is important to monitor the internal temperature of meat while smoking without opening the doors to allow heat to escape.
Interior Configuration
Inside the smokehouse, there’s a need for a combination of grated shelves and bars to hang the meat from. I recommend installing cleats on both sidewalls, thereby allowing the bars and grates to be set as needed for that smoking session. Because most people smoke a variety of meats, the ability to adjust the smokehouse’s configuration between uses can be very helpful.
Firebox Options
The only other item needed is a firebox to generate the hot smoke that will enter the smokehouse. One option is a camp-style wood-burning stove. These are generally fairly simple, inexpensive, and close to the ground. Another option is to construct a firebox from brick. In that case, it is important to build the firebox low to the ground and seal it so that smoke can enter the lower part of the smokehouse directly. Keep either of these a couple of feet from the smokehouse itself and run a piece of chimney pipe from the firebox into a hole in the lower part of the back wall of the smokehouse
Using the Smokehouse
Proper smoking of meat is actually a three-stage process, at least if the smoking is intended to produce meat that is preserved. If all that’s wanted is smoke flavoring, then all that’s needed is the cold smoking part of the process.
Smoking isn’t usually done alone, but is done in conjunction with either curing or dehydrating. Curing adds salt to the meat, which, as I mentioned earlier, creates an inhospitable environment for bacteria. Dehydrating also creates an inhospitable environment, but through a different means. It is common to combine the two: add salt to the meat, then dehydrate it. Dehydration can be done in the smokehouse by leaving the meat in longer.
Curing
Before proceeding, it is necessary to decide whether a wet or dry cure will be used. For a wet cure, a brine of at least 20% salt dissolved in water must be prepared. To do this, it may be necessary to boil the water to dissolve the required amount of salt, then let it cool to room temperature before submerging the meat. Ensure the meat is fully submerged, if necessary by weighing it down, and allow it to soak for at least 24 hours.
Dry smoking is done with a meat rub, rather than with brine. The advantage is that meat rubs allow the addition of additional spices, thereby enhancing the meat’s flavor. When using them, rub the meat with the rub until evenly coated. Take special care to rub the meat rub into joints, as those can be tricky. If a meat rub is used, the meat should be left to rest for at least 12 hours before smoking.
Any sausage to be smoked will be cured automatically, as the recipe requires adding curing salt to the mixture before stuffing it into the casing. Curing salt differs from other salts in that it contains nitrates and nitrites in precise amounts to support the curing process.
Cold Smoking
Cold smoking is the stage of the process where smoke flavor is imparted to the meat. This is normally done at 68 to 86°F (20 to 30°C). This part of the process usually takes one to one and a half hours per pound of meat, with the largest chunk smoked. This time can vary, depending on the type of meat being smoked. To determine the appropriate time, check recipes for smoking meats in the smokehouse. An excellent tool for this is available on this site.
Hot Smoking
Once cold smoking is completed, hot smoking begins immediately. At this stage, the temperature is raised to 200-225°F, which is relatively low for cooking meats. However, the idea is to cook the meat slowly, not rapidly. Slow cooking helps break down the meat’s natural toughness, turning even the toughest cuts tender.
The weight and type of meat will affect the time required for hot-smoking before the meat is done. Times are listed in the same recipes used to check cold-smoking times. Regardless of the recipes, always check the internal temperature of the meat; it is the true indicator of doneness. Proper internal temperature guidelines are available on FoodSafety.
There may be times when it is desirable to overcook meat, such as when making pulled pork. Both brisket and pork will tend to fall apart when cooked to 200°F, which is ideal for pulled pork. Leaving the meat longer can also cause dehydration, which is desirable in some situations.
How to Build a Lean-To Shed (Step-by-Step DIY Guide) by Admin June 17, 2025 DIY If you’ve ever run out of space for your lawn tools, garden gear, or even firewood, you’re not alone. Many homeowners eventually find themselves needing…


")