Shadow boxes are a specialized form of frame, most commonly used for framing three dimensional objects so that they can be hung on the wall. Whether that’s the ribbons and medals won during military service, a signed team jersey from one’s favorite athlete, a flag presented at a military funeral or dollhouse or house miniatures that you love and have been collected over the years for home alone, they can all be attractively displayed in beautiful shadow boxes for home alone.
When using shadow boxes to show off miniature collectibles, the shadow box is usually broken up into different sections, providing cubby hole for each item. These are rarely covered over with glazing of any sort, but if small children are around, it would be a good idea to do so. Adding the glazing is not all that difficult.
Shadow boxes can also be used to mount artwork. Sometimes, this is done with the artwork in the back of a glass-covered shadow box, with some related object set in front of the picture. Other times a painting on canvas might be mounted in a shadow box without glass, using the shadow box as a frame. Regardless of what’s being mounted in the box, shadow boxes provide a distinct manner of framing items to be hung on the wall, in a way that tends to make items stand out more than normal framing.
Unfortunately, commercially manufactured shadow boxes are considerably more expensive items than frames. That’s a bit odd, especially considering that the design is usually rather simple compared to other frames that use elaborate moldings. But this just gives us that much more reason to make our own. Besides, the availability of different sizes is somewhat limited.
Before making any shadow box, there are a few things that need to be decided:
Is the shadow box going to be glazed? If so, with what sort of glazing?
Will the shadow box be divided into sections?
How will the shadow box be finished? (sometimes they are painted black on the inside)
How big and how deep does the shadow box need to be, to accommodate what’s going to be on display inside it
While some shadow boxes exist which have wider frames; that is rather rare. When it does happen, the face of the frame is normally a separate piece of glass, attached to create the face of the shadow box display. In some cases, this face is made as a separate, hinged piece, allowing access to the contents inside of the shadow box.
Making a Non-Glazed Shadow Box
It is easier to make a non-glazed shadow box than a glazed one, so we’ll start there. The first step in making any shadow box is determining the size of the box. In order to do that and be sure it is correct, it’s a good idea to mount whatever is going to go in the shadow box to the backboard. This means cutting the backboard and painting it to start the project. Keep in mind that there will be some space taken up by the frame, so leave at least ¾” of backboard all the way around.
The frame itself can be made out of any 1” thick boards (which are actually ¾” thick). It’s better to use hardwood for a build of this than softwood, as it will cut cleaner and be less likely to dent. Start by ripping the wood to measure the depth of the shadow box, taking into consideration the space needed for the backing board and the overall depth desired.
Then cut the individual pieces slightly long and cut to create a rabbet to accommodate the backboard into one edge. This rabbet should be at least ¼” wide and about ¼” deeper than the thickness of the backboard.
With the rabbet cut, miter cut the pieces so that they will fit around the backboard, leaving 1/16” of space all the way around. Then attach the pieces. When this step is done commercially, it’s often done by a combination process of gluing and nailing, with the nail holes then being filled. But it’s better to do it without the nailing, if possible.
Okay, so how do we do that?
One of the easiest ways to assemble any miter joint is by using painter’s tape to hold the parts together. The tape is placed on a sticky side of the workbench, and the pieces make up the joint aligned on it. This is critical, as the pieces must butt up precisely with each other and also be in a straight line with each other. Use a long, straight edge to check that.
Apply glue to the mitered surfaces and then bend the joint, bringing the surfaces together.
Repeat for the opposite pair, then join the two sets together.
A band clamp around the entire frame will help hold it together until the glue dries.
Once dry, the frame can be finished, and the back can be installed.
Another option is to nail all the corners. If this is being done without using the painter’s tape or band clamp just mentioned, then I highly recommend using a corner clamp to hold the pieces together while nailing. The act of nailing tends to make pieces slide against each other anyway, and the presence of glue will act as a lubricant, helping them slide even more. The chances of getting a clean-mitered corner are slim without being clamped while nailing.
Once the shadow box frame is assembled, the backboard can be set into the rabbet that was cut into the back of the frame earlier. There are several ways of attaching this, including gluing it and nailing through the sides. I prefer to use glazing points pushed into the frame from the inside to hold the backboard in place.
Adding Splines to the Shadow Box’s corner
One way of making the shadow box stronger without having to use nails through the sides is to install splines in the corners. This not only adds a considerable amount of strength, but if the splines are made out of a contrasting type of wood, they can also add an attractive detail to the shadow box’s appearance.
To add splines to the shadow box, it’s first necessary to cut and insert slots into it. This is most easily done on the table saw, using a special jig to hold the frame in position. In the diagram below, the jig is shown as a cutaway so that the blade is visible, but it needs to extend past the blade, acting as a zero clearance insert, to help prevent splintering of the shadow box. The frame is placed in the jig, one corner down, and the jig is run against the table saw’s fence to align it for cutting.
Splining jig
For shadow boxes made of ¾” thick material, the blade should be set to 0.53” (17/32”) high. Typically, more than one spline is used per corner, but the splines shouldn’t be any closer to each other than one inch.
Carbide-tipped table saw blades are typically 1/8” thick, so it will be necessary to cut some wood strips 1/8” thick on the table saw or on a band saw. The table saw is probably best for this, as it will provide a smoother surface. Then, cut the strips into pieces that are at least 1-1/8” long for the individual splines.
Glue the splines into the slots with glue, either with an acid brush or a glue bottle with a needle. Then, insert the splines fully, checking to be sure that there is material sticking out both sides of the cut so that there won’t be any gaps in the shadow box’s surface when the splines are cut. Allow the glue to dry thoroughly, and then cut the splines flush with the shadow box’s surface with a flush-cut saw. Sand the surface smooth.
Making a Wider Shadow Box Frame
If a wider shadow box frame is desired, the standard way to accomplish it is to add another frame made of broader material. The key to making this work is to ensure that the inner dimension is the same or just a shade smaller than the shadow box itself. If a shade is smaller, the dividing line won’t be so obvious, but the dividing line will show if the frame is more significant.
This second frame can be made of 1”x 2” boards, architectural molding, or framing molding. It is best to assemble it right into the existing shadow box rather than make it separately and then attach it.
Either way, nailing the top frame to the shadow box will be necessary, so the trick is to hide the nails so that they aren’t visible in the finished project. To do that, sink the nails below flush with a nail set, then fill the hole above the nail head. Allow the putty to dry and sand it smooth before finishing.
Adding Dividers to the Shadow Box
The open-faced shadow box can easily be converted for use with photos and small collectibles by adding photos and dividers. These items and photos are generally made as inserts and then installed into the shadow box. In most cases, the photos and dividers are made at the same depth as the shadow box to sit flush with the surface.
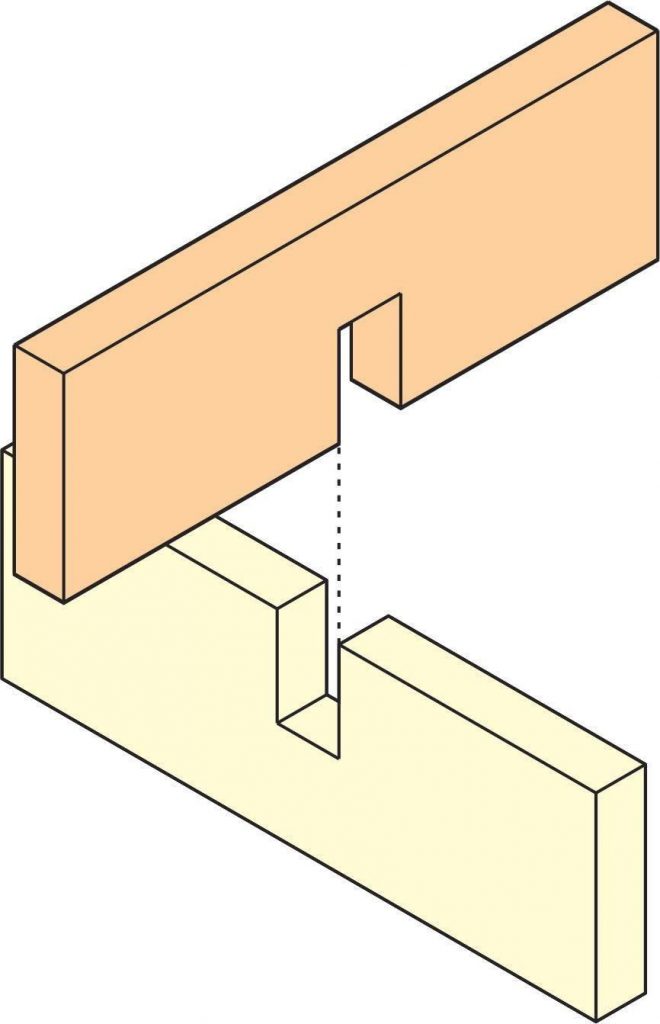
Dividers are often made of ¼” thick material and built following a geometric pattern so that all the pieces of wood go across to create the shadow box. This is considerably easier to do, as it is much easier to connect the pieces together and measure them than to install them in the box.
Joining them together is best accomplished by notching the individual pieces where they cross each other so they can be interlocked, as shown in the diagram below.
Interlocking joint
This is very easy to cut on the table saw using a sled. Hold the pieces against the side of the sled to stand on the edge, with the blade set to the cut depth. It will probably take more than one pass to get a perfect cut of the board’s thickness. It doesn’t matter if the cut is too long, as the extra won’t be visible once the two pieces are combined.
When assembling the dividers, use wood glue inside to secure and fill all the notches that have been cut. Wood glue can also attach the dividers to the shadow box, which is especially nice if the grid fits snugly. However, it is usually best to nail through the back panel into the edge of the divider and secure the grid with either short brad nails or pin nails.
The big problem with this is that it is extremely easy to miss the dividers when nailing, leaving a nail sticking through the backplane. To help prevent this, draw the dividers on the back of the backplane, providing guides to follow and helping ensure the nails are in the right place.
Making a Glazed Shadow Box
It is considerably harder to make a glazed shadow box than an unglazed one. Nevertheless, it is still something that can be carried out by the average woodworker in the company, at the house, company, home, family, or home workshop. The challenge comes in because the glazing needs to be installed in the box. This means cutting the pieces off the sides to allow room for the glazing and then filling the cut-out area back in.
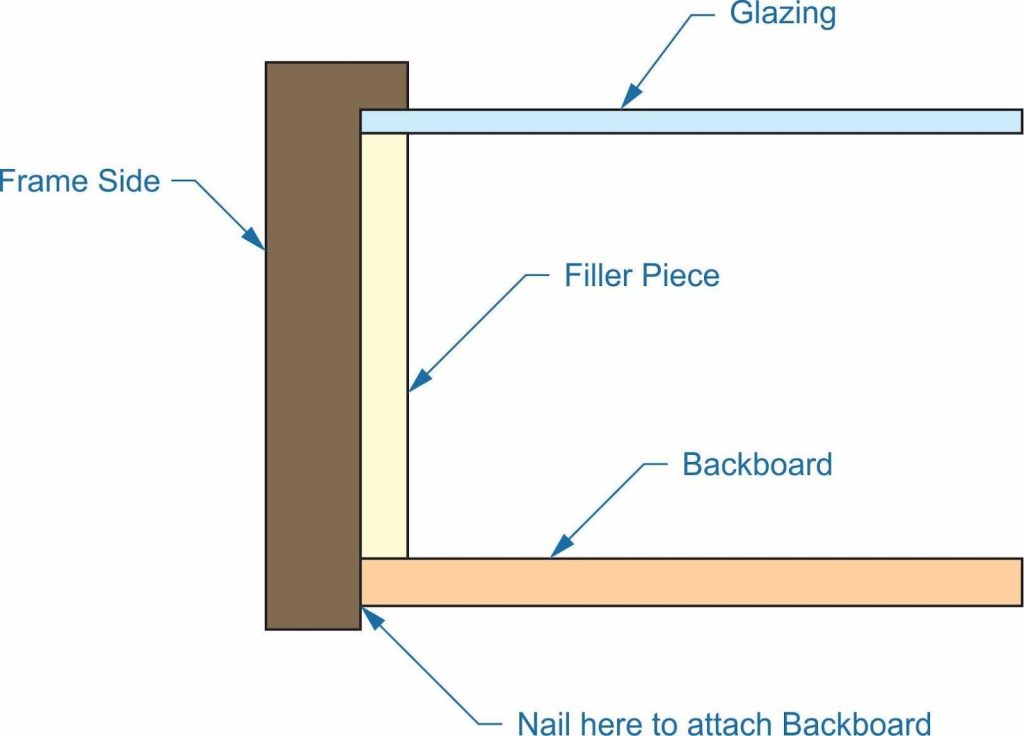
First, mount the object to be framed close to the backboard to ensure the shadow box is large enough. Then, determine the depth of the shadow box, keeping in mind that there will need to be space at the back of the shadow box for the backboard, plus about 3/8” of space at the front of the shadow box for the glazing to hang from. That will provide enough depth for the glazing itself to hang and room for the lips over the glazing to hold and secure it in place.
Glazed shadow box
The tricky part of this shadow box is making the pieces for the frame sides. As we can see in the diagram above, the frame sides need to have a large rabbet cut into them, which is more significant than is reasonably possible with either a rabbeting plane or a table saw.
The solution to this problem is to cut the majority of the material out with a straight bit on a router table, leaving a lip at the back, just like on the front. Don’t worry that the surface isn’t smooth, as it will be covered with the filler piece. Then, when everything else is cut out, cut off the lip on the table saw at what will be the back side of the frame, with the piece standing vertically up against the fence.
It will probably be easier to do projects like this with four smaller pieces rather than doing the whole board and then cutting it to size. Even so, it’s a good idea to cut half the pieces for the sides too long, ignoring the miters, and then cutting the miters after the side pieces have been hollowed out.
Since any mistakes or splintering on the router table will most likely happen at the ends, cutting half the parts long allows those mistakes to be cut off when the corners are mitered.
Once the pieces are hollowed out and mitered, they can be connected like mentioned above for the unglazed shadow box, either with or without a spline.
With the shadow box frame assembled, it should be finished before anything else is done. Then, once completed, the frame can be flipped face-side down on the workbench, and the glazing set can be put in place.
The filler pieces shown in the diagram above will hold the glazing in place. This is ¼” thick plywood, and it needs to be ripped on the table saw to fit snugly between the glazing and the backboard, leaving room behind the backboard for the fasteners that will hold it in place.
To save on having to cut all four of these pieces accurately, work around the shadow box, cutting each piece just slightly and installing it. No miter is required, as the next piece will cover any gap. The only piece that needs to be cut highly accurately is the last one to be installed, as it has to butt up tightly with the pieces on both sides. These pieces need to be finished before they are installed.
These pieces can be installed with double-sided masking tape or wood glue. If they are to be glued in place, cover the strips with 1”x 4” clamping strips, as they are thin and tack on. Adding the 1”x 4”s will spread out the clamping force of whatever clamps are used, holding a wider area.
Once the display filler pieces are installed and the adhesive has had time to dry, the display backing board can be installed with whatever is to be shown off in the display shadow box mounted to it. As mentioned, this can be glued in, nail in place, or held with glazing points.
Related Posts:
Box Spring Alternative: Easy DIY Bunkie Board Guide by Admin June 18, 2025 More About After a long day, there’s nothing better than sinking into a comfortable bed. But that comfort isn’t just about the mattress—it’s also about what’s under…
Best Plyo Box : Foam vs Wood + Top Picks by Admin April 13, 2026 DIY What Is the Best Plyo Box for Home Gyms? The best plyo box for most home gyms in 2026 is a heavy foam box with…
How to Make Barn Quilts by Admin June 3, 2025 DIY Walk through rural America and you’ll start noticing a charming trend on barns, sheds, and even garages—large, colorful quilt block patterns painted right onto the…