Pallets have become much more than just shipping contrivances, with people making a wide variety of craft, decorative and furniture projects. Pallet slat walls are a popular decorative theme, both in homes and places of business, while furniture made out of pallets gives a rustic, casual look to family rooms and patios.
So what makes pallets so popular for these projects? Two things: price and appearance. Pallets can be picked up for little to nothing, especially if the woodworker is willing to work with damaged pallets. Considering that many projects require taking the pallet apart to use the wood, damage to the pallet isn’t an issue. And that damage can add to the “distressed” look that is so popular today. When people talk about making something out of reclaimed wood for the purpose of capturing the natural patina of the wood aging, pallets are often the first thing that comes to mind.
Most pallets are made of pine, often called “whitewood,” the most common wood used in construction. Pine is cheap and abundant when compared to other woods. However, there are some pallets which are made of oak, especially for cases where the pallet is supporting extremely heavy cargo. Those are harder to find and especially harder to get for free. Oak is stronger than pine, so it is much less likely to break. That makes those pallets prime for reusing over and over again.
Not all pallets are made of wood anymore. Little by little, molded plastic pallets are replacing wood ones. This is partially economic, as plastic pallets can generally be used more times than wood ones, and partially PR, in response to environmentalists complaining about cutting so many trees every year.
Finding Pallets for Free
Pretty much every city has used pallet dealers in it. These companies collect wood pallets from businesses, for the purpose of recycling them. Plastic pallets are left out of this, as they are usually sent back to their point of origin for reuse. The dealers sort out the broken ones, sometimes repairing them, then stack the pallets by size, type, and condition, reselling them to other businesses for use. Those businesses who buy those used pallets for use save money, as the used pallets are roughly one-quarter the price of new ones.
But even at that price, buying those pallets for projects would be expensive. We might as well just go to the lumberyard and buy boards. It would probably cost about the same and we wouldn’t have to take them apart.
Nevertheless, there are many places to come up with free pallets from, if we do a little looking around. To start with, we can go to those pallet dealers and ask to see their scrap pile. This will be the pile of pallets that they decided weren’t worth the trouble to repair. Some will allow you to get anything you want from that pile for free, while others charge a nominal fee. The boards are often broken; but it’s still possible to find a lot of usable wood.
There are many other options to consider as well. Many small businesses receive palletized shipments on an irregular basis. Used pallet dealers often ignore those businesses, because they don’t have enough pallets coming in to make it cost effective to send a truck to pick up two or three pallets a month. Often those pallets just sit behind the business, near their trash can, until someone comes by and takes them.
There are people who look for these pallets, either to use in their own projects or to sell to the used pallet dealers. But it’s still possible to find them, if we keep our eyes open.
Knowing someone who receives palletized cargo is the ideal solution, as it’s usually possible to make a deal with them, where they will save those pallets for pickup, rather than putting them out. But that means we have to be willing to go get those pellets when they call, or suffer the possibility of not only losing the pallets, but also losing the source.
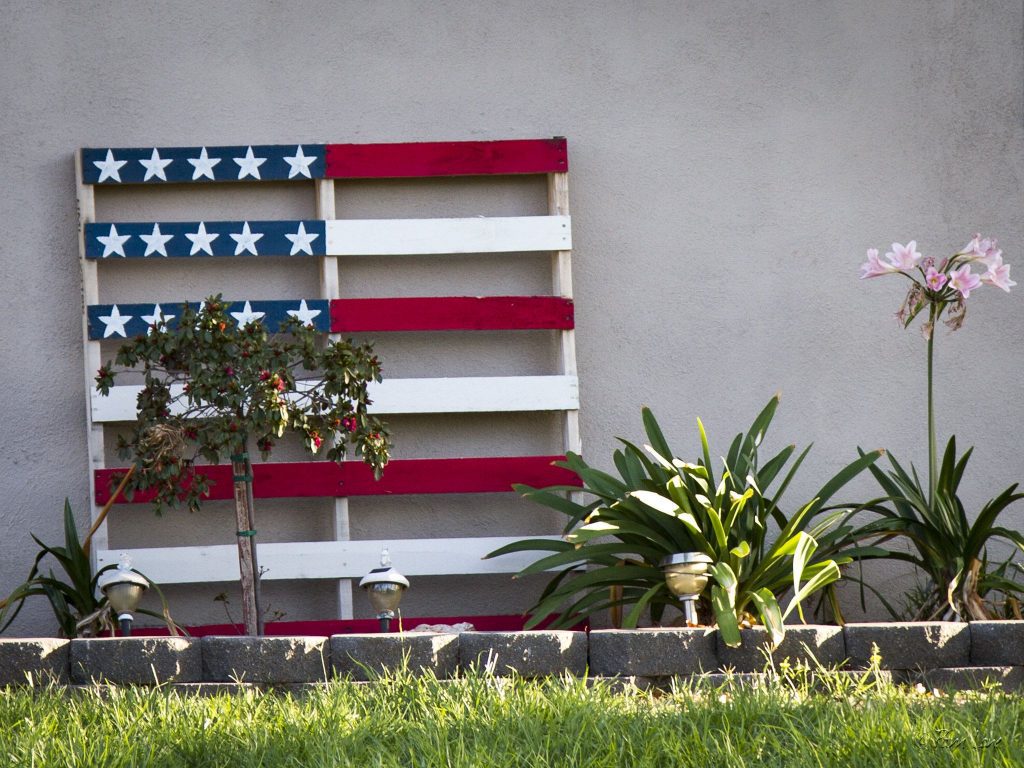
Making an American Flag from Pallet Wood
There are a couple of different ways that people make American flags from pallet wood. Some just take a pallet, as is, and paint stars and stripes on it. This doesn’t end up so much being an actual American flag, as a representation of the flag. Everyone will understand it to represent the flag; but there’s no way of making it fit the exact form of the flag. That takes a bit more work.
The first step in the process is to take the pallet apart. Some pallets come apart easier than others, depending on the fasteners used in making the pallet. I had some pallets recently with glue coated, ring shank nails in them. The nail heads literally pulled through the boards, rather than coming out of them. In some cases, it might actually be better to cut the boards off with a reciprocating saw, rather than trying to take the pallet apart.
The American flag has 13 stripes, representing the 13 original colonies, so we need a minimum of seven boards to make the flag. If the pallet doesn’t have that many boards on top, then it might be necessary to get boards from two pallets. Either the spacers or the boards used on the bottom of the pallet can be used as the connecting pieces on the back of the flag. Generally speaking, the bottom pieces are in worse condition than the top ones, so it’s not a good idea to use them on the face of the flag, as they won’t match the others.
Before continuing on, it’s important to decide just how rustic an appearance is desired for the flag. Part of the idea is to end up with a rustic looking flag, and that’s great; but even so, some people prefer a rougher surface than others. If a rough surface is desired, leave the boards as they are, but if something a bit smoother is desired, running the boards through a planer to surface them can eliminate damage and some of the wood’s roughness.
Those seven boards need to be ripped in half. I’d set the table saw’s fence to just under ½ the width of the board (1/16” to 1/8”) narrower, ripping the board twice to ensure they all come out the same width. This gives us the 13 pieces for the 13 stripes, with one extra that can be set aside.
Since we’re going for a rustic look, perhaps even a distressed look, it’s a good idea to paint all the boards white to start with, even those that will be used for the red stripes. The white paint can serve as a primer for those boards. Use a couple of heavy coats of high-quality latex paint, covering the edges and ends as well. It’s best to use a product that is a paint and primer in one. That will seal the surface of the wood better, so that less of the paint soaks into the wood.
Once that paint dries, paint seven of the boards red, for the red stripes on the flag. Be sure to paint the ends of the boards, so that the flag will look good from an oblique angle. Allow that paint to dry as well.
To assemble the boards together, lay the face down on the workbench, alternating colors, with red boards at both the top and bottom of the flag. Measure the entire height of the flag and cut two joiner boards from either the pallet spacers or the bottom boards, making the joiner boards ½” shorter than the measured dimension.
Verify that the ends of the boards for the flag’s strips are snug up against each other and the ends are even, checking them with a framing square or T-square. Squeeze out a line of glue on the down side of the joiner boards and lay them across the boards that are making the strips, leaving ¼” of space at both ends. Then either screw or nail the joiners to the stripes, taking care to use fasteners that are not going to go through the front of the flag.
Once the whole thing is assembled, flip it over, so that the face side is up. The blue field for the stars needs to be painted next. It should be in the upper-left-hand corner of the flag, covering the top seven strips, but only 40% (2/5) of the width of the flag. It will most likely take two coats of this paint to cover the red and white and may even take three.
Cut a stencil out of thin plywood or cardboard (not corrugated cardboard) for the stars. The easiest way to do this is to print out a star from the computer and use it as a stencil to make the stencil. If the flag is going to be distressed, the star can be a bit sloppy, but if not, then neatness counts. Some people make a stencil that allows them to paint a whole row of stars at once.
Using the stencil, paint the stars onto the blue field. There should be a total of 9 rows of stars, with the top and bottom rows each having 6 stars in them. The rows in-between those should alternate between having 5 and 6 stars, giving the finished flag a total of 50 stars.
Don’t forget to add some sort of hangers on the back of the flag or to cut keyhole slots in the vertical connecting strips. Today, most people use two hanger points, rather than the old wire on a nail system. Using two points makes it a bit harder to hang; but there’s no problem with the piece getting crooked on the wall.
The nail holes in the boards give a good starting point in distressing the flag, especially if they are stained with rust. That stain will probably come through the paint, given some time. Additional holes can be added, if desired.
What some people do is to take a scrap piece of wood and randomly pound a number of nails through it. This can then be placed on the surface to be distressed and the back hit with a mallet, driving just the points of the nails into the surface. Done randomly, it gives the appearance of insect hole in the wood.
The other major thing that is done to distress wood is to sand the painted finish. Two different things are desired here. One is to thin out the top color of paint, to the point where the design looks “faded” and the background color shows through in spots. Considering that the flag was painted in layers, this effect is easy to achieve. At the same time, sanding or even filing the edges of the boards can allow the wood to show through in places, giving the appearance of damage.
An additional layer of paint can then be rubbed onto the entire surface as a “wash.” To do this, water down either white, black or off-white paint, mixing it roughly 50-50 with water. Then using a rag, rub the paint onto the surface, covering it completely. Rub off the paint, rubbing lightly with a clean rag to remove all but what settles into the grain, knot and low spots in the wood.
Some people use multiple layers of wash, perhaps using black and a “dirty” off-white. Adding additional layers increases the appearance of age and that the project has been painted over numerous times in its long life.
What about a Frame?
One final thing to be considered is adding a frame around the flag. While few people bother with this, it adds a nice effect. All that’s needed is some additional pieces of pallet wood, probably stained to some dark wood color on both sides and the edge. Miter cut the corner and attach the pieces for the frame directly to the edges of the flag, as well as nailing the corners to ensure a tight miter joint.