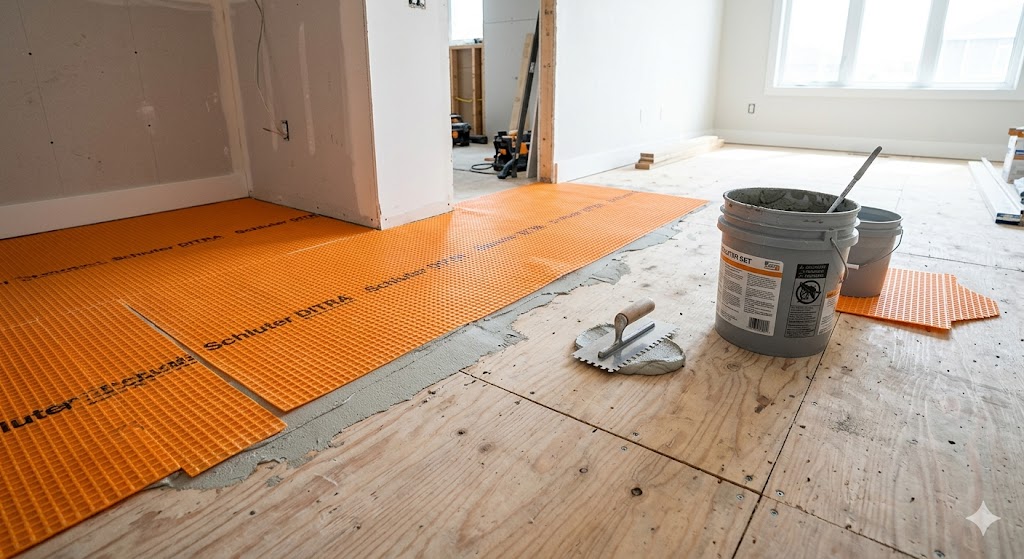
Installing Ditra over plywood requires a modified thinset mortar, a clean and properly prepared subfloor, and careful installation of the membrane to prevent movement and moisture damage. Ditra acts as a decoupling layer, allowing wood subfloors to expand without cracking tile or grout.
Ceramic tile provides a lower-cost, extremely durable alternative to hardwood flooring and is much easier to keep clean than carpeting. While not all that hard to install, tile and stone do pose specific challenges that don’t exist with other types of flooring. When installing tile over plywood, it is typical to install a vapor barrier/uncoupling membrane between the tile and the substrate to ensure a professional, long-lasting finish.
Best Ditra Installation Setup (2026 Picks)
If you want your tile floor to last 10+ years without cracking, this is the exact setup most pros use:
Category
Best Pick
Why It Wins
Price Range
Best Membrane
Schluter Ditra
Industry standard, best decoupling + moisture control
$1.50–$2.50/sq ft
Best Thinset (Plywood)
Modified Thinset (e.g., Versabond)
Strong bond + flexibility for wood subfloors
$15–$40/bag
Best Trowel
11/64″ Square Notch Trowel
Ideal depth for proper adhesion
$10–$25
Best Tile Mortar
Premium Modified Thinset
Prevents tile failure over time
$25–$60
Best Sealer
Penetrating Tile Sealer
Protects grout + extends lifespan
$20–$50
Why Ditra Prevents Cracked Tile on Plywood Subfloors
There’s something that catches a lot of people off guard when they start laying tile: wood and tile just don’t play nice together. Wood subfloors shift with changes in humidity and temperature; they flex, expand, and shrink. Tile doesn’t. If you don’t separate the two, the tile loses every time.
Ditra acts like a shock absorber. It cushions movement and provides a critical moisture barrier, similar to the one used in basement walls. When installed properly, it prevents moisture from soaking into the wood and allows any trapped moisture to escape upward instead. This is why it has those square cavities underneath—it’s not just for grip, it’s for airflow.
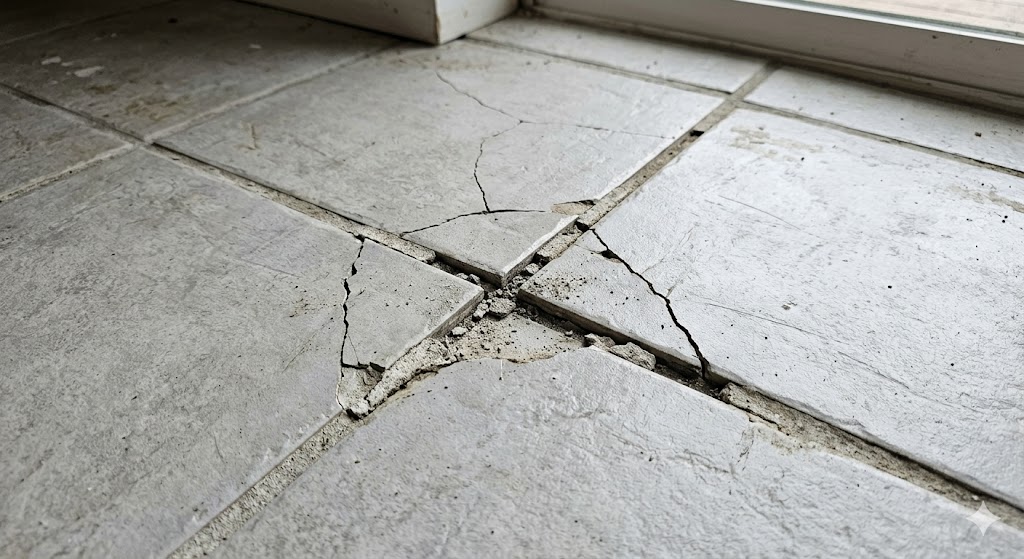
❌ The Mistake: Why Most DIY Tile Jobs Fail
The single biggest mistake I see—and I’ve seen it dozens of times—is skipping the uncoupling membrane to save $100. People assume that because their plywood subfloor feels “solid,” it won’t move. The real test is simple: wait for a change in seasons. When the humidity drops in winter and the wood shrinks, that rigid bond between the plywood and the tile will snap. You won’t see it happen, but you’ll hear it—that dreaded “pop” when a tile detaches, followed by spiderweb cracks in your grout.
💸 The Cost Difference: Spending Now vs. Paying Later
Installing Ditra adds roughly $2.00 to $3.00 per square foot to your project cost. On a 100-square-foot kitchen, that’s $300. However, the cost of a failed floor is the cost of the entire project plus demolition labor. You’re looking at $2,000+ to fix a “cheap” installation. The math is clear: the membrane is the cheapest insurance policy you’ll ever buy.
What a Decoupling Membrane Does (And Why Ditra Works Best)
One of the key concerns about subfloor preparation is that plywood is a flexible substrate. The potential for plywood to flex and change shape—even slightly—can cause grout to crack and thin-set to break loose from the substrate. Understanding the different types of plywood used in construction can help you identify if your subfloor needs additional bracing.
1. Decoupling Action
Ditra provides a decoupling action between the ceramic and the floor so that if the floor moves, the tile, mastic, and grout don’t have to. It achieves this through an open-rib structure that allows for in-plane movement, effectively neutralizing the differential movement stresses between the substrate and the tile.
2. Moisture Protection
Stone and ceramics tend to attract moisture, which can pass through the ceramic and grout. Ditra provides a barrier so that this moisture isn’t absorbed into the plywood. This is critical for preventing rot in wood-based subfloors.
3. Vapor Management
By providing a moisture barrier between the plywood and the thin-set, Ditra provides an escape route for moisture to evaporate from the plywood. The air channels on the underside of the membrane provide a route for excess moisture and vapor to escape from the substrate, which would otherwise cause damage to the tile layer.
4. Load Distribution
While the underlayment might flex, Ditra doesn’t compress. Therefore, it helps balance the load on the tile, providing a more even load distribution. When a heavy load is placed on the tile, the membrane’s column-like structures transfer that load directly to the subfloor, preventing the tile from dipping or cracking.
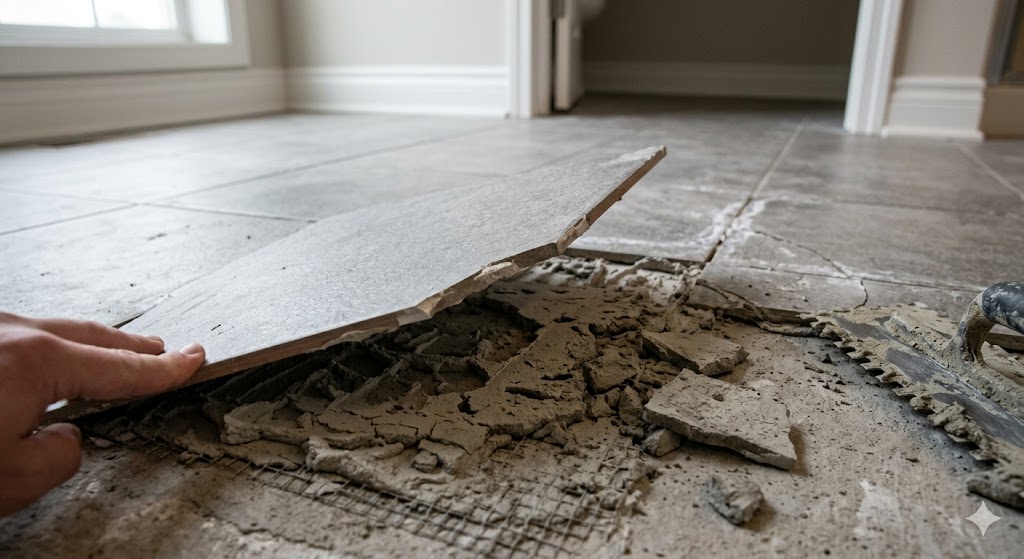
Can You Install Tile Directly on Plywood Without Ditra?
Technically, you can install tile directly over plywood, but it’s one of the most common causes of tile failure. Plywood expands and contracts with changes in moisture and temperature, while tile remains rigid. Without a decoupling layer like Ditra, this movement transfers directly to the tile, leading to cracked grout, loose tiles, or complete failure over time.
Some installers try to compensate by using thicker plywood or specialized thinset, but this does not eliminate movement. Ditra acts as a buffer, absorbing this stress and preventing it from reaching the tile surface. In short, skipping Ditra might save money upfront, but it significantly increases the risk of costly repairs later.
⚠️ Warning: The Regret of the “Quick Fix”
😬 The Regret: I once talked to a homeowner who skipped Ditra in his primary bathroom. Two years later, every single grout line had turned into a “dust generator” because the plywood was flexing under the weight of the bathtub. He had to gut the entire $5,000 bathroom because of a $150 shortcut. Don’t be that guy.
Proper Floor Preparation
Plywood flooring needs proper preparation before Ditra is installed. Whether you use construction-grade plywood or OSB, the substrate must be thick enough to support the tile’s weight. You must adhere to specific plywood thickness standards based on your joist spacing:
16” centers: Minimum of 5/8” nominal plywood or OSB.
20” centers: Minimum of ¾” nominal plywood or OSB.
24” centers: Minimum of ¾” nominal plywood or OSB, with a nominal 3/8” underlayment.
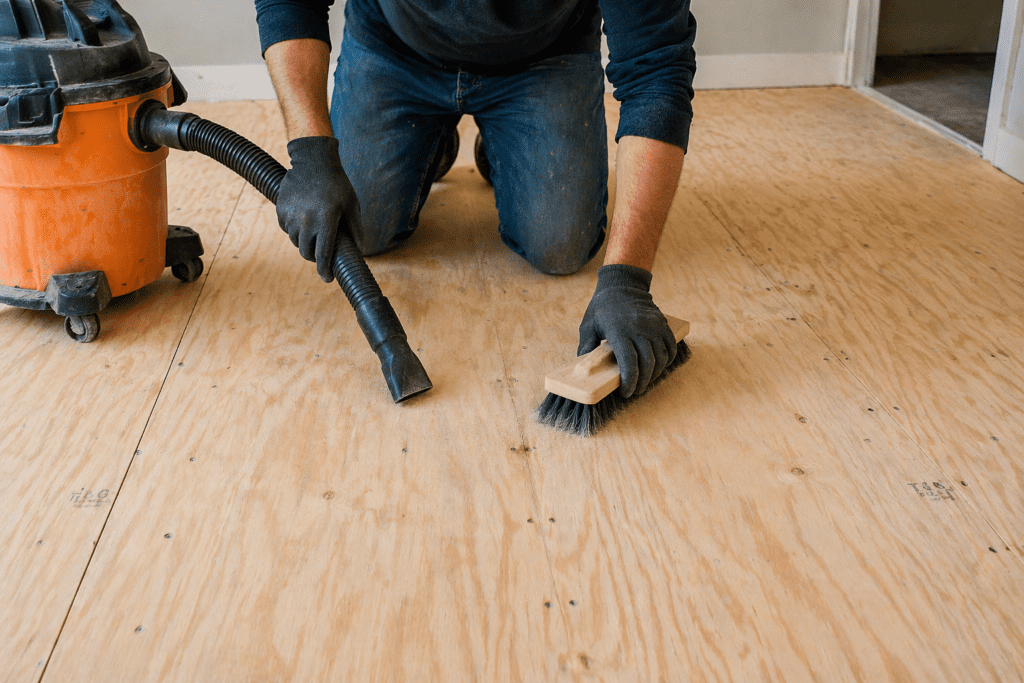
Surface Cleanliness
The plywood must be clean and smooth. Sweep, vacuum, and mop the floor to remove all debris. Even a small amount of sawdust can act as a “bond breaker,” preventing the thinset from sticking to the wood.
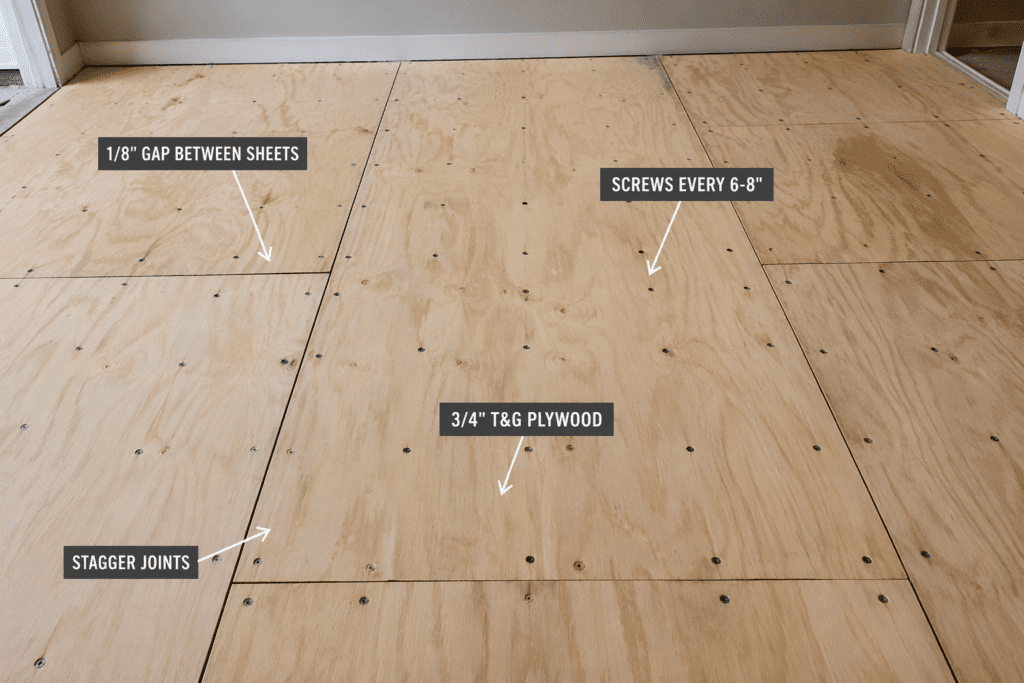
Plywood subfloors should be installed with a 1/8” expansion gap between sheets to allow for wood swelling. If the floor is covered in vinyl, ensure it is firmly bonded and clean off all wax and dirt before application.
Structural Integrity
Check for any squeaks or “bouncy” spots. If the floor moves when you walk on it, Ditra can’t fix that structural flaw. You may need to add blocking between joists or screw down the subfloor more tightly. Use high-quality floor screws every 6 inches along the edges and every 12 inches in the field.
Detailed Cost Breakdown: DIY vs. Pro
Expense Item
DIY Estimated Cost
Pro Estimated Cost
Schluter Ditra (1 roll)
$185
Included in Labor
Modified Thinset (3 bags)
$75
Included in Labor
Rental/Purchase Tools
$50
Included in Labor
Labor Fees
$0
$600 – $1,200
Total (per 100 sq ft)
**$310**
$900 – $1,500
While the DIY route saves significant money, the risk of error is higher. If you aren’t comfortable mixing mortar to the required “pancake batter” consistency, the extra cost of a pro is worth the peace of mind.
Installing Ditra on Plywood: Step-by-Step
🧰 Step 1: Pre-Cut the Ditra
Before mixing any thinset, cut your Ditra sheets to size. Use a standard utility knife; it cuts easily from the fleece side. Once cut, lay the sheets loosely in position, then fold them halfway back—this lets you spread thinset and quickly fold the membrane into place without losing your alignment.
Add water to the bucket first, then powder (4:1 ratio).
Mix with a paddle mixer and drill for 3–5 minutes at a low speed to avoid introducing air bubbles.
Let it slake (rest) for 10 minutes to activate chemical bonds.
Remix for 3 minutes. Never add more water after slaking, as this will destroy the strength of the mortar.
💧 Step 3: Wet the Plywood
Lightly dampen the plywood with a clean sponge and water. This is a “pro secret.” If you apply wet mortar to dry wood, the wood acts like a sponge and sucks the water out of the mortar. This “flashes” the mortar, making it brittle and weak. A damp subfloor ensures a slow, strong cure.
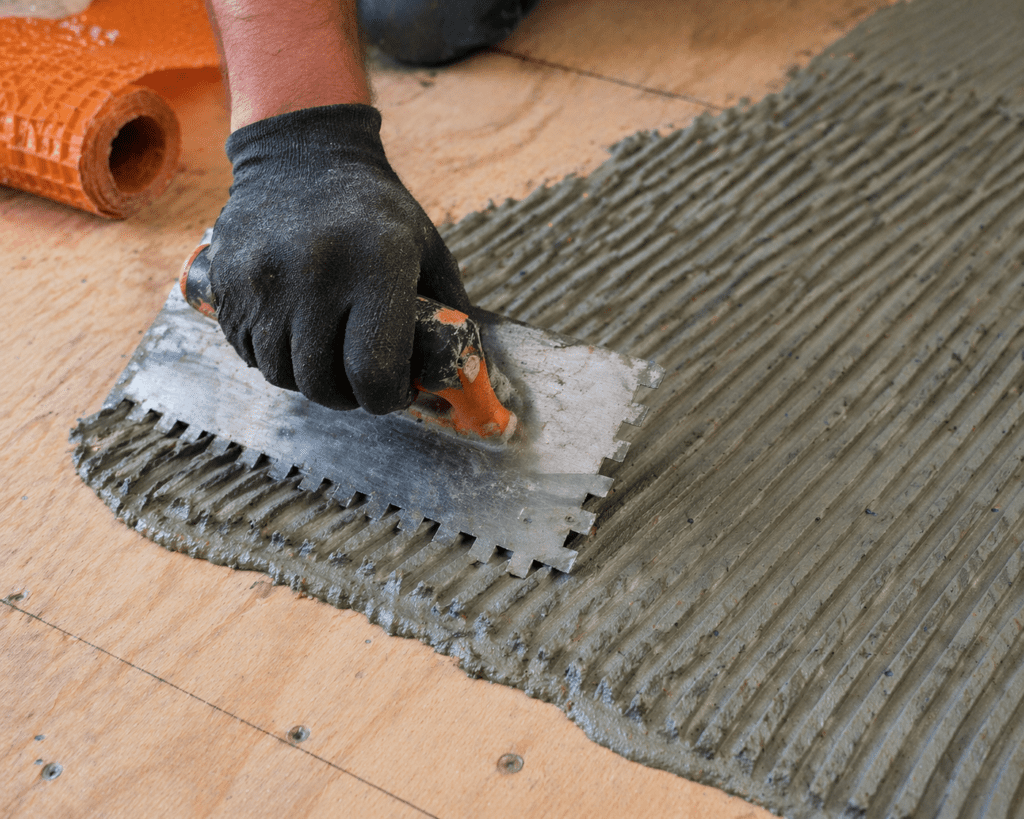
🔨 Step 4: Spread the Thinset
Use an 11/64” square-notched trowel. Start with the flat edge to “burn in” the mortar, ensuring it is pressed into the pores of the wood. Then switch to the notched side. Trowel in straight, parallel lines at a 45-degree angle. Straight lines allow air to escape when you lay the membrane down.
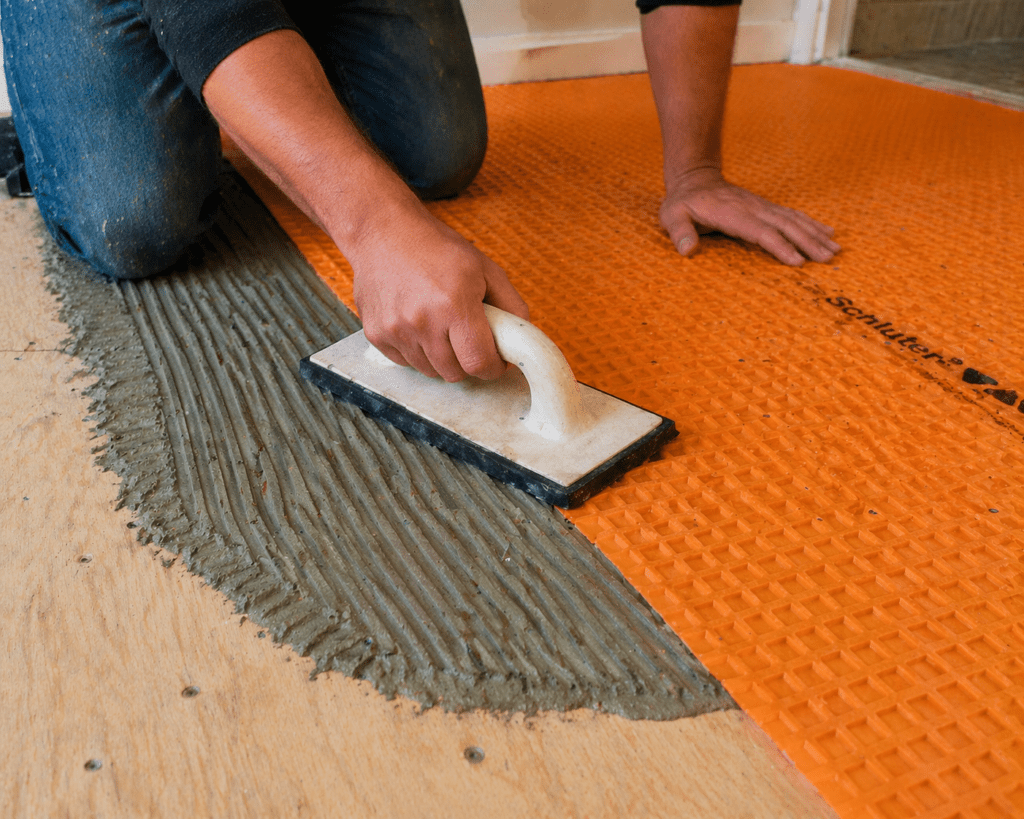
📏 Step 5: Lay the Ditra
Fold the membrane over the wet mortar (nubby side down, fleece side into the mortar). Use a flat trowel or floor roller to firmly press it in. Peel back a corner to check coverage; you should see 100% transfer of mortar to the fleece. If the thinset “skins over” (dries on top), scrape it off, remix, and reapply.
🧱 Step 6: Install Tile Over Ditra
You can tile immediately—one of Ditra’s best features. Fill the dovetailed squares of the Ditra by troweling thinset in all four directions. This “locks” the mortar into the membrane. For larger tiles (12″ x12″ or larger), back-butter each piece to eliminate hollow spots. This is a critical step for successfully tiling over plywood.
Deep Dive: The Physics of Shear Stress
To truly understand why we do this, we have to look at the shear stress involved. Imagine a sandwich where the bread is plywood and the ham is tile. If you twist the bread, the ham breaks. Ditra acts like a layer of mayonnaise, allowing the bread to slide slightly without tearing the ham.
In scientific terms, the fleece webbing on the underside of Ditra is bonded to the thinset, but the polyethylene mat itself is allowed to move independently of that fleece. This “uncoupling” is what prevents the 1,000 pounds of pressure generated by a house settling from shattering your porcelain floor. Without this movement joint, the force has nowhere to go but through your grout lines.
Environmental Considerations
Plywood is highly sensitive to the Relative Humidity (RH) of your home. In the summer, RH can reach 70%, causing the wood fibers to swell. In the winter, RH can drop to 20%, causing the wood to shrink. Because Ditra is made of high-density polyethylene (HDPE), it is completely unaffected by these changes. It acts as a neutral zone, protecting the “living” wood from the “dead” stone.
FAQs About Installing Ditra Over Plywood
Can you install Ditra directly on plywood?
Yes, but you must use modified thinset mortar (ANSI A118.11) to ensure proper adhesion to the wood surface. Unmodified thinset will not bond correctly to the glue used in plywood manufacturing.
Do you need modified thinset for Ditra on plywood?
Yes. Modified thinset contains polymers that improve bonding and allow flexibility for wood movement. However, when installing tile on top of the Ditra, Schluter technically recommends unmodified thinset to allow for faster curing by evaporation, though many pros use modified thinset for both layers.
What thickness of plywood is needed for tile?
Minimum 5/8” on 16” centers is the code minimum, but 3/4” is strongly recommended for better stability. If you have 24″ joist spacing, a single layer of plywood is almost never enough; you will need a second layer of 3/8″ underlayment.
Yes, as long as the OSB is “Exposure 1” rated, meets thickness requirements, and is clean. Note that some OSB has a wax coating that must be sanded off before the thinset will stick.
How long does it take for Ditra to dry?
You don’t have to wait for it to dry to start tiling! However, you should avoid walking on the newly tiled surface for at least 24 hours to allow the mortar underneath the membrane to reach full strength.
The Ultimate Guide to Attic Flooring: Expert Tips and Advice by Admin June 27, 2024 Installing Transforming your attic into a functional space begins with strategic flooring choices that balance practicality and safety. Whether you're aiming to create additional storage, a…
Precast Concrete Steps: Costs, Benefits & Installation Guide by Amy Reed March 21, 2025 More About Precast concrete steps are ready-made cement stairs, staircases, or hollow cement steps that can be installed outside existing staircases on a property or business premise.…