
Every home needs bookshelves. Even if they aren’t used for real paper books, they’re useful for storing an abundance of things. From collectibles to children’s toys, with vinyl LPs and DVDs in between, people use bookshelves to provide them with storage space, to display what they own, and to organize their possessions.
Let’s face it; the average bookshelf is rather boring, especially if you buy the cheap vinyl-clad particle board ones available in the big box stores. But nice bookshelves can get real pricey, making them hard to afford. What’s needed is something in the middle, perhaps something we can build ourselves, which is affordable and attractive at the same time.
If your home has a rustic or country sort of look to it, you can find an answer to this by making bookshelves out of wood crates. While we don’t often see things delivered in wood crates anymore, and real ones that were used for that purpose are getting hard to find, there are a number of companies who are making and selling wood crates for craft and decorative purposes. A quick search online will show you a number of companies who are selling crates, some of which may even be available locally.
That search will also show you that there is quite a price range for the crates you can buy. But most fall within a $10 to $30 price range. Of course, size will affect this, as well as affecting how you stack them together.
Before going any farther, let me say that there’s a big difference between making shelves out of wood crates and plastic crates. First of all, the majority of the plastic crates you can buy in the big box stores aren’t very strong. Then there’s the problem of attaching them together, so that they’ll stay together and be safe.
Of course, the other way that some people go is to use milk crates. That generally means stealing them. Even if you buy them in a garage sale, they’re probably stolen to start with. So they’re not something I would recommend.
The first nice thing about wood crates, other than their natural charm, is that they are modular. Modular furniture is supposed to be a thing, with a number of the big box stores selling modular closet organizers so that you can make the closet of your dreams. Of course, those are almost all particle board, but hey, they’re cool. The second nice thing is that they can be attached together securely, with little effort and little risk of the fasteners coming loose.
Building a Shelf with Prefab Crates
The easiest way to build a shelf is to use prefabricated crates you have purchased from some local store that has them. I would avoid buying them online, unless you are doing so from one of the big box stores that allow you to pick up locally. Otherwise, you’re going to end up paying a lot for shipping.
Almost all commercially manufactured crates are rectangular in shape, giving you a variety of assembly options. While the basic assembly is just stacked crates, you can stack them either horizontally or vertically, even a combination of the two. Some of the best designs I’ve seen combine horizontal and vertical creates to provide a more varied and attractive appearance.
Of course, the most basic means of building a shelf out of wood crates is to just stack as many crates horizontally, as you want for height and attach them together. But if you want something more visually interesting and artistic, you’ll probably want to stagger the way the crates are stacked. There are two basic ways of varying horizontal and vertical crates together, to make a more interesting shelving unit:
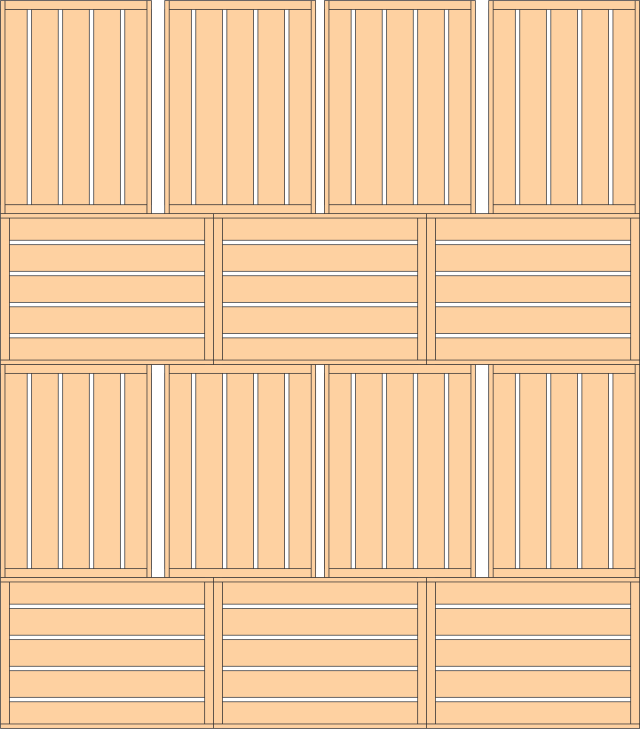
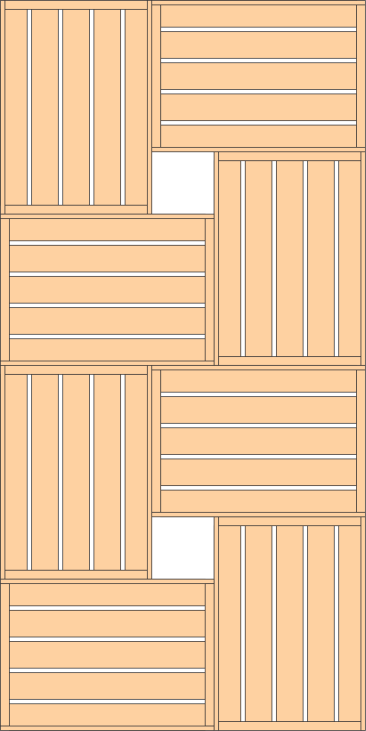
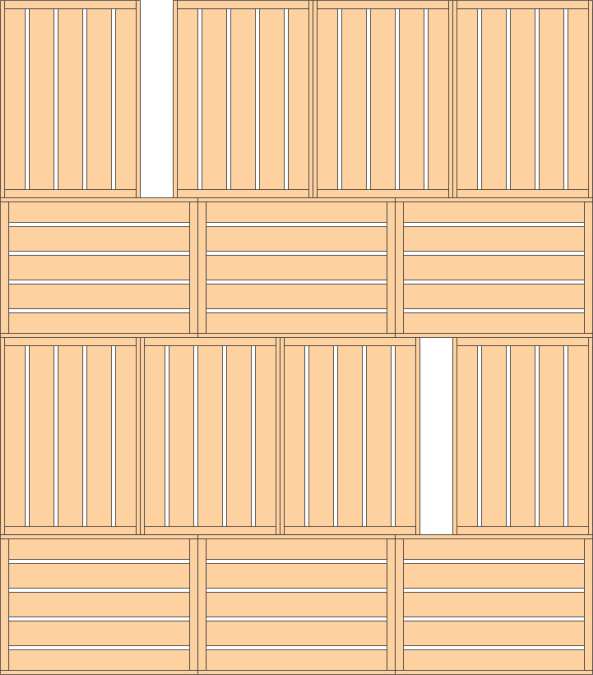
In the shelving unit on the left, alternating is done by rows, with one row of crates being laid horizontal and the next row vertical. In the one on the right, squares are made out of four crates, leaving a square hole in the middle.
In both cases, you’ll probably end up with some extra space somewhere in the bookshelf, due to the crates not being exactly double the length as their width. That’s okay, as those spaces can be used for storage as well. A simple modification to the shelf on the left makes better use of those spaces by combining them into larger spaces.
Attaching Wood Crates Together
Just stacking your crates, without attaching them to each other in any way can create a safety hazard, especially around small children. Bumping into the crates or even removing something from one of the shelves can cause shelves to move, in relation to each other. It doesn’t take much of this to make the shelving unit unstable.
If you are sure that your shelving unit is going to stay where it is and you won’t ever be moving it, you might want to consider attaching a plywood back to the whole thing. It wouldn’t have to be a thick sheet of plywood, Luan would work.
You can do without the plywood back, if you screw the individual crates to each other. The problem is that the only part of the crates that is fairly thick wood is the ends, which are either ½” or ¾” thick. The slats used on the bottom and long sides are usually ¼” to 5/16” thick. So the tricky part of attaching the crates to the luan or to each other is making sure that your screws go into the stronger end pieces.
To do this, it’s easier to work upside-down, so that you can run the screws through the thinner boards on what will end up being the lower crate and into the end pieces of the upper crate. You’ll probably have to angle your screws in a number of cases. Use 1-1/4” long drywall screws and be careful to make sure that they don’t come through the other side. If you have places where you have two end boards up against each other, you can screw directly through one and into the other.
Once you finish screwing the crates together, flip them over. This should put the visible screws heads at the top inside of your crates, where they won’t be easy to see, as the shelves, which are below eye level, will hide them.
Making a Base for Your Shelves
If you want your crate shelving unit to look a little more like a real piece of furniture, rather than a bunch of stacked up crates, you can add a lot to it by making a simple base for it to sit on. This can be made out of normal 1”x 12” boards. I’d recommend going with #2 common, as the knotholes will go nicely with the overall rustic image you’re going for.
A simple base can be made out of three pieces of lumber; one for the top and two for legs at each end, as shown in the picture below. While you could make it so the top matches the exact size of the crate shelves going on them, you’re better off making it slightly oversize, so that you don’t have to be quite so exact. That will also help the base look better.
The legs can be attached to the top with nails or screws, but I’d use wood dowel pegs. That provides for a much nicer look, especially if you make the platform wider than the shelving unit, so that those pegs can be exposed. Cut flush with the wood and stained they will stand out, adding to the overall rustic look of the shelving unit.
Making Your Own Wooden Crates
While you can buy factory made wood crates, you can also make your own. As a woodworker, you may decide that’s what you want to do, just for the fun of making them. It’s a fairly simple project, making it a great one for teaching your kids some basic woodworking skills with.
Crates can be any size you want, but the average crate is roughly 18” wide, 12” deep and 10” high. Two of those dimensions are determined by the end panels you make, with the length is determined by how long you cut the slats. There are actually only two sizes of cut pieces you need to make, which makes this extremely fast and easy to build.
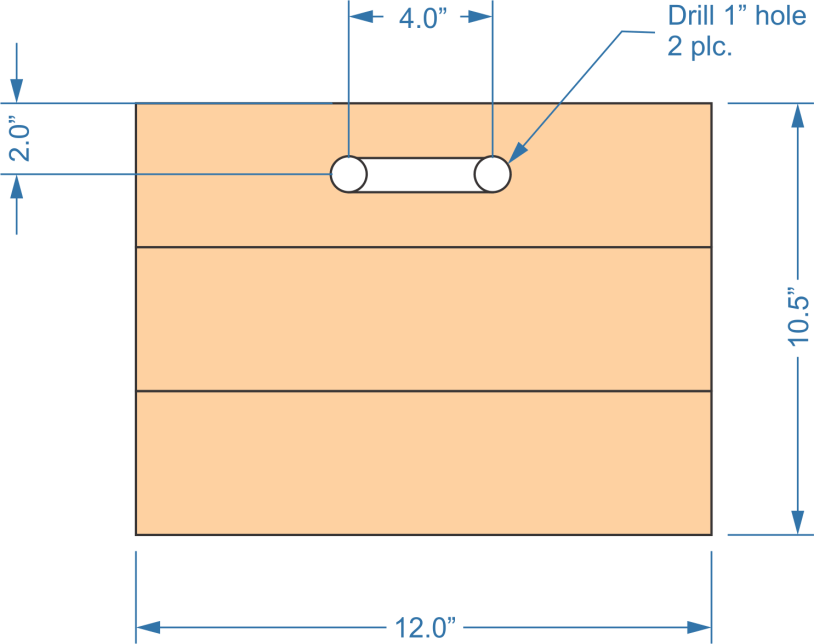
Start by cutting the pieces for the ends out of 1”x 4”s. You’ll want three pieces, 12” long for each end. This will give you an end that is 12” wide by 10.5” high. Glue the three pieces together, holding them with bar clamps to dry. Before tightening the clamps, make sure that the ends of the boards are carefully aligned. Don’t overtighten the clamps, as that will cause the boards to bow outwards, causing you to end up with a bowed end board, rather than a flat one.
You can clamp boards across the top and bottom of the three pieces, at both ends, to help ensure that the panels will be flat and not bowed. This makes for a more complex glue-up, but it is actually a fairly common procedure when making panels up of several boards, whether for tabletops or carcases.
If you want to cut handles into your end panels, mark and drill two, one inch diameter holes into the top board, four inches apart and centered on the board (see dimensions below). Then use a jigsaw to cut between the holes, turning them into an elongated slot. Be sure to file and/or sand the edges of that cut, so that you don’t have any sharp edges or splinters that can scratch anyone picking the crate up.
You’ll need two end panels, as shown above or modified to your own dimensions, for each crate. The rest of the crate is made of a series of thin slats.
In order to make those slats, start out with 1”x 3”s. Those will be too thick, so resaw them on your table saw or band saw, if you have them. That will be considerably less expensive than buying ¼” thick material for your slats. Once resawn, cut them off to the length you’ve decided to make your crate. You can sand these, but leaving them somewhat rough, with the saw marks showing, will help your crate to look more rustic.

Typically, a crate of the size we’re talking about will use four slats for the bottom and four for each side, for a total of 12 slats. All need to be exactly the same length.
I would recommend installing the slats on the bottom first, with the ends of each slat flush with the edges of the end board. Space the remaining two slats between them, which should leave about 2/3” of space between them. Glue and nail the slats to the end boards. You could screw them, if you prefer, but nailing is more authentic looking.
For the sides, the bottom slat should overlap the bottom one so that it sits all the way down on your workbench. Glue and nail this one to the bottom, to add strength to the crate. Then place another slat at the top of the side, gluing and nailing it in place. The final two slats split the distance in-between, which only leaves about ¼” between them.
As an option, you might decide that you want to rip your slats down from 2-1/2” to 2”. This will allow you to put five slats on the bottom, rather than four and allow a larger space between the slats on the sides. The overall strength of the crate won’t be degraded appreciably, but the spacing will accentuate that it is a crate, rather than a box.
Finishing Your Wooden Crate Bookshelf
How you finish your wooden crate bookshelf is up to you. It can be painted, stained, stained and varnished or just left to nature. Since this is a rustic style of furniture, you may want to consider doing a distressed finish on it. Whatever you decide, you really aren’t after the high-gloss finish of a piece of fine furniture. Better to have it a bit rough, so that it looks more authentic.