Anyone who has goats knows that goats aren’t the most cooperative of animals. If you want a goat to do one thing, you can just about be sure that it will do the opposite. Nevertheless, there are a lot of people who raise goats, either for meat or as dairy animals. In order to milk those goats or to do other tasks needed in caring for them, it’s often necessary to find some way of immobilizing the goat. Otherwise, the goat is likely to go left, when it should go right and the milk will be spilled, the injection will go into the keeper’s leg, instead of the goat or the keeper will end up on their butt, with the goat running off.
Solving this problem isn’t all that hard. After all, our brains are considerably larger than theirs are and we’re the species that builds tools. So, we need to build a tool for holding that goat still. Such a tool is called a goat stand or stanchion.
The goat stand is a rather simple device, consisting of a platform for the goat to stand on, getting it up off the ground where it is easier to milk or work on. A ramp at one end makes it easier for the goats to climb up on the stand and there’s a pair of shaped stanchions on the other end for the goat to stick their head through. Placing a bucket of feed on the other side encourages them to do just that and once they do, the stanchions can be closed, trapping their head and keeping the goat where it is convenient to work on.
Since this is just for goats, there’s no reason to make it out of fine hardwood or to even bother painting it. However, it might be advisable to avoid using MDF or particle board for the decking, as neither of those materials stand up well to water. OSB is slightly better; but either plywood or wood boards will produce a deck that will last considerably longer.
Building the Platform
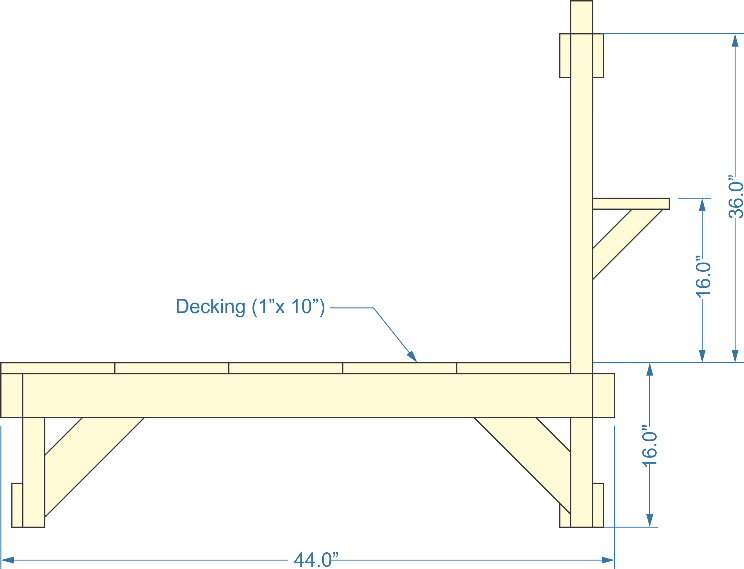
The base platform for the goat stand can be any size you want, but one that is 22” x 44” is large enough for any goat. In order to make it more convenient for milking the goat, that stand should be 16” off the ground. So, to make the frame, we need two pieces of 2”x 4” cut to 22” long and two to 41” long. Then we will need two legs that are 15-1/4” long for the back end of the stand and two that are 52” long for the front end.
Building the platform
The diagram above shows the platform assembled, giving a bit more detail. It is started by taking the two 22” long 2”x 4”s and the two 41” long 2”x 4”s and making a box out of them. The two short legs are attached to one end, which will be the back end of the stand. Note that the legs are attached short sides to us in the drawing. This is so that there is enough room for the angled braces that are installed underneath. They are mitered at both ends, with the upper end going to the inside of the box frame and the lower end sitting up against the leg. There is also a 22” long 1”x 4”, which is attached to the bottom end of the legs as a spreader.
Please note that all 2”x 4”s should be connected together with either 16d nails or 3-1/2” screw. 1”x 4”s should be attached with 6d nails or 2” screws. All hardware should be coated to help prevent it from rusting.
At the front end of the stand, the legs are attached the same way, with the exception that they stick up quite a bit farther. This is to accommodate the stanchion that will hold the goat in place. Note also that there are 1’x 4” spreaders on both sides of these legs, at both the top and bottom, and not just on the outside. This is to hold the clamp bars for the stanchion.
The last part of making the platform is adding the decking. I’ve shown it with 1”x 10” boards in the drawing, but narrower boards, plywood or OSB can be used.
Adding the Clamp
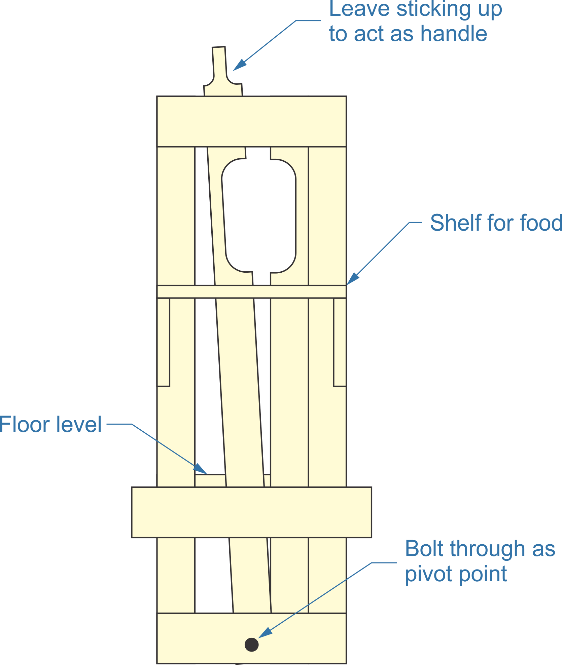
While the platform of the goat stand allows easier access to milk the goat or trim its hooves, no goat is going to just stand there and allow someone to work on it. The first chance they get, they’ll be off that stand and running away, probably getting into mischief. That’s why we made the front legs long, allowing the creation of a stanchion that will hold the goat in place.
The basic theory here is that goats don’t have a reverse gear. While it is possible to get them to step backwards if pushed, they don’t really go backward on their own. So, the key to getting them to stay put while they are being worked on is to trap their heads. That’s easy to do with a little help from some bait.
Our two existing front legs aren’t enough, as some goats could probably get between them. But they will serve as a means of holding the two additional pieces of 2”x 4” which will form the clamp, going around the goat’s neck and preventing it from pulling its head back. These are shown in the diagram below. Note how the two have been cut out, creating a space for the goat’s head to go through. One piece is fixed in place, while the other is allowed to pivot on a bolt run through the bottom. That way, the goat can stick its head through the hole, in search of the food that has been put on the shelf as bait, allowing the stanchion to be closed around their neck, without causing them discomfort. Be sure to round the edges of the area cut out for the goat’s neck to go through, so as to avoid any risk of scratching the goat’s neck.
The clamp
The material used for the movable stanchion may need to be thinned out a bit on the plane, in order to make it swing freely between the crosss. Making this piece longer than the other stanchion and the legs provides extra material that can be used as a handle. In the diagram above, I’ve narrowed that piece down at the top, making it easier to grab as a handle. It would also be useful to round the edges, making the handle more comfortable for use.
Finishing the Goat Stand Up
A couple more things are needed to finish the goat stand up. First, it’s necessary to have some means of latching the stanchion closed, once the goat is captured by it. There are several ways this can be done, such as a small piece of chain, a hook and eye latch or even drilling a clearance hole through the top cross and putting a nail through it. There should never be a lot of force against this stanchion, trying to force it open, so the latch doesn’t have to be very strong.
The second thing needed is a shelf to put a feed bucket on. Putting feed in the bucket acts as the bait to get the goat to put its head through the hole in the stanchion, so that’s essential. Although I’ve given a dimension for this on the first diagram, it may be necessary to alter this dimension to accommodate the size of the goats in the herd and the size of the feed bucket. Keep in mind that the same stand and feed bucket will need to be used for all goats to be milked.
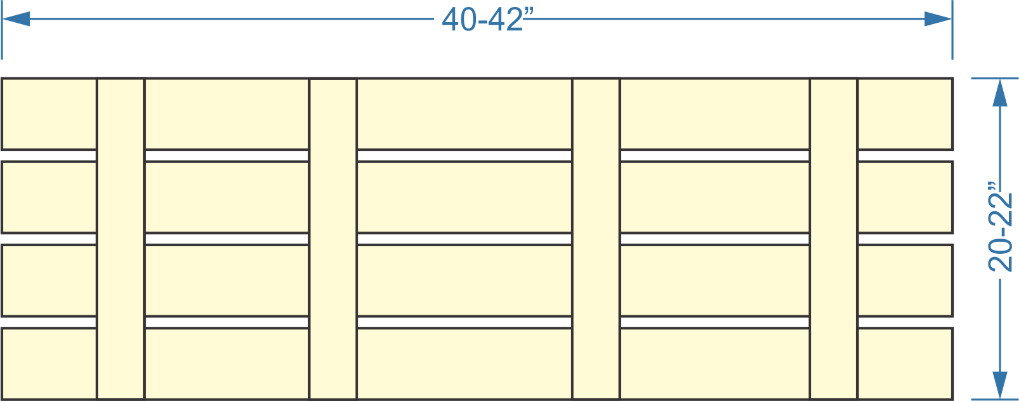
Finally, it could be beneficial to add a ramp to the stand, making it easier for the goats to get up on it. While goats are very agile creatures, making a goat jump up 16” might be a bit too much. It’s not hard to make a ramp and add it to the back end of the stand.
It may seem like the easiest way to make this ramp is to simply cut a piece of plywood and attach it; but that won’t work. While the plywood is strong enough, it’s also slippery, and so would make it hard for the goats to go up it. Instead, it would be better to make the ramp like a board and batten shutters, a series of slats, for which 1”x 4”s could be used, overlaid by several crosss, for which 1”x 2”s would work well.
The ramp
The ramp should be roughly as wide as the stand, but no wider. If it is wider, the goats could walk right off the edge, when they get to the top of the ramp. For length, it makes sense to keep it just a bit shorter than the deck of the stand, so that it can be folded onto the top of the stand when not in use. Attach the ramp with a pair of gate hinges.

")
")