One of the problems in every kitchen is where to hide the trash can. By and large, trash cans aren’t very attractive and what’s in them is even less so. That’s especially true when the trash can gets full and nobody wants to take the trash out. While it might be possible to buy a fancier trash can to make it look better, a trash can is a trash can and it will still look like what it is.
The other option is to hide the trash can. When I was a kid, we kept the trash can under the sink; but since then, someone has come up with a better option. That’s to make a cabinet special for use as a trash can, where the trash can either tip out to be accessible or slide out on drawer slides to be accessible. In either case, the trash can is not so obvious, because it is hidden in a cabinet, making it look like it is just part of the kitchen.
Ideally, this would be installed into an existing cabinet, so that it looks like the rest of the kitchen. But that may not be possible. Many kitchens are hurting for cabinet space as it is, so taking a cabinet away from storage use, in order to make a place for the trash can, may not be met with universal approval. It might be necessary to build another cabinet, just for the trash can. In such a case, the key will be to make it look as much as possible like the other cabinets, to hide that it has been added to the kitchen.
One thing that can help with this is to buy a door from one of the online companies that provides cabinet doors. There are several of these, who specialize in providing kitchen and bath cabinet doors to people who want to give their cabinets a facelift, rather than replacing the cabinets entirely. Most are just as willing to sell single cabinet doors. All that has to be done is select a cabinet door that’s made out of the same type of wood and manufactured in the same style as the existing (they will carry a wide assortment of styles). Even if it is not a perfect match, the color of the wood will adjust as it ages.
Modifying Existing Cabinet for Tilt-out Trash Can
The easiest option available is to modify an existing base cabinet, so that it houses a tilt-out trash can. This requires removing the door and any shelf that is inside the cabinet. If the door was mounted with surface-mount hinges, it will be necessary to fill the holes that were made by the mounting hardware. They won’t end up covered up by the door, so filling them in a way that blends in well is important.
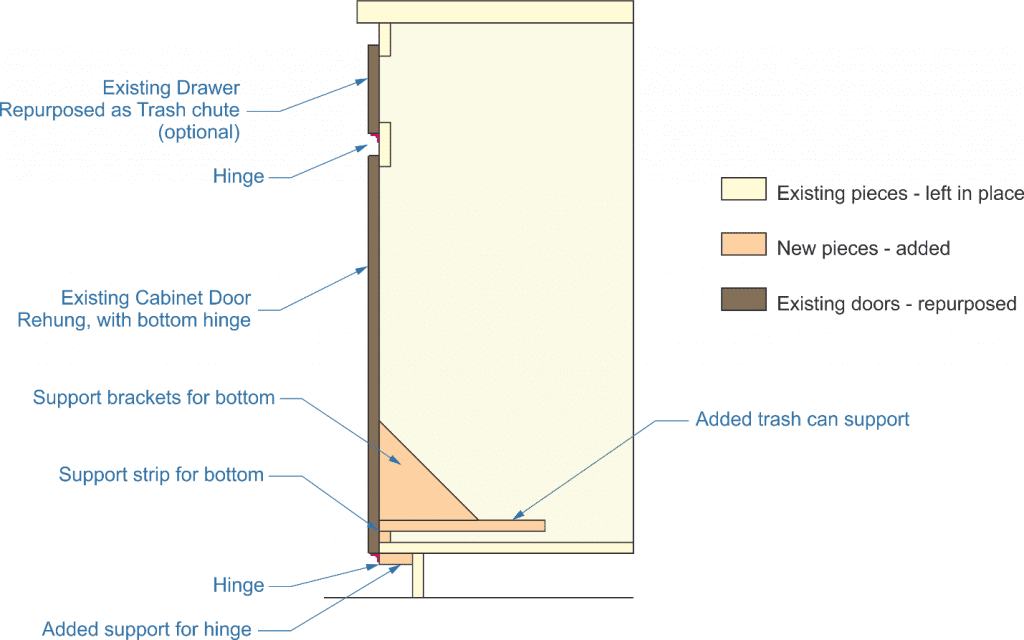
The door that was just removed will become part of the tilt-out, with the addition of a couple more pieces of wood. In addition to the door, a bottom must be installed, for the trash can to sit on. This will be attached to the door at a right angle. A strip of wood, hidden underneath will make it possible to attach the two pieces together and angled braces on both sides will ensure sufficient strength.
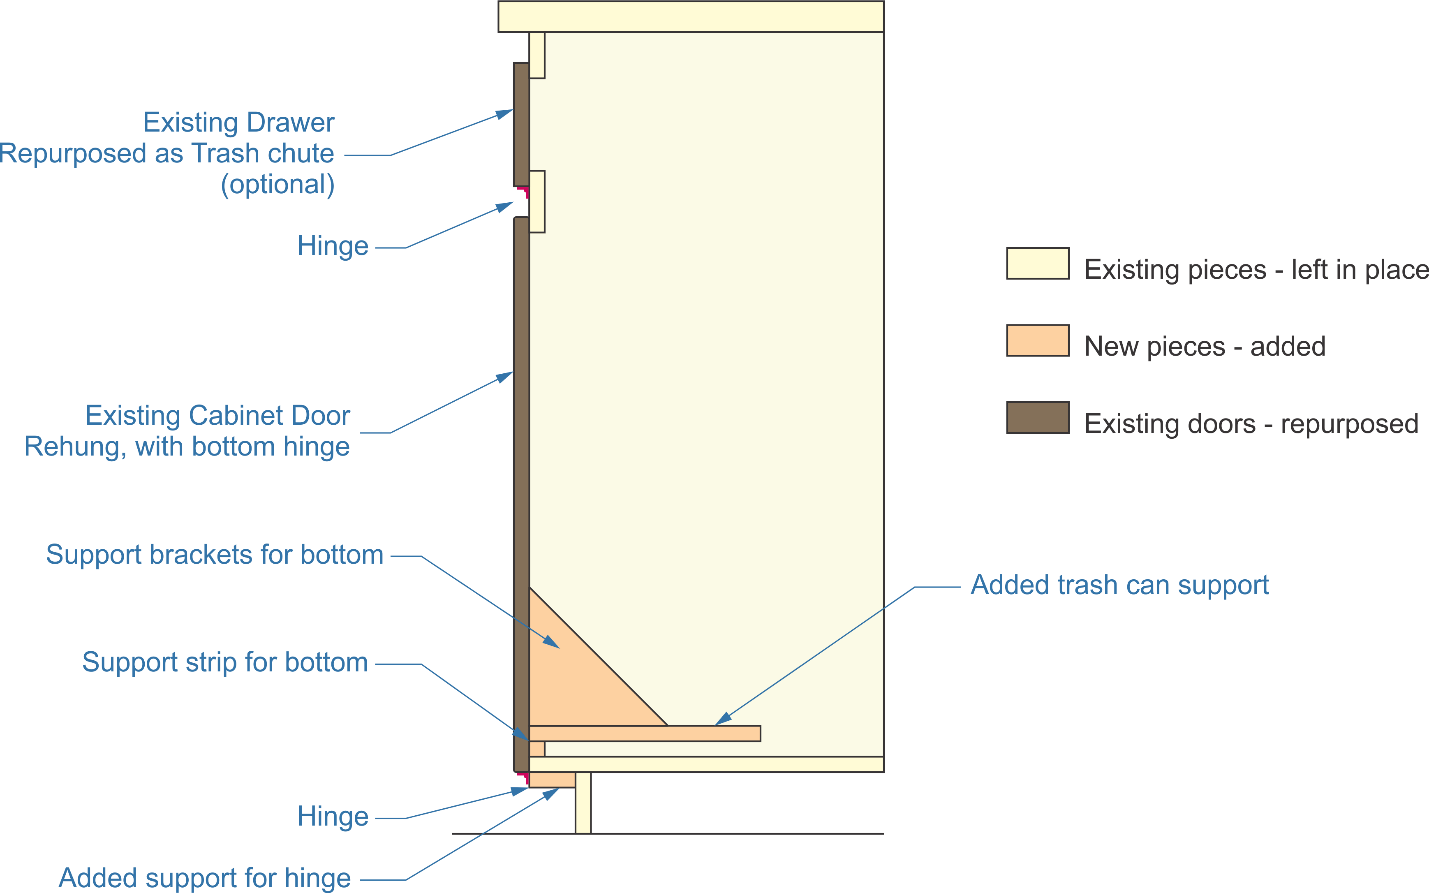
In the diagram below, we see the modification to the door. A strip of wood ¾” square and as wide as space allows is attached to the bottom of the door, in a position where it would just sit on the floor of the cabinet, with the door closed. Care must be taken in placement of this piece, as it determines the alignment of this cabinet door with the ones on either side. Glue this to the back side of the door and screw or nail it through from the back side. If screws are used, it is highly recommended to drill clearance hole in the strip to prevent splitting.
The bottom support for the trash can should be made of ½” plywood and should sit on top of this strip and be attached to it. That provides support to the front or door side of this support. To hold up the back of the support, triangular pieces of plywood are cut and attached to either side of the bottom support, as shown in the drawing. To attach them to the door, use additional pieces of ¾” square stock, attaching them from the backside, just as the strip along the bottom.

Before installing the door, an additional piece of wood needs to be attached underneath the floor of the cabinet. This should be glued in place as well and should be attached with either nails or screw, running them through from the inside. Countersink the hole for these screws, so that the heads do not stick up and clamp the piece in place while wing them in to prevent movement of the part during fastening.
To install the modified door back onto the cabinet, it is best to use a piano hinge. While cabinet hinges can be used, the piano hinge will better withstand the strain put on it, especially by children who might hang on the door while putting rubbish into the trash can. Add a chain, attached with eye screw, near the top of the door, going from the door to the inside of the frame, to keep the tilt-out from flopping all the way open, when in use.
If the door doesn’t already have a door pull on it, one will need to be added. That might necessitate installing door pulls on all the kitchen cabinets.
Optional Trash Chute
Most base cabinets that would be modified to provide a tilt-out trash bin would have a cabinet, with a drawer above it. That drawer can be modified to provide a trach chute, making it easier to put trash into the can and eliminating the potential problem of small children hanging on the tilt-out door. However, this optional addition would eliminate the drawer space.
To make this change, remove the drawer from its slot, emptying it out. The drawer will consist of a box, with a drawer face screwed to it. The drawer face can be removed, making it available for the trash chute. Add hinges to the bottom of the drawer front and attach them to the cabinet facing, along with a magnetic catch to hold the drawer front closed.
Since the full depth of the drawer space is not actually needed for the trash chute, the drawer box can be cut down to about half its original depth, using the same parts and reconnecting them back together after cutting them down. Reattach the drawer slides and attach a drawer pull to the front of this shortened drawer. It should be able to be reinstalled just as it was, except that it will not be readily visible to anyone, providing a hidden storage area.
Modifying Existing Cabinet for Slide-Out Trash Can
Many modern cabinet makers use slide-out trash can holders, rather than tilt-out ones. The idea is more or less the same, with the exception that the cabinet door is not attached to the cabinet frame with a hinge. Instead, it is attached to a box, essentially a large drawer for the trash can to sit into, mounted with drawer slide. The box is necessary, because the action of sliding it in and out could cause the trash can to tip over, if it is not constrained.

The diagram above shows the construction of this version. It essentially involves building the drawer box and attaching it to the inside of the cabinet door. Since the drawer box will have a front side, it will be possible to fasten the two parts together by drilling clearance hole in the front of the drawer box and screw through them into the back side of the door. The width of this drawer box is somewhat critical, as it needs to match up with the drawer slide.
For slides, the best type to use are the ones that attach to the inside of the cabinet face and the back wall of the cabinet. That way, no special supports are needed for the rails. Full extension rails are best, making it easier to remove the trash can for emptying. If there is sufficient space, a box of trash bags can be stored in the drawer box, behind the trash can, making it convenient. As with the tilt-out bin, a pull will need to be attached to the front of the cabinet door, if there is not already one installed.
Where No Cabinet is Available
It may be possible that no cabinet space is available for installing the tilt-out or pull-out trash bin. In that case, it will be necessary to build a base cabinet. Most homes built in recent years don’t really have enough storage space in the kitchen. However, there’s usually some extra space where another cabinet can be added in, especially if it is not the full 24” depth of most base cabinets. Making the cabinet itself is not all that hard, as base cabinets have very few parts and are usually assembled by gluing and brad nailing with a pneumatic nailer.
The big challenge in this case, is to make the new cabinet match the existing ones, as much as possible, so that it will look like it belongs in the kitchen. That starts with selecting the right materials. Kitchen cabinets are usually built out of hardwood plywood. Unless the cabinets are made of a specific type of wood, like oak, the plywood of choice is birch. Birch plywood is one of the more readily available hardwood plywood varieties and is more reasonably priced than oak or walnut would be.
The face of the cabinet is almost always made out of solid hardwood, unless the cabinets were either made by a previous homeowner or a local contractor. Normally, standard 1”x 2” hardwood boards are used for the building of the cabinet face, with the exception of double cabinets, where a 1”x 4” is used between the two doors.
It is best to take the dimensions off of the cabinets already existing in the kitchen for building the new cabinet. Build the face frame separate from the cabinet and then attach the two together. While many cabinets have been built using pneumatic brad nailers to attach the pieces together, if pocket screw are used on the back side, there are no visible hole that need to be filled.
Making Another Secret Space
All kitchen and bath base cabinets are built with a toe kick. This provides an excellent opportunity to create a secret storage space underneath the cabinet, in space that usually goes to waste. One way to do this is to install the toe kick facing with cabinet door roller latches, so that it can easily be removed, giving access to that area.
For a little fancier way of making that space useful, build a drawer that fits in the toe kick area, with the drawer facing being the toe kick facing. Magnetic touch latches can be used to hold the drawer shut, but will help it pop open with a simple push.


