It seems like everyone needs more shelves, no matter how many they have. Shelves are useful for storing things, organizing them or putting them on display. They can take otherwise wasted space and turn it into usable space, making the home more livable. There’s really no such thing as too many shelves; and plywood makes for a quick and easy way to build them, without a huge out-of-pocket expense.
Many people think of plywood shelves as something relegated to the garage, attic or basement. But that’s just one type of shelving, usually unfinished. Those shelves are used for storage, so are not intended to be fine furniture. On the other hand, most furniture shelving made today is MDF or particle board, both of which are plywood products. If the major furniture manufacturers are using plywood to make the furniture shelves they sell, there’s no reason why the rest of us can’t too.
For that matter, it’s considerably more difficult and more expensive to make shelves out of solid wood, even if we compare the cost of clear pine to hardwood plywood. So making plywood furniture shelves actually makes a lot of sense. They just can’t be made the same way that the ones used in the garage are.
Making shelves is a great way to break into furniture making. Unlike some other projects, shelves are simple to build. There is little difficulty with complex joinery and the joinery that does exist in the project is very forgiving.
Making Plywood Storage Shelves
Building storage shelves for the garage, basement or attic are simple, mostly because there is no need to worry about fit and finish. The idea is to have functional shelves, not pretty shelves. Strength and stability are paramount, along with maximizing the amount of storage space available.
While it is possible to make storage shelves out of OSB or MDF, most people make them out of construction-grade softwood plywood. Since building code allows for the use of OSB in place of plywood for flooring and sheathing, there’s no reason not to save a few dollars, by using it for making these shelves. The OSB will have to be adequately supported in any case, so the chances of breakage, due to using the “wrong material” are minimal.
The next decision is how thick a plywood material should be used for the shelving. This is a major issue, if the plywood is unsupported, such as using metal brackets to hang shelves on a wall. In that case, ¾” nominal (23/32” actual) plywood should be used. But if the plywood is attached to a 2”x 4” or even a 1”x 4” framework, the framework will be providing the structural strength, not the plywood. So plywood as thin as 3/8” can be used effectively.
Size will often be dependent on the space available, but assuming that we’re building shelves to go into a relatively empty garage, it makes sense to build an 8’ long shelving unit, because the material comes in that length. As for depth, ripping a single sheet of plywood can give us:
2 – 24” deep shelves (actually 23 15/16”)
3 – 16” deep shelves (actually 15 7/8”)
4 – 12” deep shelves (actually 11 7/8”)
How many shelves are installed in a particular shelving unit of this kind is really up to what’s going to be stored on those shelves. I’ve found it helpful to have a large space (at least 36” of vertical height) under the bottom shelf, with enough space between the upper three shelves to fit a five gallon bucket with a lid. This doesn’t leave a lot of room on the top shelf, but it works out great for storing long, thin items.
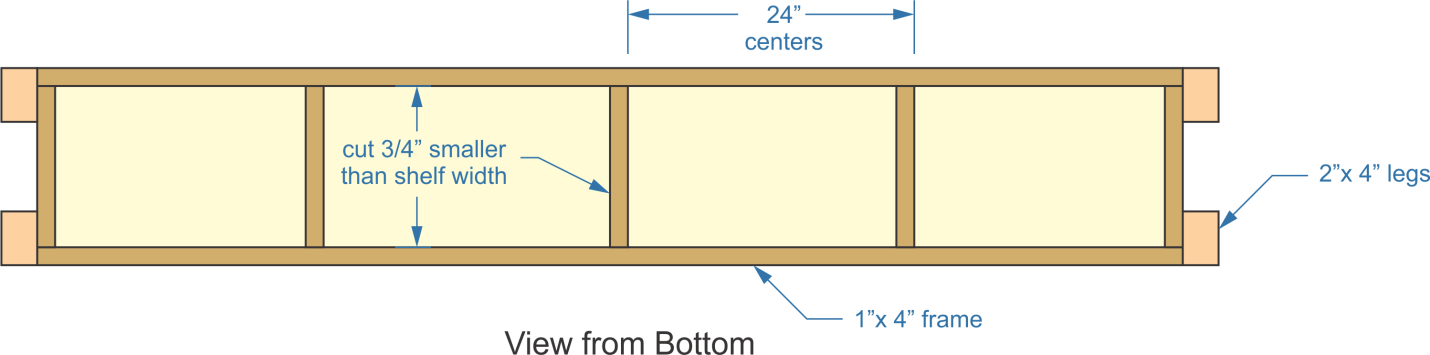
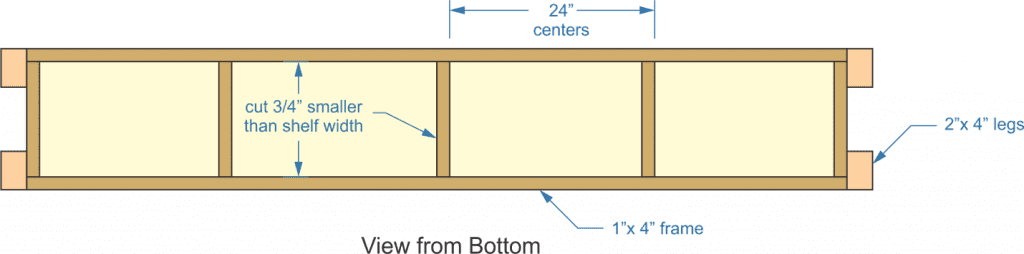
It is easiest to build the frames for the shelves first, attach the shelving material to this frame, and then attach the legs to the assembled shelves. This can all be done on the garage or basement floor and then the shelves can be stood up in place.
For the shelf frames, think in terms of making a wood ladder. They can either be made out of 2”x 4”s or 1”x4”s. While it would be a good idea to use 2”x 4”s if there’s going to be a lot of weight put on the shelves, the truth is that the 2”x 4”s won’t be all that much stronger than the 1”x 4”s, because the vertical height of the frame will be the same, either way. Since it is that dimension that gives the shelf strength and stiffness, the extra material in the 2”x 4” doesn’t help much.
Since we’re talking about an 8” long shelf, the “rungs” of the ladder can be every 24” on center. Changing that to 16” would provide a little more strength, but unless a lot of small, heavy items are placed on the shelf, it won’t make any difference. The actual support will come from the two long boards at the front and back of the shelf.
Garage shelf
Nail the framework together, rather than using screws. Screws through the longitudinal supports and into the end grain of the crossbars won’t provide any strength and may pull out. On the other hand, nails, which rely on the wood compressing against them, will provide a strong joint. Coated nails are even better, as the glue used as a coating helps prevent them from pulling out.
With the framework for the shelves finished, the plywood can be nail or screwed onto one side of each frame, with short nails or screws. If the wood used for the framework is bowed at all, attach the plywood so that the framework bows up, rather than down. This will add additional strength.
With the shelves built, all that has to be done is to add the legs. 2”x 4”s should be used for the legs and not 1”x 4”s. While the 1”x 4”s have the strength to support the weight, they are also more flexible, so would make the unit unstable. It’s a good idea to use 2”x 4” studs, rather than 8’- 2”x 4” boards for the legs, as the ceiling is only 8’ high. It might be difficult to stand up the unit, once assembled, if the longer boards are used.
Before attaching the legs to the shelves, make sure that the floor where the shelving unit is going to be placed is level, using a four-foot level. It’s not unusual for garage floors to be sloped, allowing for drainage. But it’s usually not a good idea to have the shelves sloped as well. So it might be necessary to install the legs unevenly, to account for the slope of the floor.
A four-foot level has the advantage of providing an easy way of determining how much of a difference in leg length is necessary, to ensure that the shelves sit level, over an uneven floor. When checking the floor for level, note how much space there needs to be between the level and the floor, for the level to sit level. Double that distance and offset the leg at the downhill end by that much, making it longer.
stand the shelves on edge, aligned, and attach the legs, taking care to ensure that the space below the bottom shelf is consistent, as well as the spacing between shelves. Since the legs are thicker than the framework for the shelves, it would be best to screw through from the inside, going through the shelf frame first, and then into the legs. screws would be better than nails here, as it would be difficult to hold everything in place to nail it.
In addition to attaching the legs to the shelves, it’s necessary to add at least one diagonal brace on the back side, going from one of the shelves to one of the legs. These can be of any sort of scrap material you have and can be any length; although longer is better. Two would be even better. Without any sort of diagonal brace, the shelf can collapse to the side; the brace prevents that from happening.
stand the shelf up and place it against the wall, where it goes, with the diagonal brace against the wall. For additional stability, run a short piece or two of scrap 1”x 4” or 2”x 4” between the shelf and the studs in the garage wall, nail or screw it at both ends.
Making Plywood Bookshelves
Plywood can be used in a number of different ways to make shelves for books and knick-knacks. The shelves can be made of just plywood, a combination of plywood and hardwood, or plywood with some other material to act as a support.
Another major area of design consideration, which must be thought about before starting, is how the shelves will be finished. Most commercially manufactured shelving units are made to be wood grain, although it is also possible to buy them in black or white. For homemade shelves, the choice is either the wood’s natural grain, staining the wood’s grain, or painting the wood in some way.
Painted shelves are considerably less expensive, as a lower grade of plywood can be used for making them. Yet they can still be attractive, especially if painted to match an accent wall in the home. In almost all cases, ¾” thick plywood should be used for shelving; thinner material will bend too easily.
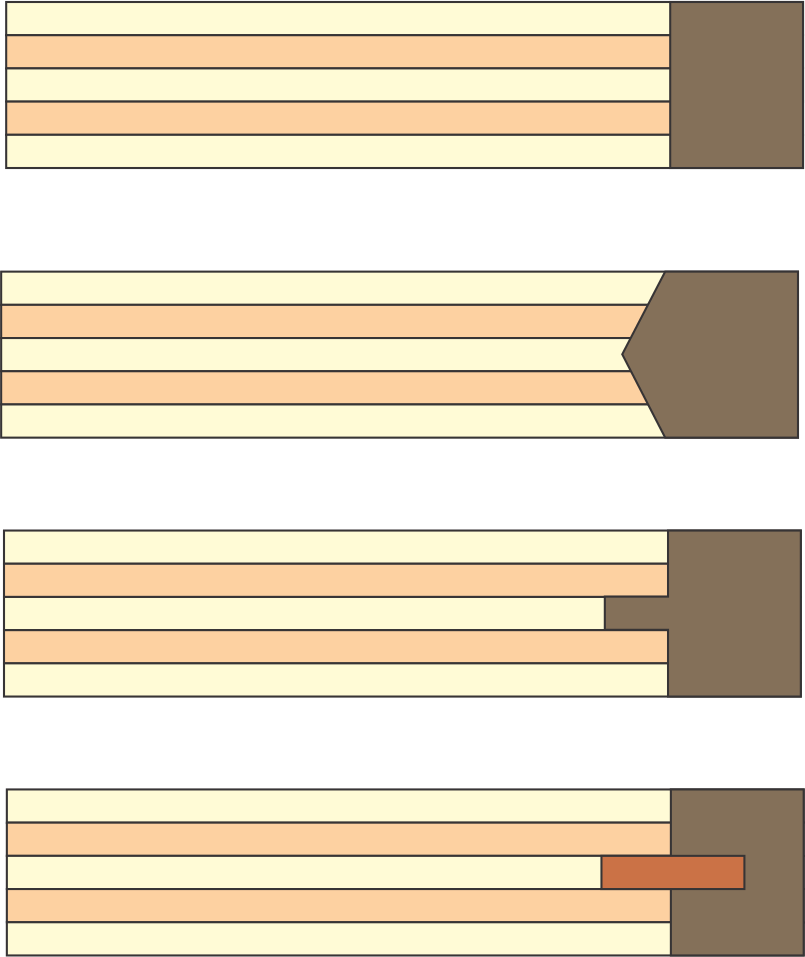
If the plywood is to be stained and varnished, instead of painting it, then it is a good idea to use hardwood plywood. Either edge banding can be applied to the visible edge of the plywood or a strip of matching hardwood. There are several ways of doing this, as shown below.
Plywood edge banding
Another option is to combine an edge banding with a support. If the shelf is going to be holding a lot of weight, such as being filled with books, then a support is necessary. Rabbeting the back of a 1”x 2” piece of hardwood and insetting the plywood into this, provides an excellent combination of a hardwood edge and a support.
Shelf edge support
Shelves of this type can be installed permanently, attached to the sides of the shelving unit or mounted with pins, such as is common with low-cost shelving units that the buyer assembles themselves. Using shelf pins allows the unit to be made with adjustable shelf heights. However, the tradeoff is a unit that isn’t as strong.
Shelves on Other Support
The simplest way of making plywood shelves for use in the home is to use something else as the support for the shelves. This can be cement blocks, bricks, glass blocks or any other strong and sturdy item. It’s just necessary to have matching pairs, so that the shelves will be level.
Another option is to use some sort of wall bracket with the shelves. There are both wood and metal ones available on the market. If the shelves are going to be mounted into a pre-existing niche in the room, 1”x 2” wood strips can be nail inside the niche, on all three sides, providing support for the shelf.
Keep in mind that with any sort of shelving unit where something else is being used as a support, the cut ends of the shelf may be visible. With that being the case, it might be necessary to band those edges as well, rather than just the front edge.
Bookcase Style Shelves
Bookcase style shelves use the same basic construction for the shelves themselves, inserting them into the bookcase. So the difference between the two is the vertical supports, a kick plate and a top. The kickplate, like a toe space under a kitchen cabinet, is to allow room for people’s toes, without them kicking whatever is on the shelves.
Start by making the outside of the bookcase, attaching vertical supports to a top shelf. This top shelf is typically wider than the others, so that it overlaps the end grain from the vertical supports. It can even extend slightly to the sides of the bookcase, overlapping up to an inch, if there are not going to be multiple bookcases sitting side by side. It can also be deeper, going a minimum of the full depth of the bookcase and possibly overhanging to the front up to an inch.
On a bookcase where the top is overhanging the sides and to the front, it can be very attractive to rout the edges of that top board, giving it a molding appearance. Pick a style which will match the room the shelving unit is going to be used in.
Cut the bottom shelf and attach the hardwood edge, but don’t put a support on this shelf. Rather, add a 1”x 3” kickplate, insert 1” to 2” in from the front edge of the shelf. Then install the shelf, nail or screw through the sides of the bookcase, into the edge of the shelf.
It can be difficult to attach plywood together by nail or screw through a panel into the edge of another panel. In order to ensure that the fastener doesn’t break out through the side of the plywood, mark the line where the fasteners will be installed, as well as where the board has to align. For screws, pre-drill a clearance hole through the side panel and a starter hole (as big as the screw’s center shank) into the edge of the shelf. This will help to keep the plywood from splitting.
Another option is to use dowel pins to hold the shelf in place. This entails clamping the shelf where it is to be installed, and then drilling holes through the outer panel and into the end of the shelf. A small amount of wood glue is then put on the dowel and it is pounded into the hole. Clamp the unit until the glue dries.
Continue adding shelves in the same manner, until the unit is fully populated. Adding a thin plywood back will give the unit considerably more structural strength, keeping it from collapsing to the side, much like the diagonal braces on the garage shelves.
A built-in Wall Unit
Taking the bookshelf style plywood shelf idea a step further, it is possible to make an entire wall into a shelving unit. This can either be done by breaking it down into 30” to 36” wide shelving units, side by side, or by making a number of plywood boxes, which stack together to cover the entire wall. These boxes should be attached together to give the entire unit stability.
Before making something like this, it’s a good idea to sit down with pencil and paper to decide how big to make each box. They’re going to have to fit together in the area being turned into a wall unit, without leaving any gaps, especially at the ends. Gaps can leave an opportunity for the boxes to move in relation to one another, ultimately making the unit unstable.
Of course, it’s not actually necessary to make a series of four-sided boxes, if they are connected together. Rather, the wall can be cut up into various sections, each of which has an outer box, with dividers inside, that helps to save on wasted material, by eliminating double walls where they are not necessary.
Finishing the Shelves
While it is not necessary to finish plywood shelves used in the attic, basement or garage, those which are built to be used indoors, as pieces of furniture, need to be finished. As mentioned earlier, this can be done with either stain and varnish or paint.
When building plywood shelves which are to be painted, it is not necessary to apply edge-banding, although it can be applied to give a smooth edge. It’s also possible to get smooth edges by filling the end grain of the plywood with some sort of paste wood filler and then sanding it smooth. Failure to use any sort of wood filler will leave an edge that is rough and absorbs a lot of paint.
Related Posts:
Floating Shelves: Stylish Storage & Easy DIY Guide by Admin September 8, 2025 DIY I still remember the first time I put up floating shelves. It wasn’t some big renovation—just a Saturday project in my living room. Instead of…
Rhino Lining Plywood: A DIY Way to Make Plywood Last by Admin January 25, 2026 Grades I didn’t start using Rhino lining plywood because I wanted something extreme or clever. I ended up there because I got tired of replacing plywood…