Cabinets are an integral part of any home. At one time, cabinets were built in place, often custom made to match the home. Those cabinets would include hutches, corner hutches and glass-fronted cabinets to show off dishes and glassware. Today’s cabinets may not be as elegant or complicated as those and are not usually installed in the dining room; but kitchens, bathrooms and laundry rooms typically have wall-mounted cabinets installed in them, whether off the shelf or custom built.
Regardless of the design and appearance of the cabinets themselves, they are all built pretty much the same way. This includes reinforcing the cabinets where they need to be, in order to make them strong enough for hanging. While the tops and backs may be made of ¼” thick plywood, there will be a thicker strip of material at the top and bottom of backs and at the backs of tops, providing something substantial to hang the cabinet from.
If both wall cabinets and base cabinets are to be installed in a room, it is usually easier to install the wall cabinets first. That allows the installer to get closer to the wall, where it is easier to handle the weight of the cabinet, rather than having to lean over the base cabinets. While the wall cabinets are typically a fixed distance above the base cabinets or above the countertop, hanging them first doesn’t change that. Hanging them level at 54” above the floor will provide the right spacing.
It’s easier to work with a mate for hanging wall cabinets; but there are ways for one man to do it alone. All the second man does is support the weight of the cabinet and there are ways around that, propping the cabinet into place.
Before installing the cabinets, it is important to ensure that the wall is properly finished and the floor is level. Homes, especially old homes, aren’t always as level, plumb and square as we would like. That can have a huge impact on things like hanging cabinets. It may be necessary to add shims to even out an uneven wall or add fillers at the ends of the cabinets, when a corner is wider than 90 degrees. Use a known straight edge to check for high spots in the wall and show where shimming might be necessary.
Find and mark the stud locations, behind where the cabinets are to be installed. It is essential that the cabinets be mounted into studs, whether in the wall, soffit or ceiling. Cabinets are heavy and become even heavier when filled. A typical wall cabinet can hold as much as 600 pounds. Screws into drywall won’t support that weight, regardless of the type of hangers used.
Standard Wall Cabinet Hanging
Assuming that an assistant isn’t available, it would be helpful to have something to hold the cabinets while attaching them to the wall. Start by measuring and marking 54” above the floor. If the floor is uneven, measure from the highest point, as the rest of the floor will have to be shimmed up to that level for the installation of the base cabinets. Make a level line at that point and install a 1’x 4” or 2”x 4” board, flush to the wall, with its top on that line, to act as a ledger board.
Before hanging the cabinets, remove the doors and any other removable pieces to reduce their weight. These items will be reinstalled, once the cabinets are in place.
Cabinets are typically installed from a corner, as that is the most critical fit. If there are two corners, the cabinets should have been made to be just a shade short of the full width to ensure that they will fit. In the case where there are two corners or no corners, it is typical to work from left to right, as most of us are right-handed and it is easier to work that way.
First, mark the location of the stud on the back of the cabinet and use that to drill clearance hole for the screws. Each stud should receive three screws, with each screw being able to support 75 pounds. One screw at the top, going through the supporting strip, one at the bottom, again going through the supporting strip of wood and one in the middle. For double door cabinets, it will be possible to put two rows of screws, but for single door cabinets it will probably only be possible to use a single row of screws.
With the holes drilled, set the back of the cabinet on the ledger board and loosely insert the screw, running them almost all the way down, but not all the way. Screws should be no. 10, coarse thread and 3” long. Verify that the cabinet is level and plumb and shim the back of the cabinet against the wall, if necessary.
Additional cabinets all need the same care taken as the first, with one exception. That is, attaching the cabinets together. Once the cabinets are loosely attached to the wall, align the face frames to be flush across the front, taking care to ensure that they are also the same height at the bottom. Then clamp them together, so they can’t move. Drill through one face frame to the next, using a countersink tapered bit, and then connect the cabinets to each other with screw.
It will probably be necessary to install a filler strip along the ending wall. This should come with the cabinets, if they are purchased as a set. But if it doesn’t the same manufacturer who made the cabinet should have matching fill strips, finished in the same way that the cabinets are. If the space to be filled is straight and even, rip the strip to fit and screw it to the face frame, in the same way that the face frames of the cabinets were screwed together. On the other hand, if the wall it needs to meet up against is uneven, it may be necessary to cut the filler strip to fit that wall. In that case, a compass can be used to scribe the wall profile onto the strip and then it can be cut with a jigsaw.
With the cabinets all in place, the screw mounting them to the wall can be tightened. Then the clamp for the face frames can be removed. Reinstall the doors and any other parts that were removed, making sure that the doors are level with each other. Don’t forget to remove the ledger board and fill the hole that the screws made, painting over the spackling.
Some walls are harder to hang wall cabinets on than drywall walls, such as brick walls and plaster and lath walls. In these cases, the screw can’t go into studs, as the studs are not available. However, the walls themselves are strong enough to support the weight of the cabinets, unlike drywall. The big problem is that anchors need to be used, as screws don’t readily go into brick or concrete.
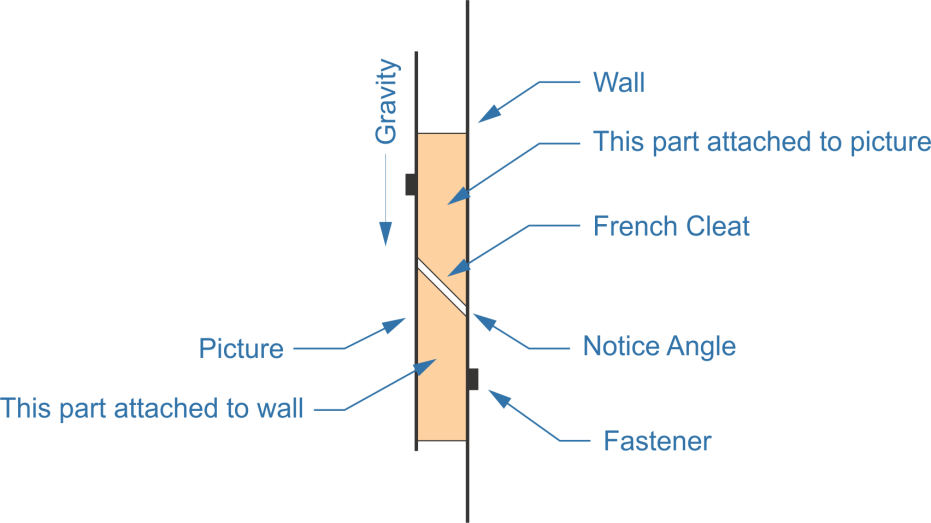
In cases like this, it is much easier to install the cabinets using a French Cleat. The French Cleat consists of two parts, either made of wood or metal, which interlock with each other in such a way that the weight of the cabinet and its contents works to pull the cabinet against the wall, both holding it secure and locking the cleat together.
Homemade French cleat
Don’t be fooled by the diagram above, take time to review it carefully. The upper part of the cleat is attached to the wall cabinet, which is on the left and the lower part is attached to the wall, which is on the right. The angle between the two pieces is what makes it possible for them to lock together, with the weight of the cabinet holding it in place.
It will be necessary to cut the French cleat to fit within the width of the cabinet, so that it doesn’t push the cabinet out from the wall. The cleat is hung near the top of the cabinet, so that the weight of the cabinet pulls down on it. Due to the way the cleat works, it will be necessary to leave a small amount of space above the cabinet, allowing the cabinet to be lifted up high enough for the two parts of the cleat to engage.
When using a French cleat, the ledger board is not needed, as the French Cleat itself performs that function. So the key to successfully mounting cabinets with a French Cleat is ensuring that the part of the French Cleat that attaches to the wall is level and secure. Use a hammer drill to drill the appropriate sized hole, as noted on the package of anchors. Be sure to use sufficient anchors to support the maximum full weight of the cabinets. It may be necessary to counterbore the holes in the French Cleat, so as to ensure that the heads are below flush, out of the way of the cabinet.
With the wall part of the French cleat in place, the cabinet side needs to be cut to fit. Attach it to the back of the cabinet, horizontal, at the right height to engage with the wall-mounted part of the cleat. The screw used to attach the cleat to the back of the cabinet can’t be any longer than the thickness of the cleat. Therefore, to ensure a solid mount that will support the weight, be sure to use a surfeit of fasteners.
While the French cleat will hold the weight of the cabinet, it is still a good idea to attach the face frames of the cabinets together, ensuring that they stay properly aligned with each other. This is done in the same way as it is with a standard wall cabinet installation.
Installing Wall Cabinets with a Soffit or to the Ceiling
While upper cabinets in kitchens, bathrooms and laundry rooms are normally attached to the wall, there are some cases where the design of the room may make that impossible, especially when the cabinets are being hung above an island or a portion of the countertop that divides the room, separating the kitchen from the dining area. In those sorts of cases, the cabinets are hung from a soffit or the ceiling. Cabinets made for this sort of installation differ from those built for hanging on the wall in that the back of the cabinet is either finished (as it will be visible) or has a secondary set of doors mounted on it.
In order to hang cabinets in this way, it is necessary to have the necessary 2”x 4” blocking to act as a support, attaching the cabinets to those 2”x 4”s through the drywall. Typically ceiling joists and supports in soffits are mounted every 16” apart, providing adequate support. However, if the ceiling joists are running in the wrong direction or there are not enough supports in the soffit, it may be necessary to add additional 2”x 4” supports before installing the cabinets. Take special care checking the location of supports for narrow cabinets, as it is possible for a 12” wide cabinet to fit between two ceiling joists that are spaced 16” apart, without either providing support to the cabinet.
To make sure that everything is going to work out properly, lay out the dimensions of the cabinets on the ceiling or soffit, drawing the outline of the cabinets. Then physically locate the structural elements that the cabinets will be attached to, drilling through the drywall, where the cabinets will hide it, to verify their location.
As with normal wall mounting, hole will need to be drilled through the top of the cabinet for the screw. In this case, there should be a support strip along the upper back of the cabinet that the screws can go through. For the front of the cabinet, the face frame itself can be drilled through and the screws run up through it. Use as many screws as there is space for.
It will probably be necessary to support the cabinets in some way while mounting them. This can be done with wood boxes. One good setup is to use a hydraulic jack, set on top of a wooden box made special for the purpose. While the cabinet will be unsteady on the jack when it is first placed there, once the jack is raised and the top of the cabinet makes contact with the soffit or ceiling it will be steady. Use the same #10 x 3” screw to attach the cabinets, as would be used to attach them to the wall.
As with the wall mount, it’s a good idea to drill through the face frame and attach the cabinets together, aligning the face frames flush. In the case where there are secondary doors installed on the other side of the cabinet, repeat the process there.
Some cabinet manufacturers may supply a full sheet cover for the back side of the cabinets, although it is more common to finish the cabinets individually. In this case, the back cover isn’t installed until all the cabinets are mounted.
Finishing the Cabinets
It is common to find minor fit problems between the cabinets and the wall, ceiling or soffit. This is why it is common for trim to be installed around the edges of the cabinets, especially against the walls and top. Matching cover molding, made of the same type of wood, is the most common trim used for this, although other molding profiles can be used as well.
Related Posts:
Hanging Bed- Full Guide How to Make It by Admin August 18, 2025 DIY Have you ever climbed into a hammock and thought, “This is great, but man, I wish I had more room to stretch”? That’s pretty much…
How to Remove Wall Cabinets – Easy DIY Guide by Admin March 17, 2025 DIY Planning a kitchen makeover? One of the first things that usually has to go is the old set of cabinets. Swapping them out for something…
Installing Garage Wall Cabinets: A Complete Guide by Amy Reed February 28, 2023 Installing Installing garage wall cabinets is a great way to free up floor space, create extra storage, and boost the aesthetics of your garage. In some…