There’s something a bit old world about a porch swing. It conjures up images of people sitting in the shade of their porch on a warm Sunday afternoon, drinking lemonade and talking to their neighbors; hearkening back to a time when life was simpler, the pace was slower, and we all had time to relax and just talk to each other.
While that image may not appeal to everyone, and especially not to the younger generation, there are many of us who can still find pleasure in the simple things in life. Things like working with our hands and creating something unique and personal. For us, sitting on that swing with a glass of lemonade (or stronger drink) is a welcome reward, after working in our shop and finish an important project. Of course, to enjoy that reward, we need the porch and swing, not to mention the beverage of our choice.
One problem in this scenario is that few homes anymore have much of a covered porch to put the swing on. Even if they do, the roof structure for that porch probably isn’t strong enough to support the weight of the swing and the people on it. That doesn’t stop some people from hanging one there anyway; but it’s much safer to use a glider swing, which will still provide the same sort of movement, with zero risk of the hangers pulling out of the rafter overhead.
A glider swing is more often compared to a rocking chair than a swing, mostly because it doesn’t have the ability to go up in the air, like we all did as kids, as if we thought we could get that swing to go all the way around the bar. Rather, it stays low to the ground, gliding back and forth with very little difference in the height that the seat is above the ground. Still, it’s comforting and relaxing, which is the point.
Glider swing can be made from pretty much any swing bench, a bench with the legs removed or even a sofa (although that might look a bit strange). But how to make the bench itself isn’t the focus of this article; rather, how to make the bench into a glider swing.
Modifying the Seat
The first part of the process is to modify the bench seat that’s going to be used for the swing. It’s going to be necessary to attach chains to the bench and it’s unlikely the existing structure has good attachment points. For one thing, they need to be able to support the weight of the swing and however many people pile on it. On top of that, the attachment points need to extend beyond the arms, so that the chains do not rub against the arms when the swing is in motion or create any pinch points between the chain and the arm. That means leaving a good two inches of clearance between the chain and the arm on both ends.
The easy way to create these attachment points is to flip the bench upside-down and attach a couple of 2”x 4”s, laid flat, to the bottom of it, one at the front edge of the bench and the other at the back end. I’d recommend using pressure treated, redwood or cedar 2”x 4”s, if available, as they will not be so easily damaged by the rain. Not a lot of screws are needed to hold the two together, as the bench will be sitting on the 2”x 4”s, so gravity will help hold it in place.
It would be a good idea to round the ends of the 2”x 4”s, eliminating any sharp corner that people might scrape their legs on. Then drill one vertical hole through each board, centered 1” from the end, for the eye bolts that the chain will attach to. Keep in mind that this eye bolt needs to be outside the chair’s arms, so that the chain doesn’t rub.
Making the Glider Frame
The glider frame is made of 2”x 4” construction lumber as well. Like the two pieces which are attached to the bottom of the bench, it is best to use lumber that is resistant to rotting. The hardware used to connect it together should also be protected from the moistures, such as deck screw, which are coated to prevent rusting.
The frame needs to be long enough so that the chains hanging down from it will be directly above the screw eyes on the 2”x 4”s that were mounted to the bottom of the bench. As these screw eyes will be mounted in the centerline of the 2”x 4”s making the top of the frame, the overall width of the frame needs to be 9.5” longer than the two supporting 2”x 4”s that were attached to the bottom of the bench. Cut two pieces of 2”x 4” to this length, to be used as stringers tying the two ends of the frame together.
For stability, the base of the frame should be deeper than the bench; 48” is usually pretty good. Not only will that keep the swing from tipping over, but the two pieces can be made by cutting a 2”x 4”x 8’ in half, with no waste. Chamfer one corner on each end; the end which will be facing up when the frame is assembled.
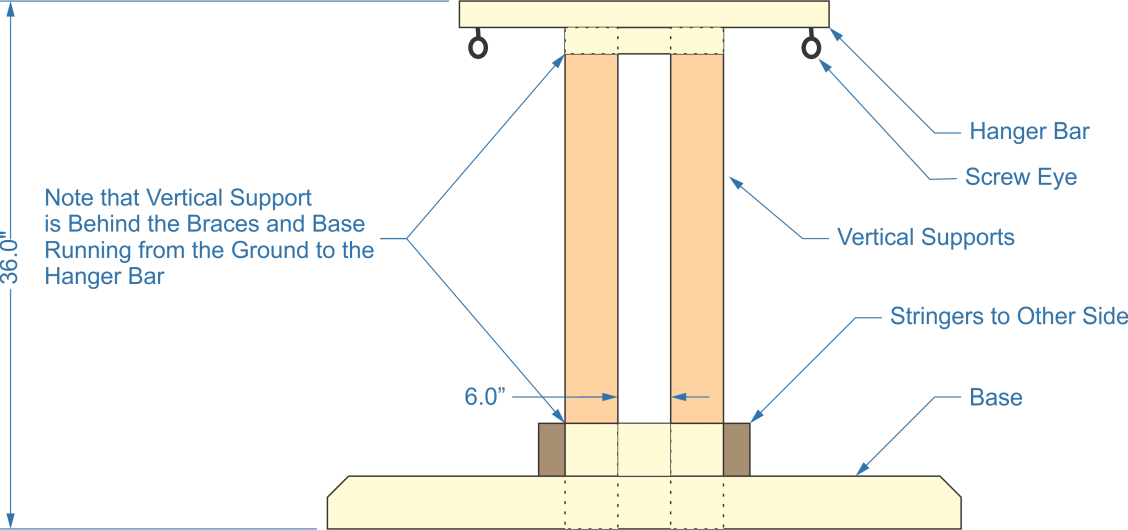
Glider swing – frame end
The diagram above shows the parts for the two ends of the glider swing frame, shown from the outside. All of the pieces shown are 2”x 4”s, with the exception of the braces mounted just below the hanger bar, at the top of the frame. These are made from a section of 2”x 4” that is ripped down the middle.
One important thing to note is that the two vertical supports on each end go all the way from the floor to the hanger bar at the top. This is why they are shown shadowed by a dotted line in the diagram above. They will be carrying the weight, so it is important that they make contact with the ground. Use a square when attaching the vertical supports to the base, to ensure that they are exactly vertical.
There are braces installed at the top and bottom of the vertical supports. These are added on for the purpose of preventing racking of the frame from movement. Use at least three screw per joint between these braces and the vertical supports, as well as between the vertical supports and the base.
The hanger bar is another section of 2”x 4”, attached to the top of the entire assembly. The length of this piece must be determined by the spacing of the two supports mounted under the bench. The idea is to have the chains installed exactly vertically, between the supports on the bottom of the bench and the hanger bar. It would be a good idea to round the ends of the hanger bar, just like the ends of the two supports on the bottom of the bench, to help prevent anyone from getting a scraped up leg by running into the ends of this.
The reason why the hanger bar is sitting on top of the vertical supports, and we’re not just extending the brace and using it to attach to, is that this makes the weight of the bench and anyone sitting on top of it push down through the 2”x 4” inch hanger bar and then longitudinally through the vertical supports to the ground. It is virtually impossible for the movement of the swing to cause the structure to work its way apart, unless the wood begins to decay to the point where it is no longer gripping the fasteners.
Attaching it All Together
Once the two end frames are built, the two stringers are attached, connecting the two ends together. Notice in the drawing above that these two pieces of 2”x 4” are mounted vertically. They go the full length of the frame, making it possible to screw them to both the vertical supports and the brace. This is important, as it helps prevent the stringers from coming loose due to lateral movement.
Finally, pieces of chain are attached to the four screw eyes in the frame, using S-hooks. The other ends of the chain are attached to the screw eyes in the bench supports, also with S-hooks. Exactly how long a pieces of chain will be needed depends on the design of the bench and how high the owner wants it sitting off the ground. But they will probably be about 20” long. That’s a good starting point, with the idea that they can be cut down, if needed.
Taking the Design to the Next Step
While the glider swing will work just fine as illustrated above, this might be an excellent chance at getting some additional woodworking practice, especially for those who aren’t accustomed to cutting mortises and tenons. The nice thing about using mortise and tenon joints on this project, other than it looking like a more professional job, is that since it is outdoor furniture, any slight gaps in the mortise and tenon won’t be as obvious as it would be for finely finished indoor furniture.
There are at least two places which lend themselves very well to using mortise joints on this project. The first is in joining the vertical supports to the base and the second is in joining the stringers to the end frames.
In order to do this a slight change will have to be made to the design. That is, the vertical supports will have to sit on top of the base pieces, rather than beside them. However, the overall length of these vertical pieces can stay the same, if the tenon is made to go all the way through the board being used as the base. If it is not going all the way through, then the vertical pieces will need to be shortened accordingly.
It would actually be easier to do a mortise joint with the stringers that attach the two ends together, than it would be to make a mortise and tenon to join the vertical supports to the base. Since the stringers are coming perpendicular to the ends, the tenon made on the ends of those would only have to go through half the material thickness, 1-3/4”, rather than 3-1/2”.
For a bit of a fancier mortise and tenon, consider making the tenon longer, going all the way through the vertical support and out the other side, then drill a hole in the part sticking out, putting a wood dowel pin through it to hold it in place and keep it from backing out.
Speaking of Dowels
This design also lends itself to one of my favorite methods of joinery, doweling. Both of the joints I mentioned above can also be done by doweling the pieces together, rather than cutting a mortise. The advantage of doweling in this case is that it is fast and easy, much easier than doweling boards together to make a tabletop.
In the case of doweling the vertical supports to the base, first clamp the pieces together. Then drill through the base and into the end of the vertical supports. Please note that a long drill bit will be needed, as it has to go through 3-1/2” of base, before reaching the vertical support and should go into the vertical support a good 2”. I’ve got a ½” brad point drill bit that’s 5-1/2” long, which makes it ideal for this.
Rather than using the pre-cut and grooved dowels normally used for doweled joints, use pieces of ½” diameter dowel rod which are more than long enough to fill the hole just drilled. Cover them with a thin film of glue before pounding them in, and then be sure to pound them all the way home. Once the glue has had time to dry, the excess dowel rod can be cut off with a flush-cutting saw.
Connecting the stringers between the frames is essentially the same, although it will be a bit harder to clamp the pieces in place for drilling. Be sure to cut down the stringers by 3” to make the design work the same. The other difference is that instead of drilling the holes 5-1/2” deep, it’s only necessary to drill them 3-3/4” deep.
I’ve doweled many a 2”x4” construction together this way, using it for things like handrails, ramps and patio furniture. The doweled joints hold up longer than screw or nails, because water can’t get into the joint and cause decay. For most applications, two ½” dowel rods are sufficient; but in cases where there is going to be a lot of lateral strain on the joint, I’d up that to three or even four dowels.