Summer warmth and sunshine can be enjoyable; but there’s usually a limit to how much of it we can take. Even the sun worshippers amongst us like to get out of the direct force of the sun at times, hiding out in the shade. While we can always go indoors to do that, it’s nice to have someplace outside where we have shade.
For most people, this means erecting a tent-style shade or what’s known as a “sail shade,” which is a triangular piece of canvas or other cloth, which is tied at the corners to the eaves of the house or poles set into the ground.
But that doesn’t always work. Any fabric sunshade is going to get torn up, in high wind areas. It’s possible to prevent this, if the sunshade is taught enough that it can’t vibrate in the wind; but that’s extremely hard to do. It takes a tremendous amount of tension to keep a sail shade from moving, when the wind is blowing across it. That, in turn, means that the poles and other supports have to be extremely well anchored, so as to be able to constantly support that tension.
Fortunately, fabric sun shades aren’t the only option available to us. Some people build a roof over their patio, giving themselves shade. That’s a great option, if you can afford it. But it can get quite expensive. Wouldn’t it be better if we could build something out of plywood, which could withstand the wind and rain, while still giving us shade?
Of course, that’s not the only sort of sun shade that we might need. If you live in a hot part of the country, you might want to consider sun shades over your windows, to help keep the direct summer sunlight out. That will help keep your home cooler, as much of the sunlight coming in your windows and hitting things indoors ends up converting to heat.
We’re going to look at two simple sunshade designs you can make yourself, to help make your life cooler. Both designs are scalable, so you can either use them for window shades or a patio shade.
Arched Plywood Shade
One nice characteristic of working with plywood, especially the thinner sheets, is that it is flexible. While that isn’t what most people are looking for, there are times when that flexibility is extremely useful. We’re going to take advantage of it in this design.
Curving a sheet of plywood makes it extremely strong along its lateral dimension, the same way that an I-beam is made strong; by having a lot of material far away from the center axis of the bend. The more of the material that is away from that centerline and the farther away it is, the stronger the structure is. While a curved piece of plywood will never be as strong as a steel I-beam, it will be much stronger than a flat sheet of plywood is.
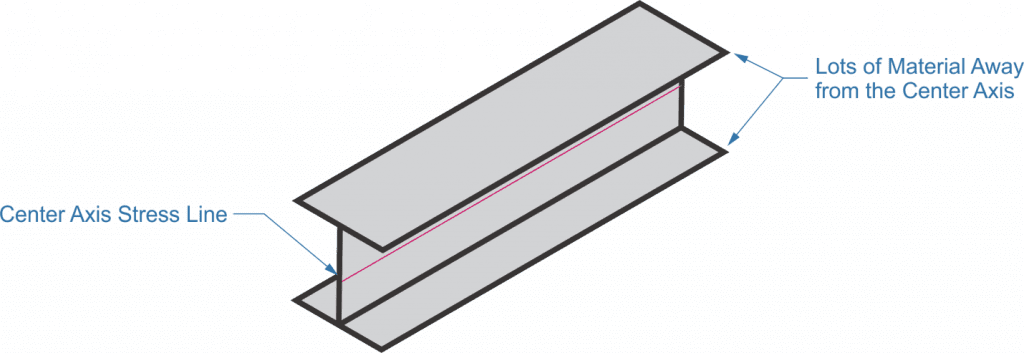
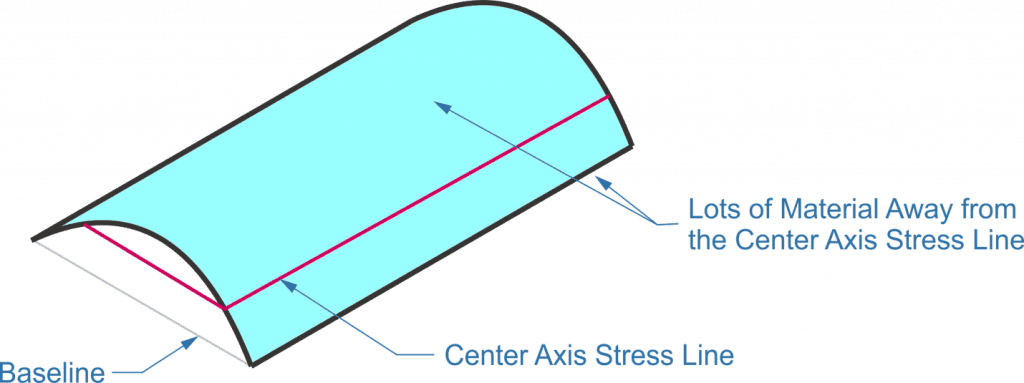
What this means, is that we need very little support structure for a curved piece of plywood, along the length of the curve. As long as we have enough structure in place to maintain the curve, the plywood skin itself provides much of the strength and stiffness, even if we are using the thinnest of plywood.
So, in order to turn a curve like that into a sun shade, all we really need is curved frames for the ends, plus stringers along the straight edges of the plywood. attaching the exterior to a framework like that will hold the plywood in place, so that the plywood can provide the strength to withstand the wind.
If we’re going to use this as a window shade, we aren’t going to want to have a curve like I’ve shown in the second drawing there. Rather, we’re going to want the high point against the wall, with the shade curving downwards from there. That will provide good runoff for the rain, while still keeping the strength the curve provides. So, we’ll need end frames something like this:

In the image above, we’re looking at the end of the sun shade from the inside (under the shade). The plywood end frame provides the support. By making it out of plywood, it is extremely easy to make, just amounting to cutting out some openings and the curve for the top. The mounting plate can be a 1”x 8” as I’ve shown, or a larger one if you want more of a curve to help keep the sun out. At the other side, there is a 1”x 2” forming a front lip. This will need to be bevel cut, to match the end of the curve.
I would rip a few thin strips of the ¼” plywood for the shade and stack them, gluing and nailing them to the top curve of the end frames, to make a sort of beam at the top. Then, with the frame assembled, it can be skinned over with ¼” thick plywood.
At this point, you can either choose to paint the entire thing, trusting the paint to protect the wood or add a layer of roofing over the top, to protect the thin plywood that you are using as a shade. I’d recommend using some sort of roll roofing for this, as it will be easy to apply.
Slatted Plywood Shade
Another option for a sun shade is to use a slatted approach. Doing so effectively requires a good understanding of the sun angle where you live. You’ll want to know where south is and how far the sun’s track is above the horizon, in both summer and winter.
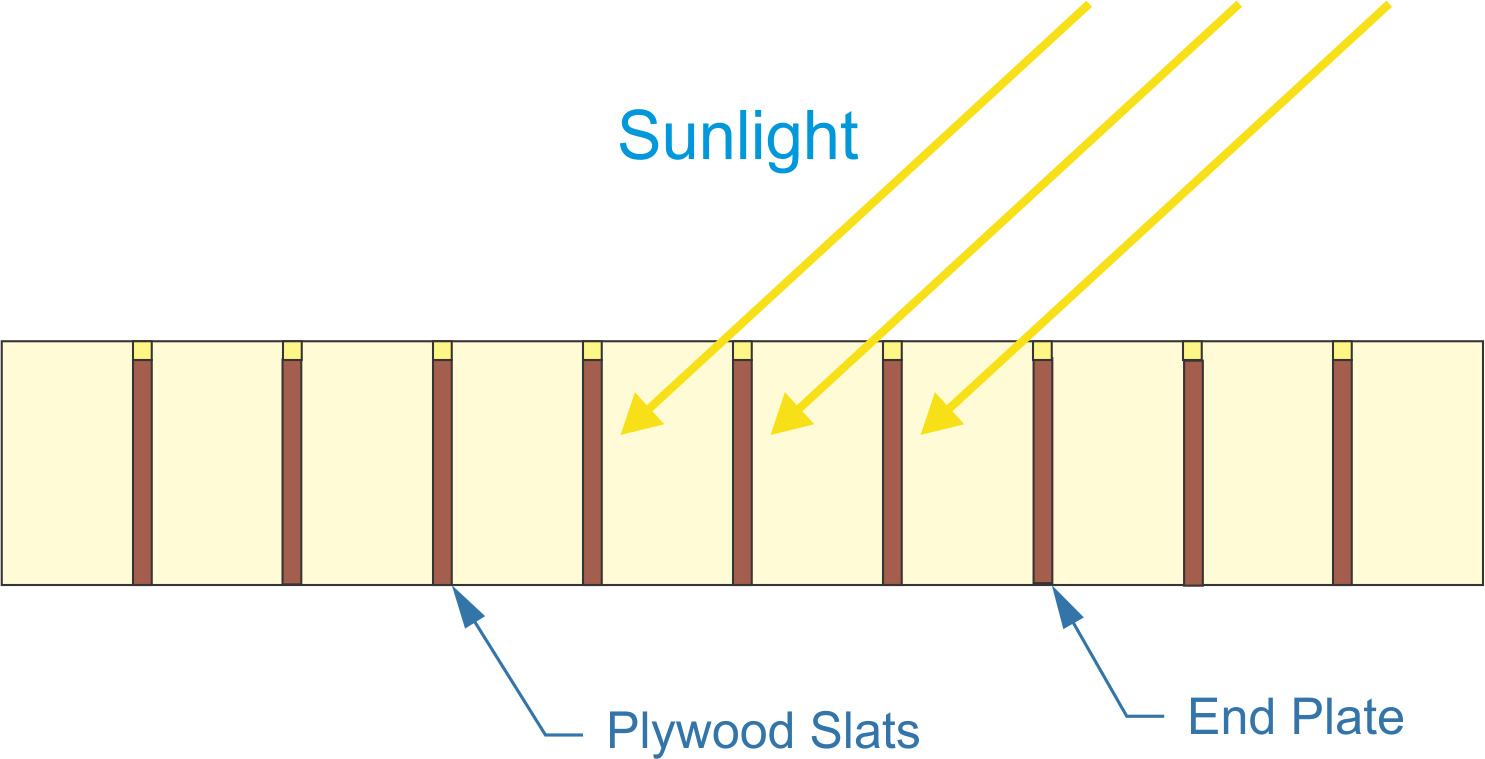
The idea of a slatted shade is that you attach a number of strips of wood vertically, onto a frame, so that they block the sunlight, without blocking rain or anything else. A shade of this sort blocks the sunlight, as shown in the drawing below, but doesn’t block out light. So you’ll have a nice airy, well-lit area, while still being protected from direct sunlight.
This sort of thing is often done with dimensional lumber, which can get very expensive, especially for larger sizes. You can make the same basic thing, using plywood for the slats, and save a lot of money.
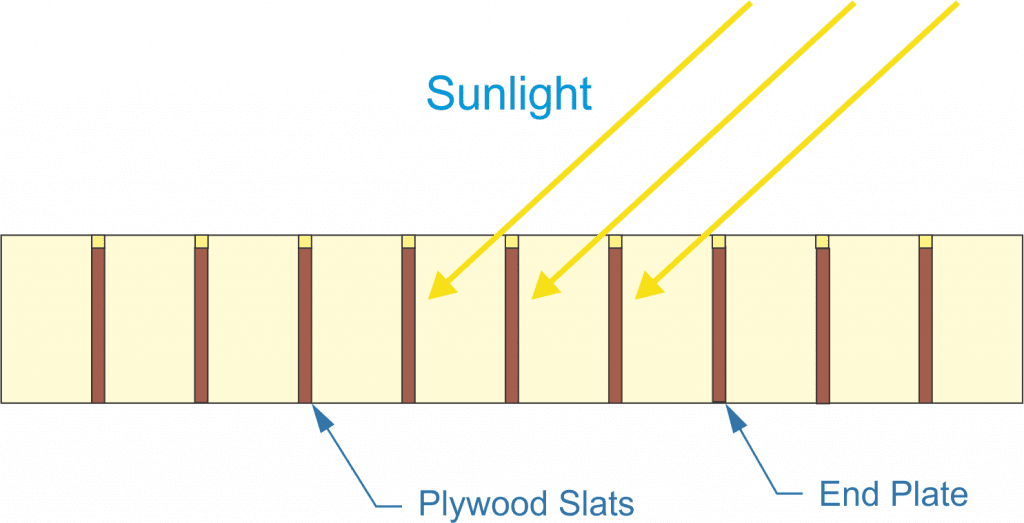
In the diagram above, we are looking at the structure of the shade from the inside. The vertical slats are made of plywood, with the framing they are mounted into being made of dimensional lumber. To get a good solid joint, it will be best to cut slots in the frame, before assembly, which the slats will fit into. They should fit snugly, but not so much that it is difficult to remove the slats. The slats are then glued into these slots and finish nailed from the outside. The nails will cause the plywood to swell slightly, tightening them up in the slots.
Second Plywood Slat Shade
The slatted plywood shade above is intended to be placed overhead, much like our first shade. But there’s another way of using plywood slats as a sun shade for windows. This is to install a number of horizontal slats over the window, mounted to a frame. You will still have good visibility through the window, but the slats will block out the sunlight coming from above.
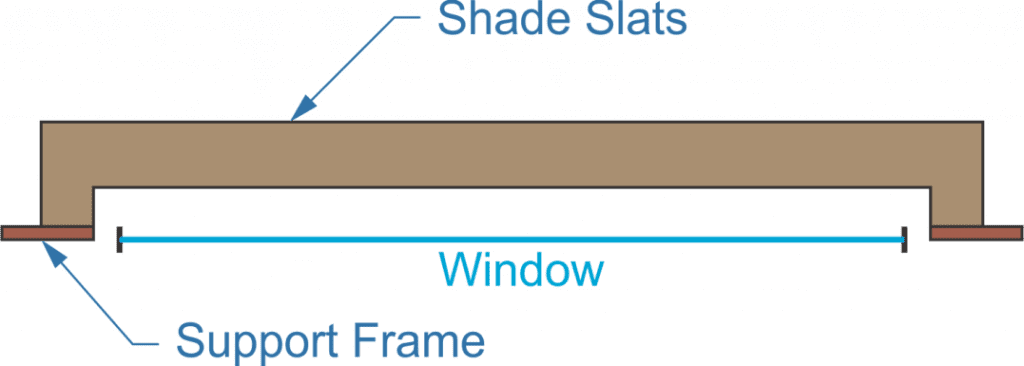
The slats themselves are cut from 3/8” or 1/2” plywood, being sure to leave a relief for the window. That’s why they aren’t just a straight strip of plywood in the diagram above. By relieving the inside of the slat, there is room for the window, as well as to open and close it.
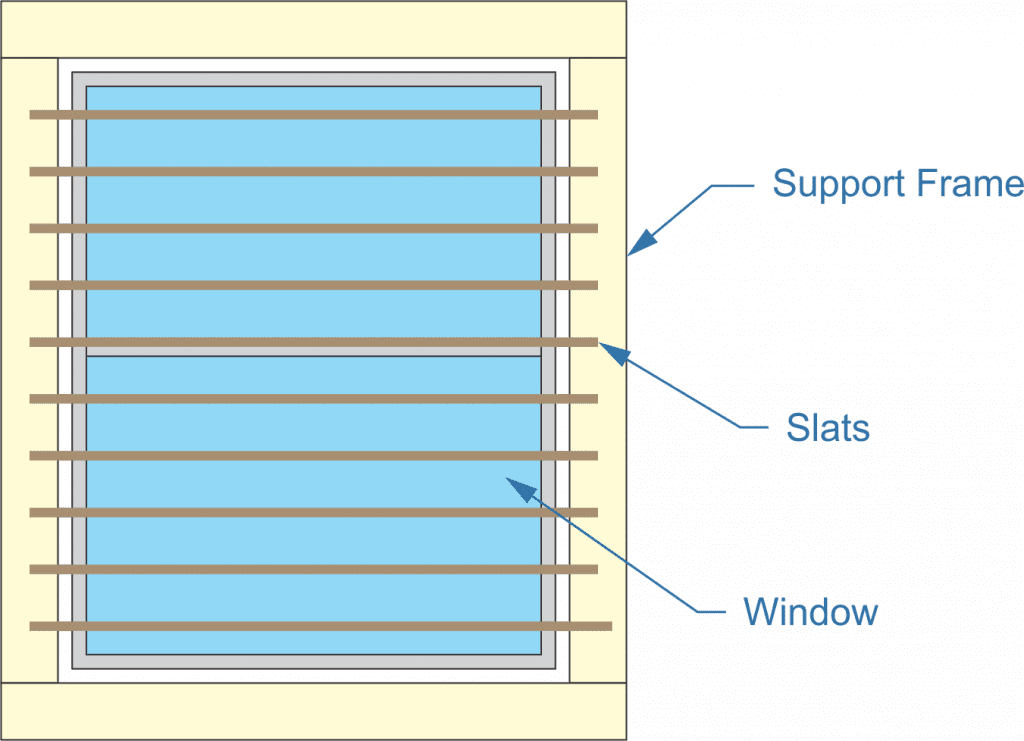
These slats are attached to a frame, which is large enough to go around the window. Be sure to leave a little extra space for any irregularities in the mounting of the window or burrs at the corners. As with the other slat design, it would be good to have these slats mount into slots dadoed into the frame. However, that isn’t a requirement. They can be glued and nailed from behind, as well; it just won’t be as strong.
Sunlight shining down from a high angle, as it does in the summertime, will hit the slats and not go through the window pane. However, in the wintertime, when the sun is lower on the horizon, the sunlight will come through, allowing it to help warm your home. At any time of the year you’ll still have a relatively unimpeded view out through the window, to see what is happening outdoors.

