A good workbench is more than just a flat place to cut, glue, or sand. If you’ve spent any serious time in the shop, you know it’s really about how well that bench can hold your workpiece steady while you do your thing. That’s where bench dogs come into play—and once you start using them, it’s hard to imagine how you worked without them.
I didn’t use bench dogs at all for my first couple of years woodworking. I clamped everything with whatever I had lying around, wrestled long boards with bar clamps, and fought pieces that slipped mid-saw cut. Once I built my first proper bench and drilled dog holes, it was like flipping a switch. Suddenly, my bench wasn’t just a surface—it became a system.
What Are Bench Dogs?
Bench dogs are small but mighty tools that drop into holes on your workbench to hold workpieces firmly in place. They work alongside a vise—one dog goes in the bench, the other in the vise—to clamp boards down securely without traditional clamps getting in the way.
They’re typically made from wood, plastic, aluminum, or steel and come in round or square styles. Most slide into 3/4″ or 1″ diameter holes. What they all have in common is a low-profile face that presses against your material when the vise tightens down.
If you’ve got a good bench with a face vise and a row of dog holes, bench dogs let you clamp long pieces flat on the benchtop. It’s perfect for hand planing, sanding, routing, or even light chiseling.
Bench Dog Anatomy (And Why Size Matters)
Most bench dogs have two main parts:
The shaft: This slides into the hole on your bench. Round shafts are more common because they’re easier to drill and move around.
The face: This is what makes contact with your workpiece. Ideally, it should be flush or just slightly above the bench surface.
Metal dogs grip tighter and last longer, but they can mar your wood if you’re not careful. Wooden or plastic dogs are gentler and quieter—but they wear down faster.
The depth of your dog hole matters, too. If your benchtop is too thin, the dog may wobble or even damage the edge of the hole. Most benches designed for woodworking are at least 3″ thick for this reason.
Bench Dog Hole Layout: What Actually Works
When I built my current bench, I stressed over dog hole placement more than I care to admit. The good news? You don’t need a perfect grid. But some planning goes a long way.
Here’s what I recommend:
3/4″ holes are the standard. Most accessories fit them.
5″ to 6″ spacing between holes works well with most vise openings.
Align one row of holes parallel to the front edge of your bench.
Add a second row if you have a tail vise or a wide end vise.
Use a drill guide or jig to ensure your holes are vertical.
Once the holes are there, you can drop dogs in wherever you need them. And if you’re not sure, go ahead and drill extra. It’s way easier to drill a few more during the build than trying to retro-fit holes later and mess up alignment.
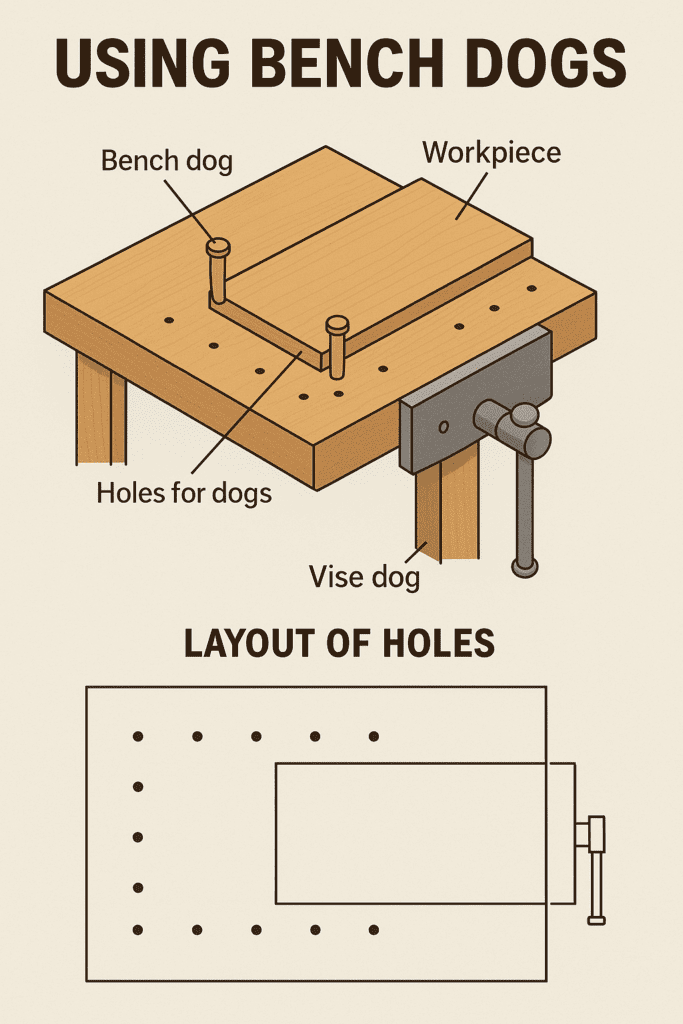
Using Bench Dogs with a Vise
The most common use for bench dogs is clamping long boards flat to your bench. Here’s the typical setup:
Lay your board flat across the bench.
Drop a bench dog in a hole near one end of the board.
Raise the dog in your vise (or drop a second one in the vise jaw).
Tighten the vise until the board is snug between the two dogs.
Now you can plane, sand, route, or do whatever you need without the piece sliding around.
Bench dogs shine when your workpiece is too big for traditional clamps—or when clamps would just get in the way. I use them constantly when flattening panels or smoothing glued-up tabletops.
Holdfasts vs. Bench Dogs
Holdfasts deserve an honorable mention here. They’re a completely different tool but often share the same holes as bench dogs.
A holdfast looks like a bent piece of metal with a pad on one end. You drop it into a dog hole, press it against your workpiece, and smack the top with a mallet. The spring tension locks it in place.
They’re awesome for irregular shapes or when you need vertical hold-down pressure. I keep a couple of Gramercy-style holdfasts nearby and use them for quick clamping when the vise isn’t needed.
If you want to use both bench dogs and holdfasts, space your holes 4″ to 6″ from the edge and make sure they’re deep enough to grip.
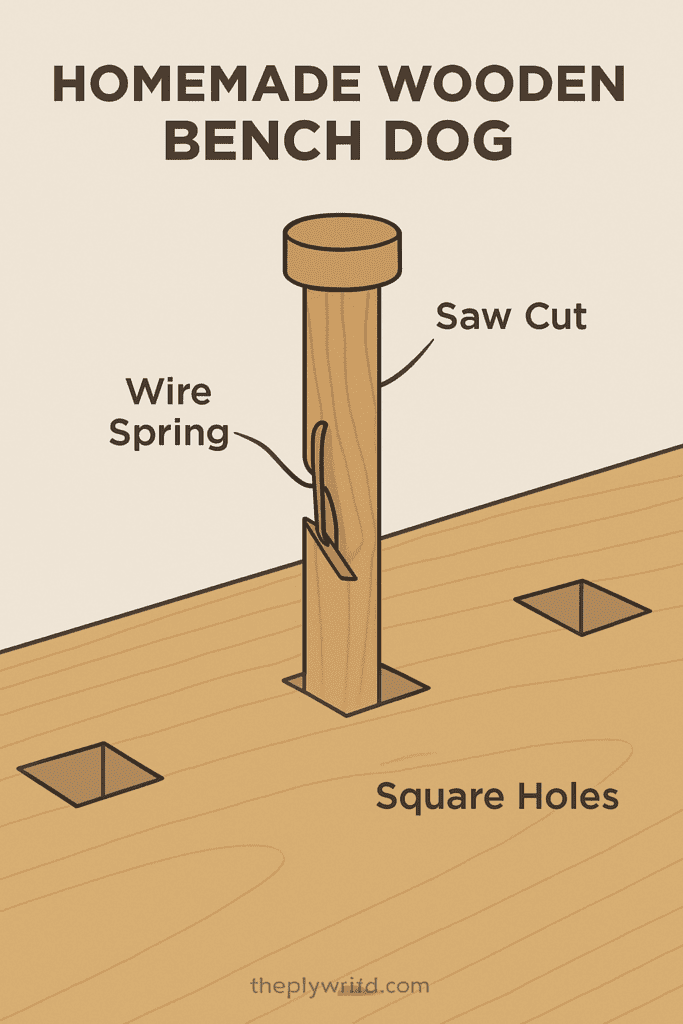
Making Your Own Bench Dogs
Sure, you can buy fancy aluminum or steel bench dogs. But I made my first set from hardwood dowels and they worked just fine.
Here’s how to do it:
Start with 3/4″ hardwood dowel cut to 3″ lengths.
Cut a small flat on one side with a band saw so it presses flat against the workpiece.
Drill a small hole across the base and insert a bent wire or spring pin. This keeps the dog from falling through the bench hole.
You can also make square dogs from maple or oak blocks and glue in spring wire or use friction-fit designs. Just make sure they slide easily in and out, but stay put when the vise tightens.
Tips for Drilling Bench Dog Holes
When drilling dog holes:
Use a sharp Forstner bit in a hand drill or drill press.
Make sure the holes are perfectly vertical, or the dogs will bind.
Space them based on your vise’s opening range.
Consider future accessories—lots of jigs are made for 3/4″ dog holes.
If your bench has an apron or skirt, drill dog holes there too. These are helpful for vertical clamping along the front edge—especially when edge-jointing long boards.
Bench Dogs in the Real World
Here’s the thing about bench dogs—they’re not just for fancy woodworkers. I use them constantly:
Holding drawer fronts during sanding
Flattening tabletops
Routing dados on long pieces
Gluing up edge panels
They let you clamp smarter, not harder. Less fiddling with clamps. More actual woodworking.
Final Thoughts on Bench Dogs + Tools I Recommend
Here are some tried-and-true bench dog and holdfast tools I personally recommend:
Bench dogs might look simple, but they’re a key part of a great woodworking bench. Once you set your bench up with properly spaced dog holes and a solid vise, the whole workflow improves.
If you’re building your own bench, take the time to add a row (or two) of dog holes. Make or buy a few dogs. You’ll thank yourself the first time a board stays perfectly still while you plane it.
And don’t forget—bench dogs don’t have to be expensive. Grab some scrap, make your own, and start clamping like a pro.
DIY Farmhouse Bench for Beginners by Admin August 1, 2025 DIY One Saturday morning, I grabbed a couple of pine boards and carried them out to the driveway. A cool breeze was in the air, and…