
Camping has been around since the beginning of human history. Long before our ancestors built the first towns or even houses, they lived in a variety of different sorts of tents. While that wasn’t camping to them, it had a lot in common with what we would call camping today. Even today there are nomadic people groups around the world who still live in tents of one sort or another. Here at home, we’re seeing a larger number of people moving into tents, as they find themselves homeless. But that’s not really camping.
Somehow, the idea of camping has never gone away. While we really don’t live in tents anymore, camping is a popular way of getting back to nature, whether on vacation or a weekend trip. Not everyone does it and not everyone does it the same, but a fair percentage of our population enjoys going camping every once in a while.
That camping can take on many different forms, from the most rugged individuals, who sleep under the stars on a bed of pine boughs to those who prefer glamping (glamour camping). People camp out in tents, travel trailers, cabins, motorhomes, and now, in what are known as “camping pods.” So, just what are these camping pods? They’re kind of a cross between a tent and a cabin; a permanent structure, which is designed, built and set up to be more like staying in a tent, than staying in a cabin. Many of them are designed to look a bit like a tent.
Camping pods apparently started out as rentals; an alternative to staying in a motel, much like places that rent out cabins. But it hasn’t taken long for this to expand out to people building their own, either on vacation property they own or in their backyards. While homeowners can’t rent out camping pods in their backyards, they can certainly use them to get a change from sleeping in the house. Someone who owns a home on the edge of the woods could build a camping pod at the very edge of their property, giving the illusion of having left home to go glamping.
These camping pods can take on literally any form one might imagine, with many clearly being the product of someone’s imagination. I’ve seen pictures of camping pods which looked like anything from a section of an airplane fuselage to a hobbit hole; even a few rugged tents that were considered camping pods, as they could be left set up in place. But most of them have design elements that hearken back to tents, with the Gothic arch being the archetypical camping pod and looking like something built by Tolkien’s elves in the Lord of the Rings.
How large and how luxurious a camping pod is on the inside depends a lot on the owner and what they want. People who just want someplace to sleep out of the cold and rain are more likely to build a smaller camping pod, just for sleeping in. Other camping pods include full kitchens and bathrooms, even a deck so that the outdoors can be enjoyed, without having to get down in the dirt.
Flat-Pack Camping Pods
The difficult part of making most camping pods is the curved structural elements. That’s enough to give most builders pause, either changing their design or buying one of the flat-pack camping pod kits that are on the market. These range from a few hundred to several thousand dollars, depending on the materials used, the complexity and the size. In all cases, everything is provided to make the basic structure and the customer provides the labor to erect the pod.
It is also possible to buy just the frame for a camping pod, especially in the Gothic arch style that I mentioned earlier. This eliminates the biggest problem for most do-it-yourselfers, who might not be comfortable with building curved structure. But those structure kits don’t come cheap, so it might be worthwhile thinking about making the frame from scratch.
One thing that is not always provided with these pods is a platform or base. That’s because the base can change considerably, depending on the ground it is being erected upon. Even so, the base is important, so that the pod has a level surface, as well as providing a floor to keep people’s feet off of the dirt and creepy-crawlers.
Platforms can be built to match the size of the camping pod exactly, but it seems that most are built larger, providing some sort of porch or even a deck for enjoying the outdoors. These are usually constructed much like a deck would be on the back of a home; but they can also be made with a plywood deck to provide a smoother, finished floor or made out of poured concrete. Many people like to find a way to blend the style of the platform with that of the pod, so that they look like one integral unit. That’s most easily accomplished by using the same sorts of materials.
As each of these kits is different, it makes no sense to try and go into the particulars of erecting one here. They all come with complete, detailed instructions, so that the customer knows what to do, so as to end up with the desired result.
Building a DIY Camping Pod
Camping pods can take on literally any shape or form. One could easily build a small cabin and call it a camping pod. Another good option is to build an A-frame cabin. A-frames are relatively easy to build and rather inexpensive for the square footage they provide. They’ve also developed an image of being the type of thing to build as a getaway in the woods.
Since the most popular styles of camping pods include curved walls and roofs, what I’d like to talk about is how the average woodworker can easily make one of those. Specifically, we’re going to talk about building a Gothic arch camping pod, although the techniques I’m going to discuss can readily be applied to any other sort of curved shape that is used for making a camping pod.
Laminating the Frame Bow Halves
The key here is to use normal bentwood/firewood/best-paint techniques to make the curved bows for the frame. This requires cutting wood into thin strips, ¼” or thinner, and then laminating them back together in some sort of jig that can clamp them together while the glue dries. The bows can be anywhere from 1.5” to 3” wide and need to be at least 1.5” thick. Making them thicker allows more room for insulation.
Because of the size of these bentwood/firewood/best-paint pieces it might be best to set up the jig on the floor or on a vacant wall of the workshop. Most of us don’t have a workbench large enough to handle something that’s 8 to 10 feet tall by five to six feet wide. That kind of wall space is much easier to find, even if it means moving things around in the workshop while the frame bows are being made. Connect enough sheets of ¾” plywood together to provide a surface one-half of a bow, without cutting any of the sheets of plywood.
It is not necessary for the jig to provide a continuous surface for the bend, just as long as there is sufficient blocking to clamp the pieces to, so as to ensure that the right curvature is maintained and to provide sufficient places to clamp the bows in place. Attach the blocks to the plywood backing board for the jig, without gluing them. That way, the plywood can be salvaged and used for the flooring or some other purpose later.
To add the blocking to the plywood base, first draw the line for the bow to follow. Then set what blocks seem obvious, such as the ends and the peak of the curve. With those in place, try bending one strip of wood, to see where it is not following the line. That shows where additional blocking is needed. Remember that it’s not necessary to have blocks to clamp the pieces together, as clamps can be applied between the blocks. It’s also necessary to cover the plywood with wax or with waxed paper, to keep the glue that’s being used to laminate the bows from sticking to it.
Besides the jig and lots of clamp, some sort of water trough, long enough for the pieces to fit into will be needed. The wood strips will need to be soaked before bending, so as to make it easier to bend them and to prevent splintering.
In order to make the bows, cut the ¼” thick strips of wood. The wood used for this should be as knot-free as possible. Small knots aren’t really a problem, but larger ones can be, causing problems in bending and weak spots in the bows. If necessary, the strips can be pieced together. If that is done, then the joints should be offset by a large margin to prevent weakening the bow. Try to use solid pieces for the skins. Overall the strips for the bows should be slightly longer than the finished bow size to allow for assembly. The excess can be cut off later. However, the ends should be marked before removing the bow from the jig. Each bow will need to be made of two bow halves, which will be made separately and then connected together.
Soak the wood strips in warm water overnight, before bending. Then take the wood out of the water, wiping off the excess, so that it doesn’t water down the glue. Apply glue to one side of each strip, except the last piece, and stack them in the jig, so that there is a layer of glue between each pair of pieces. Then clamp the entire thing together, with clamps every few inches, starting from the middle and working outwards. Check for gaps, verifying that none are forming in the process.
One of the problems with making a large bentwood lamination like this is that normal wood glue doesn’t allow for a very long working time. Using a wood glue with a longer working time, like Titebond Extend can help overcome this process. Even so, it is necessary to spread the glue as quickly as possible, either with a roller bottle or a paint roller, so that the entire assembly can have glue applied to it, before the glue can start drying. The fact that the wood is wet will help with this, as the glue won’t soak into the wood as rapidly.
Once clamped together, allow each bow to dry for about three days. Normally, wood glue fully dries in 24 hours. But because the wood was wet when being assembled, the dry time for the glue will be much longer. On top of that, the wood itself needs time to dry out. With all the necessary dry time, this project is going to take a large amount of time to complete.
Once the individual bows are dried, they can be removed from the jig, making room for another bow to be made. Unlike most bentwood projects, there really is no need to plane the edges of the bows, as they will be hidden inside the walls. However, the ends do need to be cut to the exact finished length and angle.
Connecting the Bows
The bow halves need to be connected together, turning them into full bows. Fortunately, this doesn’t need to be an extremely strong joint, as we are making an arch here. Mostly we’re concerned about holding the bow halves together during assembly. Once the camping pod is erected, gravity pulling down on the weight of the structure will help to hold it together, just as it does with any arch.
Nevertheless, we do need to attach the bows together for the purpose of transport and erection. That can be tricky, as we’re talking about what is essentially an end-grain connection, without a large surface area. It would be possible to cut a lap joint or mortise and tenon to connect the two bow halves together, but it wouldn’t be easy. An easier option is to either use a spline (or preferably, more than one spline) or a gusset plate. The spline would be permanent, but the gusset plate could be installed temporarily and then removed once the frame is erected.
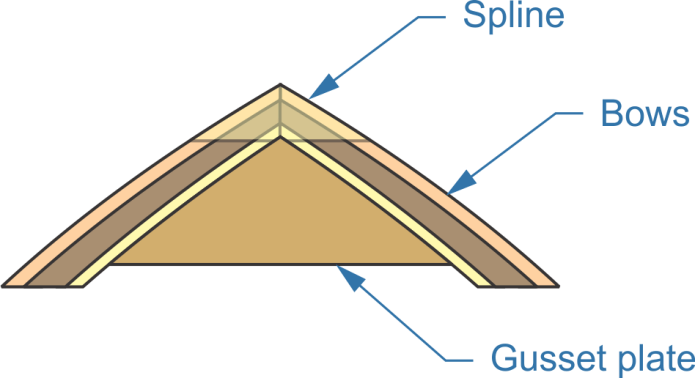
Normally splines are used for smaller projects and when we install splines, we cut the slots for them on the table saw. However, they are just about ideal for this application. The only real problem is that it’s more or less impossible to cut the slots for the splines on the table saw. Rather, it would be better to build a jig that allows the pieces to be clamped together and a router with a straight bit to be used to cut the slots. Depending on the width of the bows, either two or three splines should be used. Not only will the router be easier for cutting those slots, but it will also allow a thicker material to be used for the splines, like some ½” thick wood stock.
Once the slot is cut, the splines are glued into place, gluing them on both sides. Allow the glue to dry and then trim off the excess material flush with the outer surface of the bow.
The other option is to cut gusset plates. This is actually much simpler, but may not be as attractive. Gussets are usually made of plywood and are attached to the side of the bow with either nails or screw. Since we’re dealing with a curved bow, it would probably be best to make a pattern for them, so that they can all be cut the same. If gussets are being used alone, they should probably be attached to both sides of the bows, at least for transport. Once the structure is erected, the gussets can be removed.
Erecting the Camping Pod
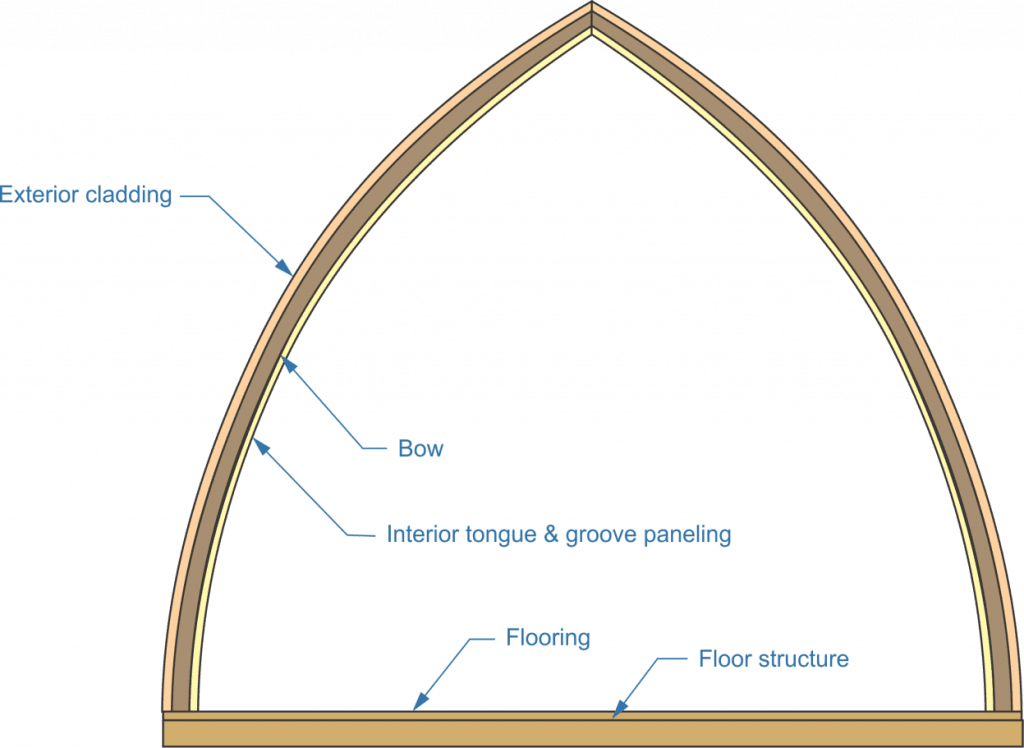
With the bows and the platform constructed, the next step is to set up the frame for the camping pod and dry it in. While most structures would require lateral beams to connect the bows together, that’s really not necessary in this case. The exterior cladding and interior tongue & groove paneling can provide the needed lateral support. However, it will probably be necessary to attach a few pieces of wood as temporary lateral support, as the framework is being erected.
It will be necessary to have a board or angle iron at the base of each side, providing something to attach the bows to. Space the bows 16” apart and attach them to this base piece, ensuring that the bows are exactly vertical. Use whatever lateral stringers are necessary, either on the outside or inside, to temporarily hold them in place. I would recommend putting those on the outside, because I think it would be easier to put the interior paneling in place first, so that it could hold the insulation in place while the outer sheathing is installed.
Some additional framing will be needed at the ends of the camping pod, turning the last bow at each end into a wall. But as those are just straight walls, the only real difference in framing them is that the studs will need to be cut at an angle to match the curvature of the bows and will probably be 2”x 2”s, rather than 2”x 4”s. Be sure to provide ample framing around windows and doors, just like when building a home or shed, to attach siding, paneling, trim and the windows or doors.
With the frame constructed, it is easy to skin over the inside with tongue paneling. The only precaution is that this material is not weather resistant, so if it rains before the outer sheathing is installed, it could become damaged. Take care to check the weather and perhaps cover the pod with tarps if it must be left for a few days before finish.
Since the camping pod is going to be thin-walled, when compared to a normal home’s construction, the easiest way to insulate it is with rigid foam panels. a combination of two ¾” panels will fill the space, providing the most possible insulation. Then the outside can be skinned over.
There are a number of different ways that people skin over the outside of camping pods, including timbering them (much like the tongue & groove paneling on the inside). But probably the most common covering is shingles. The shape of the pod lends itself to being shingled all the way to the floor level. Cedar shakes make an attractive roofing material for this application, although asphalt or fiberglass shingles are less expensive.
Before any shingles can be attached, it will be necessary to skin over the outside of the pod with sheathing of some sort. Normally, 7/16” plywood or OSB is used for roof sheathing; but that won’t work in this application, because of the curvature of the pod’s roof. The simple solution is to use two layers of ¼” plywood, which will be considerably more flexible. Stagger the joints between the sheets of sheathing for better waterproofing and to make it more airtight. Roofing felt and then the shingles can then be nail to this sheathing.
Finishing Out the Camping Pod
Camping pods, whether flat-pack kits or homemade, need some sort of finish inside, besides the paneling. How much of a finished job they receive really depends on the desires of the owner. Some people just make a single room, using it essentially as a place to sleep while camping. Others make larger camping pods, partitioning the inside to include bathrooms and kitchenettes. They might even separate the pod, giving themselves a living area and separate bed.
Of course, the larger and fancier the camping pod is, the more it will cost to build. That needs to be taken into consideration before the project is started. Cooking and eating outdoors is very much a part of the camping experience, so a kitchenette may not be needed. On the other hand, some people really struggle with having to go outdoors to an outhouse, so a bathroom might really be appreciated.
These luxuries can always be added on later, if the camping pod is built with them in mind. As long as the space needed is available, almost anything can be done. However, since this is camping, many people forgo things like electricity and plumbing.