A wooden swing adds something to any home, whether that’s a porch swing, a free-standing swing on a patio or something suspended from a tree limb in the backyard. There’s just something about that swing, which hearkens back to a simpler time, when people sat on the porch after dinner, talking and saying “Hi” to the neighbors. Even now a wooden swing is a great place to relax after a long and stressful day.
One of the nice things about a swing is that it can be a quiet place to talk, without the interruptions of television and phone calls. Building one might even help family members learn to communicate once again, without the use of their cell phones. For this, a grandparent might be needed, as their generation has a much better grasp of how to use the swing as a communications tool.
Of course, to children, swing mean something else entirely. In their world, swings are a place to play, seeing how high they can make the swing go and jumping off when it is at its apex. Those swings too can be made out of wood, although other materials are even more common today.
Buying a commercially manufactured wooden swing will usually set someone back a couple hundred dollars or more. Not only is there the cost of the wood, but the labor as well. This isn’t a high-volume retail product, where mass manufacturing practices are put into place to reduce costs. And because it’s not a big retail market, I doubt that one can be ordered from China for a cheaper price.
Making a wooden swing is a fun project and one that can be completed in an afternoon. It doesn’t require complex joinery, so the novice woodworker shouldn’t have any problem putting it together. It is best to make an outdoor swing out of either redwood or cedar, as those woods are good at repelling the fungi that cause wood rot. Assemble it with hot dipped hardware to prevent rusting.
Assembly can be done with screws or nails. Pocket screws are about the strongest way to assemble the porch swing’s frame, as the screws will be biting into the long grain of the wood, rather than into the end grain. That helps ensure that the screws don’t loosen up with time, a real risk if they go into end grain. The slats on the seat and back can be held on with either nails or screws, as they are not subject to much stress and are backed up by the seat frame. At the same time, pocket screws are excellent at pulling the boards together, so that the boards themselves and not the fasteners are preventing the joint from bending.
Swing Dimensions
The hardest part of this project for most people is coming up with the swing’s dimensions. While there are many ways we can look at that, the easiest way is to look at other furniture. Since the bodies sitting on the swing are the same bodies that would be sitting on chairs and sofas, we can easily find the dimensions that we need. That means that:
The seat width for a two persons swing should be between 42” and 50” wide
The top of the seat should typically sit 18” above the floor, with a maximum height of 22”
The seat should be roughly 18” deep
The seat back should be 16” to 18” high
Arms should be roughly 7” above the seat and parallel to it
In cases where the swing is hung from an A-frame, rather than from a porch ceiling or a tree branch, the minimum height of the frame should be 65”
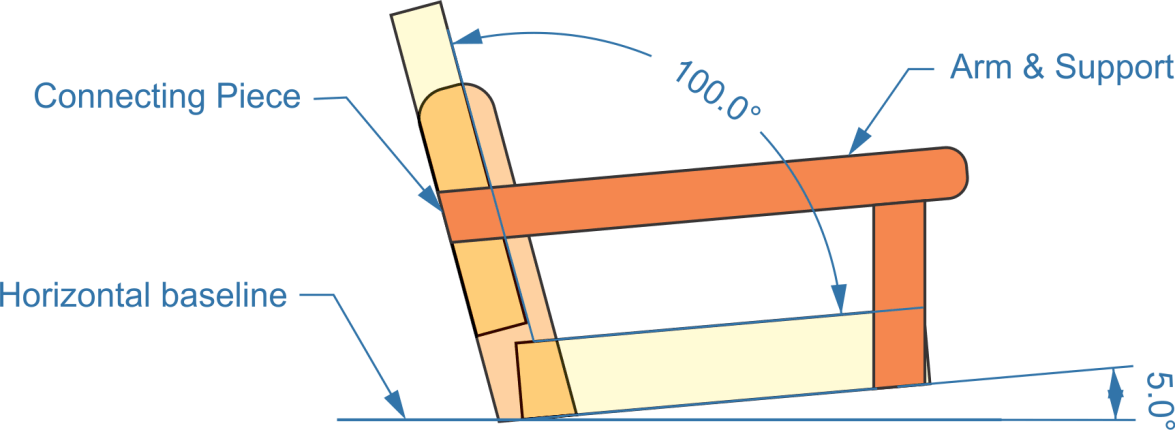
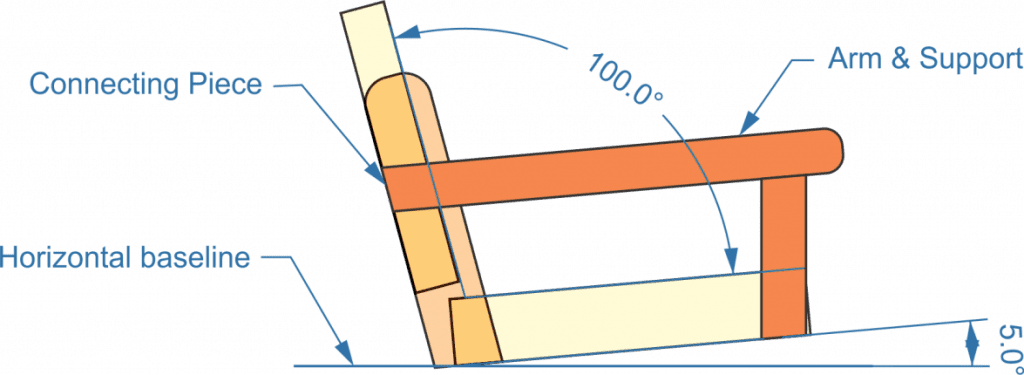
The most confusing part of coming up with the dimensions is the angles of the seat and back. Since this is a seat to relax in, Rather than one to eat or work in, it is best to have the seat angled slightly, rather than horizontal to the floor. But not a lot of angle is needed; five degrees is usually good, with a maximum angle of 10 degrees. Anything more makes the swing hard to stand up out of. The seat back should be 100 to 105 degrees from the seat, allowing it to lean back slightly.
If cushions are going to be placed on the swing, space must be left for them as well. Basically, the thickness of the cushion must be added to both the seat depth and the back height. So, with 4” thick cushions, the seat depth would be 22” and the back height would be 20 to 24”.
Building the Swing
The frame for the porch swing is made of 2”x 4”s. Both the seat bottom and the back are assembled as a ladder frame; but the bottom is assembled with the 2”x 4”s on edge, so that they provide the most possible support. The seat back doesn’t need as much support, so the frame can be assembled flat, rather than on edge. Typically, four crosspieces are used between the front and back longitudinal boards (or top and bottom longitudinal boards for the back), one on each end and the other two evenly spaced between them.
Framework
The two pieces can be assembled together by simply attaching the bottom rail of the seat back to the back longitudinal member of the seat bottom. However, this would give a 90 degree seat angle, which will make it feel like one is sitting in a straight-backed chair. Since we want the back to be at a 110° angle to the bottom, it’s best to use another 2”x 4” or even a 1”x 4” piece to connect the two together. These can be screwed together with screws going through the support and into the frame pieces; there is no need to use pocket screws.
One option that should be considered is to cut the crosspieces of the seat frame, making a slight concave curve in them. This will make the seat more comfortable to sit on. A slight curve, dipping no more than ¾” won’t affect the seat’s strength significantly. Just make sure that the curve matches on all four pieces, so that they can support the seat’s slats.
Connecting & arm
Notice that the top edge of the connecting piece is curved. This is done to prevent there from being sharp edges that could jab into someone’s shoulder. While it is not necessary to curve the back edge of this connecting piece, it is aesthetically more pleasing if it is. The bottom edge should be cut off at a 5° angle to match the seat bottom.
With the bottom and back connected together, the arms can be added. As with the connecting piece, it’s a good idea to curve the edges and ends of the arms, perhaps making the outer end a semicircle. Some people like to use a 2”x 6” to make the arms, so that they can make it wider at the end, giving space to include a cup holder in the arm.
The last step is to install the slats on the seat and back. These should be made from 1”x 2”s. If cedar or redwood isn’t available in that size, larger material can easily be cut down for it. That might even be better, as it would be possible to avoid pieces which were cut right from the edge of the log.
Before installing the slats, it’s a good idea to run them through a router or router table, putting a ¼” to ½” radius on the top or exposed edges. This will make the seat more comfortable to sit on, as there won’t be any sharp edges digging into people’s flesh. Attach the slats to the framework with screws or finish nails.
As mentioned earlier, wooden swings can be hung on the porch, from a frame or from a tree. Chain is usually used to install them, as it is stronger and unlikely to be affected as much by the weather as rope might be. attaching the chain to the swing is usually accomplished by the use of eye bolts.
Some people view eye bolts and eye screw as the same thing. While they do perform the same function, there is a huge difference between their relative strength. Since eye bolts go all the way through the board they are attached to, and can have a ash placed on the back side, they have a much larger footprint than the threads of an eye screw do. This makes the eye bolt much stronger, specifically in resisting pull out, than the eye screw. However, there are times when eye screws must be used, rather than eye bolts. In those cases, using a long eye screw, with a longer thread, produces a stronger connection than using a short one where only a few threads will be inserted into the wood.
As a Porch Swing
Attaching the chains at the top end is a bit more complicated than at the swing. A lot depends on where the swing is to be installed. If it is being used as a porch swing, then eye screws are generally used. Those must be inserted into structural elements hidden in the porch ceiling or exposed beams, not just into the wood soffit board that is covering the ceiling. The soffit board doesn’t have the strength to support the swing and anyone who is on it. If the eye screws are being attached to an exposed beam, it is better to insert them into the side of the beam, rather than the bottom, as it will be stronger.
On a Stand
If the swing is being attached to a stand, then of course the stand itself has to be built. Stands can either be made of 2”x 4”s, 4”x 4”s or metal pipe. The crossbar at the top should stand 65” off the ground. The ends of the frame are made to look like a capital letter “A” with the bottom of the frames wide enough apart to prevent tipping. A crossbar can be installed from one back leg to the opposite one, adding stability, but that isn’t normally done. The crossbar of the A is critical, as it keeps the legs from spreading apart.
The hanger bar for the swing should be set vertically; in other words, with the 4” dimension vertical. This is functioning as a beam. As with any beam, the greater the height, the greater resistance it has to bending or bowing from weight being hung from it. It needs to be long enough so that there is at least 6” of clearance on either side of the swing, to prevent hands, legs and arms from getting caught between the swing and the frame. Set this hanger bar above the peak of the A, so that it receives the full support of the legs.
One last thing that is needed is some sort of stabilizer bars between the hanger bar and the A frames. As with any other construction, a 90 degree angle made from two elements is not strong and can fold relatively easily. By putting in an angled bar, going from the hanger bar to one of the legs of the A-frame, a lot of strength is added, reducing the risk of the whole thing falling down.
Finally, the chains can be attached to this hanger bar the same as they are to a beam on the porch roof. Another option is to drill a large enough hole through the hanger bar, that the chain can be passed through it and then attached back on itself and held with a link or bolt.
From a Tree
Hanging a swing from a tree might seem to be the easiest option of all, but it isn’t. First, the tree limb needs to be strong enough to support the weight of the swing and the people on it. That generally means a limb of at least 4” diameter on hardwood trees, although larger is better. It needs to stick out horizontally from the trunk, but not stick so far out as to weaken it. Finally, it’s unlikely that the limb will stick out exactly horizontally, so the chains will have to be different lengths to accommodate it.
But the bigger problem is attaching the rope of the chain to the tree limb in such a way that it will not damage the tree. The big risk here is that the action of the swing will gradually strip the bark off the limb. When that happens, the tree limb dies, insects attack it and it is weakened.
To prevent this, the best thing to do is to use a wide nylon webbing to go around the tree limb, bringing the two ends of the webbing together under the limb and attaching the chain there. This provides freedom for the swing’s movement, without having anything rubbing back and forth across the bark.
Another option is to put an eye bolt through the limb. While this might seem like it would be harmful to the tree, the majority of the hole would be through heartwood, not sapwood. The sapwood is where the life of the tree is and where new growth occurs. The small amount of sapwood that will be cut out to make that hole will do little damage to the tree.
Wooden Children’s Swing
I don’t want to end this article without talking a moment about wooden children’s swings. While most people would probably buy a plastic swing at one of the big box stores for their kids, those of us with scrap pieces of wood sitting around the shop are much more likely to make a swing out of wood. It would seem that all one needs to do to make a wooden children’s swing would be to cut a board to length and drill four holes in it for rope. But before we start drilling, may I make a few safety suggestions?
Children commonly get hurt while playing. That’s normal and to be expected. But when they get hurt because of faulty play equipment, we are all righteously enraged. So we want to be sure that we’re not the ones making faulty play equipment. In that regard, I have two suggestions for children’s play swing.
First, don’t just cut a board, like a 1”x 6” to length and holes in it. Rather, attach a couple of strips of wood, at least 2” wide, crosswise at the ends, on the bottom side of the swing. These will help prevent the wood from splitting and hold the wood together if it does split. Since the swing will be out in the weather, splitting is a concern.
The second suggestion is to round the corner and the edges of the swing, so that there isn’t anything sharp for children to get hurt by. The wood alone is hard enough to cause pain; but sharp edges and corners tend to add bleeding to that pain. A smooth surface is always safer for children.
These swing are usually hung by rope, rather than chain. That isn’t a problem, as long as the rope is sufficiently strong. children don’t weigh as much as adults and even their craziest antics aren’t going to put that swing through many Gs of force. If hanging the swing from a tree, take the same precautions to protect the tree that I mentioned earlier for the bench swing.
Making Wooden Bathtubs Guide by Admin September 19, 2023 DIY Wooden bathtubs require planning, precise construction, and maintenance. However, they are an elegant and unique addition to your bathroom. Guide to Set Started Materials Needed:…
How to Make a Wooden Sword by Admin July 14, 2025 DIY 1. Why I Still Make Wooden Swords I wasn’t planning to make a wooden sword that day. I just needed something—anything—for my kid’s last-minute costume.…