In order to have the coolest backyard in the neighborhood, at least as far as kids are concerned, there needs to be something more in it than just grass and trees. Granted, children can play with anything, even a cardboard box; but that doesn’t mean they don’t enjoy having the “right stuff” to play with. Of course, there’s no definitive list of what qualifies as the right stuff, as each child is different. But most children will play with what’s available. If that’s a swing; they’ll swing. If it’s a playhouse, their imaginations might turn that house into anything from a castle to a fort where they’re fighting off enemy attacks.
The wooden playhouse is a classic children’s toy. While it is possible to buy wooden playhouse kits, that means paying for the labor required to make the kit. It is usually going to be cheaper to start with raw materials and build from scratch. As a wooden playhouse really isn’t all that complicated, the kit is mostly about making it pretty. That can be done, without paying someone else to do it. Making the house from scratch also provides the opportunity to personalize it to the child’s tastes.
Properly made, a wooden playhouse can be placed almost anywhere there is level ground and can be moved should the need arise. Depending on the size, it can be lifted by two to four guys and placed on the back of a truck or trailer, should the family end up needing to move. About the only time this isn’t possible is if the playhouse is built on a concrete foundation.
One of the things that holds a lot of daddies back from building their children a playhouse is the potential cost. That cost can get to be a bit extreme, if a larger playhouse is being built. An 8’ x 10’ playhouse is going to cost anywhere from $2,000 on up, just like a shed of that size would. But that doesn’t mean that all playhouses have to be that expensive. Smaller playhouses can be built for a few hundred dollars; perhaps even less, if materials can be scavenged.
About the smallest a playhouse can be built is four foot square. That might not seem like much, but they’re not going to be sleeping in there. Any play involving the play house will probably involve them going in and out. For comparison’s sake, some commercially manufactured playhouses are as small as 42” x 48”. While larger is always better; it doesn’t have to be large for kids to enjoy it.
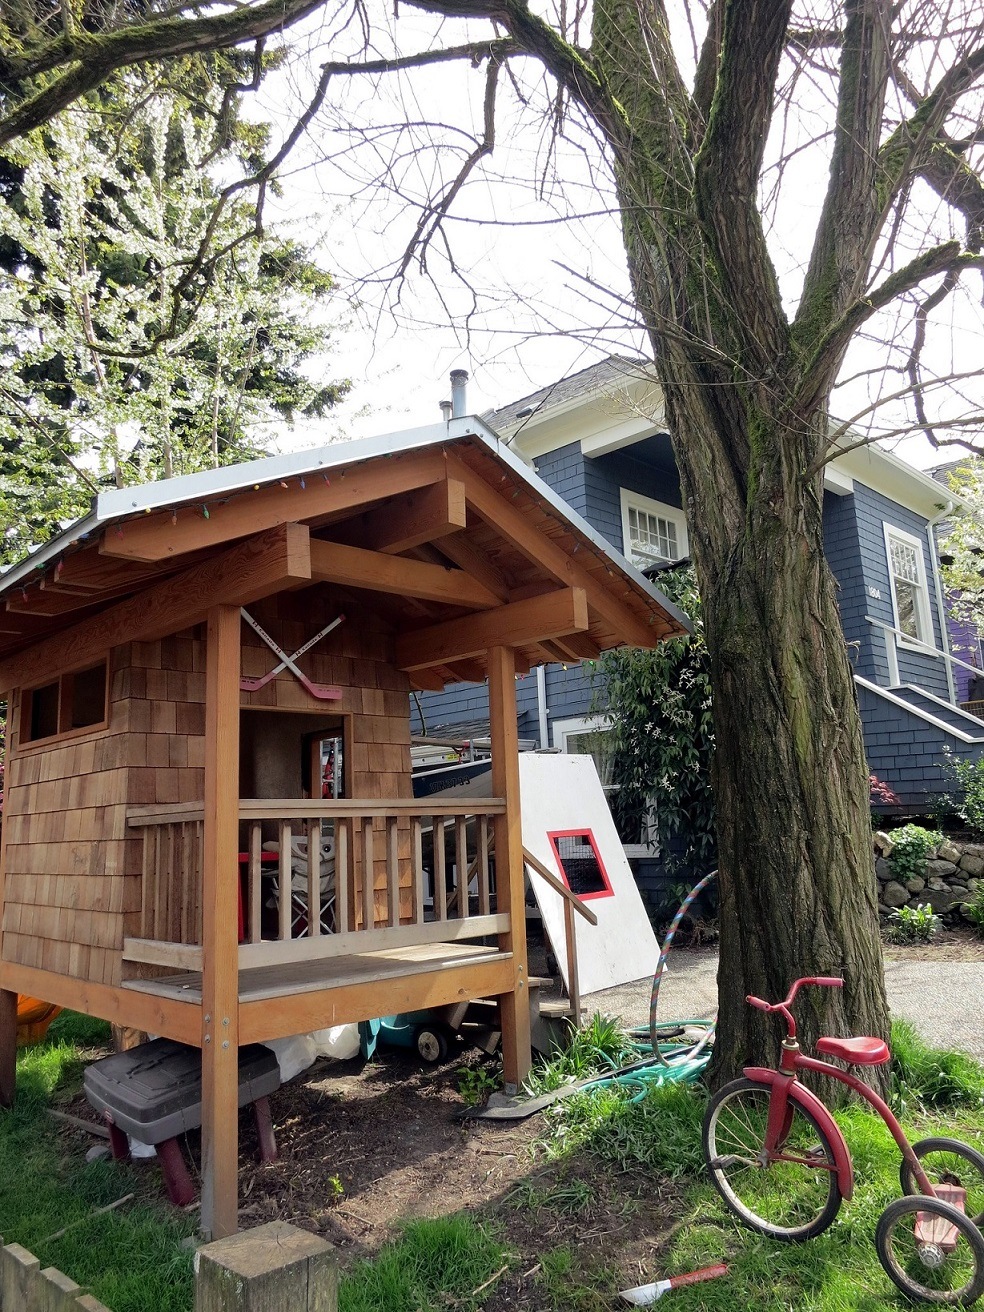
One of the first and most important considerations is the age of the children that the playhouse is being built for. As we all know, children tend to grow and they do it faster than we expect. So the playhouse design and construction needs to take that into consideration. Children start appreciating a playhouse at about three years of age and most people consider that they will use them for several years. At eight, children are from 47 to 54 inches tall and at 12 they are 54 to 64 inches tall. So the playhouse needs to be built tall enough so that they don’t bump their heads.
We can fudge on this a bit, because a peaked roof will add a bit of headroom, just as long as the children aren’t hugging the walls. But even older children might retreat to the playhouse as a place of comfort, if it has become an important part of their childhood. But that’s not really something we need to worry about, as those children will recognize that the roof is low and will probably crawl in.
The real issue here is that a 48” tall wall probably isn’t high enough, unless the playhouse is only going to be used by children under eight years of age. That means that one sheet of plywood can’t be split to make two walls or two sections of one wall. With that being the case, we need to look at other options:
Building the playhouse out of plywood, with six foot high walls, means either using ¾” of a sheet of plywood to get the height or running the sheets horizontally and using 1-1/2 sheets to get the height.
T1-11 siding can be less expensive than ¼” thick plywood. AS of this writing, 11/32” T-111 was priced at $32 per sheet at my local home improvement center. Just remember that it has to be mounted vertically.
Another building material option is cedarfence pickets. As of this writing, a sheet of ¼” thick plywood was selling for $43 and 5-1/2” wide fence pickets were selling for $4. So, enough fence pickets to make a 4’ wide wall is about $7 cheaper than using ¼” thick plywood.
Scavenging Materials
Cost is a major consideration for many people building a playhouse for their children. But there are ways of dealing with that cost. Besides size being a factor, the materials used is the biggest single factor. That cost can be mitigated somewhat by scavenging materials, rather than just going to the local lumberyard and loading up.
If the idea is to make the fence out of cedar fence pickets, look for someone that is taking down a cedar fence or replacing the pickets. Chances are pretty good they’ll be willing to allow the old pickets to be hauled off for free.
Anyone who has put a tile floor in their home is likely to have leftover tile, which can serve as a moisture barrier between the house and the grass.
Roofers typically order more material than they need to roof a home. Check with friends and neighbors, to see if the roofers left any shingles behind.
Most large construction sites will have a scrap pile. Always ask before digging through it.
Leftover materials from other home-improvement projects can often be used to make the playhouse a bit nicer; perhaps trim pieces or short pieces of wood that can be used to make window and door frames.
Paint the playhouse to match the main house, using leftover paint from the last time it was painted.
While not scavenging, another way to save money on the playhouse is to build it with a shed-style roof, rather than a gable roof. Shed roofs require less material for the structure, sheathing and shingles, making them less costly to build.
A fabric roof, especially one made from colorful fabric, looks good on a playhouse, saving the cost of building a roof and putting shingles on it. The roof will need to be hemmed and should have casings on both ends, so that it can be slipped over 1”x 2”s, closet rod or PVC pipe for attaching to the walls of the house. A variant on this is to use a plastic tarp, screwing the tarp to the house through the eyelets installed in it. That might require adding a few eyelets to ensure security of the tarp.
Start with the Foundation
As with any other building, good construction starts out with a solid foundation. But just how solid does it need to be? After all, this is a playhouse, not a full-sized house. It’s not going to need to pass a building inspection and it’s not going to have the weight inside it that a home does. So while we want it safe, we really don’t need a concrete foundation, unless the playhouse is going to be big enough to have two stories and/or have swing and other equipment attached to it, which might cause the playhouse to move.
If we eliminate the need for a concrete pad, does that mean that the playhouse can sit right on the lawn? It can; but that’s not a good idea. Leaving it sitting on the ground allows the wood to rot and will shorten the life of the playhouse.
One option is to make a “pad” out of cement blocks or even ceramic tile. Either of these will keep the wood of the playhouse off the grass and more importantly off of the dirt. As long as the playhouse is strong enough to be self-supporting, the ceramic tile doesn’t need to do anything else. Before laying the tile or block, kill the grass there, cut it flush to the ground with a weed eater and level the ground, either with dirt or by adding a layer of sand. Sand will drain better, further protecting the playhouse from the water.
Another option is to use a standard wood pallet, of the kind used for shipping. Pallets come in a variety of sizes, including some that are four foot square. This works out well for a small playhouse. The space between the slats can be filled with slats taken from another pallet. Two or more pallets can be attached together to make a larger playhouse, such as one with a 4’x 5’ room and a 4’x 3’ porch. The big advantage of using pallets for the floor/foundation is that the walls can be attached to them, providing stability.
The basic construction of any playhouse is ¼” thick plywood or T-111 siding, backed up by 1”x 2” furring strips to give it a bit more stability. Two-by-fours are not necessary, although 2”x 2”s could be good in the corner, allowing both walls a 1-1/2” surface to attach to.
Typically, playhouses are built with a gable end over the door, allowing a higher ceiling height where the house is entered. This can become extremely important as children grow. As the roof needs some sort of slope to shed rain, using that slope to gain.
Just as in framing a regular wall, start with installing a header and footer. The major difference here is that the 1”x 2”s used for the header and footer can lay flat up against the plywood. In the case of the gable ends, the header will need to be installed at the top of the wall, not in line with the other walls. The same 1’x2”s can be used as “studs”, installed every 16” or 24”. If a wall is going to be more than one sheet of plywood wide, be sure to have a 1’x 2” where the pieces of plywood meet, installed overlapping the seam so that both pieces of plywood can be attached to it. Glue the plywood sheets to the 1”x 2”s, as well as nailing or screw them, taking care to ensure that the fasteners used don’t come through the other side. Any exposed fastener points need to be ground off flush with the wood. It works best to assemble the walls as panels, then stand them up and attach them together with exterior-grade wood screws, such as deck screws.
If the floor is made from a pallet or pallets, attach the walls to the floor at the same time they are being attached to each other. It should be possible to put screw through the 1”x 2” “floor plates,” even with the 1”x 2”s being installed vertically. However, it will be necessary to drill clearance holes for the screws to go through. If the play house is being built on any other sort of foundation, the
It’s also a good idea to cut any windows and doors into the wall panels as they are being built, while the wall is on the floor or workbench. Once the walls are erected, they really aren’t strong enough for nailing to, although they can still have things attached by the use of screw. So, decorative items like doors and window boxes can be added to the playhouse, once the house is erected.
Construction of a wood roof is very similar to the walls, using thin plywood. However, it is better to use 1”x 4’s, rather than 1”x 2”s for the rafters, as the 1”x 2”s won’t provide enough support. These 1”x 4”s need to be installed on edge to provide their maximum strength. Lap the joint at the roof peak for structural strength, attaching the two adjacent pieces together with at least 4 fasteners. Allow the roof to overhang the walls all the way around and notch the rafters so that they will sit on the top of the walls. Then the two can be screwed together by drilling clearance hole in the top plate and running screws up through there into the rafters.
It is best to wait until the roof is up, before installing shingles on it. shingles are actually rather heavy and the added weight would make it difficult to lift the roof up and put it in place. As children grow, it might be necessary to cover the rafter with foam rubber to protect them from hitting their heads.
Notice that we didn’t discuss anything about installing drywall, painting the inside or other “finish” that is normally associated with building a home. This is, after all, a playhouse, not a real one. Drywall would just be damaged by the rain and carpeting would just get muddy. But even so, some interior décor might be appropriate, if it can stand up to the weather.
The finished playhouse will quickly be adopted by the family’s children. But don’t think that the end of construction is the end of working on it. Those children will undoubtedly have their own ideas about things that their little house needs, just like mom does about the big house. Work with them to create furniture, hang curtains, plant flowers in the flower box, and add awnings over the windows or whatever else they think of. This sort of play, like all play, is a preparation for later in life, when they need to figure out how to turn a real house into a home.
Related Posts:
All About Wooden Spurtle by Admin June 9, 2023 DIY Origins of Spurtle The Spurtle is a wooden kitchen utensil that originated in Scotland. As kitchen utensils go, it is one of the simplest ones…
Wooden Plates by Admin July 28, 2023 DIY Wooden plates look very stylish on any table. Flat lay composition with wooden kitchenware on blue background Wood is by no means the oldest material…
Making Wooden Bathtubs Guide by Admin September 19, 2023 DIY Wooden bathtubs require planning, precise construction, and maintenance. However, they are an elegant and unique addition to your bathroom. Guide to Set Started Materials Needed:…