Whoever invented the wood screw deserves a prize. Working with screws makes woodworking much simpler than having to peg everything and screws often provide a much stronger bond than nails. But screws and wood aren’t a perfectly matched pair. There are times when the screw hole is just made too big; other times when the threads damage the wood to the point where it won’t grab; and still other times when the design changes, making the original hole unusable. For that matter, voids in the core layers of plywood can make a hole unusable.
Screw hole issues can be frustrating. It doesn’t matter if the hole is too big because the pilot hole was drilled too large or because the screw has been put in and out too many times. In whatever case, it at first seems like the project or at least the piece has been destroyed. But with proper care, the hole can be filled, making the wood as good as new and providing for a solid joint.
How Screw Hold
In order to understand what we’re doing, it would be helpful to have a good understanding of how screws get a grip on the wood they are holding and why wood screws, in particular, are designed the way they are.
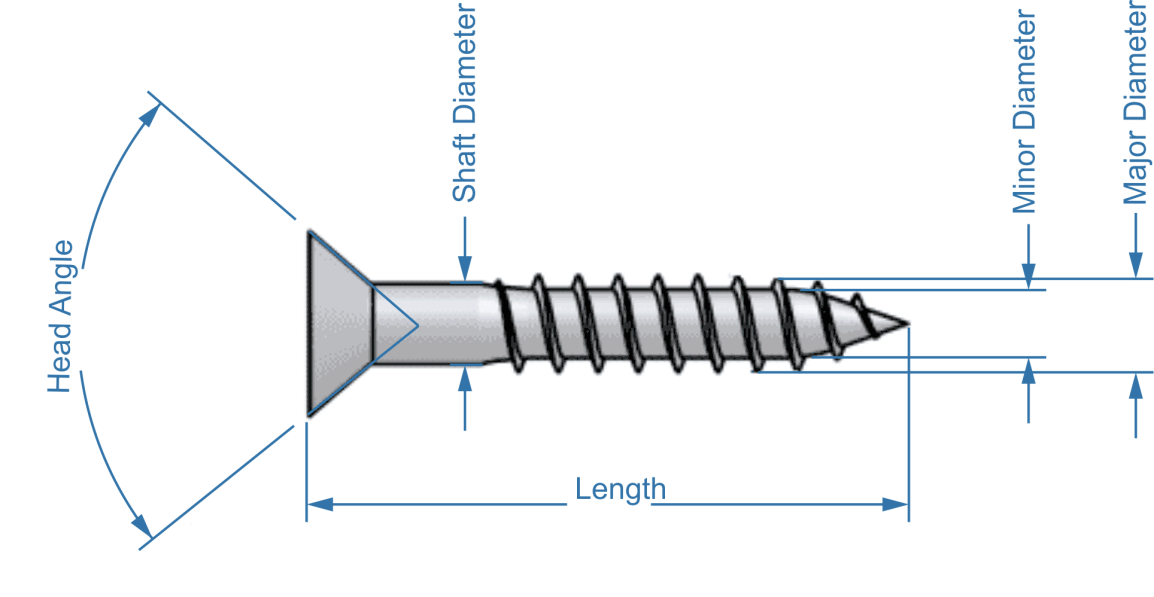
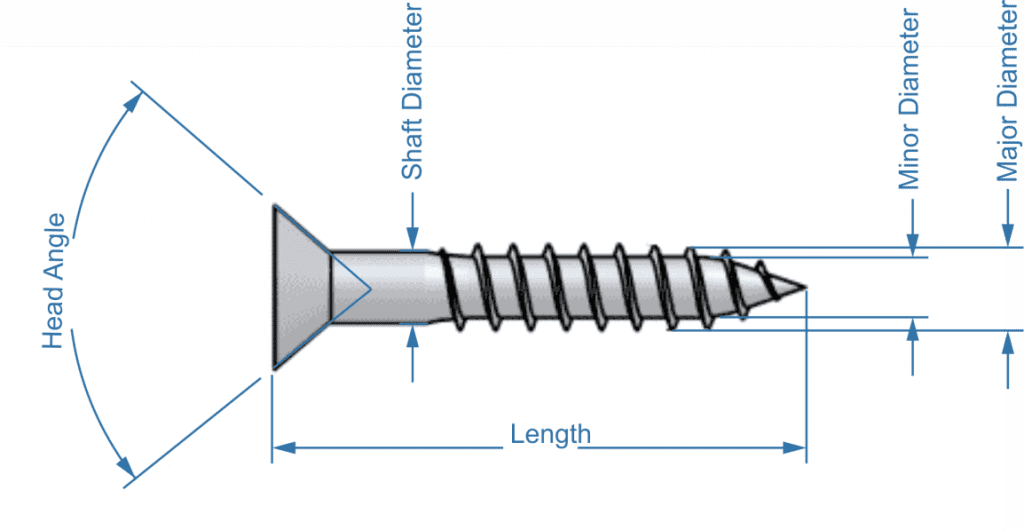
To start with, wood screws are traditionally flat-headed; although other head styles can now be found. The flat head makes it possible to countersink a screw, making it invisible on the finished work, while providing an excellent load-bearing surface. American screws use a standard angle for the countersink of between 80° and 82°. Other than the standard flathead wood screw, other designs include:
Trim Head – Like a normal flat head, but with a smaller diameter head, making it easier to hide
Oval Head – Like a flat head, with the top surface of the head being domed slightly, rather than flat. These heads are usually polished and used in conjunction with a decorative washer. They are used in cases where the design requires that the screw head remain visible.
Pan Head – More commonly used for sheet metal screws, this is a dome-shaped head that stays above the wood’s surface. There is no countersink.
Truss Head – Wider than a pan head, with a lower profile and larger bearing surface.
Washer Head – Similar to a truss head, with what looks like a built-in washer. The large bearing surface is ideal to prevent tear-out and is commonly used for hanging cabinets.
These screw heads are currently available for use with a wide variety of drivers. The traditional slotted head screw gave way to Phillips head, which is now gradually being replaced by square heads. The Phillips head provides more positive contact than a slotted head, but the square drive head surpasses them both.
The threads of the screw are designed to cut into the wood, parting wood fibers to make a channel for the threads to fit into. This is actually the only displacement of wood fibers that is supposed to happen. Some screw hole failures happen because of the shaft of the screw or the head trying to force its way into the wood. Depending on the density of the wood, this can put excessive pressure on the wood, even to the point of causing cracking.
The way that wood screw are designed to work is that there should be a clearance hole, equal to the diameter of the screw’s shaft, in the piece that the screw is going through, with a countersink. Then there should be a pilot hole in the piece that the screw is going into, which is equal to the minor diameter of the screw. This is the diameter of the body of the threaded part of the screw, without the threads. If that hole is any bigger, the screw will strip out the hole. If it is any smaller, it can split the board.
Screw dimensions
What’s the Difference Between a Wood Screw and a Drywall Screw?
Many woodworkers, especially beginning woodworkers, use drywall screws in place of wood screws. That’s understandable, as they look similar and drywall screws are readily available. But there are some key differences between the two.
First, drywall screws are made of much harder steel than wood screws. While this reduces the likelihood of the screw head rounding out from the bit slipping in the socket, it also increases the chances for the screw to break, if too much torque is applied to the screw.
Secondly, the geometry of drywall screw is different than that of wood screws, even though they look similar. Drywall screws have a longer thread, with a smaller screw shaft. There is also no section of the shaft which is not threaded; they are threaded from the point all the way up to the head, with a sharper point. This is, in part, because the screw is designed to be self-tapping, without a pilot hole, whereas wood screws are intended to be driven into a pilot hole. That difference is due to drywall and whitewood used for construction being much softer than hardwoods used for woodworking.
Finally, the heads of the two screw are different. While wood screws are flat headed, with an angled bottom, intended to seat against a drilled countersink, drywall screws are “bugle head.” That name comes from the fact that the head is shaped like the bell of a trumpet. This allows the drywall screw to self-countersink into the soft drywall. But it doesn’t work the same way on hardwood. The curved profile of the bugle head only makes intermittent contact with the countersink, causing a much weaker joint.
Now to the Main Question
Having said all that, for wood screws to hold pieces together their threads need to be able to dig into the wood grain and the bottom side of the head needs to make solid contact with the countersink in the wood. At the same time, it is important to avoid splitting the wood, which can be a serious problem at the ends of boards or edges of plywood.
If the pilot hole is drilled too large, the screw’s threads won’t be able to dig into the wood fibers well enough to make a solid joint. There’s even a chance that the screw will strip out the hole, especially if the screw is driven in with power tools.
A similar problem can happen when the screw is put into and taken out of the wood several times. Each time the screw is inserted, the threads of the screw chew up the wood fibers a little bit more, especially if the threads don’t engage the wood exactly as they had previously. Eventually, this causes enough of the wood fiber to break up and fall out of the hole, that there isn’t enough for the screw to grab onto.
The solution for both of these problems is the same, more material needs to be added into the hole, replacing what was lost. Fortunately, wood fiber adapts to this well, as what is put into the holes is broken up by the screw’s threads and the pieces conform to the wood fibers on the edges of the hole, filling the gap, strengthen the hole and holding the screw in place.
There are a variety of different materials that can be used for this, most notably wood products:
Wood match sticks (my favorite)
Toothpicks
Skewers of the type that are used for making shish kabob
Narrow wood dowels
A splinter split from a piece of wood
Golf tee
Nylon cable ties
Steel wool (only for light loads)
toilet paper mixed with wood glue makes a passable putty for filling the holes
In addition to these rawl plugs, the cheap plastic plugs that are used for inserting a screw into drywall or plaster can be glued into the hole, shrinking it. Please note that in order to use a rawl plug it may be necessary to drill the hole out slightly larger, so the plug will fit. This may also be true when using a dowel rod.
Always use wood glue, along with whatever material you are putting into the hole. The wood glue will mix with the wood fibers, bonding them to the main part of the wood. Put a little glue in the hole, shove in whatever plug is being used and cut or break it off flush. The screw can then be installed immediately, without waiting for the glue to dry.
What to do if a Hole is Off-Center
A variation of this repair can be used in the case of holes that are off-center, such as in the case where a hole is drilled wrong or where hardware is being replaced, but the new hardware doesn’t align perfectly with the existing. The difference is that in this case, the hole should be filled with whatever pieces of wood are being used as filler, along with the glue and left to dry.
It’s important when doing this that the entire hole is filled. Whereas a single wood matchstick might have been used before, in this case it might take two or one with a couple of toothpicks. The idea is to fill the hole so that the wood is essentially like it was before drilling the original holes.
Don’t bother cutting off the filler sticks until the glue has had time to dry. Then cut them off flush with the wood surface, either using a flush cut saw or a vibratory multitool. Then new pilot holes can be drilled, allowing the new hardware to be mounted. It’s a good idea to use a self-centering drill for these pilot holes, to avoid drilling them off-center.
Filling Larger Hole
Screw holes aren’t the only ones that can be problems. Occasionally we might make the wrong hole with a hole saw; either making it too big, too small or in the wrong place. Those can be repaired as well, with the help of other sized hole saws and perhaps the use of a belt sander.
Holes too small
For hole saw holes which are too small, it seems that all we would need to do is to use a larger hole saw to enlarge the hole. The only problem is that we don’t have a pilot hole for the pilot bit.
All that’s needed to fix this problem is to cut another hole the same size in a piece of scrap material. Stack that piece, along with the original one that was cut out to make the hole and place them over the pilot bit in the new, larger hole saw. The dual plug can be set into the existing hole, allowing the new hole saw to be centered on the existing hole for cutting the hole larger.
In the case of holes made with hole saws that are either too big or in the wrong place, the hole will need to be plugged and recut. But that can’t be done with the piece which was cut out with the hole saw, as it will be too little to fill the hole. Instead, cut a plug out using the next larger size hole saw. Then sand around the edges of that new plug, until it fits snugly into the existing hole. Leave just enough room for glue, so that the plug can be glued in place.
When gluing in the plug, take care to prevent it from protruding out either side. It should end up flush with the surface of the wood. clamp it in place to dry, if possible. Allow the glue to dry fully before recutting the new hole, unless the new hole will not overlap the old one in any way.
Obviously this sort of repair would be visible on stained and varnished pieces. It may even be a bit difficult to hide it in painted pieces. But fixing the hole and then going on to finish the project is better than having to throw the whole thing away because of one misplaced hole.
Related Posts:
How to Remove a Stripped Screw From Wood by Amy Reed May 22, 2025 DIY A stripped screw is every woodworker’s nemesis. It usually happens when the head of a flathead or Phillips screw becomes too worn or damaged to…
How to Build a Scuttle Hole for Easy Attic Access by Admin July 28, 2025 DIY When we bought this house, I barely noticed the faint square in the hallway closet ceiling—a drafty little scuttle hole that served as our only…