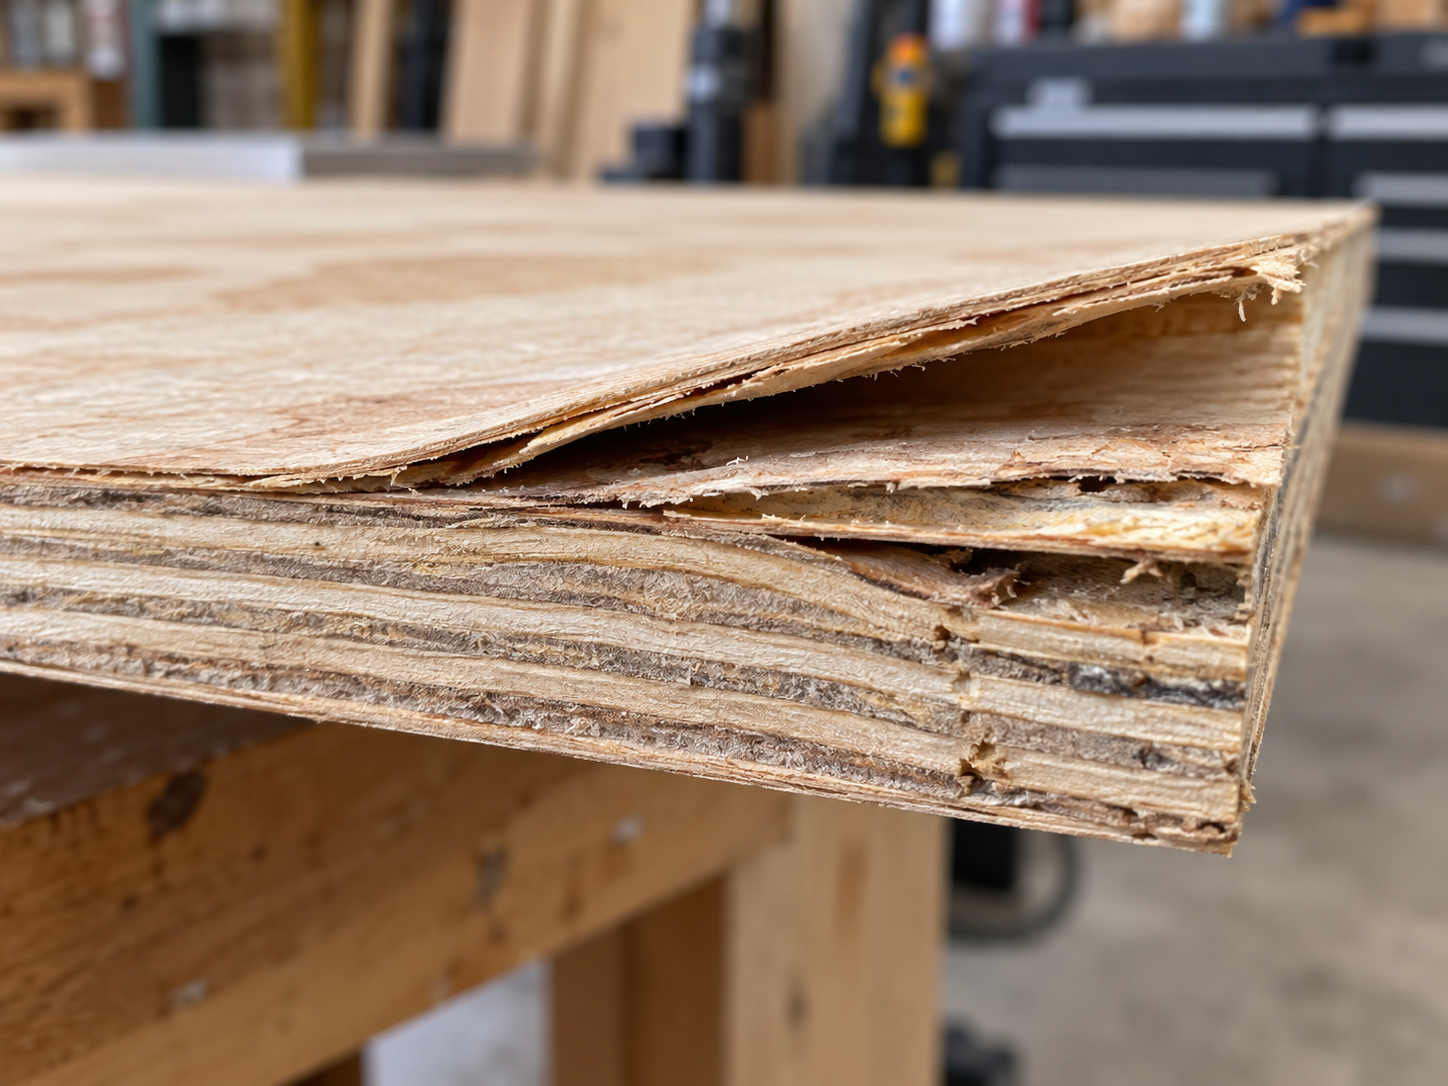
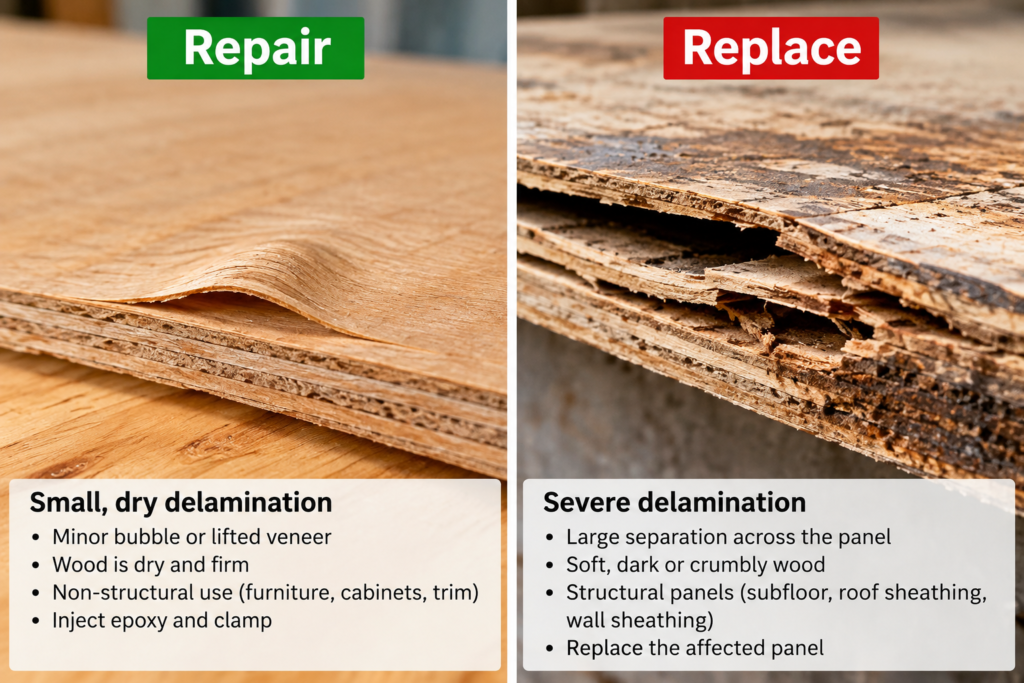
Repair plywood delamination only when the separated area is small (about the size of your palm or less), the wood is dry and firm, and the panel isn’t structural. If a subfloor, roof deck or wall sheathing has confirmed structural delamination, have it assessed and replace the affected panels when necessary. Replace any panel where the wood under the plies is soft, dark or wet. This guide covers what causes plywood to delaminate, how to tell true delamination from ordinary surface defects, what a glue repair can and can’t fix, and the signs that mean a sheet has to go.
Quick answer
Repair: small, dry, non-structural spots on furniture, cabinets, shop jigs or trim. Inject epoxy and clamp.
Assess, then replace as needed: confirmed structural delamination on subfloor, roof sheathing or wall sheathing.
Replace: separation that keeps spreading, soft or rotted wood, or wetting you can’t stop.
Fix the water first. A glued spot fails again if the panel keeps getting wet.
Not every flaw is delamination. Open knots, splits and patches on C- or D-grade faces can be normal for the grade.
Plywood Delamination Repair vs Replace Chart
What you find
Where it is
Decision
Why
Small bubble, dry, firm wood
Furniture, cabinet, shelf, jig
Repair
Low load, easy to clamp and keep an eye on
Edge plies lifting, dry
Non-structural trim or panel
Repair, then seal the edges
Edges are where water gets in
Open knot, split or patch on a C/D face that sounds solid when tapped
Sheathing or subfloor
Usually no action
Often allowed by the panel grade; not delamination
Confirmed structural delamination
Subfloor
Have it assessed; replace affected panels when necessary
A panel glued back together no longer carries its rating
Confirmed structural delamination
Roof deck or wall sheathing
Have it assessed; replace affected panels when necessary
Structural load and fastener holding are at risk
Separation that grows from month to month
Anywhere
Replace
The bond is failing across the panel
Soft, dark or crumbly wood under the plies
Anywhere
Replace and find the leak
That’s decay, not only glue failure
Large blisters across the face
Exterior siding or sign
Replace
Too much area to inject and clamp evenly
The palm-size line is our working rule of thumb, not a published standard. If you’re unsure about a structural panel, get it assessed before deciding.
What Plywood Delamination Is (and Isn’t)
Delamination means the glue bond between veneers has let go and the plies are peeling apart. When a bond fails this way, the veneers usually separate cleanly with very little wood fiber stuck to the glue line. That’s different from a panel where the wood itself has broken down, as it does with rot.
It’s also different from surface defects the grade allows. Construction plywood with C- or D-grade faces can have open knots, splits and factory patches. Those are visible flaws in one veneer, not plies separating from each other. Tap them. A defect the grade allows sounds solid around its edges, while true delamination sounds hollow across an area.
This distinction drives the repair decision. Glue failure on sound wood can sometimes be re-bonded. Decayed wood has nothing solid left to glue to.
Keep two ideas separate when you read a plywood stamp:
Bond classification (Exterior or Exposure 1) describes how well the glue line holds up to moisture.
Decay resistance is a separate property. Neither Exterior nor Exposure 1 plywood resists rot unless it has also been preservative-treated.
A panel can keep a good glue bond and still rot. A panel can also have sound wood and a failed bond.
What Causes Plywood Delamination
Manufacturing Defects
Some delamination starts at the mill. Common causes include glue that dried out before the panel was pressed, too little glue or skipped spots, veneer surfaces that don’t take glue well, and glue that didn’t fully cure.
Suspect a defect when a panel delaminates soon after installation, or when one sheet fails while its neighbors in the same conditions hold up.
Moisture Cycling and Panel Construction
After installation, the most common cause is repeated wetting and drying. Each cycle swells and shrinks the veneers, and that stresses the glue line.
You’ll see two bond classifications on U.S. structural plywood:
Exterior: meant for long-term exposure to weather or repeated wetting and drying.
Exposure 1: meant to survive moisture during construction delays before the panel is covered. It isn’t meant for permanent outdoor exposure.
Exposure 1 and Exterior plywood usually use the same kind of exterior adhesive. Part of what separates them is how the panel is built. Exposure 1 panels can include D-grade veneers, which allow larger knotholes and gaps inside the panel, and that affects how the panel handles moisture.
PS 1, the U.S. standard for structural plywood, gives each bond classification its own test procedures and acceptance criteria. The Exterior criteria are the more demanding of the two, and Exterior is the classification meant for permanent weather exposure. Neither classification measures decay resistance, and neither guarantees how a panel will perform in a particular installation. PS 1 no longer recognizes interior-only bonds.
End grain and cut edges soak up water much faster than panel faces do, so delamination usually starts at an edge and works inward. Outdoors, the usual causes are unsealed edges, missing drip edges and water pooling on flat surfaces. Indoors, look for plumbing leaks, condensation in poorly vented spaces, and wet subfloors under bathrooms or kitchens. Our guide to getting moisture out of a plywood subfloor explains how to dry a wet floor before you judge it.
Heat
The adhesives in Exterior and Exposure 1 plywood are thermoset resins, so they don’t soften or melt at normal service temperatures. Heat alone is rarely the cause. Heat combined with moisture, such as a hot roof deck over a damp, poorly vented attic, can speed up damage that moisture has started.
How to Inspect Delaminated Plywood
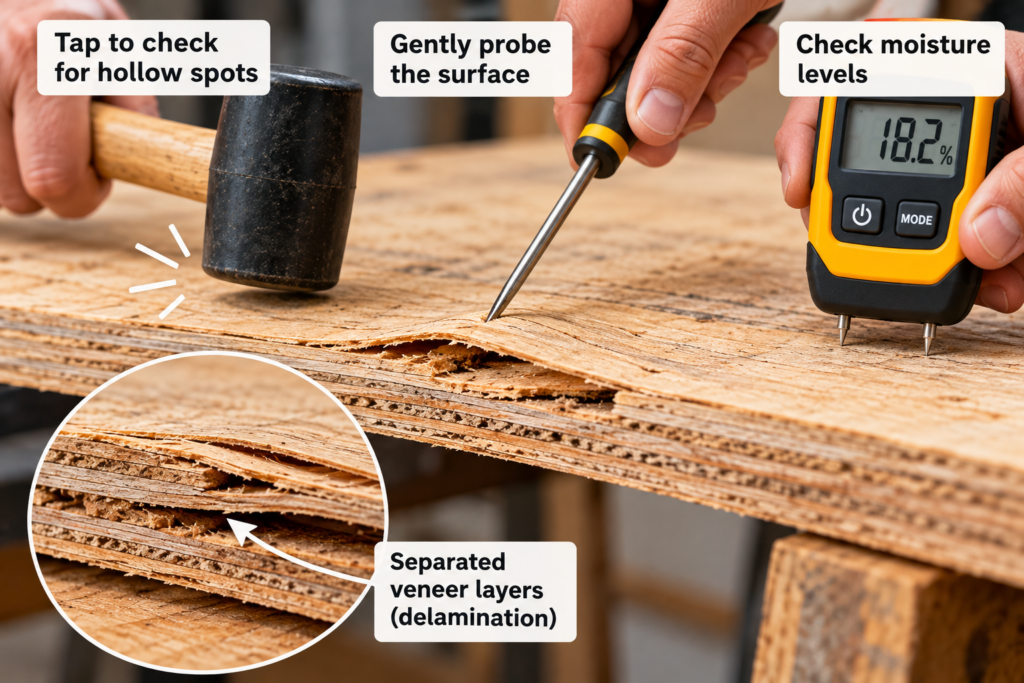
🧪 Real test you can run in 10 minutes. It’s a first screen, not an engineering assessment.
Look. Check for bubbles, lifted face veneer, swollen edges and gaps between plies at cut edges. Note open knots, splits and patches separately, because they may be normal for the grade.
Tap. Tap across the panel with a screwdriver handle or a coin. Sound wood rings solid, and separated plies sound dull or hollow. Pencil a line around the edges of any hollow area.
Press. Push on the area. If the face flexes or crackles, the bond underneath has failed.
Probe. Push an awl into the wood at the edge of the damage. If it sinks in easily, or the wood comes out in soft, stringy fibers, you’re looking at decay. See what to do with rotten plywood.
5. Check moisture. A moisture meter, pinless or pin-type, can show that wood is wetter than it should be, but it can’t prove the panel is dry all the way through. Compare readings against sound wood nearby and follow the meter maker’s instructions. Don’t glue wood that reads wetter than the sound wood around it.
6. Read the stamp. An Exposure 1 panel left out in the weather long-term was used outside its intended exposure. That’s worth noting, but it doesn’t tell you why this panel failed. Water getting in, a manufacturing defect or physical damage could each be the cause.
Measure the area you marked. If it’s bigger than your palm, it’s on a structural panel, or it’s still growing, move on to assessment and replacement.
This repair is for small, dry separations on non-structural parts such as furniture, cabinets, shelves, shop fixtures and trim.
Stop the water. Find out why the area got wet and fix that first.
Dry the panel. Let it dry until moisture readings are close to the sound wood next to it. Treat the meter as a screening tool, not proof. If the panel was soaked, give it extra drying time.
Open the gap. Slide a thin putty knife into the separation to clear out dust. If the bubble is closed, drill two or three small holes through the face ply only: one to inject through and one to let air out.
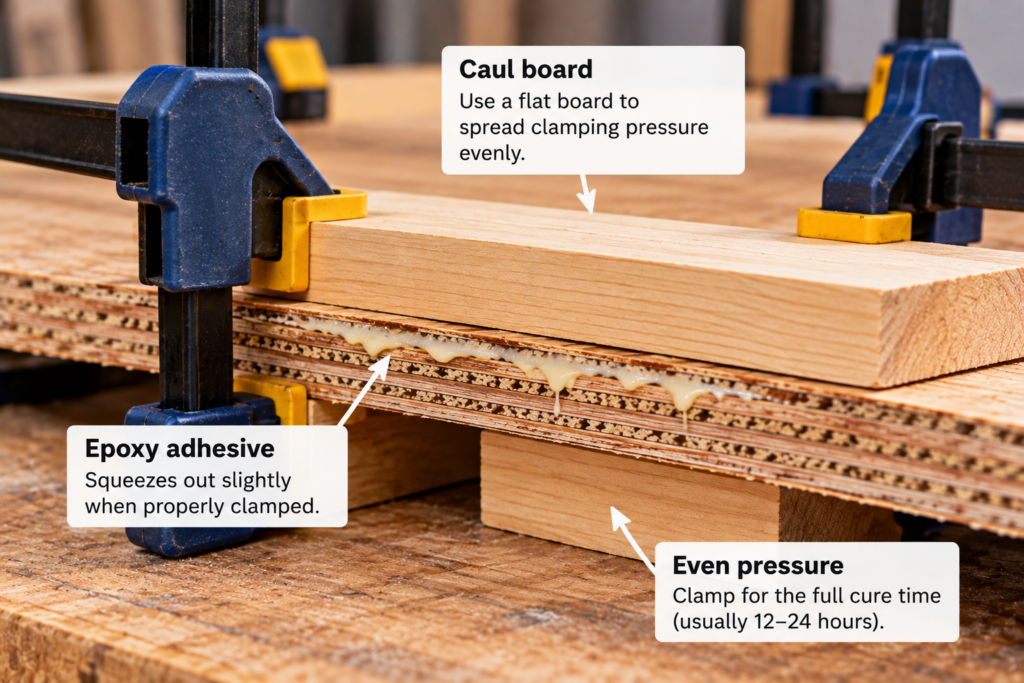
Inject epoxy. Use a thin, slow-setting laminating epoxy and a glue syringe. Keep filling until epoxy shows at the vent hole. Epoxy fills gaps and bonds without needing heavy clamping pressure. Polyurethane glue foams as it cures and can push the plies further apart. Our epoxy vs Gorilla Glue comparison covers the difference.
Clamp or weight it. Lay wax paper over the area, then a flat caul (a stiff, flat board), then add clamps or weight. Use light, even pressure so you don’t squeeze out all the epoxy.
Cure and check. After a full cure, tap the area again. It should sound solid.
Seal the edges. Prime and paint all exposed edges, or coat them with epoxy, so water can’t start the problem again. Our guide to painting plywood covers primers.
💸 Cost difference: a small epoxy kit and a syringe can cost less than one replacement sheet, so repairing makes sense on a cabinet side or a shop table. On a subfloor, the cost of materials isn’t what matters. What matters is the cost of a floor that fails later. Our subfloor replacement cost guide shows how much bigger that job gets.
Repair Limitations
A glue repair has real limits:
It doesn’t restore a structural rating. Span ratings and bond classifications describe the panel as it was manufactured and tested. No rating covers a panel that has been glued back together on site.
It only fixes the area you can reach. If one spot has failed, the rest of the glue line has been through the same conditions and may be next.
It can’t fix decay. In some marine and trim repairs, epoxy can firm up slightly softened wood. In a structural panel, rotted plies need to come out.
It won’t survive continued wetting. If you can’t keep water off the panel, the repair will fail.
On boats, any separation in a transom calls for a structural repair. See our guide to marine plywood for transoms.
Warning Signs You Need to Replace the Panel
⚠️ Warning: if you see any of these, get the panel assessed and plan on replacing it.
Confirmed structural delamination on a subfloor, roof deck or wall sheathing: hollow across an area, not just a surface defect the grade allows.
Soft spots or noticeable bounce when you walk on the floor.
Wood under the separated ply that is dark, crumbly, stringy or smells musty.
Separation that spreads between checks a few weeks apart.
Fasteners pulling through the panel, or nails backing out.
Swollen edges that have lost their shape across several sheets.
Mold growing on or inside the panel.
Long-term weather exposure on Exposure 1 panels. This is a risk factor, not proof of the cause, so weigh it alongside the other signs.
When you replace a panel, fix whatever caused the damage too, whether that’s flashing, drip edges, ventilation, a plumbing leak or unsealed edges. Otherwise the new sheet will fail the same way.
Best Tools and Materials for Plywood Delamination Repair
Disclosure: As an Amazon Associate, theplywood.com earns from qualifying purchases.
❌ Gluing a wet panel. Epoxy doesn’t bond well to wet wood, and moisture trapped under the repair keeps the damage going.
❌ Using polyurethane glue in the gap. It foams as it cures and can push the plies further apart.
❌ Clamping too hard. Squeezing out most of the glue leaves a starved joint that fails again.
❌ Fixing a subfloor bubble and laying new flooring over it. If the repair fails, you have to tear out the finished floor to reach it.
❌ Treating Exterior plywood as rot-proof. The bond classification covers the glue line, not the wood. Untreated Exterior panels can still decay if they stay wet.
😬 Regret: fixing the bubble but not the leak. The glued spot holds, and the plies next to it start separating.
Plywood Delamination FAQ
Can delaminated plywood be repaired? Yes, if the area is small, dry and firm, and the panel isn’t structural. Inject epoxy, clamp lightly and seal the edges. If a subfloor, roof or wall sheathing has confirmed structural delamination, have it assessed and replace the affected panels when necessary.
What causes plywood to delaminate? Usually it’s repeated wetting and drying, often through unsealed edges, or a panel used in conditions it wasn’t meant for. Manufacturing defects, such as glue that dried out or was spread unevenly, cause some failures soon after installation.
Does Exterior plywood delaminate? It can. Exterior and Exposure 1 panels usually use the same kind of adhesive, but PS 1 tests each classification differently, and Exterior is the one meant for long-term weather exposure. When Exterior plywood delaminates, check for a manufacturing defect, water trapped over a long period, or physical damage.
What glue is best for plywood delamination repair? A thin, slow-setting laminating epoxy. It fills gaps, bonds without heavy clamping and resists moisture once it has cured.
Is delaminated plywood subfloor dangerous? It can be. Separated plies lose stiffness and hold fasteners less well, which leads to soft spots and can lead to failure under load. Have confirmed delamination assessed, replace the affected sheets, and find where the moisture is coming from.
Small, dry separations on furniture and shop parts can be glued back with epoxy, as long as you seal the edges afterward. On a subfloor, roof deck or wall sheathing, have confirmed structural delamination assessed and replace the affected panels when necessary. Replace any panel with soft or rotted wood. Either way, fix the source of the water first, or the next panel will fail the same way.
Related Posts:
Can OSB Get Wet? Swelling, Repair and When to Replace by Admin October 6, 2026 DIY Yes, OSB can get wet. A standard Exposure 1 panel is built to handle normal construction delays without losing its structural strength. The catch is…
Patch or Replace a Rotted Plywood Subfloor? by Admin September 24, 2026 DIY Woodworking Whether to patch or replace rotted plywood subfloor comes down to how far the decay has spread and what's underneath it. Small areas of rot…
RV Paneling: Repair, Replacement, and Maintenance Guide by Admin September 14, 2025 Installing Owning a recreational vehicle brings freedom and adventure, but it also comes with upkeep. One of the biggest hidden problems RV owners encounter is RV…