Newel posts are the support posts for handrails or stair railings located at the ends of the fence, and anywhere there is a corner, the bar must go around. But that’s not what the word newel post originally meant. It was a much more specific term, applied only to spiral staircases.
In that case, the newel post was the central supporting post for the staircase. Today that earlier definition has been lost, as we rarely use spiral staircases and commonly build regular staircases with handrails.
A large part of the reason why newel post caps are used is purely decorative. Leaving the end of the newel post, cut off square, with the end grain showing just isn’t all that attractive. But there’s a practical reason for covering that end grain as well.
That’s because the end grain soaks up moisture 100 times faster than the long grain, so leaving it exposed creates a condition where the top end of the newel post expands and contracts with changes in the moisture level. Sealing that end grain with paint or varnish is challenging, as it can soak many of these finishes.
All newel post styles and caps can be made of wood, cast in metal, and molded from urethane. For home interiors, wood is the most common.
Some newel posts come with the cap cut into the base when purchased. This is pretty much only done with a ball-type cap, as flat or peaked caps typically extend past the edges of the post. But even then, the existing cap can be cut off and a different style of cap installed.
Installing a Newel Post Cap
At first, glance, installing a newel post cap may seem difficult for those who have never installed one before. That’s mainly because the installation hardware is hidden if the installation is done correctly. In most cases, newel post caps can be installed in no more than a few minutes.
On the other hand, removing a newel post cap can take longer than installing one in case they are replaced.
Due to their location, newel post caps receive a lot of handling as people go up and down the stairs. This can lead to excessive wear, necessitating their replacement long before the newel posts need to be replaced. When that happens, the biggest problem is often figuring out how they were installed so that the newel post caps can be removed without causing excessive damage to the newel posts.
There are three basic ways in which newel post caps are installed:
Adhesive
The simplest way of installing newel post caps is to use construction adhesive alone. A dab of construction adhesive is put in the center of the top of the newel post, and the cap is pressed down upon it, spreading the glue and ensuring that it makes good contact with both the newel post and the cap.
While this is a simple method of installing newel post caps, it is the least secure method. The adhesive is attached to the end grain of the newel post cap, where it can’t get a good “bite” on the wood, especially since construction adhesive is a heavy-bodied adhesive with high solids content. On the other hand, removing the newel post cap is usually relatively easy if it needs to be replaced, as the glue can be pried loose.
Dowel
Some newel post caps come with a dowel base intended to be glued into a matching hole at the end of the newel post cap. This is the most secure mounting method, as the dowel provides a large long grain surface for gluing. This mounting is commonly used on round ball-type newel post caps without base molding.
The problem comes when the newel post doesn’t have a hole drilled into the end for the newel post cap to mount. This isn’t a big issue, as drilling a hole is tricky. Just ensure that the hole into the end of the newel post is straight.
When replacing this sort of newel post cap, it is necessary to cut through the dowel. A thin kerf saw, such as a Japanese pull saw, cutting just at the base of the newel post cap, is the best way to cut. It will probably take some time to cut, as this must be done by hand rather than using a power saw.
Nails
The most common method of installing newel post caps is with nails. This can be done with round newel post caps without molding around the top of the cap, but it is most commonly used with square newel post caps, which have that molding. The cap is set in place, and a pneumatic finish nailer is used to put one nail on each side of the molding, down near the bottom, in the center of the side.
This is the most complex type of newel post cap to remove, often requiring breaking up the lid, as the nails are not accessible to be removed. But since the cap is being replaced anyway, it doesn’t matter if the post cap is broken up.
Is it Possible to Make Newel Post Caps?
While most people buy newel post caps that have been factory-made, the woodworker can make their own. This is especially advantageous when several caps are needed, as buying many caps can be daunting. There are several ways of making one’s newel post caps.
Round Ball Caps
The various styles of round ball caps, including king and queen caps, require a lathe. However, if one has access to a lathe, they are straightforward to make. Much like any other finial, it’s just a matter of turning the ball or a different shape out of the blank.
But what if a square base is required, with the ball cap? That’s not any harder. The main difference is that the square base must be routed to give it an appropriate profile after making the ball cap.
Turned post cap
Using the drawing above as an example, a 5”x 5” x 6” block of wood could be mounted to a faceplate to turn a dovetail mortise into the bottom of the block. The ball could then be turned for the top of the newel post cap.
A router with a straight bit is first used to cut out the pocket at the bottom, shown by the dotted line. Then various other bits can be used to form the “molding” on the edge of the base. In this case, a round-over bit would first round the top edge. Then a beading bit could be used for the lower part of the post cap itself. Finally, a round bit could cut the indentation into the side.
Of course, all this will require considerable sanding, and then the newel post cap will be finished; that’s part of any project.
Peaked Newel Post Cap
Other than ball newel post caps, the peaked cap is probably the most common post cap style. This can also be made in the home workshop, even more, accessible than the ball cap above. It can either be made as a solid piece, like the ball overhead, or in pieces assembled to make the complete cap. Let’s look at how it can be made in parts. I’ve made the drawing below an exploded view to show the difference and involvement.
For the best possible look, the peaked front post cap and square base should each be made of four pieces of lumber, mitered, and connected. This will eliminate any visible end grain, creating a better newel post cap. But to be honest with you, no factory will make newel post caps made of four pieces of wood laminated together to avoid end grain. So if you don’t do that, you won’t be criticized.
Of those pieces, the one which would make the most sense to build out of mitered pieces would be the square base. Cutting four mitered pieces and gluing them together, perhaps an element pocket screw from the bottom side to hold the pieces while the glue dries will make the post cap more attractive. But again, that is
Round Ball Caps
Thus styles of round ball caps, including king and queen caps, require a lathe. However, if one has access to a lathe, they are straightforward to make. Much like any other finial, it’s just a matter of turning the ball or a different shape out of the blank.
But what if a square base is required, with the ball cap? That’s not any harder. The main difference is that the square base must be routed to give it an appropriate profile after the ball has been made.
Turned post cap
Using the drawing above as an example, a 5”x 5” x 6” block of wood could be mounted to a faceplate to turn a dovetail mortise into the bottom of the block. Once done, the workpiece would be removed from the faceplate and climbed into a chuck with dovetail jaws. The ball could then be turned for the top of the newel post cap.
Once the ball and the ring at its base are turned, the workpiece is removed from the lathe to work the ground. When making newel post caps in the workshop, remember that router bits can often be combined to create more complex profiles.
A router with a straight bit is first used to cut out the pocket at the bottom, shown by the dotted line. Then various other bits can be used to form the “molding” on the edge of the base. In this case, a round-over bit would first round the top edge. Then a beading bit could be used for the lower part of the post cap itself. Finally, a round bit could cut the indentation into the side.
Of course, all this will require considerable sanding, and then the newel post cap will have to be finished; that’s part of any project.
Peaked Newel Post Cap
Other than ball newel post caps, the peaked cap is probably the most common style of post cap. This can also be made in the home workshop, even more, accessible than the ball cap above. It can either be made as a solid piece or in pieces assembled to make the complete cap. Let’s look at how it can be made in pieces. I’ve made the drawing below an exploded view to show the different parts involved.
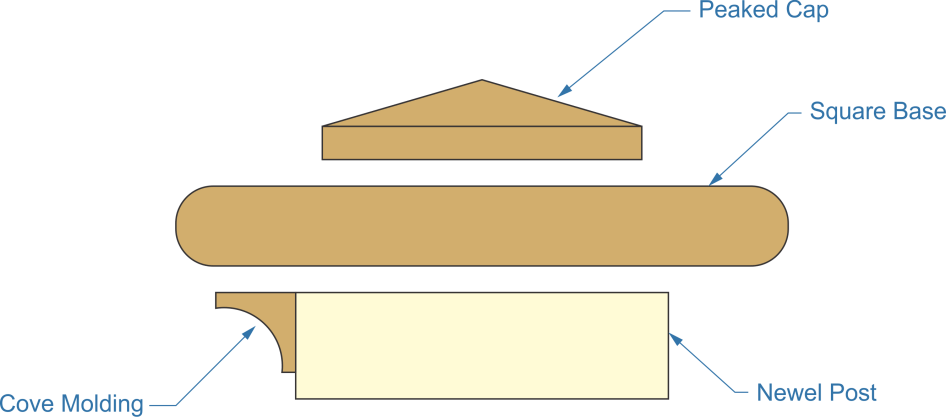
Peaked post cap
For the best possible look, the peaked cap and square base should each be made of four pieces of lumber, mitered, and connected. This will eliminate any visible end grain, creating a better newel post cap. But to be honest with you, no factory will make newel post caps made of four pieces of wood laminated together to avoid end grain. So if you don’t do that, you won’t be criticized.
Of those pieces, the square of the post cap and base would make the most sense to build out of mitered pieces. Cutting four mitered pieces and gluing them together, perhaps with a pocket screw from the bottom side to hold the elements while the glue dries, will make the post cap more attractive. But again, that is not required.
However, this design is ideal if we’re trying to avoid using a router. The square base can be made from stair treads, which come with a rounded edge on theMiterter Cutting four pieces and then assembling them into a square base gives a round border around the base.
The other option is to start with a single piece of wood and route the edges, as we discussed for the ball post cap above. Depending on the router bits available, any molding design can be used.
However, it is unnecessary to make this very complex, as the piece of base cove molding below the post base provides the molding effect. Any baseboard or casing could be used in place of the base cove molding, depending on the look desired and the molding available.
If any miter joints are used, either in mitering four pieces together to use molding below the base piece, there is always a chance of some small gaps between the components. The normal way of dealing with this is to use wood putty to fill the cracks, but there’s a better way.
Save some of the sawdust from the wood and mix it with wood glue to make perfectly matching wood putty, filling the gaps with that. However, remember that this will not stain well if you plan on staining the wood.
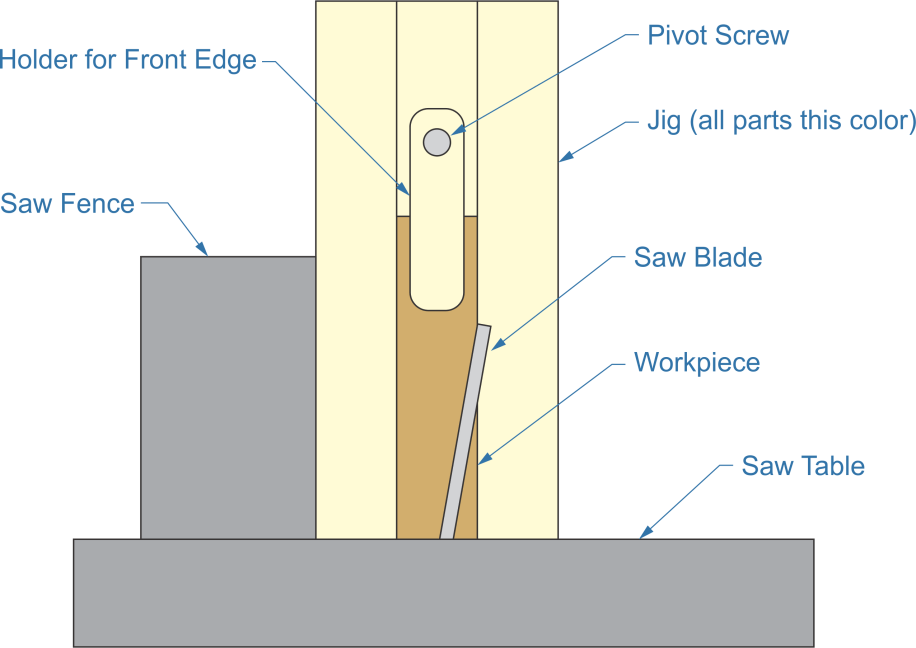
The top peaked piece of the newel cap is cut on the table saw, standing on the edge and setting the blade at an angle. A jig is needed for this so that it can support the workpiece and keep it from falling into the saw blade. That won’t be much of an issue for the first cut, but the chances of the workpiece falling into the edge and being destroyed increase as more sides are cut.
However, this design is ideal if we’re trying to avoid using a router. The square base can be made from stair treads, which come with a rounded edge on them. Miter cutting four pieces and then assembling them into a square gives a rounded edge all the way around.
The other option is to start with a single piece of wood on the edges, as we discussed for the ball post cap above. Depending on the router bits available, any molding design can be used. However, it is unnecessary to make this very complex, as the cove molding below the post-cap base provides the molding effect. Any baseboard or casing could be used in place of the cove molding, depending on the look desired and the molding available.
If any miter joints are used, either in mitering four pieces together to use molding below the base piece, then there is always a chance of ending up with some small gaps between the pieces. The usual way of dealing with this is to use wood putty to fill the cracks, but there’s a better way. Save some of the sawdust from the wood and mix it with wood glue to make perfectly matching wood putty, filling the gaps with that. However, remember that this will not stain well if you plan on staining the wood.
The top peaked piece of the newel cap is cut on the table saw, standing on the edge and setting the blade at an angle. A jig is needed for this so that it can support the workpiece and keep it from falling into the saw blade. That won’t be much of an issue for the first cut. Nevertheless, as more sides are cut, the chances of the workpiece falling into the blade and being destroyed increase.
The jig must surround the workpiece on three sides, the top, and the bottom, with the workpiece standing on its edge. The fourth side will sit on the table saw’s table and must be flush with the bottom of the jig. The jig must also ride against the saw’s fence, establishing the distance the workpiece is held away from the fence to ensure it is the same for all four sides. Ensure it fits snugly enough into the jig that it won’t slip while cutting.
Peaked post cap jig
Related Posts:
How to Build a DIY Plywood Truck Cap by Admin May 7, 2025 DIY If you've ever hauled plywood in the back of your truck, you've probably thought about how handy a cap would be—especially one you built yourself.…