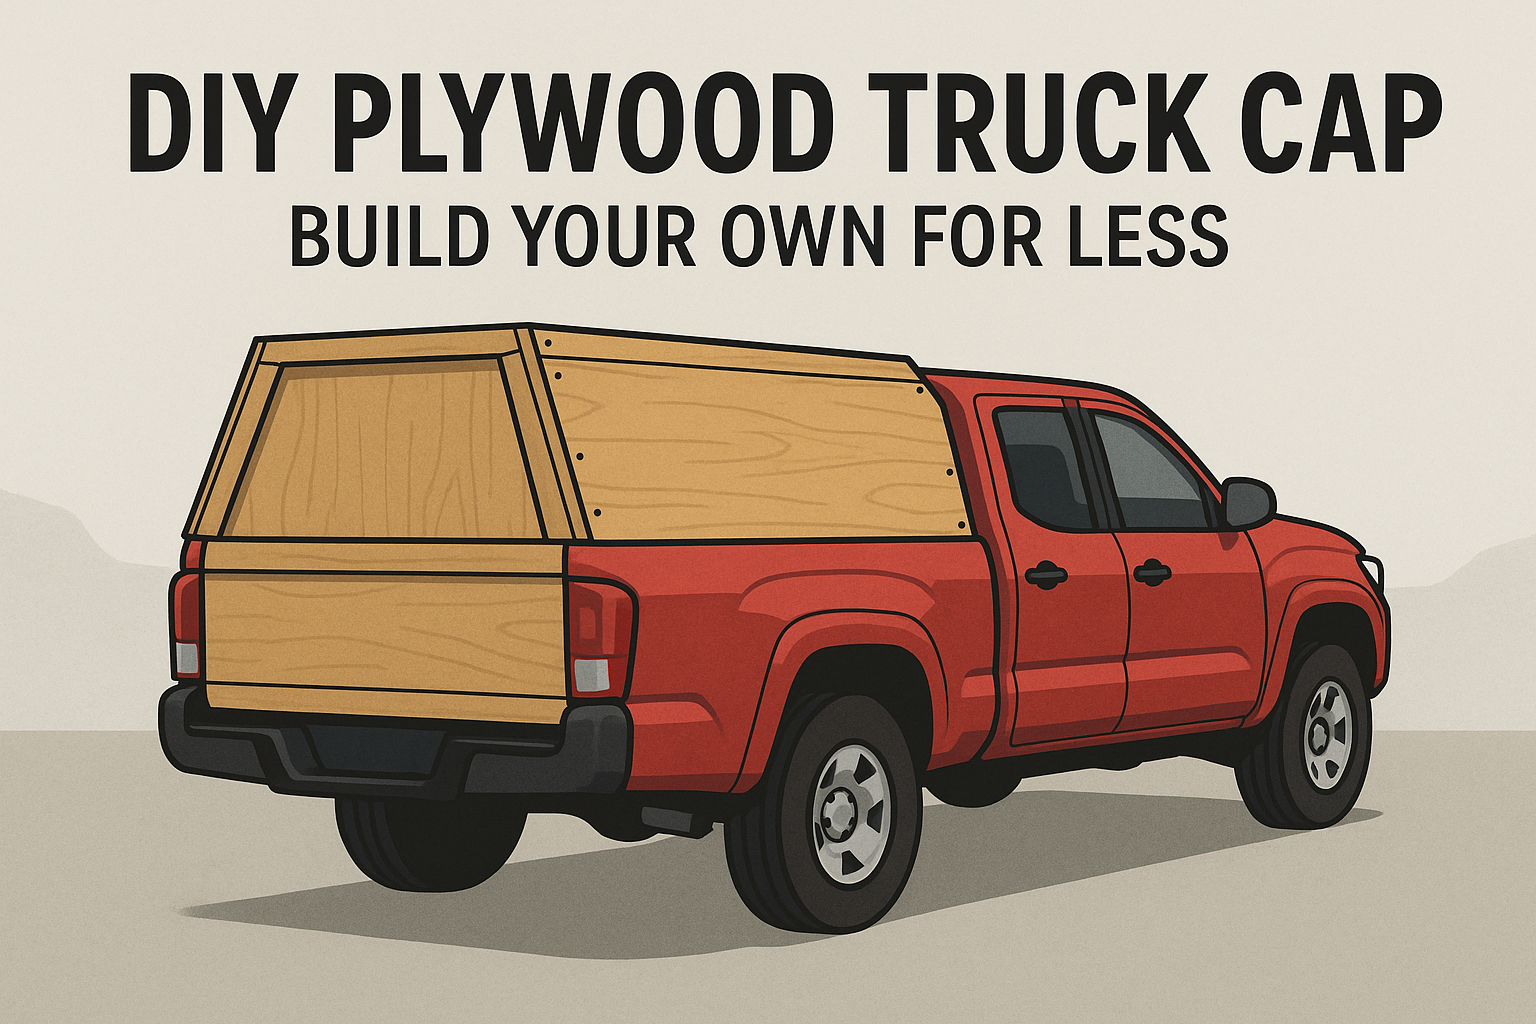
If you’ve ever hauled plywood in the back of your truck, you’ve probably thought about how handy a cap would be—especially one you built yourself. Commercial caps can cost well over a grand, but you can build your own for under $300 with just a few sheets of plywood, basic tools, and a weekend of work.
Not only will a custom plywood truck cap keep your gear protected from the elements, but it also gives your truck a rugged, personalized look. Done right, a DIY cap can be just as strong and weather-resistant as a store-bought model, and way more rewarding to use.
Let me walk you through how I built mine, including the small tricks that made a big difference.
Why I Built My Own Plywood Truck Cap
When I priced out aluminum and fiberglass caps, I couldn’t justify the cost. I figured: if I could frame walls and install flooring in my garage, why not build a truck cap? I also wanted something I could modify later—add lighting, internal shelves, or even turn into a small camper setup.
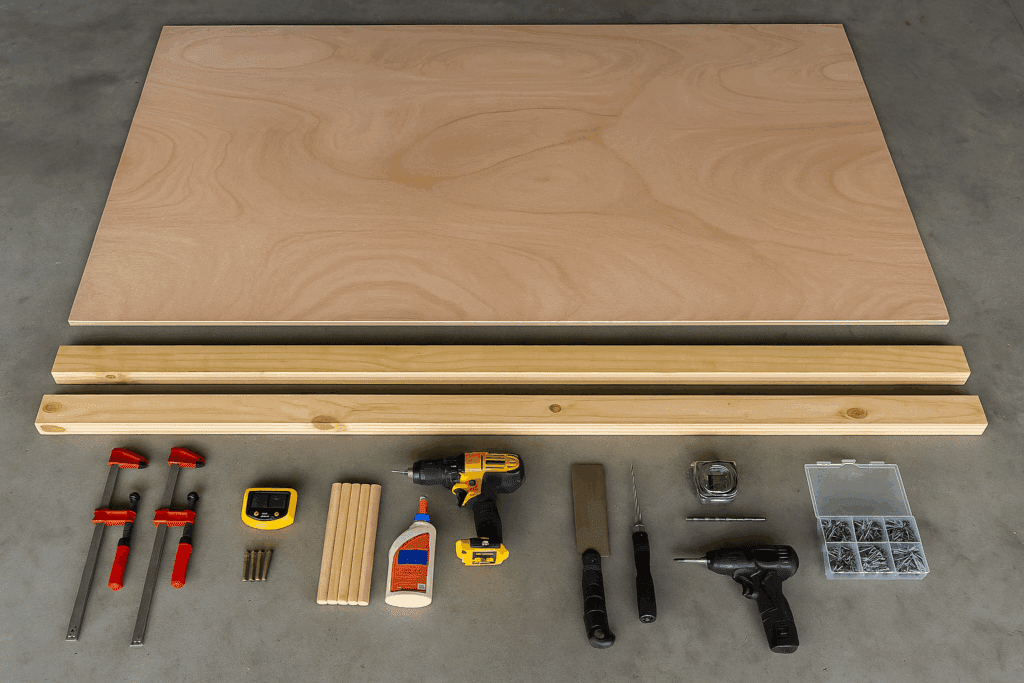
So I went with plywood. It’s strong, inexpensive, easy to work with, and readily available. Plus, it holds paint well and can be sealed for all kinds of weather.
I started by cutting two 2x4s to run the length of my bed rails. You’ll want to leave a bit of overhang—about ½”—to make room for your front and rear panels.
Pro Tip: Use a digital angle finder to match the cab’s angle and shave the outer edges of your 2x4s. It makes everything sit snug and look cleaner.
Clap these boards down tight. They’ll form the foundation for everything else.
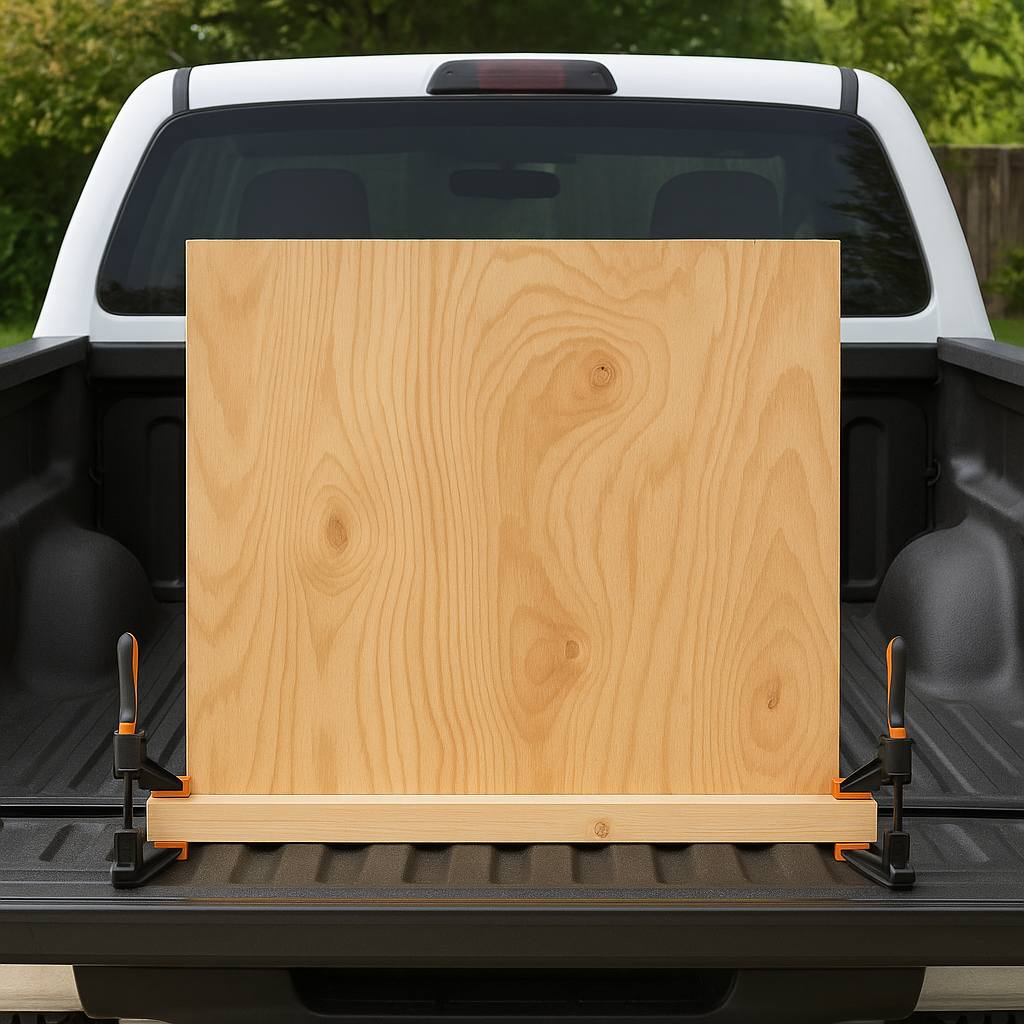
Step 2: Cut the Front and Rear Walls
Use your ½” plywood vertically against the cab. I traced the cab’s contour onto it and used a trim router for the cut—it was more precise than a jigsaw and gave me cleaner edges.
The rear panel can be square or curved at the top—your call. If you’re planning a flip-up hatch, mark that now but don’t cut it until after the structure is in place.
Step 3: Join Everything Without Weak Screws
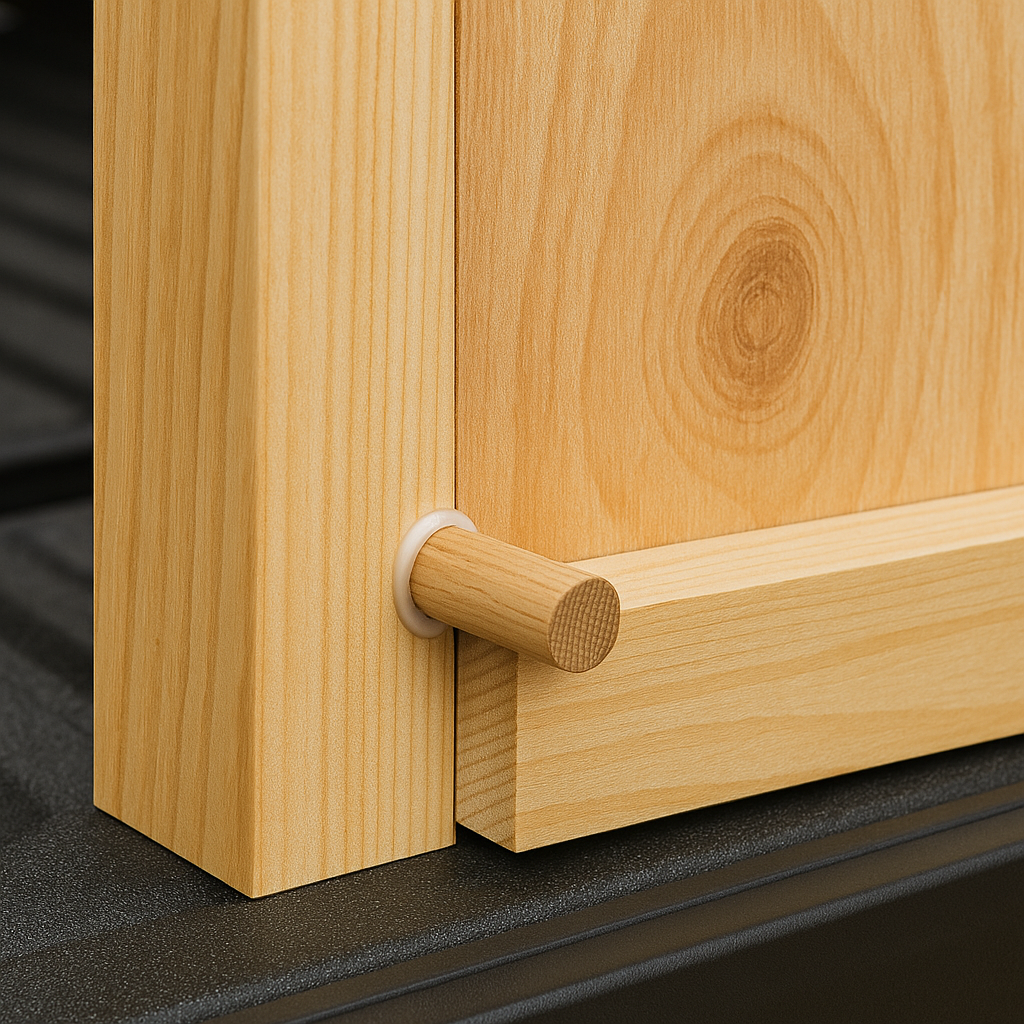
Screwing into the end grain of 2x4s won’t hold for long. Instead, I drilled ¾” holes into the plywood edges and inserted hardwood dowels into the frame rails. Add a generous amount of glue, clamp it tight, and let it cure.
Once dry, cut off the extra dowel with a flush saw or oscillating tool. It’s a rock-solid joint that’ll handle road bumps and vibrations better than screws alone.
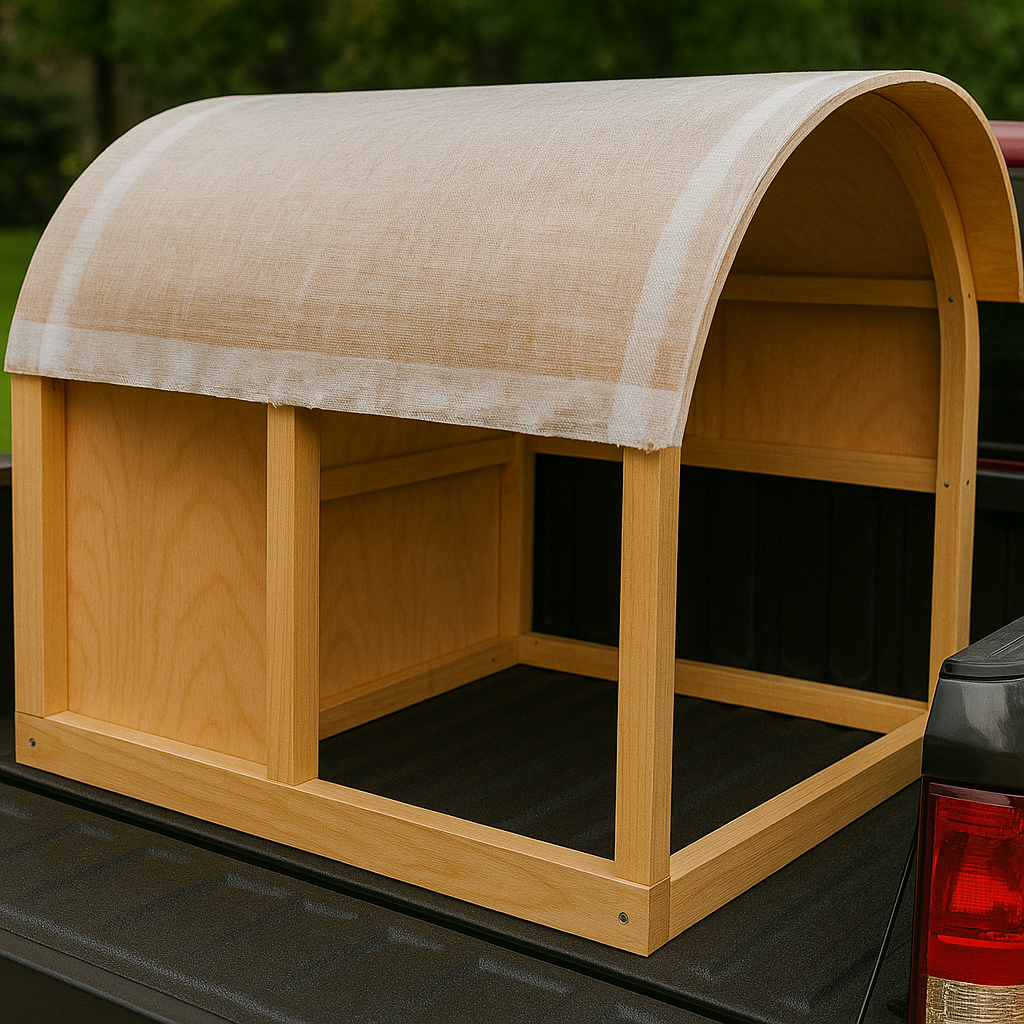
Step 4: Interior Framing Makes or Breaks It
I built curved roof bows using 1×6 boards. A shallow arch not only looks better but also helps water run off. These attach to vertical 2×2 posts spaced evenly around the perimeter.
Tip: Cut notches into the bows so you can run horizontal ribs from front to back. This adds structure and gives your skin panels more places to grab onto.
I used lap joints with wood glue and predrilled all my screw holes to prevent splitting.
Step 5: Skin the Cap with Bending Plywood
Standard plywood won’t bend much, so use ⅛” bending ply or marine plywood. Start at the side rails and work upward, wrapping over the bows. I used stainless screws every 4 inches.
At the top center, I capped the seam with a thin strip of plywood and sealed it with fiberglass tape and epoxy resin. No leaks so far—and I’ve driven through some heavy downpours.
If you want to keep your tailgate, cut a rectangular hatch into the rear wall, then reattach it with strap hinges. I mounted gas struts to the interior and added rubber weather seals for a tight fit.
Prefer barn-style doors? Remove the tailgate and hinge the two vertical panels off the rear frame. Just be sure to reinforce the framing inside.
Step 7: Add Windows (Optional, But Worth It)
I picked up a pair of RV windows with built-in screens and cut the openings with a jigsaw. Mounted them with weatherproof screws, sealed the flanges with caulk, and haven’t had a single leak.
If you’re on a budget, clear polycarbonate or acrylic sheets work too—just make sure you mount them with overlapping edges and good sealing.
Step 8: Seal and Protect the Entire Cap
Once the whole cap was built, I coated the entire thing with marine-grade wood sealer. I followed that up with two coats of exterior paint to match my truck.
Every seam got a bead of high-grade caulk. I also added foam gasket tape between the rails and my truck bed to keep dust and water out.
Step 9: Customize the Interior
This is the fun part. I framed shallow storage bins over the wheel wells, mounted bungee cords on the ceiling for loose gear, and built a small platform to sleep on during fishing trips.
I even added some battery-powered LED strips and a small 12V fan for ventilation. Total luxury compared to a plain bed cap.
Roof Rack: Mount aluminum crossbars for hauling kayaks, ladders, or gear boxes.
Solar Panel: A basic 100W kit runs lights and charges small devices.
Insulation: Foam panels covered with fabric keep things warmer in winter.
Ventilation: A small rooftop vent fan helps reduce moisture inside.
Final Thoughts
Before wrapping up, it’s worth mentioning just how flexible a plywood truck cap can be over time. Once you’ve built the structure, you’re free to upgrade and personalize it however you want. For example, I recently added an insulated interior paneling system using foil-backed foam and spray adhesive. It helps with temperature regulation and also reduces noise from the road.
I’ve also installed a compact, lockable storage cabinet mounted to the cap’s interior frame, which holds recovery straps, jumper cables, and a small tool roll. These upgrades didn’t cost much, but they’ve made a huge difference when I’m out on job sites or weekend trips. Another great addition was a small fold-down work table attached to the interior wall—perfect for making coffee or setting up a laptop. On longer trips, I plug in a small portable fridge and power it with a lithium battery box charged by a roof-mounted solar panel. This turns the cap into a functional micro-camper, ideal for off-grid nights.
The modular nature of a plywood build means it evolves with your needs—whether that’s for work, adventure, or a little of both. If you plan your frame and structure thoughtfully, adding these extras later is quick and rewarding. I even wired in a few 12V outlets and a USB charging station to keep gear powered on the go. With enough creativity, your plywood truck cap isn’t just a storage shell—it’s a mobile basecamp.
Building your plywood truck cap is one of those projects that pays off every time you use it. It’s functional, affordable, and you get to say “I built that.”
Mine has survived highway driving, backroads, and plenty of bad weather—and it’s still going strong. Whether you’re storing tools or gearing up for your next camping trip, this DIY project is.
Related Posts:
Newel Post Cap by Admin July 31, 2023 DIY Newel posts are the support posts for handrails or stair railings located at the ends of the fence, and anywhere there is a corner, the…
DIY Plywood Desk: How to Build One at Home by Admin October 8, 2025 DIY I built my first plywood desk because I was tired of working hunched over the kitchen counter. It wasn’t some grand plan — I just…
DIY Jon Boat: How to Build a Plywood Fishing Boat by Admin January 5, 2026 DIY A jon boat is one of the few boats that actually makes sense to build at home. It’s simple by design—flat bottom. Straight sides. Mostly…