Attic storage is important in any home. With the amount of available storage dropping in modern homes, people need someplace to store their Christmas decorations, camping gear and other items that they don’t use all the time. For many, that means making use of attic space. Installing an attic ladder makes it easier and safer to utilize that space, as it is not necessary to bring a ladder into the house and set it up, risking the ladder slipping while getting on or off it at the top end.
The problem with that is that as much as 85% of a home’s heat loss is through the attic. Since heat rises, that makes a lot of sense from the physics point of view; which is why the building code requires so much insulation in attics. But just because the building code has that requirement, doesn’t mean that attics are actually insulated that well. The amount of insulation found in the attics of many homes, especially older homes, is usually less than required.
Part of this is caused by the insulation compacting down over time. On top of that, older homes were built with less insulation in the attics, as the building code has changed since then. But even in cases where homes have been built with the required attic insulation, there’s always a chance that there are non-insulated areas. There are just too many areas of an attic which are difficult to insulate properly.
One of the areas that are often left without proper insulation, allowing heat to escape our homes, is the aforementioned attic ladder, sometimes referred to as the stairs. This is somehow considered a difficult area to insulate, even though it really isn’t.
Some manufacturers provide “insulated” attic stairs, which come with a sheet of foam insulation inserted between the stairs themselves and the thin piece of plywood that covers the attic access when the attic stairs are folded away. However, that insulation is only ½” and doesn’t cover the entire area, making it very poor insulation. There are much better things that can be done, which will provide more insulation.
Using a Commercial Attic Stair Insulator
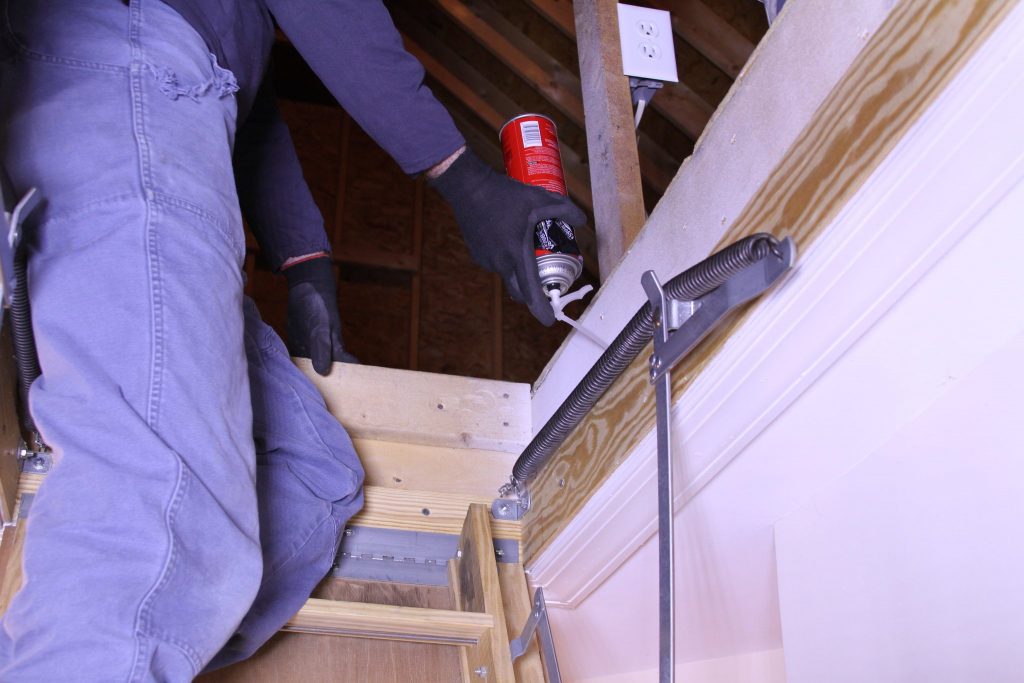
The easiest and fastest way of providing at least some insulation to the attic stairs is to buy an attic stair cover. There are a variety of these available on the market, ranging in price from $35 to about $150. Some are flexible, while others are rigid. Using one of these eliminates the necessity to do a lot of cutting and measuring to install some insulation. However, they really don’t provide a lot of insulating value, because they are thin.
Most of these are made so that they can attach either to the edge of the attic stair’s frame or the plywood flooring installed in the attic. In either case, the procedure to install them is basically the same and must be done from the attic side, preferably with the stairs in their closed position.
Start by opening up the insulating cover and unfolding it. The cover will have a panel that is hinged at one end, with Velcro or a zipper to allow it to be opened. This hinged side should face in the same direction as the base of the stairs, so that it can be folded back out of the way, while climbing up into the attic.
Spread out the cover over the staircase, making sure it will fit and that the flexible mounting flange on the cover meets up with either the floorboards or the stair frame. This flange will probably have double-sided tape installed on the bottom side of it. Working with one side at a time, remove the protective cover from this tape strip and stick the cover down, taking care to ensure that it is centered correctly, so that all the other sides of the cover will also be able to be attached.
Continue around the cover, attaching each side and pressing it down. Once the adhesive is stuck to the flooring or stair frame, follow that up with a staple gun, placing staples every six inches to provide extra security. Check that the zipper functions correctly and the job is finished.
Making an Insulating Cover
The basic problem of not having enough insulation in those commercial stair covers can be easily solved by making a DIY cover. This is a simple project, requiring only a knife and measuring tools to complete. The hardest part is getting a sheet of rigid foam insulation into the attic. It will probably need to be cut in order to do that, as the 4’x 8’ sheet won’t fit through the attic access. Cutting it to two 2’x 8’ sheets should work.
It’s best to avoid the white Styrofoam board, as it tends to crumble when cut. The other types of rigid foam board are made of other types of expanding foam, which do not form the small granules of insulation that Styrofoam does; so while they can still break, they don’t crumble in the same way, leaving crumbs all over the place. Either ¾” or 1” foam board can be used, depending on what is available. In addition to the rigid foam insulation, a roll of aluminum tape, typically used for sealing ductwork, will be needed.
The idea is to build a box out of that rigid foam insulation, which will sit down on top of the stair frame. That’s important, as it both ensures that there isn’t a gap left for air to pass through and it ensures that the cover will stay in place.
If the insulating foam has one side that is covered with an aluminum film, build the box with that side facing in. That coating is intended to reflect heat back into the room. Since the idea here is to keep the heat in the living spaces of the home and not in the attic, the aluminum film should face down.
To make the box, cut four sides from the rigid insulating foam. These should be high enough to ensure that they go higher than the stairs in their folded position. There isn’t a lot of extra space around the frame, so the sides will have to be measured carefully. Ideally, it will fit snugly in the available space, but not so snugly that it is hard to get the box into place, while standing on the ladder.
The corner of the box should be attached together with the aluminum tape, taping them both on the outside and the inside. Care must be taken when working with this tape, as it is thin, extremely sticky and tends to roll up on itself when the liner is removed. When taping the inside of the corners, it is a good idea to fold the tape first, adhesive side out, so that the folded edge can be placed right in the corner and the tape won’t just stick to the insulating board in the wrong spots.
With all four sides of the box assembled, cut another piece of the rigid foam to make a top for it, making it the same size as the outside. Tape it to the sides, both outside and inside, just as the sides were taped together.
To add extra insulating value, it would be a good idea to add another layer of insulating foam around the sides. However, this layer can only be added above the attic floor level, as there won’t be enough room between the joists to add a second layer there. Once this layer is attached, adding another layer on the top is a good idea as well.
Some people recommend attaching a layer of fiberglass insulation to the top of the box, in order to give it additional insulation. While this can be done, the rigid foam insulation has a higher R-value per inch, than fiberglass batts do. So it is actually better to add additional layers of rigid foam, than to add fiberglass. Besides that, adding fiberglass means covering the fiberglass with building wrap, which might end up tearing loose from the box when trying to move the cover.
Old homes might have an actual staircase leading up to the attic, even if the attic is not finished. These are unlikely to be insulated, as it would be an interior staircase with interior walls. If the home is old enough, it is possible that it wasn’t insulated or was only minimally insulated when it was built.
Insulating this sort of stair can be a different sort of challenge; nevertheless, it can still be done by the do-it-yourselfer. Once again, rigid foam insulation is the best choice for insulating the staircase itself.
The idea is to insulate the bottom side of the stair. In order to do this, the starting point is seeing what is already there. It is unlikely that the underside of the staircase will be insulated, being hidden by building a closet under the stairs. That’s actually the best possibility, as it means that walls and ceilings won’t have to be taken apart to insulate the stairs.
Nail furring strips to the bottom of the stairs, running them longitudinally every 16 inches. Care should be taken to ensure that the nails do not go through the stair treads, sticking up for people to step on above. Cut the rigid insulation to fit and attach it to the furring strips. Rigid foam insulation is normally installed with a foam adhesive, but can also be installed with nails, as long as oversized ashs are used with the nails to keep the nail heads from pulling through, much like roofing nails have washers to keep them from pulling through shingles.
The rigid foam insulation alone will accomplish what is needed, but adding a layer of drywall over the insulation will help protect it. If the space under the stairs is used for storage, the foam insulation could easily become damaged by items being stored and removed, negating its value.
If there are staircase walls that separate the living portion of the home from the attic storage area, it would be a good idea to insulate them, while insulating the stairs. As long as one side of those walls is exposed (without drywall installed), this is easy, as either the same sort of rigid foam insulation boards can be installed between the studs or faced fiberglass batts can be installed. The facing on the batts serves as a vapor barrier, so it would be important that it be installed in a way that leaves the facing on the attic side of the wall.
The situation is different if the walls are already covered with drywall on both sides. In that case, the big question is whether or not it is already insulated. To determine that, cut a small hole in the wall, on the attic side, and use a hook bent out of a coat hanger to probe the hole, seeing if any insulation comes out on the hook.
If it is determined that there is no insulation currently within the wall, the easiest possible way to insulate it, without having to remove the existing drywall, is to use blown-in insulation. The way this is done on already finished walls is to cut a hole near the top of the wall with a hole saw; then insert the hose from the insulation blower into the hole and fill it with loose fill insulation. A hole will need to be made between each pair of studs, so that the whole wall can be insulated. Once the insulation is blown in, the holes can be patched by normal drywall patching techniques, using the circles that were cut out to make the holes.
Related Posts:
Deck Stairs: DIY Guide to Building Safe Outdoor Steps by Admin July 30, 2025 Installing The first summer after I finished building my backyard deck, I realized something was missing—deck stairs. Every time I wanted to get to the garden…
Building Landings For Deck Stairs by Amy Reed February 28, 2023 DIY A landing is a flat pad, usually made of concrete, gravel, flagstone, bricks, or pavers, that appears at the bottom of deck stairs. It’s designed…