I’ll be honest with you. The first time I tried to permanently stop wood rot, I didn’t actually stop it. I painted over it.
Eighteen months later, a porch post that looked “fine” on the outside snapped clean through when my dad leaned on the railing. Nobody got hurt. But the repair bill — replacing the post, two joists, and re-flashing the whole ledger board — came to just over $1,200. ⚠️ That’s the warning I wish someone had given me before I picked up a paintbrush instead of a moisture meter.
Since then, I’ve redone fence posts, a rotted window sill, a shed corner post, and a bathroom subfloor that had been quietly soaking for years under a leaky tub surround. Some of those fixes lasted. Some didn’t. This guide is everything I learned from both the failures and the ones that actually held — not just the stuff that looks fixed for a season and then comes back.
Learning how to stop wood rot permanently starts with understanding that rot is a moisture problem first and a wood problem second.
How to Stop Wood Rot Permanently: Quick Answer
To permanently stop wood rot, eliminate the moisture source, remove damaged wood, allow the area to dry, treat the surrounding wood with a borate preservative, repair or replace affected sections, and maintain proper drainage.
Quick Comparison: What Actually Stops Wood Rot
Method
Stops Active Rot?
Lasts
Cost (Avg)
Best For
Paint/caulk over it
❌ No (hides it)
A few months
$20–$40
Nothing — avoid
Wood hardener + epoxy filler
✅ Yes, if the rot is dry
5–10 years
$40–$80
Small soft spots, trim
Borate treatment (e.g., Bora-Care)
✅ Yes, prevents future rot
10+ years
$60–$120
Framing, sills, joists
Cut out & replace section
✅ Yes
15–20+ years
$150–$600
Structural members
Improve drainage/ventilation first
✅ Yes (root cause)
Permanent if maintained
$0–$300
Every single case
If you only remember one row, remember the last one. Every method above eventually fails if water keeps finding its way back to the wood.
What Wood Rot Is and How to Stop Wood Rot Permanently
Before you treat anything, it helps to know what you’re fighting. Wood rot is fungal decay, and there are three rough categories worth knowing:
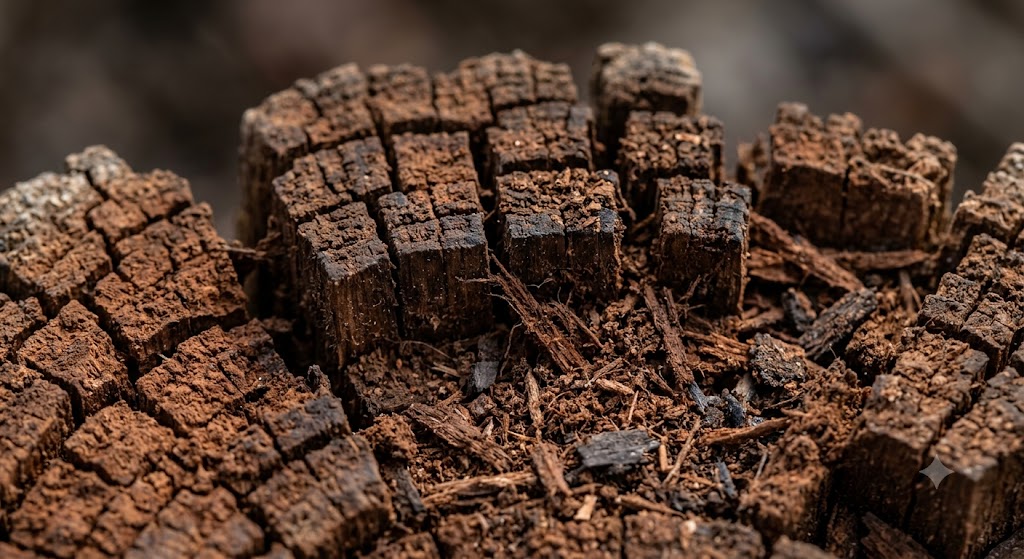
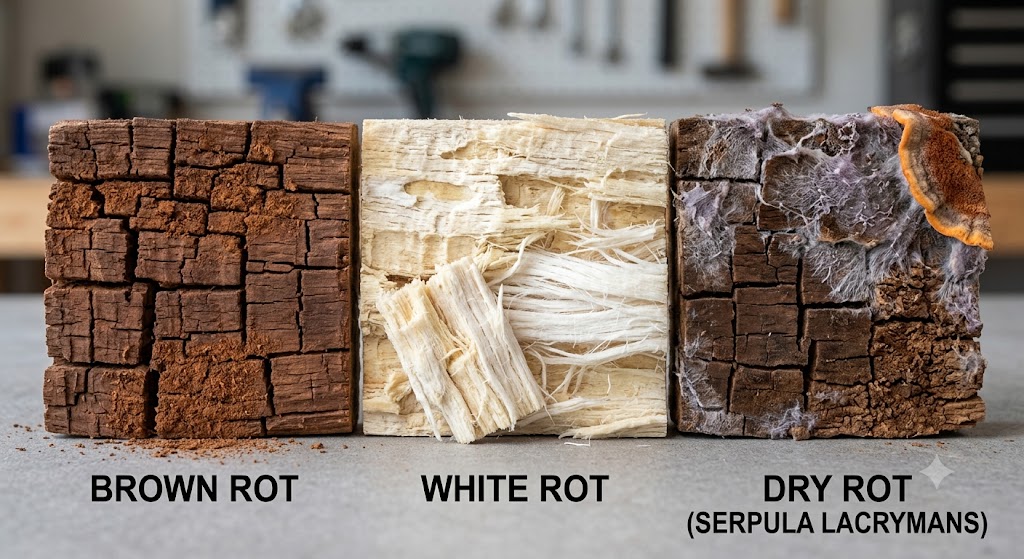
Brown rot — breaks down cellulose, leaving wood looking cracked, with small, cube-like chunks, crumbly, and dark. This is the most common type around homes (decks, sills, framing).
White rot — breaks down lignin too, leaves wood stringy and lighter in color, often spongy rather than cubed.
Dry rot (a specific fungus, Serpula lacrymans, common in the UK and older homes) — confusingly named, because it can spread through masonry and still-dry timber once established, even without constant moisture.
For 95% of homeowners dealing with a deck post or window sill, the issue is brown rot. The name doesn’t change what you do about it, but it’s worth knowing because online searches for “dry rot” sometimes pull up UK-specific advice (about chemical injection treatments for masonry) that doesn’t apply to a typical American deck or porch repair.
Mistake #1: You Can’t Stop Wood Rot Permanently by Treating the Symptom
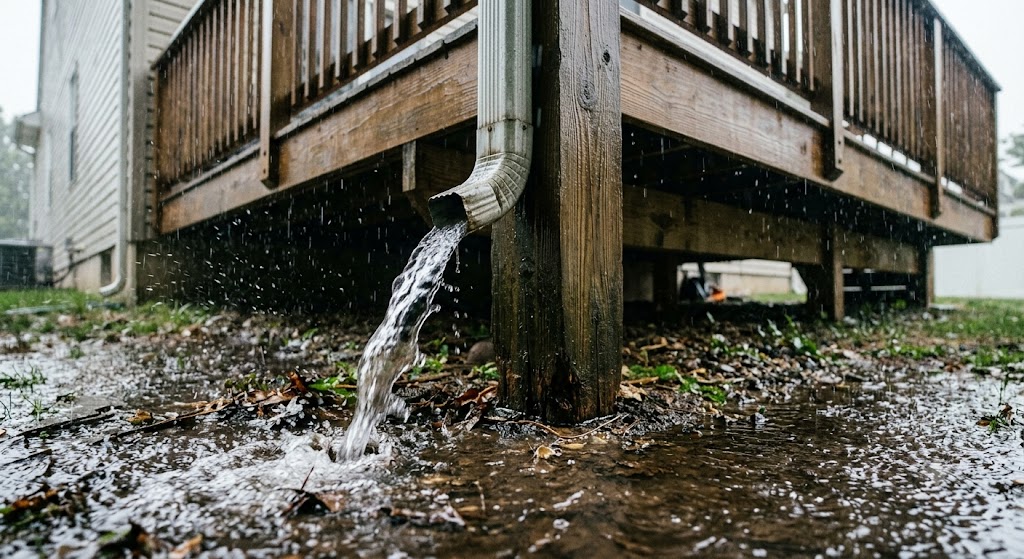
😬 Here’s my regret, plain and simple: I fixed that porch post three separate times before I ever asked why that one spot kept getting wet. Turned out a gutter was dumping water two feet from the base every time it rained, and the soil grading sloped slightly back toward the house instead of away from it.
Before you spend a dollar on hardener or epoxy, walk the area after a hard rain and actually watch where the water goes. Nine times out of ten, the “wood problem” is a water-management problem wearing a disguise. Common culprits I’ve personally traced rot back to:
A downspout that ends right next to a post base instead of routing water away
Caulk gaps where a deck ledger board meets the house siding
A windowsill with no slope, so water sits instead of running off
Mulch or soil piled up against a fence post or siding, holding moisture against the wood
A bathroom exhaust fan that’s either missing or never gets used, letting humidity soak into the subfloor over the years
Fix the water path first. Everything else in this guide is secondary to that one step.
Mistake #2: Confusing Dry Rot Residue With Active, Wet Rot
This one trips up even people who’ve done a few repairs before. Press a screwdriver or an awl into the wood:
If it’s soft, spongy, and damp to the touch — that’s active rot with ongoing moisture. Epoxy and hardener will not hold long-term here. The wood needs to dry out completely or be cut out and replaced.
If it’s dry, crumbly, and the original moisture source is already gone — that’s dry residue from past rot, and a wood hardener (like a petrifying liquid resin) actually bonds well and restores some rigidity.
🧪 The test I run on every job now: a $15–$20 moisture meter pressed directly into the wood, not just the surface. Anything reading under 15% is generally safe to treat with hardener and filler. Above 20%, I don’t even bother weighing my options — it’s getting cut out, no exceptions, because anything I fill over wet wood will just rot again from the inside within a year or two.
Moisture Meter Readings and What They Mean
Moisture Reading
Recommended Action
Under 15%
Safe to repair with wood hardener and filler
15–20%
Continue drying and monitor
20–25%
Active moisture problem likely present
Over 25%
Remove the moisture source before any repair
💸 The Cost Difference Nobody Tells You Upfront
Here’s the part that stings, and the part most “quick fix” articles gloss over. Catching rot early — a small soft spot, caught within a season of it starting — typically runs:
DIY hardener + epoxy filler kit: $40–$80
A weekend afternoon of your own time
Zero contractor visits
Catching it late, the way I did, after it’s spread into structural framing:
Lumber, fasteners, flashing, possible permit or inspection fees: $300–$1,500+
A contractor, because by then it’s genuinely not a weekend-warrior job anymore
Sometimes a domino effect — one rotted joist often means the two next to it have been getting damp too
The math is blunt but consistent in my own repairs: every season you wait roughly doubles the eventual scope of repairs. Rot doesn’t pause for your schedule, your budget, or the time of year. It just keeps eating — which is exactly why the goal isn’t a quick patch, it’s learning to stop wood rot the first time permanently.
Where Wood Rot Shows Up Most Often (and What’s Different About Each)
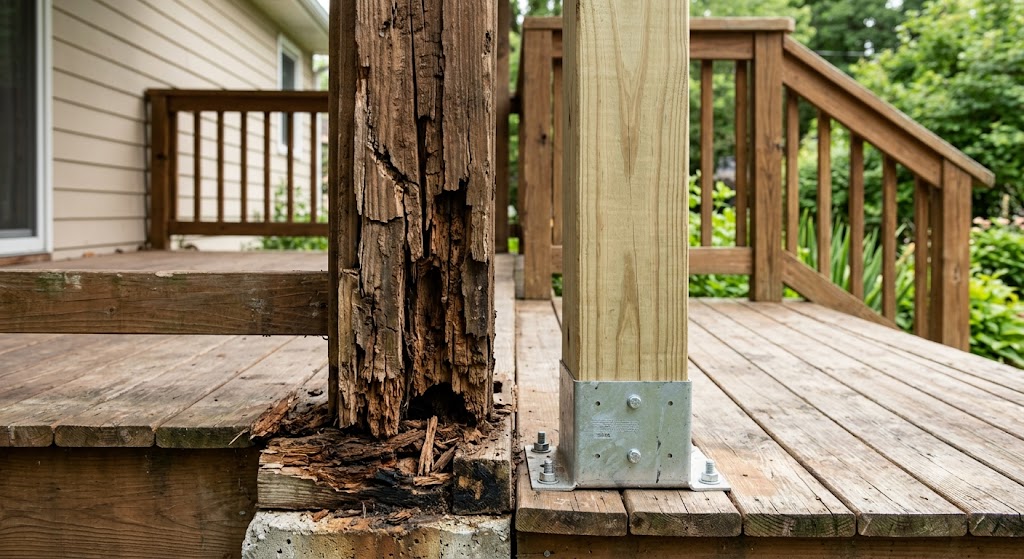
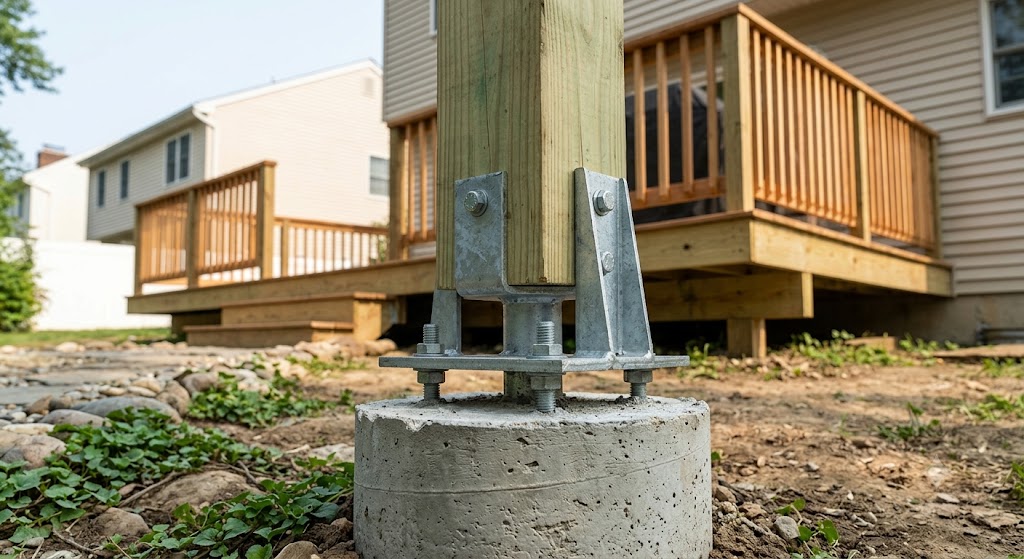
Deck posts and railings. Usually starts at the base, right where the post meets concrete or soil. The fix almost always includes a post base or stand-off bracket, so future replacement wood never touches the ground or concrete directly again. I didn’t do this the first time around — I just buried a new post in the same spot. It rotted again in four years. The second time, I used a galvanized post base lifted two inches off the slab, and that post is still solid eleven years later.
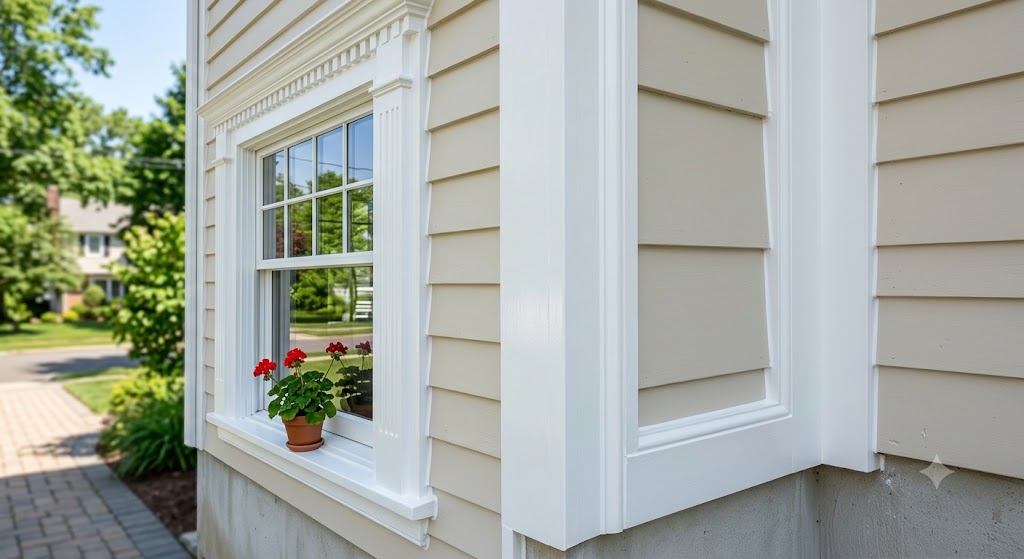
Window sills and frames. Usually caused by failed caulk or a missing drip cap above the window, letting water run down the face of the siding and pool on the sill. Small soft spots here respond very well to epoxy filler since the wood isn’t structural, but you have to fix the flashing/caulk first, or you’ll be back in two years.
Fence posts. The classic mistake is setting wood directly into concrete without a gap. Concrete actually holds moisture against the wood like a sponge. Pressure-treated wood, a gravel base instead of solid concrete at the bottom of the hole, and a post that’s rated for ground contact all matter more than any treatment you apply after the fact.
Bathroom subfloor. This one’s sneaky because you usually don’t see it until the floor feels soft underfoot or tile starts cracking. By the time it’s visible, it’s almost always active rot, not dry residue — which means cutting out the affected section of the subfloor, not just treating the surface. If you’re rebuilding this area, a waterproof plywood underlayment is worth the upcharge over standard subfloor sheathing. Either way, get the moisture source (usually a failed shower pan or grout) fixed before you replace a single board.
Shed and barn corner posts. Same root cause as fence posts nine times out of ten: ground contact plus poor drainage around the base. A simple gravel skirt around the structure’s perimeter prevents more repeat rot than any chemical treatment I’ve used. If you’re rebuilding siding or sheathing in the process, exterior plywood rated for the application holds up far better than interior-grade sheets pulled from a leftover stack, and marine plywood is worth considering for anywhere splash-back or standing water is a regular issue.
The Permanent Fix: How to Stop Wood Rot Permanently in 7 Steps
Find and eliminate the water source first. Re-pitch the grading, extend the downspouts, fix the flashing, repair or replace failed caulk, and add a vapor barrier where appropriate. This step is non-negotiable — skip it and everything below is temporary, no matter how good the product is.
Let the area dry out fully. Don’t rush this. A moisture meter reading under 15% before you treat anything with hardener or filler.
Remove all soft, rotted material completely. Don’t leave “a little” behind out of laziness or to save material — fungus regrows from whatever soft, damp wood is left, and you’ll be redoing the same repair within a year or two.
Treat the surrounding sound wood with a borate-based wood preservative. This is the step most quick DIY guides skip entirely, and in my experience, it’s the single biggest difference between a 2-year fix and a 15-year fix. Borates soak into the wood fibers, making them inhospitable to the fungus, even if moisture returns briefly.
Rebuild with the right material for the job. Two-part epoxy wood filler for cosmetic and minor structural sections (sills, trim, small post repairs). Full section replacement with pressure-treated or naturally rot-resistant lumber for anything load-bearing, and check our roundup of the best plywood for outdoor projects if sheathing or decking is part of the rebuild.
Seal, prime, and paint the repaired area to match and protect it, using a paint actually rated for exterior wood, not whatever was left over in the garage.
Re-inspect every spring and after major storms. Five minutes with a screwdriver and a flashlight beats another $1,200 surprise. I now do this walk every April, no exceptions, because the porch post taught me that lesson the expensive way.
DIY vs. Calling a Pro: How I Decide Now
After enough repairs, I made myself a simple rule so I wouldn’t second-guess every time I found a soft spot. It’s not scientific, but it’s saved me from both wasted money and from in-over-my-head weekends.
DIY it: Trim, window sills, fence posts, fascia boards, small deck railing sections, anything cosmetic or non-load-bearing where the rotted area is under roughly 2 square feet.
Get at least one quote before deciding: Deck posts, ledger boards, stair stringers, anything touching the roofline, or rot that’s spread across multiple framing members.
Call a pro, no DIY attempt: Anything affecting a load-bearing wall, a roof truss, or a subfloor under a bathroom with plumbing nearby. The cost of being wrong here isn’t a redo — it’s a safety issue.
One thing that changed my mind on this over the years: a quote isn’t a commitment. I used to avoid calling contractors because I assumed I’d feel pressured to hire them. In practice, a 15-minute look from someone who does this daily has talked me out of unnecessary full-section replacements more than once, simply by correctly identifying that a spot was dry residue rather than active rot.
Climate Factors That Affect How to Stop Wood Rot Permanently
Where you live changes how aggressively you need to follow up on this. A few patterns I’ve noticed that match what most building-science sources confirm:
Humid, rainy climates (Pacific Northwest, Southeast U.S., coastal areas) — rot progresses faster, and borate treatments break down sooner. Annual inspection isn’t optional here; twice a year is smarter, ideally before and after the wettest season.
Dry climates (Southwest, high desert) — rot is less common overall, but when it does show up, it’s almost always tied to a specific, fixable leak: a sprinkler hitting siding, a single bad gutter joint, a hose bib that drips. Find that one source, and the problem usually doesn’t come back for years.
Freeze-thaw climates (Midwest, Northeast) — water that gets into wood and then freezes expands the damage mechanically, on top of the fungal decay itself. Sealing and catching small spots before winter matters more here than in milder climates.
None of this changes the actual repair process. It just changes how often you should be checking and how much margin for error you have before a small spot becomes a $1,200 spot.
Best Tools to Stop Wood Rot Permanently
I’m not going to list ten options just to pad this section out. These are the ones I’ve personally used across multiple repairs and would buy again without hesitation:
Moisture meter — non-negotiable for the “is it really dry?” test described above.
Exterior-grade wood hardener (petrifying liquid) — only useful on dry rot residue, see Mistake #2 above; skip it on active, wet rot.
Galvanized post base brackets — the single product that’s prevented the most repeat rot in my own deck and fence repairs, by keeping new wood off concrete and soil entirely.
As an Amazon Associate, I earn from qualifying purchases — at no extra cost to you. I only link things I’ve actually used on real repairs.
Quick-Answer FAQ
Does painting over wood rot stop it? No. Paint and caulk seal moisture in rather than out, which often accelerates rot beneath while hiding visible signs. If your goal is to stop wood rot permanently, paint is never the fix — it’s the exact mistake that cost me $1,200.
How do I know if wood rot is structural? If the affected piece bears weight — a joist, support post, beam, or ledger board — treat it as structural until a contractor or inspector confirms otherwise. The screwdriver-and-moisture-meter test above is a useful first check, but it’s not a final structural verdict on its own.
Can wood rot spread to healthy wood next to it? Yes, if moisture and fungal spores are both present, decay can spread into adjoining sound wood. That’s exactly why Step 4 above — treating the surrounding sound wood with borate, not just the visibly rotted section — matters even when the neighboring wood still looks completely fine.
Is dry rot the same as wood rot? “Dry rot” technically refers to a specific fungus that can spread through wood and even masonry with relatively little ongoing moisture, whereas general wood rot requires continued dampness to progress. In practice, for most U.S. homeowners, the term gets used loosely to mean “rot that’s no longer wet.” Either way, fixing the water source still comes first.
Will pressure-treated wood ever rot? Yes, eventually, especially at cut ends where the treatment doesn’t fully penetrate, or anywhere it sits in constant ground contact or standing water. Pressure treatment buys you years, not immunity. Sealing cut ends and keeping wood off direct contact with soil/concrete still matters, even with treated lumber.
How long does a borate treatment actually last? In dry, protected conditions (under a roofline, not exposed to constant rain wash), a single borate application can protect wood for a decade or more. In fully exposed, wet conditions, it breaks down faster and benefits from reapplication every few years during your annual spring inspection.
Final Thoughts on How to Stop Wood Rot Permanently
If I’ve learned one thing from repairing wood rot, it’s that most failures happen because people repair the wood and ignore the water. The wood isn’t usually the real problem. The moisture is. Fix that first, and most repairs last for years — which is really the whole secret to how you stop wood rot permanently. Ignore it, and you’ll eventually be doing the same repair twice.


")
")

")
")
