Whether you call it a scuttle hole, a crawl space, or “that weird hatch in the hallway,” your scuttle attic is likely the single biggest thermal leak in your home. It’s a literal hole in your ceiling that, if left unsealed, acts like a chimney—sucking expensive heated air out in the winter and dumping stifling humidity in during the summer.
What is a scuttle attic?
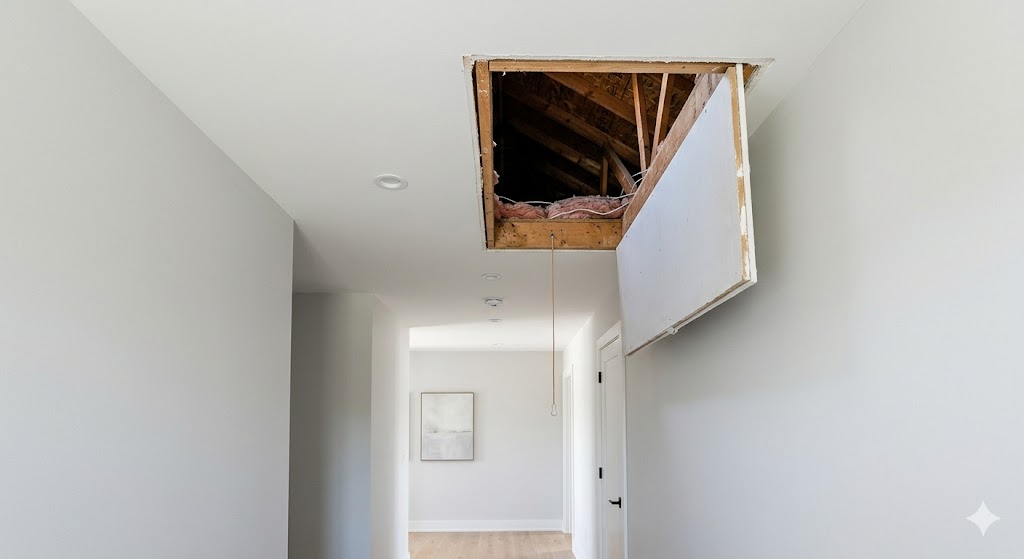
A scuttle attic is a small ceiling access opening (usually 22×30 inches) that allows entry into the attic space. Because it is often just a loose piece of drywall, it is one of the primary sources of residential energy loss, requiring specialized scuttle attic insulation to stay efficient.
Quick Answer: How to Fix a Drafty Scuttle Attic
A scuttle attic is a ceiling access opening that often leaks air and heat. To insulate it properly, seal the edges with weather stripping, add rigid foam board to the hatch, and match the insulation level (R-30 to R-60) of the surrounding attic.
Where Should a Scuttle Attic Be Located?
The location of a scuttle attic hatch plays a bigger role than most homeowners realize, especially when it comes to energy efficiency and usability. Ideally, a scuttle attic should be positioned in a central, easily accessible area of the home—most commonly in a hallway ceiling. This allows for safer access with a standard ladder and avoids placing the hatch in temperature-sensitive rooms, such as bedrooms or living spaces, where drafts are more noticeable. Poor placement, such as near exterior walls or in unconditioned spaces, can increase thermal bridging and worsen heat loss.
From an insulation standpoint, interior ceiling locations are easier to seal and maintain. The surrounding drywall and framing tend to be more consistent, making it easier to apply weatherstripping and create an airtight seal. In contrast, attic access points in garages or closets often have irregular framing and gaps, which can complicate insulation efforts. Additionally, if you plan to use your attic for light storage, positioning the hatch near the center of the attic floor reduces the need to step across joists or compress insulation.
If you’re building or remodeling, it’s worth planning the scuttle attic location in advance. Aligning it with existing ceiling joists and ensuring there is adequate clearance above can make future insulation upgrades much easier. A well-placed scuttle attic not only improves convenience but also reduces long-term energy loss and maintenance issues.
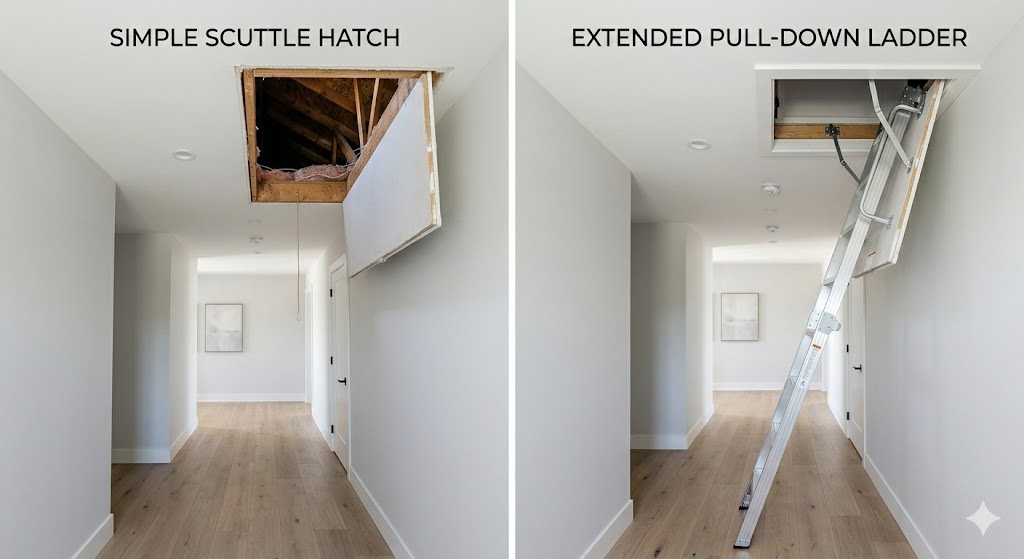
Scuttle Attic vs. Pull-Down Stairs: At a Glance
Before you decide to seal attic access hatch openings or replace them entirely, look at how the standard scuttle attic stacks up against modern alternatives.
Feature
Scuttle Attic (Hatch)
Pull-Down Stairs
Motorized Attic Lift
Initial Cost
$50 – $150 (DIY)
$400 – $1,000
$2,000+
Ease of Access
Difficult (Needs Ladder)
Easy
Automatic
Energy Leak Risk
High (If Unsealed)
Extreme (Large Opening)
Low (Pro-Sealed)
Storage Potential
Inspection Only
Moderate Storage
High Storage
Best For
Maintenance/HVAC
Seasonal Decor
Finished Attic Spaces
Best Scuttle Attic Insulation Setup
If you want to stop attic heat loss completely, this is the exact setup most homeowners use (and it usually pays for itself within one season):
Why Scuttle Attic Insulation Stops Massive Energy Loss
The primary driver of attic hatch energy loss is the Stack Effect. In the winter, warm air in your living space is lighter than the cold air outside, so it rises toward the ceiling. If your scuttle attic is unsealed, it acts as a pressure relief valve. This creates a pressure imbalance: as warm air escapes out the top, cold air is sucked in through gaps in your windows and doors to replace it.
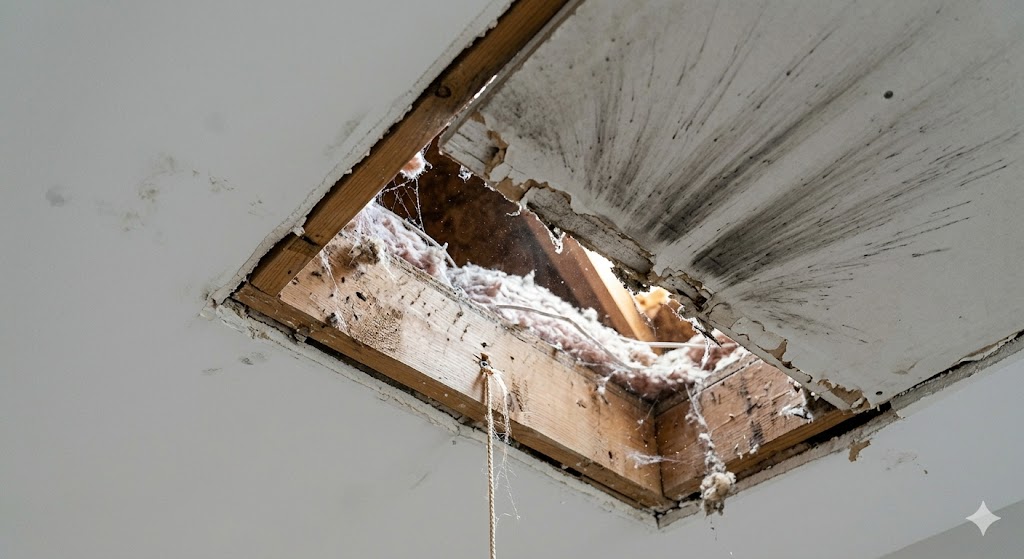
Your attic is the most extreme temperature zone in your home—reaching up to 150°F in the summer and plunging to near-freezing in the winter. Because the scuttle hatch is usually just a thin piece of drywall, it offers almost zero thermal resistance. Even a tiny 1/4-inch gap around the frame can be equivalent to leaving a window cracked open year-round.
Signs Your Scuttle Attic Hatch Is Losing Energy
Not sure if your hatch is a problem? Look for these symptoms in your home:
Drafts near the ceiling: You feel a ghost-like breeze in the hallway directly under the hatch.
Hot hallway in summer: The area around the access point feels significantly stickier than the rest of the house.
Cold spots in winter: Walking under the hatch feels like walking under an ice box.
Dust falling from the hatch: Dark “ghosting” or actual insulation dust on the floor indicates air is moving through the gaps.
High HVAC bills: Your system runs constantly, but the house never feels “right.”
❌ The #1 Mistake Homeowners Make
Most people assume that because they have a “panel” on their ceiling, the house is airtight. This is a massive mistake. During a recent 🧪 Real test using a thermal imaging camera, we found that a standard uninsulated drywall scuttle attic hatch can reach 115°F in the summer, while the hallway below it is72°F.
⚠️ Common Scuttle Attic Mistakes
Skipping weather stripping (the biggest air leak)
Using fiberglass on the hatch (loses effectiveness fast)
Not sealing edges (creates hidden airflow)
Crushing insulation under storage boards
Best Materials for Scuttle Attic Insulation
Building topical authority means choosing the right material for the job. Here is how the most common insulators compare for a hatch application:
Rigid Foam (Best Overall)
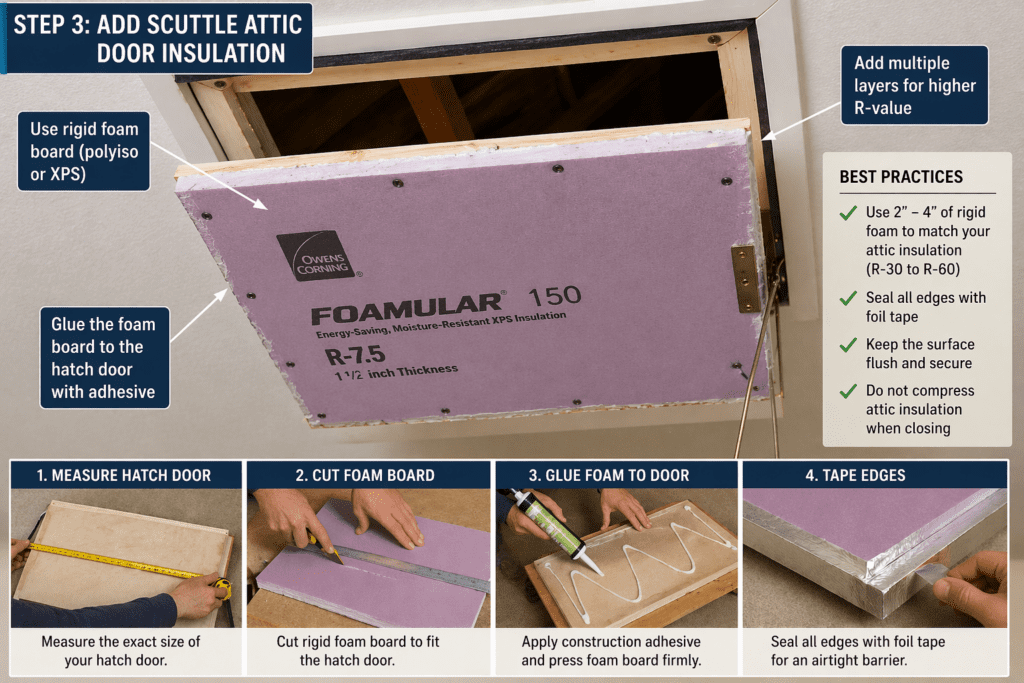
Rigid foam board, specifically Polyisocyanurate (Polyiso), is the gold standard for scuttle attic insulation. It offers the highest R-value per inch (about R-6.5), meaning you can get high protection without a massive, bulky stack. It’s clean, doesn’t shed fibers, and can be cut easily with a utility knife to fit the exact dimensions of your hatch.
Fiberglass
Fiberglass batts are cheap, but they are inefficient for a moving hatch. Because you have to move the door to enter the attic, fiberglass tends to get compressed or torn. Once compressed, fiberglass loses its ability to trap air, rendering it nearly useless for stopping attic hatch energy loss.
Spray Foam
Spray foam is the “air seal king.” While a professional-grade kit is expensive, using “Great Stuff” foam around the fixed wooden frame of the scuttle attic is an effective way to create a permanent air barrier. However, never spray foam the hatch door shut!
R-Value Guide for Scuttle Attic Insulation
Your goal is to have the R-value of the attic insulation at your hatch match the rest of your attic.
R-30 Minimum: This is the absolute floor for any climate.
R-38 to R-60: Recommended for most US climates to meet energy codes.
If your attic has 15 inches of blown-in cellulose, your 1/2-inch drywall hatch is a massive thermal hole. By stacking 4-6 inches of rigid foam on the hatch, you bring that “thermal bridge” up to par with the rest of your home’s envelope.
The “Invisible” Cost Difference
When comparing a scuttle attic vs pull-down stairs, the 💸 Cost difference isn’t just in the wood. It’s the long-term impact on your HVAC system. A scuttle hole is cheap to build but requires a proper scuttle-hole insulation dam to prevent loose fill from falling down.
When preparing the attic for storage, you’ll need to consider different types of plywoodto ensure you have a sturdy walking surface. Using the wrong plywood thickness can lead to sagging or unsafe footing during maintenance.
According to the Department of Energy, the attic is the primary location for heat loss in a residential home. By properly sealing and insulating your scuttle attic, you can expect 10–15% energy savings on your monthly utility bills. Because the materials for a DIY fix usually cost less than $50, this upgrade typically pays for itself in just a few months. It is widely considered the highest-ROI home efficiency project you can undertake.
Scuttle Attic vs Attic Tent Cover (Which Is Better?)
This is a common debate for homeowners looking for the best results:
Option
Pros
Cons
DIY Foam Board
Extremely cheap; customizable to any size.
Requires manual removal; can be messy to build.
Attic Tent Cover
Best airtight seal; easy zipper access.
Higher upfront cost ($100+); requires stapling to frame.
Can You Use Your Scuttle Attic for Storage?
Yes, but you must be careful. Most scuttle attic joists are designed for “dead loads,” not the weight of your entire life’s collection of boxes.
Plywood Platforms: Use at least 5/8″ or 3/4″ plywood thickness to span joists safely.
Load Limits: Always calculate the plywood weight and the weight of your bins.
No Crushing: Use 2×4 “sleepers” or perform subfloor prep to raise your boards above the insulation. For the best balance of strength and cost, many homeowners opt for CDX plywood.
😬 The Regret: “I wish I’d added a light.”
The most common Regret we hear from homeowners after they seal attic hatch openings is accessibility. They spend a weekend making the scuttle attic insulation airtight, only to realize they didn’t install a permanent LED light. Trying to balance on a ladder while pushing up a heavy, insulated scuttle attic cover in the dark is dangerous.
How to Make Your Scuttle Attic Airtight (Pro-Level Tips)
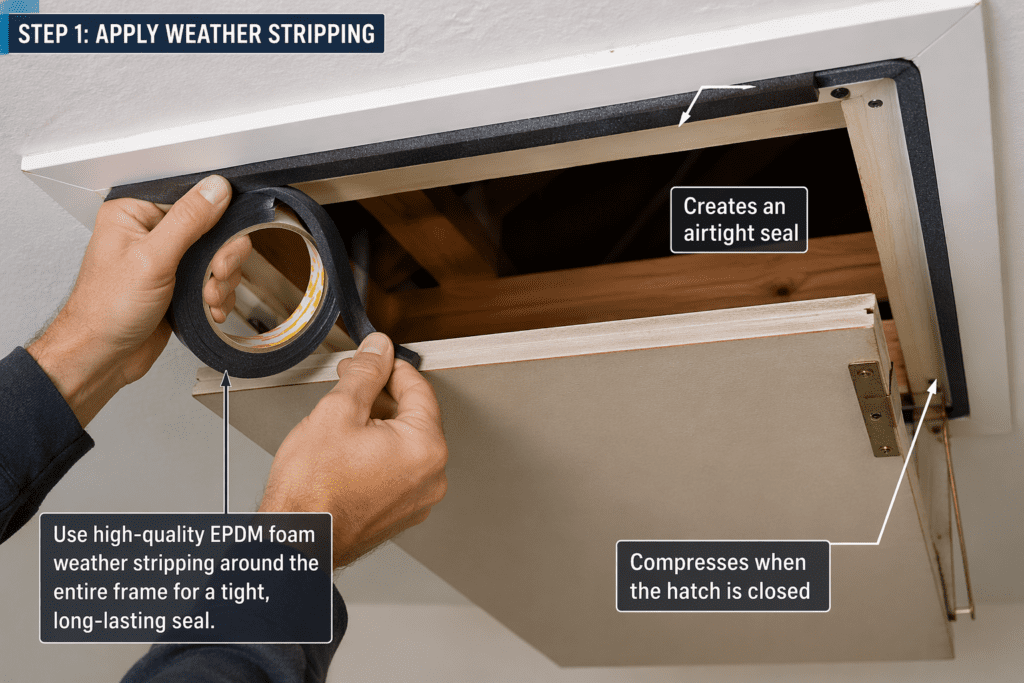
Properly sealing a scuttle attic goes beyond just adding insulation—you need to eliminate air movement entirely. Even the best insulation won’t perform well if air is still leaking around the edges. The first step is ensuring the hatch sits flush against the frame. If the drywall panel is warped or uneven, replace it or reinforce it with a thin plywood backing to create a solid, flat surface. This ensures consistent pressure on your weatherstripping.
Next, focus on creating a continuous air barrier. Apply high-quality EPDM or closed-cell foam weatherstripping around the entire perimeter of the hatch frame, ensuring there are no gaps at the corners. When the hatch is closed, it should slightly compress the seal, forming an airtight gasket. For even better performance, add a simple latch or weighted system to pull the hatch tighter against the seal—this small upgrade can dramatically reduce air leakage.
Inside the attic, seal the surrounding frame using spray foam to close any hidden cracks between the drywall and wood framing. This step is often overlooked but critical, as air can bypass your hatch insulation entirely through these gaps. Finally, test your work by turning off the lights in the attic and checking from below for any visible light leaks. If light can pass through, so can air. A properly sealed scuttle attic should feel completely draft-free, even during extreme weather conditions.
How to Insulate a Scuttle Attic: A Step-by-Step Guide
Follow this professional attic hatch insulation DIY process to stop the “chimney effect.”
1. Apply Attic Hatch Weather Stripping
Clean the ledge where the hatch rests. Apply EPDM rubber stripping in a continuous loop. The weight of the hatch should compress the foam to seal the attic access hatch and prevent leaks.
2. Build a Scuttle Hole Insulation Dam
In the attic, build a wooden box (the “dam”) around the opening using 2×10 boards. This prevents blown-in insulation from falling into your house. If you are also doing wall insulation nearby, ensure the dam is high enough to accommodate the new depth.
3. Add Scuttle Attic Door Insulation
Glue rigid foam board to the top of the drywall. For the best scuttle attic cover results, aim for R-30 or higher.
DIY vs Professional Attic Air Sealing
While a DIYer can easily handle a scuttle attic hatch, full-scale attic air sealing (including top plates, wire penetrations, and plumbing stacks) is often best left to the pros. They have the blowers and specialized equipment to find hidden leaks that a homeowner might miss. However, fixing the hatch is the “low-hanging fruit” that offers the highest ROI for your effort.
How to Seal an Attic Hatch (Quick Checklist)
Install EPDM weather stripping around the frame.
Add rigid foam insulation to the hatch door.
Build an insulation dam in the attic.
Check for light leaks from above (indicates air gaps).
Add weight to the hatch to ensure a tight, compressed seal.
FAQ: Attic Hatch Air Sealing
How do I stop drafts from my attic hatch? Use EPDM weather stripping on the trim and a weighted scuttle attic insulation board on the hatch itself.
What is the best insulation for scuttle attic access? Rigid foam board (Polyisocyanurate) is the best insulation for scuttle attic access because it provides high R-value and doesn’t shed fibers into your home.
Is an attic tent worth it? Yes, an attic tent is worth it if you access your attic frequently. It provides a full air seal and eliminates drafts, making it more effective than basic foam board insulation.
Related Posts:
How to Build a Scuttle Hole for Easy Attic Access by Admin July 28, 2025 DIY When we bought this house, I barely noticed the faint square in the hallway closet ceiling—a drafty little scuttle hole that served as our only…


")


")
