Tables have taken on an extensive variety of different shapes and styles through the ages. Functionally, the shape and style aren’t the important part; what’s important is that the table provides someplace to set things, whether for storage, décor or use. Even so, style defines our lives, giving us a way of expressing our unique personalities and character. So the utilitarian table has gone through countless changes in style.
One of the table styles that is associated with mid-century modern is the floating table top. Today, mid-century modern furniture and furniture reproductions have become extremely popular with the younger generation, bringing the floating top table back into vogue.
Obviously these table tops don’t really float; they just give the appearance of doing so. This is accomplished by hiding whatever is supporting the top, giving the illusion that the table top is floating. There are a number of ways to do this, all of which provide the same basic effect.
In order to understand the idea here, it is probably best if we start out by looking at how most tabletops are supported, as the floating top is actually a modification to the standard means of supporting the table’s top.
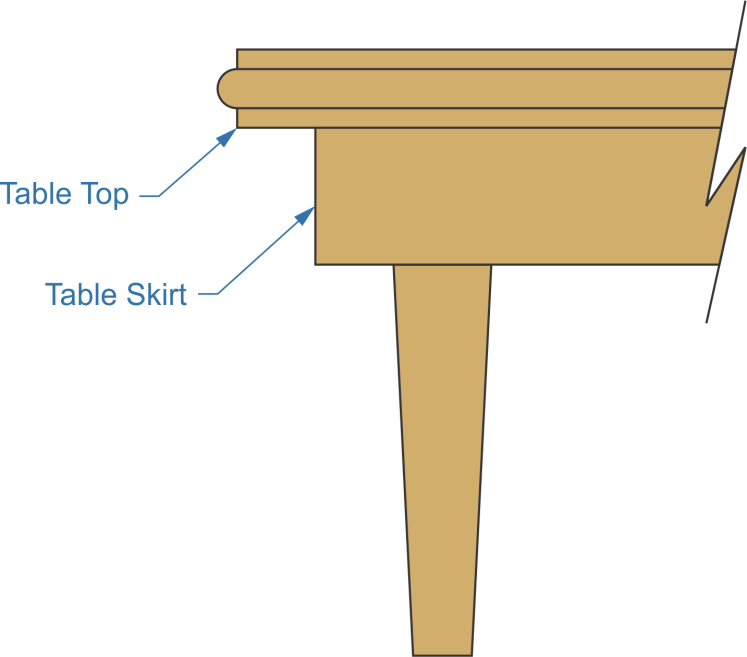
Standard table construction
As we can see in this diagram, it’s usually the table skirt that supports the table top, as well as connecting the top to the table’s legs. On larger tables, there might be stingers going from one side of the skirt to the other, providing additional support to the table top and keeping it from flexing. Simply raising the table top, which requires some sort of hidden support, is all that it takes to turn any normal table into a floating top table.
Keep in mind that this is a modern or mid-century modern style, so the table in the diagram above, with a routed edge is not appropriate. Rather, it would be better to use a square edge, a rounded edge, or an angled edge. An extremely swept-back angled edge works especially well for floating top tables, as it accentuates the appearance of the table top floating above the base, invoking the image of a tapered airplane wing.
Edge types
While it is possible to make a floating top in a number of different ways, there are two common means of doing this.
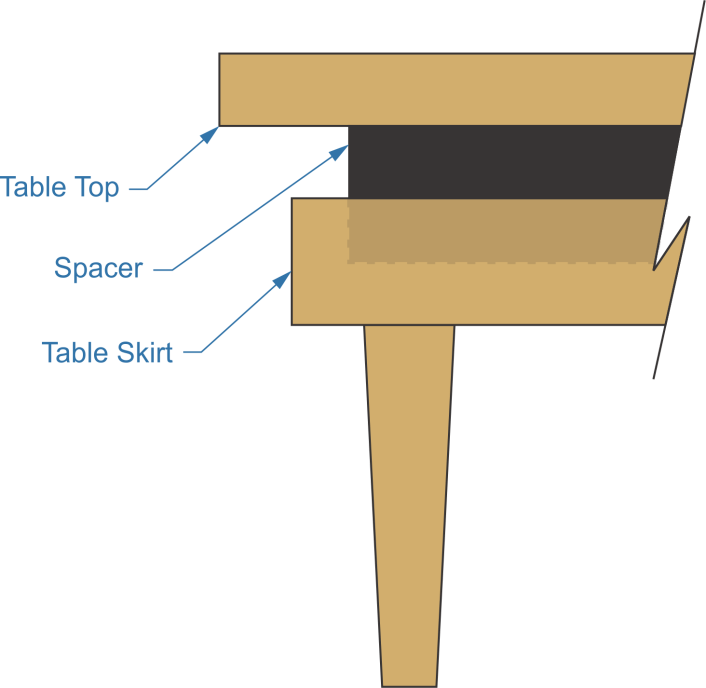
Inset Floating Top
The first and most common means of floating a table is to add a spacer, something like a second skirt, between the normal table skirt and the table top. This second skirt is inset, inside the first, and is often painted black to make it harder to see.
Inset floating top
As you can see from the shaded area in the diagram above, the spacer is actually attached to the inside of the skirt, setting it back from the outer edge of the skirt by however thick the skirt is, usually ¾”. Height is a bit of a concern, as it needs to be high enough so that it gives the appearance of floating, while not being so high that it is easily visible. This pretty much limits the height to somewhere in the ¾” to 1-1/4” range.
Attaching the spacer from the inside, with any fasteners going through the spacer and from there into the skirt eliminates the problem of having to hide the hardware or fill nailholes. Even so, it’s a good idea to glue the spacer to the skirt, as well as screwing or nailing it.
The only real challenge with this design is that the legs need to be modified to make it work. Although it is not shown in either of the drawing above, the tops of the legs would typically be flush with the top of the table skirt. However, the spacer gets in the way of attaching it there. There are two possible solutions to this problem.
Solution 1 – Extend the spacer down so that the bottom of it is flush with the bottom of the table skirt. Then attach the table leg to the inside corner made by the combined table skirt and spacer. This will move the leg ¾” towards the center of the table, which will not be all that obvious. If anything, it might be interpreted by some as looking like the skirt is floating above the leg.
Solution 2 – cut out the necessary material from the top of the leg, so that ¾ of the leg actually sits up against the bottom of the spacer, while the other ¼ reaches up to the bottom of the table top. The leg can then be attached to both the skirt and the spacer.
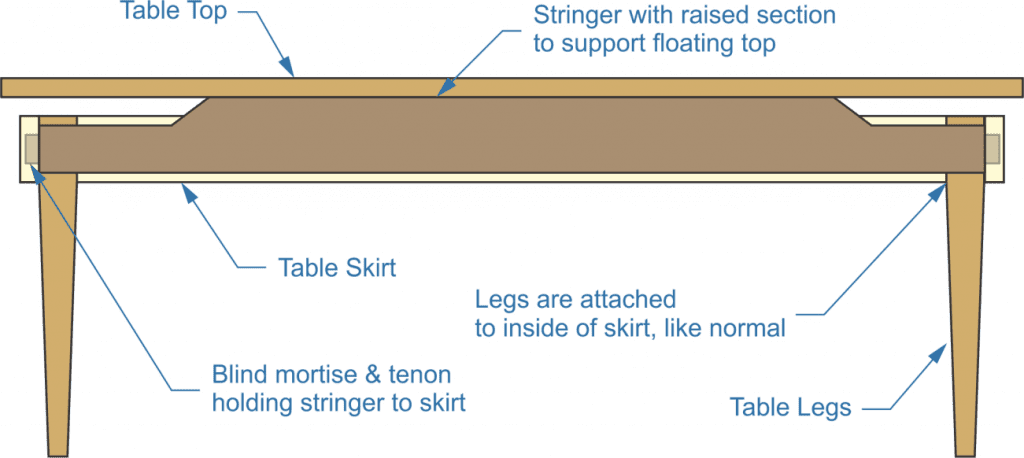
Stringer Floating Top
The second way of modifying a basic table design, in order to turn it into a floating table top, is to use a span support across the width of the table top. Earlier, I mentioned that there might be stringers going from one side of a standard table’s skirting, to the other side, in order to provide support to the table top. With this type of floating top design, those stringers are essential, as they are modified to provide support to the table top, holding it up off the table skirt.
Stringer floating top
The diagram above is a cutaway view, allowing us to see the stringer and how it is constructed. The key here is to provide enough support to the table, so that it can support the weight of whatever is going to be put on it, without flexing. That might require adding more stringers than would normally be used in the building of the table. With a standard ¾” thick tabletop, it probably wouldn’t be good to have more than a one foot overhang around the edges and no more than two feet between stringers.
Of course, even with the extra support, this table will not be as strong as the typical dining room table. So it wouldn’t be a good idea to stack it high with books or use it as a stand to rebuild an engine. However, it should be fine for normal activity, such as using this design for either a dining room table or a coffee table.
The tricky part of this design is that the stringers need to be attached either with a blind mortise and tenon joint or by using a domino joiner:
Domino Joiner
The domino joiner can be said to be the next generation of the biscuit joiner. It is a major improvement over biscuit joining because the dominos are much closer to an actual mortise and tenon, making them considerably stronger. It also fits tighter than a biscuit does, providing a much more positive location, helping to ensure that the surfaces of the pieces are smooth, when used to laminate pieces to make a tabletop or to join rails & stiles. A biscuit joiner really can’t provide the strength in a rail & stile joint that a domino joiner can. The only problem is that they are expensive.
Operating the domino joiner is much like operating the biscuit joiner. In fact, the two tools look much alike. The major difference is that whereas a biscuit joiner has a round blade that cuts out a curved slot for the biscuit to sit into, the domino joiner has a bit something like an end mill or a Rotozip bit. This bit moves back and forth, cutting out a mortise with rounded ends that perfectly fit the domino.
To use the domino joiner, the tool’s table and fence are placed on the edge of the board and the trigger is pressed, holding the tool in place. The bit then cuts into the edge of the board, moving back and forth on its own to cut the length of the mortise. Once it is cut, glue can be applied and the biscuit inserted to become the tenon. A matching mortise cut in the other piece allows the two to be joined together.
Blind Mortise & Tenon
Traditionally, mortises are cut with a chisel; however, in more recent times many woodworkers “cheat” by hogging out the majority of the material with a drill bit, drilling a number of hole that just touch each other. They then clean out the mortise the rest of the way with a chisel. The chiseling out of the mortise can be undertaken from both sides of the wood, making it easier to cut a clean mortise. This saves time and can reduce the number of errors involved in making the mortise.
The difference between this and cutting a blind mortise is that drilling doesn’t go all the way through the board and the chisel work can only be done from one side. About 1/4” of material needs to be left uncut, to ensure that the joint remains hidden from the other side.
It is always best to cut the mortise before the tenon. That way, the tenon can be cut to match the mortise if something goes wrong. By and large, it’s easier to make changes to a tenon than a mortise, so it makes sense to leave the easier part of the joint for last. Just make sure that the tenon is cut marginally shorter than the depth of the mortise, so that it will fit. Don’t make it too short, or it will be weak, rather, just make sure it doesn’t bottom out in the mortise hole.
One thing woodworkers who haven’t made a lot of mortise joints in the past need to keep in mind is that if the joints are not at the same height, it will affect the tabletop sitting on the stringers. In other words, if one of the mortise and tenon joints is 1/8” lower than the others, the tabletop will have a distinct twist in it, once everything is assembled. To prevent this, check the heights of the stringers with winding strips, before assembly. That way, the tops of the stringers can be adjusted, if necessary.
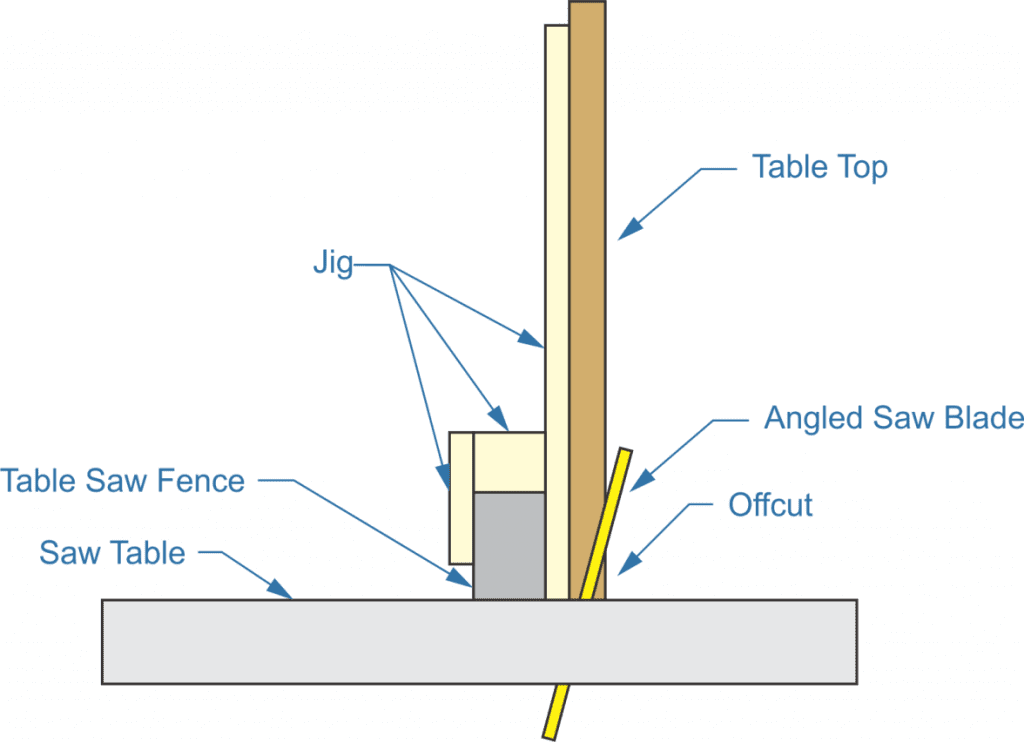
Making an Extreme Angled Edge
I mentioned the extreme angled edge as an option for floating tables earlier. This is fairly easy to accomplish with the right jig on a table saw. Although the table saw’s blade doesn’t tip beyond 45 degrees, it will do 15 degrees just fine. So if we make a jig that slides along the fence and extends the fence’s height. Then clamp the workpiece jig so that it is held vertical, a 15 degree shallow angle can be made into the edge of the table top.
The key to making this cut is in how well the jig is made. It needs to fit snug around the table saw’s fence, but not so snug that it binds up when being moved. Waxing the sliding surfaces can help with that. The jig also needs to be rigid enough that it can support the weight of the table top without allowing the table top to swing to one side or the other. This is, of course, a bigger problem with larger table tops, than it is with smaller ones. The jig also needs to be large enough that the table top can be clamped to it, so that it won’t move away, creating a gap and producing part of the cut at a more shallow angle.
When cutting larger tablet tops in this way, it can be a good idea to have an assistant working the other side of the table, catching the table top as it comes out of the blade. Another good thing to do is extend the jig farther to the fence side, so that it sits on the table, about a foot away from the table, being sure to wax the underside. A weight on this extension will help keep the jig and table top from tipping, but the extra weight will make it harder to slide the table top through the saw, increasing the need for that assistant.
Don’t expect a perfect cut this way; as with just about any other cut made on a table saw, there will be visible blade marks. The good news is that they will be on the bottom of the table top. Nevertheless, the cut angle should be planed smooth and sanded to ensure a good finish to the project.
Related Posts:
Making Wooden Bathtubs Guide by Admin September 19, 2023 DIY Wooden bathtubs require planning, precise construction, and maintenance. However, they are an elegant and unique addition to your bathroom. Guide to Set Started Materials Needed:…
DIY Floating Desk by Admin July 26, 2023 DIY Building a floating, wall-mounted desk for modern office furniture requires a different style and special techniques. You can’t make a “floating” desk like any other…