If you try to define a cocktail table precisely, you might have more trouble than expected. While it might seem like a simple question, it has been confused by opinions and how people have used the term. For many, “coffee table” and “cocktail tables” are synonymous, so use the names interchangeably. Yet others might differentiate them nothing more than how they are being used. Still, others go by a technical differentiation, saying that cocktail tables are rectangular while coffee tables are round, oval, or square.
Looking at the dictionary willn’t help much either, as both are synonyms. The people responsible for keeping track of our language aren’t all that picky about such terms, especially when any table will work for holding a drink.
Regardless of how they are named, cocktail tables and coffee tables are used to set one’s drink of choice when they’re not actively drinking it. Whether the social gathering of the moment is drinking coffee or cocktails, having someplace to congregate around, where people can place their drinks, along with whatever finger food or pastries they might be eating, is excellent, allowing them to use their hands for other things, like gesturing as they speak.
Tabletops are tables, so there is a nearly infinite variety of styles and designs. The material choices aren’t limitless, but there are still many possibilities. From wood to glass, with metal and stone in between, tabletops have been made from various materials.
While many people might argue it, the term coffee table is most often used to refer to tables placed in front of a sofa or the middle of a living room set. They are not limited to being used for placing coffee on; in fact, they often have books, decorative plants, and the TV remote sitting on them as well.
As most people see them, Cocktail tables are much less likely to appear in the average living room. They’re the tall tables used in bars and for “meet and greet” conference sessions. They are rarely used with chairs in that setting, although they can be. In many such cases, there are small tables for placing one’s drink while standing around and talking.
As such, a cocktail table will usually be considerably higher than most other tables. Whereas a coffee table is typically 16 to 18 inches tall, a cocktail table will be 42 inches tall. The other two standard table heights are for desks and tables, which are 30” tall, and countertops, which are 36” tall. The taller 42-inch height is more convenient when standing and works well with barstools.
Designing a Cocktail Table
Any table consists of two to three essential parts, regardless of size. They are:
Tabletop
Legs or column
Base, if the design uses a column
One of the main concerns when designing any table is ensuring that it is stable. The legs or base are primarily responsible for stability, but the table top can also play a part. However, the size ratio between the top and the base or the top and the location of the legs will have a more significant effect on stability.
Building the Tabletop
Tabletops made of glass, marble, or other materials don’t require much work, as they are usually bought, cut, and finished to size. However, most tabletops are made of wood, and as this is a wood website, it makes more sense to stick with a wood tabletop design.
Wood tabletops are usually made of laminated hardwood pieces, which may or may not be edged with some frame. Thickness can vary, but for a small table like this, 3/4” is usually enough. Additional thickness merely adds material cost without any real benefit. The overall size for a cocktail table is usually somewhere between 24” and 30”, regardless of whether it is square or round. Round is typical, as patrons are more likely to run into a corner sticking out.
Several pieces of hardwood are required to make such a tabletop. Typically, they are made of consistent-width pieces of the same sort of wood. However, exciting variations can be made by choosing varying widths of boards or mixing different types of wood so that the difference in coloration or grain can stand out.
Boards to be laminated together for furniture, such as this tabletop, should always be cut a little long. That way, they can be laminated together without huge concern about the alignment of the edges. Once the laminated tabletop is dry, it can be cut to length.
Clamps for Laminating
You’ll also need clamps to hold the wood together. The laminated wood pieces are held together with pipe or bar clamps with a wide enough capacity. Clamps should be spaced no more than six inches apart for most tabletops.
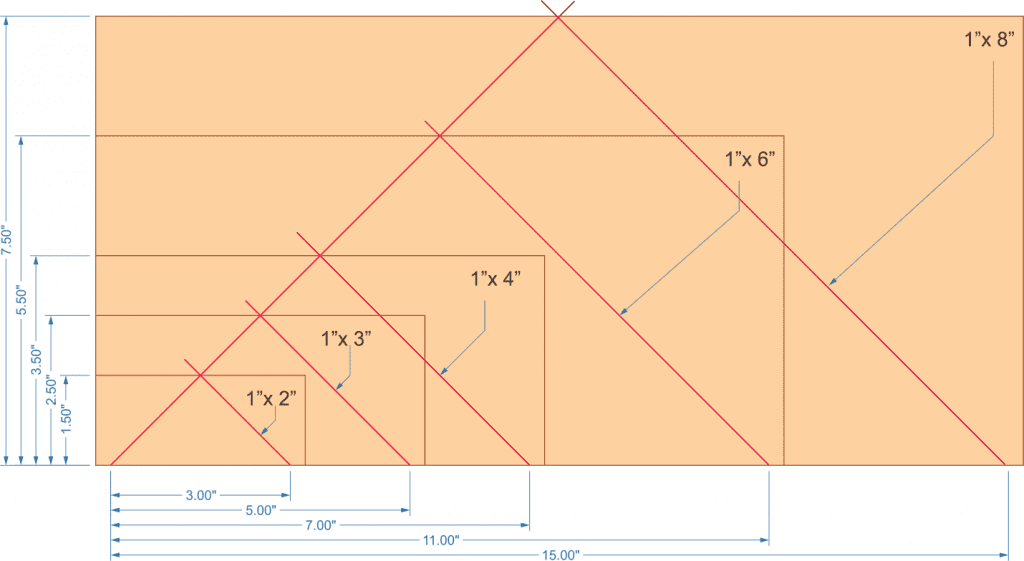
For a more accurate determination of how many clamps to use, draw 45-degree lines, slanting towards each other, from two adjacent clamping locations. If the lines don’t intersect at the far edge of the board or before, the clamps are spaced too far apart. Based upon this, maximum clamp spacing for common board sizes comes out to:
3” for 1”x 2”s
5” for 1”x 3”s
7” for 1”x 4”s
11” for 1”x 6”s
15” for 1”x 8”s
As shown in the diagram below
Cocktail table – clamp spacing
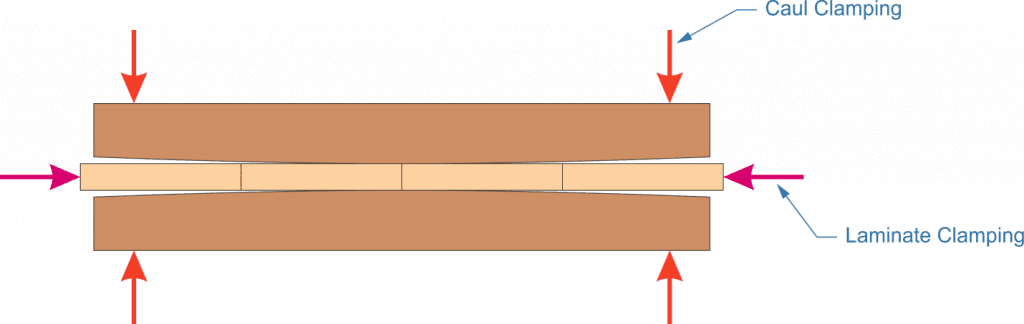
In addition to the bar or pipe clamps that will hold the boards’ edges together, you’ll need four additional clamps, which will be used with cauls to hold the boards flat. Cauls pressure the boards’ top and bottom, keeping them aligned so the laminated tabletop doesn’t cup or bow.
Making Cauls
Cauls can be made of scrap material, but if you want to make yourself a good set of cauls that you will use regularly, buy some premium 2”x 4” boards, which are kiln-dried. They should be stamped with “KD” to indicate that they have been kiln-dried. Cut them off to make pairs of cauls the length you need. Ensure that they are straight, and then plane one edge of each pair to create a bit of a bow, as shown in the diagram below.
Cocktail table – caul clamping
This diagram is slightly exaggerated to make the curvature visible. Ideally, cauls should have enough of a curve in the edge cauls so that considerable pressure from the clamps is needed to make the entire edges of the cauls come together while at the same time not having so much of a curve that the clamps can’t draw the two edges together along their entire length.
The edges of the cauls need to be coated with something to prevent glue from sticking to them. Traditionally, wax was used for this, but clear packing tape also works.
Preparing the Boards
Before gluing the pieces of wood together, the edges should be jointed to ensure that they are smooth and even and planned to ensure they are all the same thickness. If you do not have a jointer or planer, you can use other options.
For starters, a plane can smooth up the edges of boards rather than using a jointer. That’s what was done before jointers were available. In the case of boards that are rough cut and not S4S (sanded four sides), the boards can be ripped on the table saw to get the edges straight and remove the roughness of the sawmill cut, and then planed smooth.
Boards can also be thinned down with a plane, although it is usually easier to laminate the boards together and then plane them to make the thickness consistent. Alternatively, they can be laminated together, and then a belt sander can be used to give them a consistent thickness.
Laminating the Boards
A dry layup should always be made before gluing to check the fit of all parts and verify that the right clamps are available. Many woodworkers alternate the placement of their bar or pipe clamps, putting one underneath and the next on top to ensure that the clamps can’t pull the boards in a way that would cause the tabletop to cup. Even when using cauls, the clamps can cause a cup between sets of cauls in the middle of the tabletop.
The bottom part of each caul becomes the base on which the glue-up is made. The clamps from the bottom side of the tabletop should be laid between and outside the chairs on the benchtop. Once they are in place, the boards are on top, and the edges are glued together. Set the clamps snugly in place, but do not fully tighten the clamps until all clamps are in place.
The clamps holding the cauls should be fully tightened before the clamps are used to laminate the boards. They must be pulled to the point where no gap remains between the cauls and the tabletop at the ends of the cauls. Then, the bar or pipe clamps can be fully tightened.
Finishing the Tabletop
Once the glue has dried thoroughly (usually overnight), the clamps and cauls can be removed, exposing the tabletop. With a chisel, chip off any glue squeezed out between the joints, being careful not to dig into the wood tabletop. Then, plane or sand the tabletop to level and smooth it.
If the tabletop is intended to be round, the edges of the boards should be cut off on a table saw, making the ends square. Round tables must be cut out with a band saw or jigsaw. To avoid tearout, place a piece of masking tape on the cut line before cutting it. In the case of round tabletops, sanding of the cut line will be needed to smooth out marks from the saw blade and eliminate any uneven places from cutting.
The tabletop’s edges can either be left vertical, routed, or banded with wood veneer edging to hide the end grain in the wood. If banding is not used, using a round-over bit on a router table will eliminate sharp edges, making the edge more comfortable for those who lean against it.
Legs for the Cocktail Table
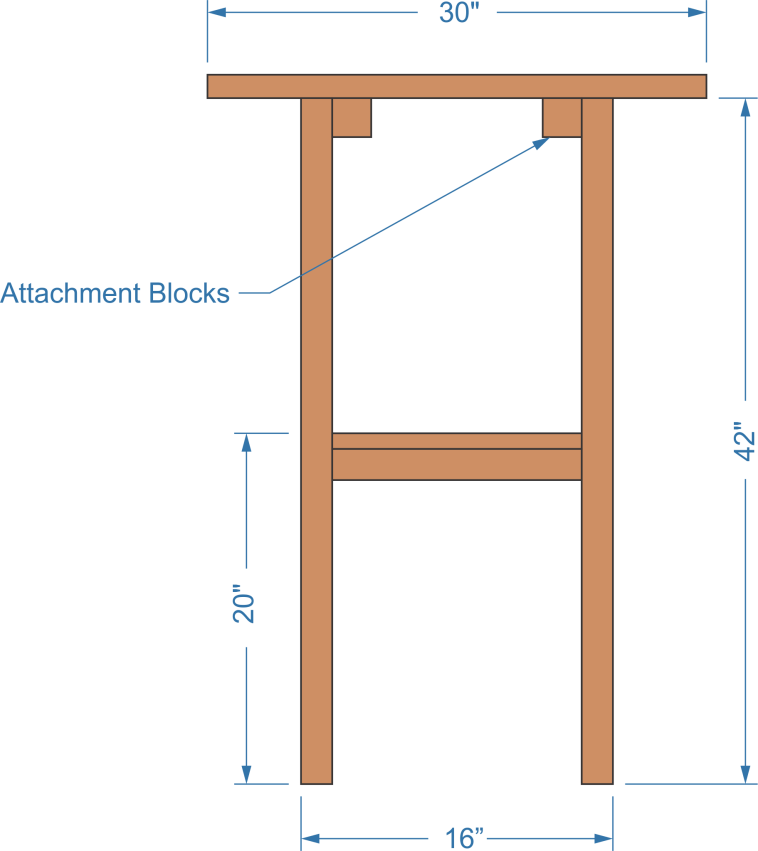
Simplicity is usually the key when legs are used with a cocktail table. Turned wood or carved legs are generally not used. Instead, a 2”x 2” square hardwood leg is joint. They will need to be cut to 41 ¼” long to accommodate the thickness of the tabletop.
Cocktail table legs are not attached to the corners, even in square tables. Instead, they are attached inset from the edge to give the most possible room for patrons’ legs around the table. Inserting the legs does not require skipping a space, so nobody is straddling a table leg.
They will need a shelf or other support roughly 20” above the floor level to stabilize the legs. Table legs can be attached to the corners of this shelf, either with dowels or by screwing through from the shelf’s support into the leg to keep the screw heads hidden.
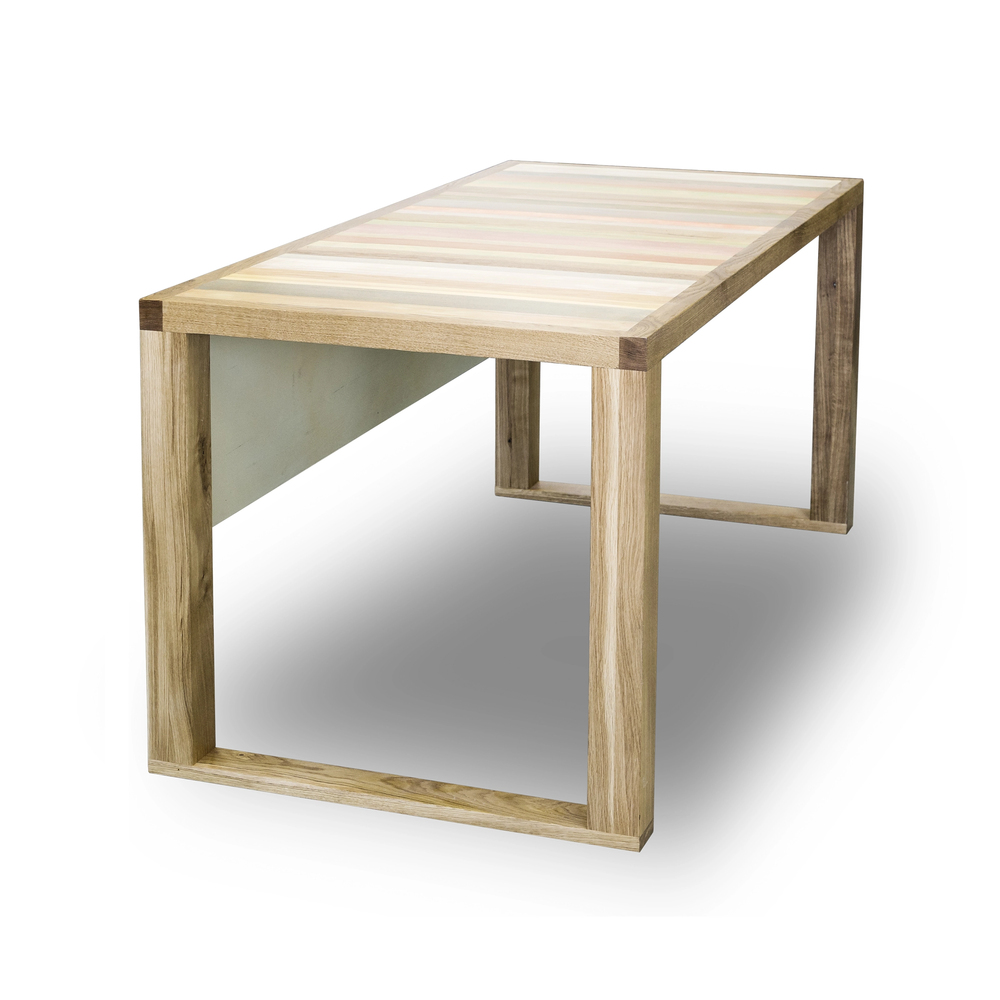
Cocktail table – table dimensions
Blocks are added for each pair of legs to attach to the tabletop. These can be made of whatever material is available, although the same material used for the legs will work well. Attach the blocks to the legs, the same as the legs are attached to the shelf and the bottom of the tabletop, by screwing through from the bottom of the attachment blocks into the bottom of the tabletop.
When building furniture like this, it is always important to consider how parts will be attached before starting the build. It is always best if fasteners can be run through from a direction where the fastener will not be visible or leave an exposed hole. By screwing through from the inside of the shelf and the bottom of the attachment blocks, the screw heads are left hidden without having to fill or plug the holes.
If the cocktail table uses a column and base, a wide range of options exist. The simplest option is to buy a ready-made column and base with the homemade table top. This saves a lot of work while providing an attractive, professional look.
A second option is to scavenge the base from a used bar stool and lengthen the column. The advantage of this is that the metal base is provided, even if the entire column needs to be replaced. The column used for barstools is nothing more than metal tubing, which is easy to find in various sizes.
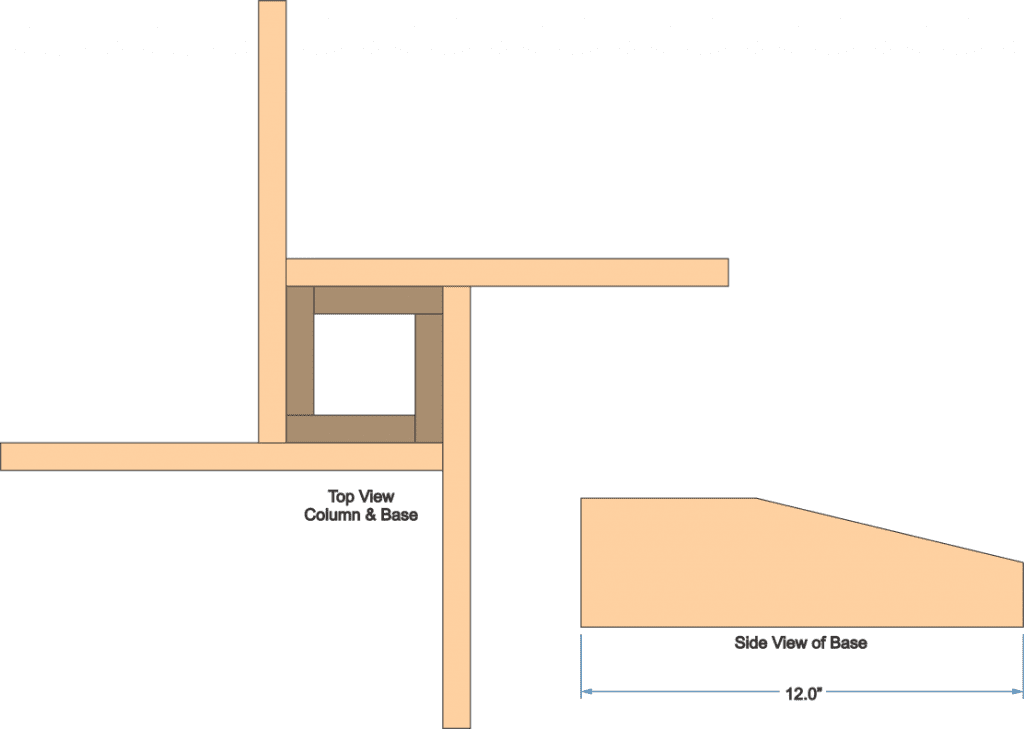
A wood column and base can be made from hardwood 1”x 4”s.
Cocktail table – column and base
With this style base, four pieces are cut 41 ¼” long and connected to form the column, shown as the four medium brown pieces in the diagram above. Four feet, shaped like the inset diagram above, are attached to the column at floor level, ensuring they make good contact with the floor at all points. The column is attached to the underside of the tabletop using attachment blocks, much like what is used for the legs above.
How to Make an Epoxy Resin River Table by Admin March 18, 2025 DIY How to Make a DIY Epoxy River Table (Step-by-Step Guide) Creating an epoxy river table may look like an expensive and complex project, but with…


")