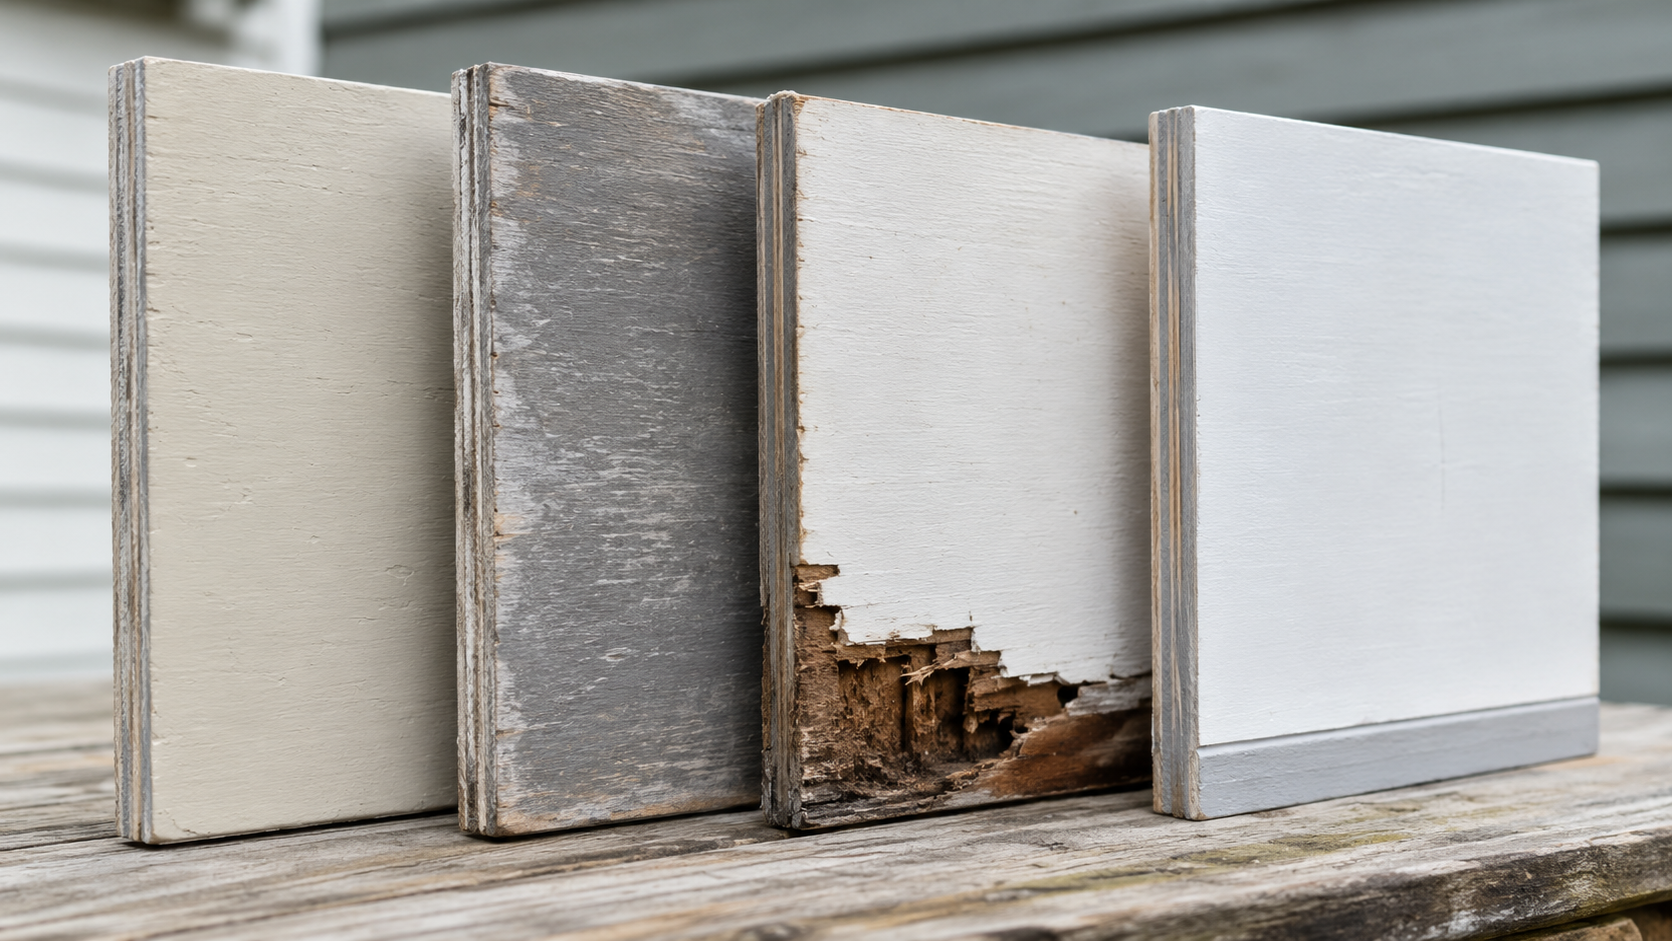
Exterior plywood has no single outdoor lifespan. Covered sheathing that remains dry can remain serviceable for the life of the surrounding assembly, while permanently exposed plywood depends heavily on panel rating, drainage, edge protection, finish quality and maintenance. Bare untreated panels exposed repeatedly to moisture can deteriorate much sooner. Bond classification governs the glue line, not decay resistance.
Exterior Plywood Lifespan at a Glance
Condition
What to expect
Covered sheathing, kept dry
Can last the service life of the assembly
Exposed, fully finished, recoated on schedule
Potentially long service life with proper finishing, drainage and maintenance
Exposed, finished once, never maintained
Failure typically begins at edges, joints and coating cracks
Exposed, faces finished but edges left bare
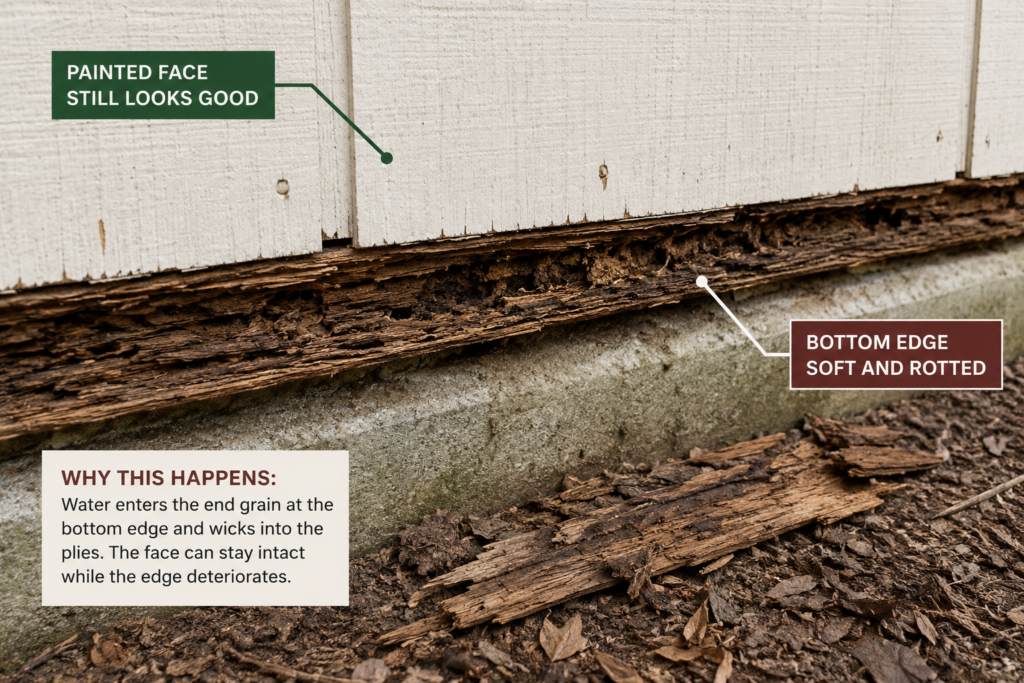
Bottom edge softens while the painted face still looks sound
Bare and untreated, permanently exposed
Rapid checking, swelling and eventual decay
Pressure-treated, ground contact
Depends on AWPA use category, drainage and installation
These are planning guides, not warranties. Actual service life depends on climate, orientation, drainage, maintenance and installation quality.
What Actually Determines Exterior Plywood Lifespan
Five major factors that determine service life:
1. Edge sealing. Cut edges expose end grain and veneer boundaries, making them particularly vulnerable to moisture entry. This is one of the most important controllable variables.
2. Finish maintenance. InterNACHI notes that surface preparation and paint quality are the most important determinants of a coating’s life expectancy — and the coating is what protects the panel.
3. Water management. Flashing, drainage, ground clearance and whether the panel can dry between wettings.
4. Correct panel for the exposure. An Exposure 1 panel should not be specified for permanent weather exposure, regardless of the finish applied.
5. Panel grade. Grade matters, but it cannot compensate for poor drainage, exposed edges or failed coatings. A well-maintained exterior panel can outlast a neglected higher-grade panel.
⚠️ Warning: Bond classification is not decay resistance. Exterior and Exposure 1 describe adhesive performance. Resistance to fungal decay comes from preservative treatment, which is a separate process — see pressure-treated plywood. A panel can hold its glue line perfectly while the wood around it rots.
Exterior Plywood Lifespan by Panel Type
Panel
Typical service context
Lifespan drivers
CDX / rated sheathing
Covered by roofing or siding
Stays dry; can last the life of the assembly. Exposed permanently, it fails early
BCX
Painted, exposed
Finish quality and recoat interval
ACX
Painted, visible at eye level
Same as BCX; smoother face improves appearance and finish quality
APA 303 siding (incl. T1-11)
Finished exterior surface
Finish must be worked into the grooves; inspect them for coating cracks and thin coverage
MDO
Signs, painted panels
Overlay resists surface checking; edges and penetrations still need sealing
Pressure-treated
Ground contact, wet locations
AWPA use category matched to actual exposure
Marine grade
Boat components
Service life depends on coating system, design, drainage and exposure; APA marine is not automatically preservative-treated
1. Edge wicking. Water enters unsealed end grain and travels up through the veneers. The lower portion of the panel softens while the face above still looks intact.
2. Coating failure at joints and fasteners. Small cracks open at panel joints, nail heads and grooves. Water gets behind an otherwise sound coating and cannot dry.
3. Ground contact and splash. Panels set too close to grade take repeated wetting from rain splash and never fully dry.
4. Trapped moisture in core gaps. C and D veneers permit internal gaps. Water entering larger core gaps can remain trapped longer and create localized wet areas that dry more slowly.
5. Delamination-like rupture. Rapid water ingress at a panel edge causes differential swelling in the core, which can rupture wood fibres and present as apparent delamination even where the adhesive bond itself has not failed.
❌ A common mistake: Using CDX as a permanently exposed surface. Most CDX carries an Exposure 1 bond classification, which is designed for construction-stage moisture, not permanent weathering. The open knotholes on the D back also trap water and are difficult to finish. CDX belongs under roofing, siding or a weather barrier.
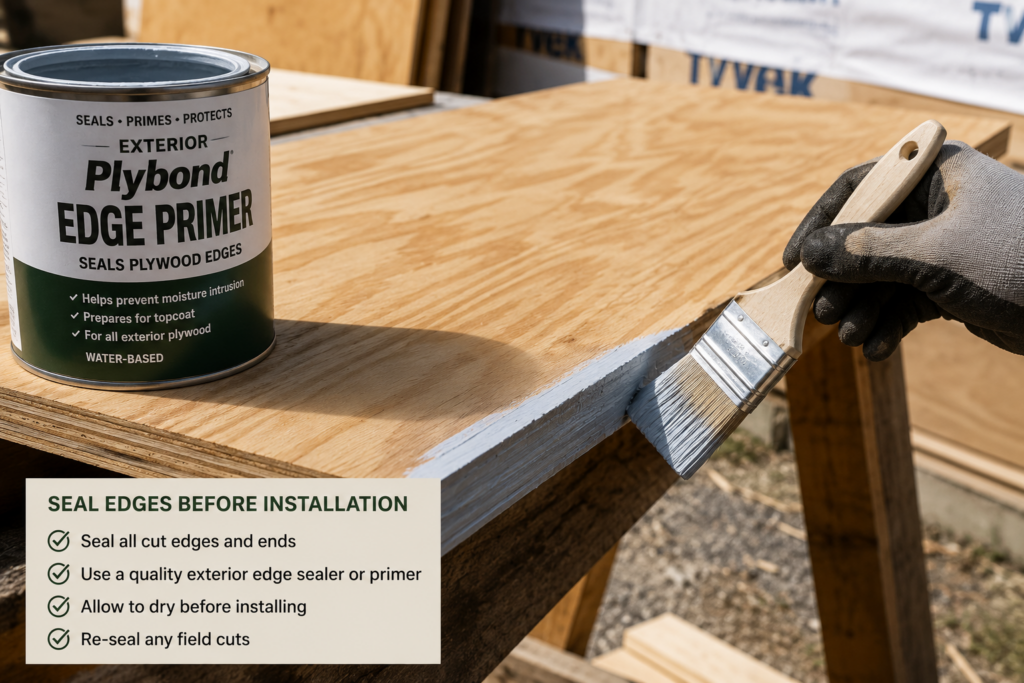
😬 The regret pattern: Finishing the faces of a siding panel carefully and never touching the bottom edge, because it’s the one nobody will ever see. Moisture wicks up through the unsealed end grain and the bottom few inches turn soft while the painted face above still looks fine. Because the painted face can still look sound, bottom-edge deterioration may go unnoticed until the panel has softened significantly. APA specifically recommends sealing all siding edges before installation and resealing every field cut.
How to Extend Exterior Plywood Lifespan
Before installation:
Let panels acclimate if they arrived wet or were stored outdoors.
Seal or prime every edge — all four — while you can still reach them. Use the coating system appropriate to the project: primer or edge sealer for painted siding, a suitable water-repellent treatment for stained siding, penetrating epoxy for demanding exposure.
Prime and finish the panel according to the siding or panel manufacturer’s coating instructions.
At installation:
Keep the bottom edge clear of grade so rain splash doesn’t soak the end grain.
Leave an expansion gap between panels. APA recommends 1/8 inch, but manufacturer instructions take precedence.
Reseal every edge cut in the field. Every one.
Use corrosion-resistant fasteners compatible with the panel and any preservative treatment.
Finish promptly. For APA Rated Siding, APA recommends finishing preferably within two weeks of installation, using an all-acrylic latex system when painting.
Inspect annually. Recoat before the coating fails, not after.
This is a procedure to run, not a result to read. Do it annually and you are more likely to catch localized problems before they become panel-replacement or structural repairs.
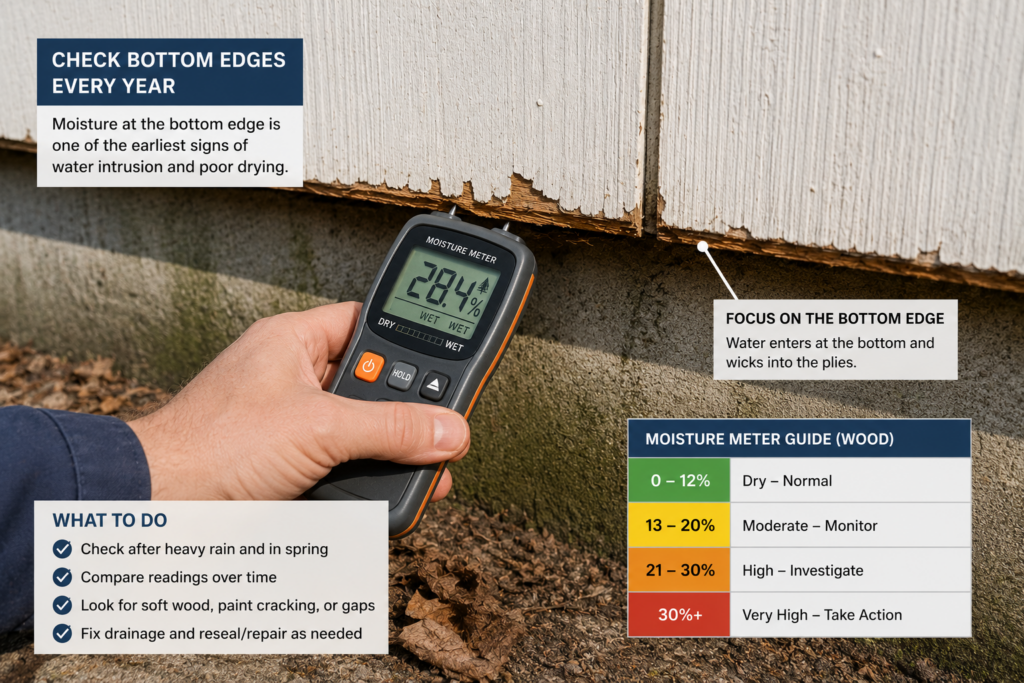
What you need: a moisture meter, an awl or flat screwdriver, a flashlight.
Probe the bottom edge of every exposed panel with the awl. Firm resistance is good. If it sinks in, the end grain has been wicking.
Take moisture readings at the bottom edge, mid-panel and top. A bottom-edge reading consistently higher than dry reference areas may indicate persistent moisture at the lower edge. Compare readings over time rather than relying on one measurement.
Check every joint and fastener with the flashlight at a low angle. Look for hairline cracks in the coating, rust bleed, and gaps at panel seams.
Check the grooves. Inspect grooves on T1-11 or 303 siding carefully for coating cracks, thin coverage and trapped moisture.
Pay extra attention to the most sun- and weather-exposed elevations. UV exposure shortens coating life, so these usually drive the recoat schedule.
Photograph anything questionable and compare against next year’s photos. Year-over-year change is the useful signal, not a single reading.
Record the readings. If bottom-edge readings remain materially higher than dry reference areas or trend upward over repeated inspections, investigate the moisture source, edge condition and coating before decay develops.
💸 What Early Failure Actually Costs
The cost gap isn’t in the panel. It’s in everything attached to it.
Scenario
Rough cost
Sealing edges and priming at install
A can of primer or edge sealer plus an hour
Recoating siding on schedule
Paint plus labor, on a planned cycle
Replacing one failed siding panel
Panel, plus removal, plus refinishing to match, plus the trim and flashing you disturb
Replacing sheathing behind failed siding
Panel cost is minor; access and rebuild dominate
Structural repair after undetected rot
The expensive one — framing, insulation and interior finishes
Current sheet prices are in our plywood price guide. The point stands regardless of the week’s lumber market: the panel is almost never the expensive part of a failure.
💸 Where the money actually goes: Skipping edge sealing saves roughly the cost of a quart of primer at install. The failure it causes is priced in demolition, access and refinishing — not in plywood. This is why finishing and installation detail deserve as much attention as grade selection.
Recommended Products
The products below support the finishing and inspection steps above:
How long does exterior plywood last? There is no warranted figure and no single reliable number. Covered sheathing that remains dry can remain serviceable for the life of the surrounding assembly. Permanently exposed plywood depends heavily on panel rating, drainage, edge protection, finish quality and maintenance, and bare untreated panels exposed repeatedly to moisture can deteriorate much sooner.
Does exterior plywood rot? Yes. The Exterior bond classification protects the glue line, not the wood, and does not provide preservative treatment. Untreated veneers absorb water, swell and decay. Where decay resistance is required, use plywood preservative-treated for the actual exposure condition.
How long does CDX last outside? CDX is designed to be covered. Most CDX carries an Exposure 1 bond classification, rated for construction-stage moisture rather than permanent weathering. Left permanently exposed, it degrades quickly at edges and knotholes.
How long does plywood siding last? Plywood siding lifespan varies too widely for a single reliable number. APA emphasizes proper edge sealing, prompt finishing and ongoing maintenance rather than publishing a fixed service-life figure.
Does sealing plywood edges really matter? Yes. Edge sealing is one of the highest-value preventive steps for exposed plywood. APA recommends sealing siding edges before installation and resealing field cuts.
How often should exterior plywood be repainted? Recoat according to the coating manufacturer’s instructions and before visible coating failure develops. Inspect annually, paying extra attention to the most sun- and weather-exposed elevations.
Does thicker plywood last longer outdoors? Not by itself. Thickness governs span and stiffness, not decay resistance. A thicker unsealed panel still rots at the edges. See our plywood thickness guide. (Verify this slug before publishing — see the duplicate-slug note below.)
Does marine plywood last longer than exterior plywood outdoors? Marine plywood does not automatically last longer outdoors on land. Its tighter defect limits do not replace good drainage, finishing and maintenance.
Related Posts:
Best Paint for Exterior Plywood: What Actually Lasts Outdoors by Admin August 27, 2026 DIY The best paint for exterior plywood is a high-quality 100% acrylic latex exterior paint applied over an exterior-rated primer. Just as important, every exposed plywood edge…
T1-11 Siding Lifespan: How Long Does It Last? by Admin August 31, 2026 DIY Last updated: August 2026 Ask ten contractors how long T1-11 siding lasts and you'll get answers ranging from "a lifetime" to "I've pulled panels that…
Exposure 1 vs. Exterior Plywood: Which Can Be Used Outdoors? by Admin August 21, 2026 DIY Focus Keyphrase: Exposure 1 vs Exterior plywood Meta Description: Compare Exposure 1 and Exterior plywood, learn what the grade stamp means, and choose the right panel for…