Back when I bought my first cordless drill, almost half a century ago, they weren’t all that common. That drill/driver, which was a professional grade tool, was rather expensive and extremely weak by today’s standards. The 7.2 volt battery didn’t provide the oomph of today’s cordless tools, required longer to charge and the smaller battery didn’t last as long.
Today these tools are much more reachable, much more powerful and with the increased competition can be considered to be much less expensive (when you account for inflation). Perhaps that explains why the average woodworker or do-it-yourselfer has several different ones, allowing them to have different ones, which specialized in different tasks. There’s also a much wider choice of tools, not just drivers of one sort or another, but a host of other tools as well. Manufacturers are working overtime to supply tools for every perceived need.
This means the average woodworker will have several different drills, drivers and other cordless tools. While some try to get everything of the same brand, it rarely works out that way. Whether due to great sale prices, gifts, or availability, most of us seem to end up with an assortment of brands.
That can cause a problem with finding a place for storing those tools, the spare batteries for them and especially the chargers. Many of us find ourselves in a place where we’re almost constantly charging batteries, just to keep up with our own usage. Leaving chargers scattered around on our workbenches is a bit untidy, taking room we need for other things, so it’s nice to have someplace where we can organize it all, making it easy to keep our batteries charged and our tools readily available.
While such a center for our power tools could be just about anywhere, including inside a drawer, one of the best ways of handing it is to make a wall-mounted charging station, which has room for the power tools, the chargers and any spare batteries.
It’s interesting how many professional woodworkers have gone to storing their tools on the wall, something that used to be thought of for nothing more than home mechanics and repairmen. But the truth of the matter is that storing tools in organized holders, hanging on the wall, makes them much more accessible and easier to find. If someone is working with their tools all day, having them readily available, hanging on the wall, actually makes more sense than sitting in a toolbox somewhere.
Building the Charging Station
Like many other things in the workshop, it makes sense to build a charging station out of plywood. Many of us leave our shop furnishings and jigs unfinished, as they are only in the shop and are not really in public view. Besides, who doesn’t like seeing the grain of the wood in the projects they make?
With that in mind, I’d recommend using quality cabinet plywood, something like birch, if that fits into the budget. If not, construction-grade plywood can be used, but it won’t provide as nice a fit and finish to the project, especially on the edges.
There are endless styles that can be used for a charging station, but most are actually variations on the same theme. They consist of a wall cabinet that has two or three shelves, with the bottom shelf being a dedicated hanger for the power tools, with the upper shelf being reserved for the chargers. Any middle shelves are used for storage of boxed tools, accessories and charged batteries. Someone who owns an assortment of cordless tools or accessories that they use with those tools might want to consider putting two or even three shelves above the one for hanging the drills and drivers. If larger tools are stored in the charging center too, then a shelf with high clearance, other than the top shelf, might be useful.
The Drill/Driver Rack
The starting point for this project is the rack for hanging the drills and drivers, as that ends up determining the overall width of the wall unit. Of course, how wide that ends up being will depend on how many drills and drivers the woodworker has. I’ve designed the plan below for five drivers, but it could easily be expanded to hold more.
Cordless tool storage – drill rack
Before laying that out and cutting it, it’s a good idea to check the handle width and overall body width of the tools that will be hung on that rack. It was designed to hold most tools, but there’s always the possibility that there will be some that won’t fit.
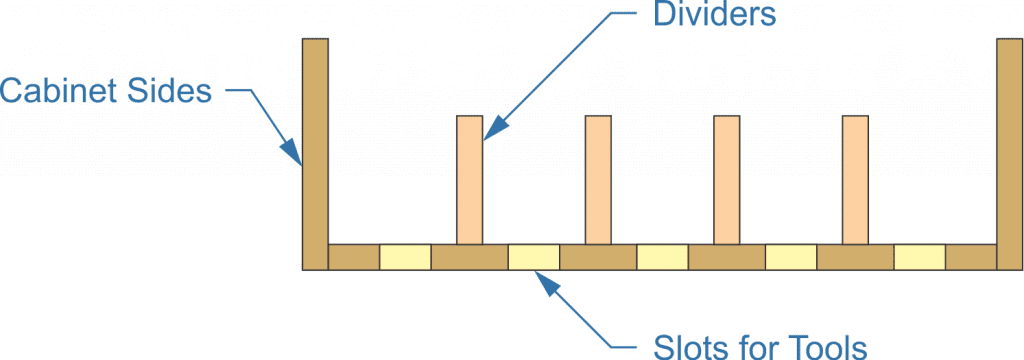
In most cases, it’s inadvisable to make the above rack without any support. Better to make a “T” in between each of those slots, in order to provide better support. Those Ts can act as dividers between the tools, as well as supports, something like this:
Cordless tool storage – tool hanger
With the need to add those dividers, one might ask why bother making the plate above, with cutouts for the tools to set into. It would seem to be easier to just use strips of plywood or 1”x 2”s, running them the full length, front to back. But if that were to be done, the design would be weaker and the dividers might swing to one side or the other with use.
Making the Cabinet
As mentioned earlier, the overall cabinet can take on a variety of different forms, depending on what the woodworker needs for storage of their tools. While most such racks are open, with shelves, I’ve also seen some made with drawers for holding bits and other small parts.
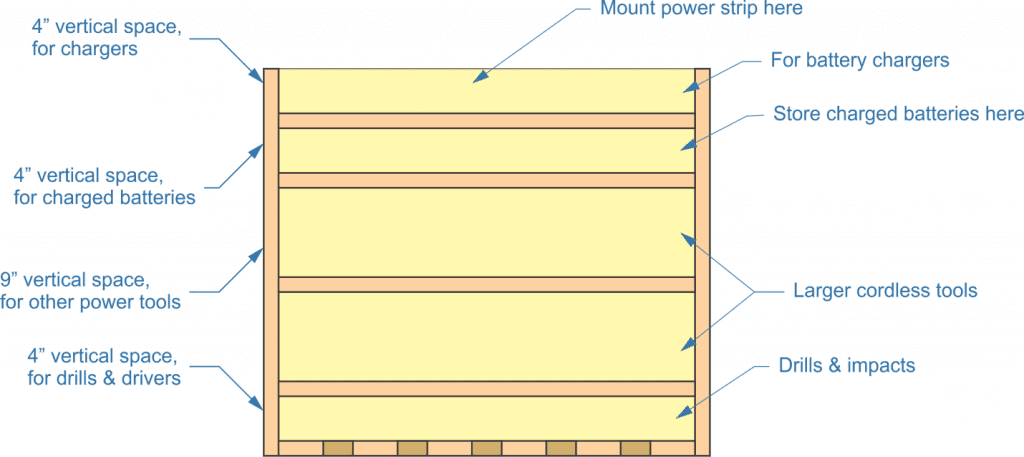
Cordless tool storage – overall layout
In the diagram below, we see that this rack has a total of four shelves, plus the rack for storing the drills and drivers. That would make it a rather large rack; as such storage racks go, as most don’t have that many shelves. Nevertheless, it shows how much storage space specifically designed for cordless power tools can be fit into a small area of wall space. The overall size of this rack is roughly 30” square.
That many power tools and batteries is going to add up to be a considerable amount of weight. So it’s important to make sure that the rack is strong. For that reason, I’d avoid nailing it together. It would be better to use either screws or dowels. As this is made out of plywood, if screws are used, pilot holes should be drilled to keep the ends of the plywood from splitting.
One of the problems with screw or nailing into the edge of any piece of plywood is that the plywood can expand easily, eliminating the clamping force that would otherwise ensure a strong joint. Dowels actually provide a stronger storage cabinet, even though metal screws are stronger than dowel rods. The added strength is going to come from the interface between the dowel and the plywood, which will be much more solid than screws, even if it is off center.
Go ahead and add dowels or screw through the back, into the backing board as well. This will allow the backing board to act as a stiffener for the shelves, helping to keep them from sagging due to the weight on them. If this is not done, then stiffeners should be added to the bottoms of the front edges of the shelves. But that’s not as good an option, as it will limit what can be stored in the rack.
The top shelf of the storage unit is reserved for mounting battery chargers, as I have designed it. Another shelf can be selected for this, but by putting it on the top shelf, there is little risk of hitting one’s hand on the shelf above, when pulling out batteries. Some of the battery chargers maintain a strong grip on the batteries. For this reason, it’s also a good idea to screw down the chargers, using the mounting hole on the bottoms.
To hang the storage rack, I’d recommend using a French cleat, as it can hold the weight. The other good option is to screw through the backboard, directly into studs, assuming that the backboard is made of ½” thick material or thicker.