Outdoor sports are great family activities, especially during the warmer summer months. Unsurprisingly, many families invest in the equipment to partake in these sports, causing storage space problems.
Storage Solutions
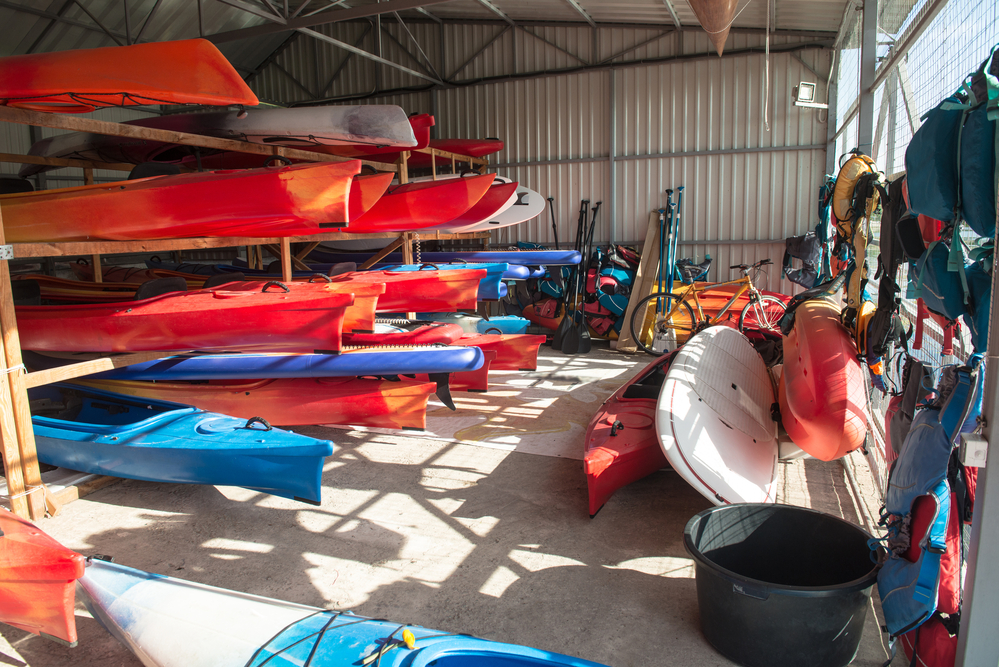
Storage of kayaks and boats in hangar
While storing an inflatable beachball might not be much of a problem, the larger the item, the more we struggle to find a place to keep it.
When it comes to large items, like kayaks, it’s often helpful to build some unique storage rack to store them, especially when they have curved surfaces so they don’t stack so nicely.
Although kayaks are outdoor sports equipment, they should be stored indoors or at least where they have a roof over them. While rain won’t damage them, constant exposure of the kayak to the sun can dry the plastic they are made of, eventually causing it to fail.
The storage solutions? For most of us, that means storing the kayak in the garage; a back garage is a great idea for storing kayaks, but a porch or garage or storage shed with an overhanging roof will also work as a storage solution.
As with large items, how the two kayaks will be oriented in the rack will depend significantly on the available storage space above.
In most cases, it makes more sense to store multiple kayaks in them horizontally because there isn’t quite enough storage space above or ceiling height to do otherwise.
But situations may exist with ample ceiling height, but windows and doorways make storing the two kayaks together horizontally impossible.
In that case, keeping the two kayaks together vertically up against the wall might be better.
In either case, the rack to keep the two kayaks in must be strong enough to hold the two kayaks together in place, even during a strong wind.
There are many different ideas and ways of making a simple DIY kayak rack here, but in this case, it makes more sense to go for simplicity than anything else.
This isn’t a display homemade diy kayak rack project we’re talking about, but rather a storage, easy diy kayak rack here.
Anything done to make it more attractive or any high-quality joinery probably won’t even be seen, let alone appreciated.
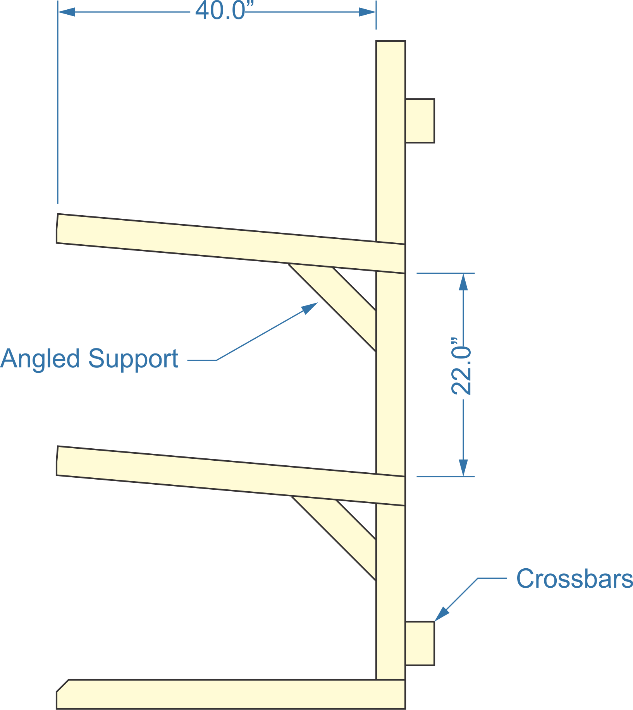
Kayaks can vary in size, but they will all fit into a rack providing a cross-section of 40” wide by 22” high. Two arms are required to hold each kayak, which should be spaced roughly 60” to 72” apart.
The kayaks to be stored in the rack can be measured to determine if those dimensions can be brought down any.
But as they are, they should accommodate up to three or six larger kayaks. No padding should be required for smaller kayaks unless there is metal in contact with the kayaks.
Making a Kayak Rack Out of 2”x 4”s
One of the simplest materials to make a kayak rack, kayak storage, easy diy kayak rack top, shed or kayak top shelf is 2”x 4” studs.
Outdoor active leisure: young female backpacker on a weekend trip, kayaking, hiking
Assuming an 8’ ceiling height, up to three or four kayaks should be able to be stored vertically. Fitting four up to six kayaks vertically would require a full kayak rack, a diy kayak storage rack, or a shed with a 9’ ceiling height.
These wood kayak storage racks can either sit against the wall or be set in the middle of the floor, allowing space to store multiple kayaks on both sides.
It all depends on how much space is available. Weight isn’t an issue when storing kayaks, as the heaviest kayaks used for fishing only weigh 120 pounds.
Recreational kayaks run about 35 pounds for a single kayak and 65 pounds for a double.
Even so, I’d recommend using glue and screws to join the pieces together and adding in angled support brackets, made out of scrap pieces of 2”x 4”, to provide extra strength and angled supports.
A pair of crosses will keep the kayak racks aligned and allow for extra support to attach the wooden kayak rack back to the wall.
Make a kayak rack out of a kayak rack.
Your kayak rack and kayak racks size out of 2”x4”s
Please note that the support bars for the three kayaks above (the shelves) are mounted at a slight upward angle (5 deg.) to help keep the kayaks from falling off.
Since those support bars are mounted to the sides of the vertical supports, the angled support brackets must be attached to the side of the support bars (the back side) and mitered to sit on the face of the vertical supports.
It would be harder to place the mitered edge on the bottom of the support bars, as they are at an angle. Be sure to anchor them well into the vertical supports.
It may only be possible to fit one fastener in this application, so a 3” long or longer lag screw would be better than standard wood screws or drywall screws.
This design project is intended to be mounted to the wall, although it could be free-standing.
The main reason for using cross braces for mounting it is to keep it from moving when loading and unloading the kayaks.
The crossbars provide a simple solution and convenient extra security for mounting. They can be attached to the studs in the garage wall with a 3” to 3-1/4” screw.
A Couple of other Material Options
The bottom horizontal support bar is also the foot resting on the floor. Adding another section of 2”x 4” attached to the side of it would allow that second piece of 2”x 4” to be installed at the same 5-degree angle as the upper horizontal supports.
The vertical supports can be made of 4”x 4”s rather than 2”x 4”s, allowing them to be dado cut for the horizontal support bars. This is unnecessary for strength with the support brackets, but it would improve the overall project.
The horizontal support bars can be doubled up, attaching them to both sides of the vertical supports. Again, this is not necessary for strength, as the rack doesn’t have to hold much weight, but doing so would look good, making the overall impression of the frame appear more secure. The same angled bracket could be attached to both horizontal support bars, running screw-in from both sides. A small 2”x 4” block at the ends of the horizontal support bars would give it a more massive, solid appearance.
If the ceiling height of the first kayak stand and storage shed allows minimal space, a fourth pair of horizontal supports could be added, either for storage of the tools required for the kayak stand, storage of tools for another kayak stand and storage solutions, or for storage of kayak paddles.
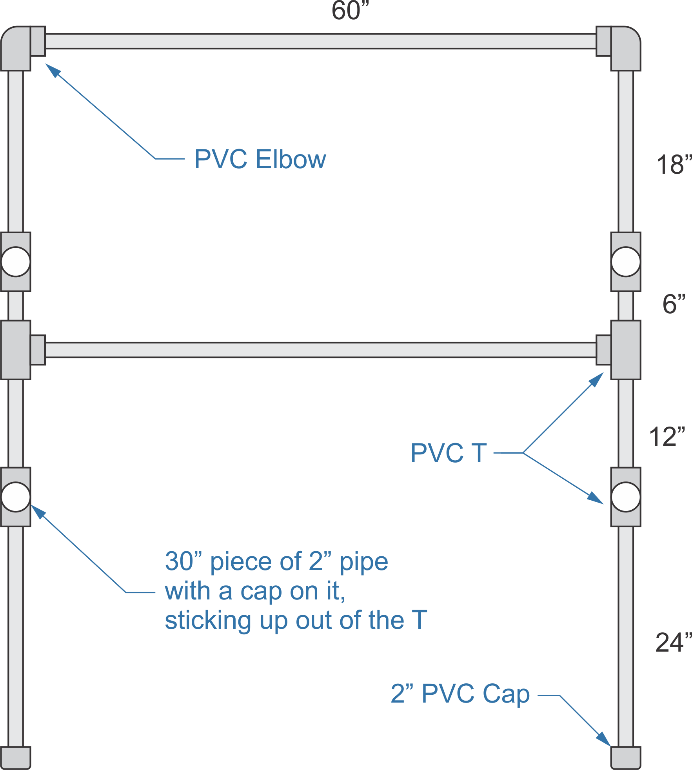
Many people like making their kayak rack and kayak storage rack or racks out of PVC pipe, as it is quick and easy to work with. PVC has sufficient strength to hold recreational kayaks without any problem but probably isn’t strong enough to support heavier fishing kayaks. I’d recommend using 2” diameter PVC, more for stiffness than anything else.
One thing lacking on a PVC outdoor kayak rack is the “foot” on the wood one. This outdoor kayak rack is more of a temporary storage for longer kayaks, used outdoors during the kayak months. When colder weather appears, and it is clear that the kayaks aren’t going to be used anymore that year, they should be moved indoors for storage during the winter.
Making a homemade wooden kayak rack wooden rack for kayak storage is a simple project the wooden kayak storage rack project that is the simple project out of wood and PVC pipe
The dimensions marked on the drawing are cut sizes for the pipe, including the 30” pieces that stick out the elbows. Take care while assembling each side of the rack that the elbows and Ts are installed at 90 degrees to each other so that the whole frame will go together.
– DIY PVC kayak rack is somewhat susceptible to damage from prolonged exposure to the sun. While it doesn’t affect PVC’s tensile strength, it can affect its impact strength, meaning that a blow could cause it to crack. Painting the PVC kayak rack will help protect it from UV rays, helping it to last longer.
This rack is designed to lean against the wall, although it can just as well be mounted to the ground or wall.
If it is counted against the floor or wall, ensure that the feet are a good 18” away from the floor or wall so that the rack can adequately support and store the weight of all the materials and kayaks.
To mount it to the floor or wall, all that’s required is ordinary pipe hangers.
Making a Vertical Kayak Rack
Storing a custom rack of kayaks vertically in the garage can be challenging, as most garages don’t have enough ceiling height.
But if there is sufficient ceiling height, perhaps because of an open attic area of a lake house or garage or the garage being a pole barn, not a garage, then storing kayaks or multiple kayaks together vertically on a custom rack can save a considerable amount of floor space.
It’s also much easier to keep various kayaks together vertically than to make racks to keep them horizontally.
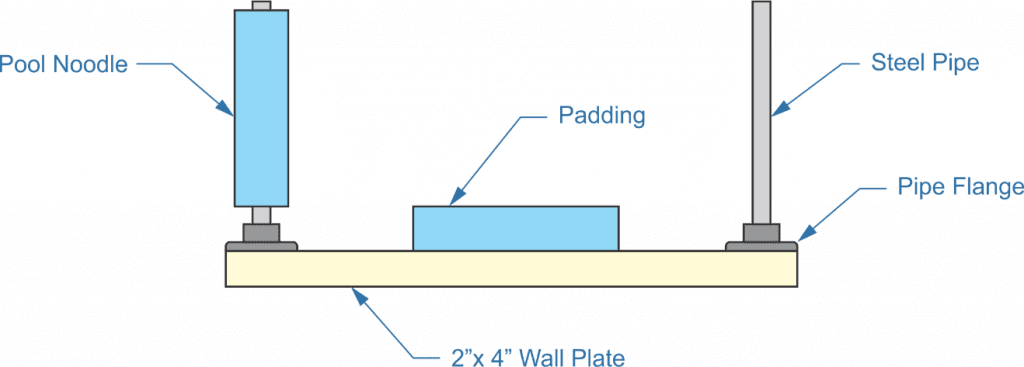
All that’s needed for a vertical kayak stand or homemade kayak rack or simple kayak rack, or homemade kayak rack is a piece of 2”x 4” about 2’ long and a couple of pieces of ½” or ¾” steel pipe with flanges. The pipe and flanges are mounted at both ends to the 2”x 4” base.
Once secure, cover the pipe with a cut-off piece of pool noodle to keep the line from scratching up the wooden frame of the kayak stand, a simple kayak rack, or a homemade kayak rack. A piece of the same pool noodle or thick foam rubber can be attached to the 2”x 4” for the same reason.
Making a vertical kayak rack
This: diy kayak rack should be mounted to the wall, screw through hammer drill the 2”x 4” into the studs in the wall, high enough to hold one end of the diy kayak rack in place.
Ideally, the pointed end of the diy kayak rack should fit between the pool noodle-covered pipes with no more than 1” to spare, but not snugly.
The other end of the DIY kayak rack or PVC kayak, single the diy kayak rack, on the diy kayak rack, can sit in a wood, metal, or plastic box or bin with an old pillow or foam rubber to protect it from damage.
In addition to the DIY kayak, PVC pipes, and diy kayak and rack, some screw eyes will need to be installed in the wall, roughly at the mid-height of the diy kayak and far enough apart so that they are wider apart than the diy kayak to be where diy kayak storage stored.
Ensure they are anchored into a stud and not just the drywall, even if that requires mounting a horizontal piece of 2”x 4” or 1”x 4” for them to mount. These screw eyes are for bungee cords to hold the DIY kayak storage, diy pvc pipes, and diy kayak rack in place.
Hanging a Kayak from the Garage Ceiling
There are several ways of hanging a used diy kayak rack, storage rack, or PVC kayak rack from a ceiling, including building racks.
The big problem with using your own used diy kayak rack ideas, homemade diy kayak rack ideas, or any other outdoor use any diy kayak rack ideas is that the kayak has to be lifted over one’s head to slide it into the rack.
While that may be possible, especially with the lighter recreational kayaks, I wouldn’t want to try it with the heavier fishing kayaks.
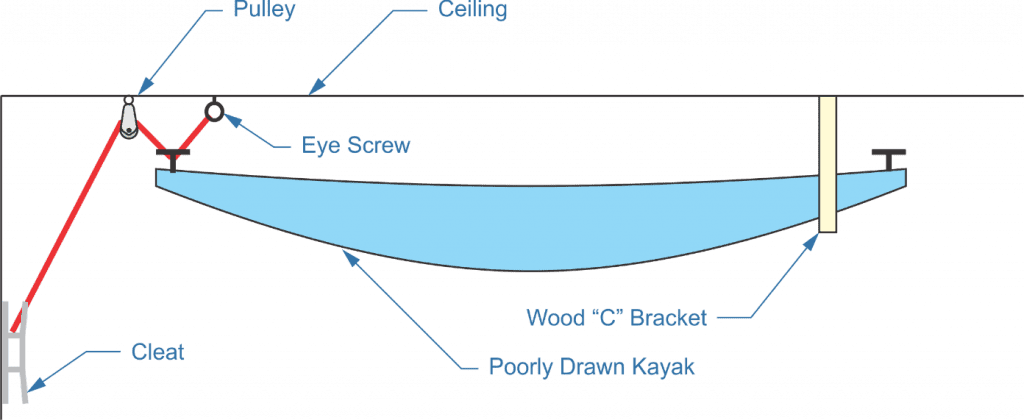
One way around dealing with this weight issue is to just put one end of the used outdoor kayak rack into a rectangular or “C” shaped bracket mounted to the ceiling. Make sure it is big enough for the canoe and kayak rack to fit into and is mounted to the ceiling joists.
Conversely, a simple rack and pulley arrangement can easily lift your outdoor kayak rack. I’ve never done this with a full wooden rack or outdoor kayak rack myself, but I have hung long extension ladders in this manner, which weigh more than my own outdoor kayak rack or wooden kayak rack ever would.
Hanging a kayak from the garage ceiling
In this case, once the first end of the diy kayak rack, PVC diy pvc pipes or diy pvc kayak rack is inserted into the bracket, one pulley can pull the wooden.
The DIY kayak rack or PVC pipes diy pvc kayak rack up to the ceiling can be tied off at a cleat on the wall. The light rope is sufficient, as this isn’t a lot of weight.
A ¼” nylon line or paracord is sufficient even with a fishing kayak. Avoid stiff ropes or natural ropes with many threads hanging out that can get the DIY kayak rack or yak rak to catch up in the pulley.
The rope running through that pulley will need to be attached to the ceiling in some way, such as with an eye screw. A loop is made in the rope between that eye screw and the pulley. This loop hangs down and is attached to the canoe and kayak rack.
Most kayaks, especially the heavier ones, have rubber and nylon strap handles on both ends, which can be used for attaching.
However, if the handle doesn’t lend itself to running the rope through or around the wooden frame, use another pulley with a carabiner that can attach to the kayak handle. Once the string passes through the pulley, it goes to a cleat mounted to a stud in the wall to be tied off.
It is easy to tie rope of this type off to a cleat using a simple figure-8.
The last couple of loops of the strings should be flipped backward so that the loop captures the loose end. Friction in the rope will be sufficient to keep the cord from coming loose.
Related Posts:
Maple Plywood DIY Guide: Projects & Finishing Tips by Admin August 23, 2025 Hardwood My First Experience With Maple Plywood When I first started messing with plywood, I honestly didn’t care what I was buying. Pine was cheap, easy…
Cedar Plywood: A Complete DIY & Builder’s Guide by Admin September 8, 2025 Softwood If you’ve ever stepped into a cedar-lined closet or opened an old cedar chest, you know the scent. That fresh, woodsy smell isn’t just nostalgic—it’s…


")