I’ve been working with plywood for a long time, and the single most expensive mistake I see homeowners and contractors make isn’t buying the wrong grade or species — it’s buying the wrong thickness for their subfloor. A floor that bounces, squeaks, or fails a flooring manufacturer’s warranty almost always traces back to a subfloor that was underdeveloped from the start.
This guide gives you the full picture: the quick-reference thickness chart, code requirements, a real cost comparison, and examples from actual projects I’ve seen go right — and badly wrong.
⚡ Quick Answer
What is the best plywood thickness for a subfloor?
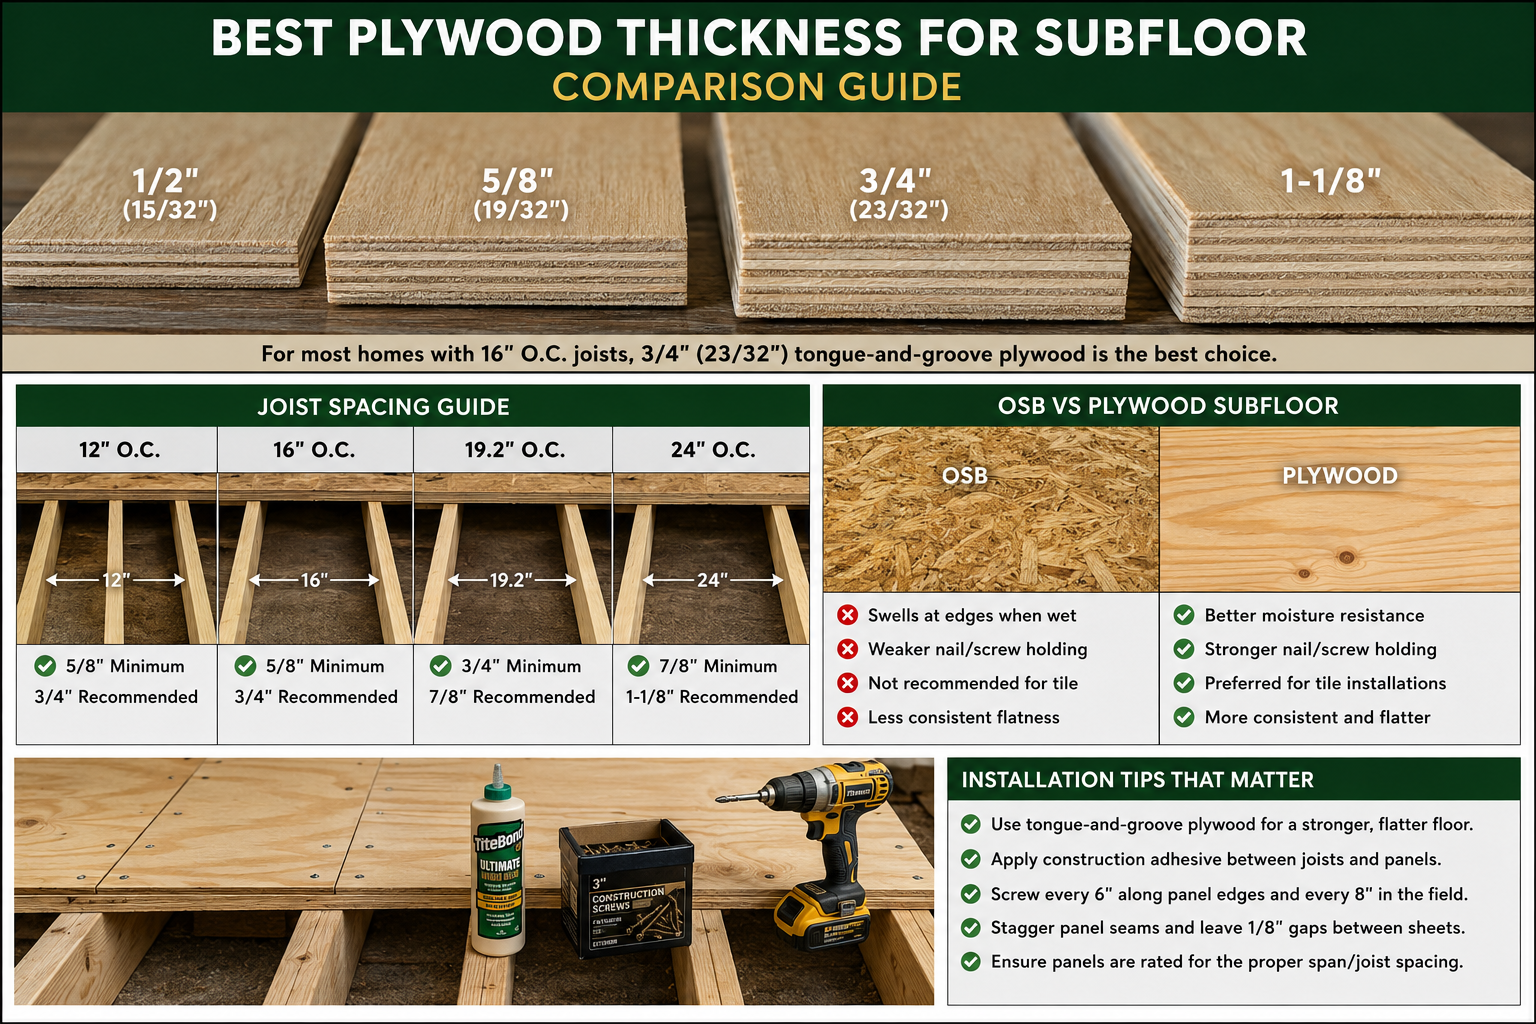
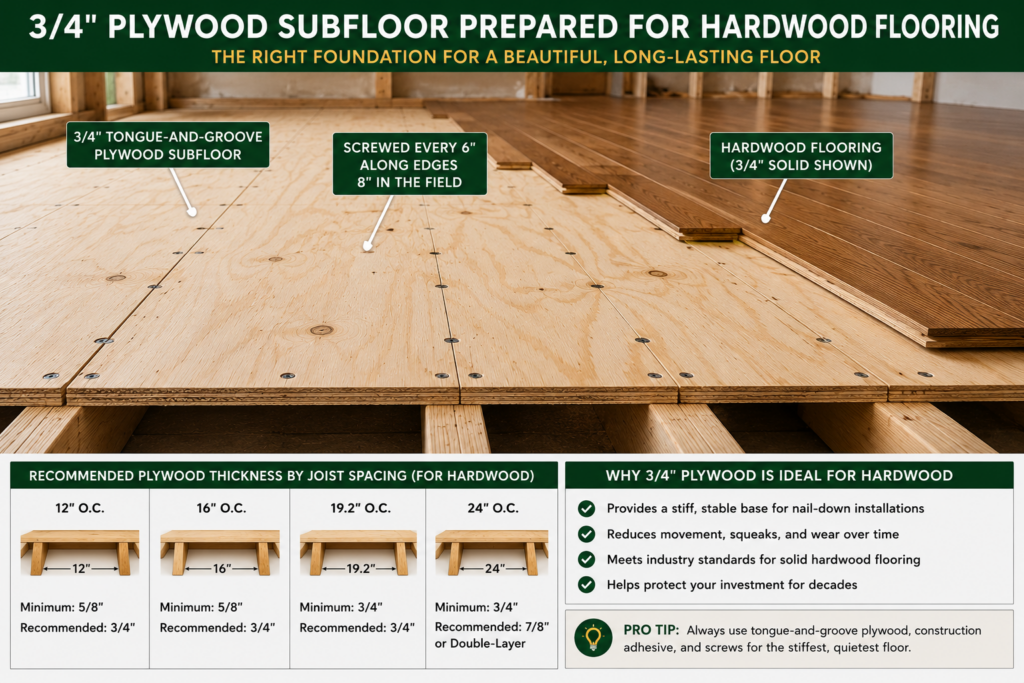
For most homes with 16-inch on-center joists, 3/4-inch (23/32-inch) tongue-and-groove plywood is the best subfloor thickness. It provides superior stiffness, reduces squeaks, meets building code requirements, and works with hardwood, tile, laminate, vinyl plank, and carpet. On 24-inch O.C. joists, upgrade to 1-1/8-inch T&G or use a double-layer system.
Recommended Subfloor Thickness by Flooring Type
Flooring Type
Recommended Subfloor
Notes
Solid Hardwood
3/4″ T&G plywood
Flat within 3/16″ over 10 ft
Ceramic / Porcelain Tile
3/4″ + cement board
L/360 deflection required by TCNA
LVP / LVT
3/4″ T&G plywood
Flat within 3/16″ over 10 ft
Laminate
3/4″ T&G plywood
Flat within 1/8″ over 6 ft
Engineered Hardwood
3/4″ recommended (5/8″ min)
Bounce and joint separation risk with thinner panels
Carpet
5/8″ minimum, 3/4″ preferred
Most forgiving flooring type for subfloor thickness
Natural Stone
3/4″ + uncoupling membrane
L/720 deflection often required — most demanding application
Vinyl Sheet
5/8″ min, 3/4″ preferred
Every subfloor defect telegraphs through; flatness critical
⚠️ The #1 Mistake: Using 1/2″ plywood where 3/4″ is required. It saves maybe $0.30/sq ft upfront and costs thousands in flooring callbacks, squeaks, and failed tile jobs. Don’t do it.
This is the chart I wish I’d had when I started. Bookmark it. Print it. Put it in your truck.
Joist Spacing
Minimum Thickness
Recommended Thickness
Best For
Risk if You Go Thinner
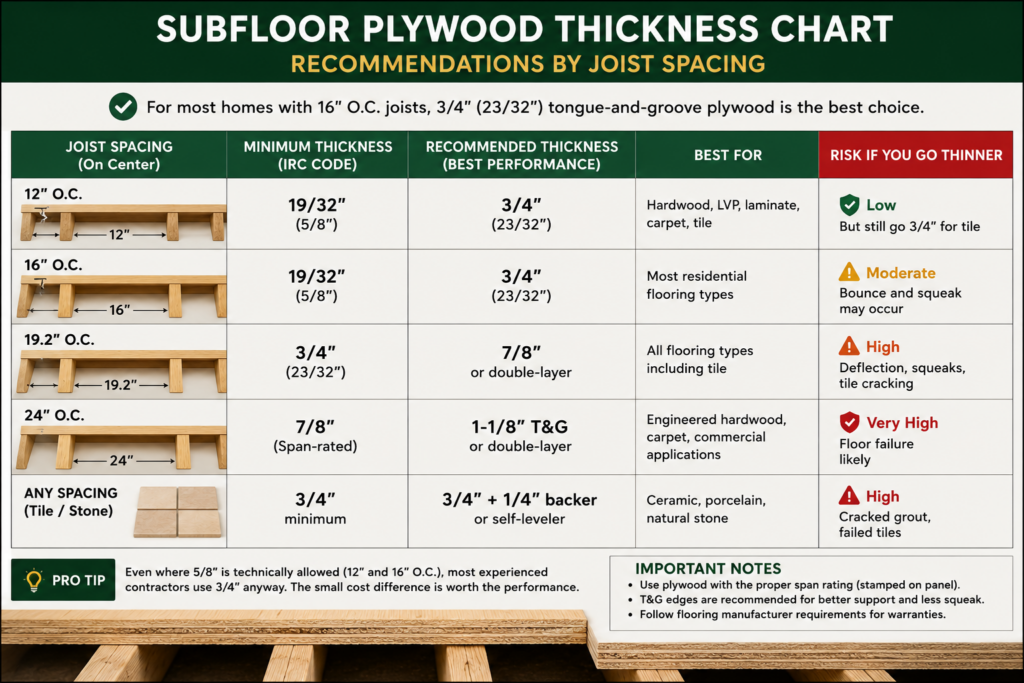
12″ O.C.
19/32″ (5/8″)
3/4″ (23/32″)
Hardwood, tile, LVP
Low — but still go 3/4″ for tile
16″ O.C.
19/32″ (5/8″)
3/4″ (23/32″)
Most residential flooring
Moderate — bounce, squeak
19.2″ O.C.
3/4″ (23/32″)
7/8″ or double-layer
All flooring types
High — deflection, tile cracking
24″ O.C.
7/8″ (Span-rated)
1-1/8″ T&G or double-layer
Engineered hardwood, carpet
Very High — floor failure guaranteed
Any (Tile/Stone)
3/4″ subfloor minimum
3/4″ + 1/4″ backer or self-leveler
Ceramic, porcelain, natural stone
Cracked grout, failed tiles
Any (Heated Floor)
3/4″
3/4″ + proper backer
Radiant heat systems
Heat warping, delamination
Quick Answer: For most homes with 16″ O.C. joists, 3/4″ (23/32″) tongue-and-groove plywood is the best subfloor thickness. It meets IRC code requirements, satisfies virtually every flooring manufacturer’s warranty requirement, and eliminates the risk of bounce and squeak. Don’t overthink it.
📋 Full Comparison Table: Thickness vs Application
Thickness
Nominal
Best Applications
NOT Recommended For
Typical Cost/Sheet
1/2″ (15/32″)
4’x8′ sheet
Underlayment over existing subfloor, low-traffic attic decking
Primary subfloor, tile, hardwood, 16″+ O.C.
$28–$38
5/8″ (19/32″)
4’x8′ sheet
Subfloor on 12–16″ O.C. joists, underlayment
24″ O.C., heavy tile, stone floors
$38–$50
3/4″ (23/32″) ⭐
4’x8′ T&G sheet
Primary subfloor for all residential flooring on 16″ O.C.
24″ O.C. without additional layer
$48–$68
7/8″
4’x8′ sheet
19.2″–24″ O.C. joists, heavy loads
Tight budget projects (expensive)
$60–$85
1-1/8″ T&G
4’x8′ T&G sheet
24″ O.C., commercial, tile over wide spans
Standard residential with 16″ O.C.
$70–$100+
Double Layer (2x 3/8″)
Custom
Adding stiffness to the existing thin subfloor
New construction (use a single thicker sheet)
$50–$75 total
⭐ = The recommendation for 90% of residential projects.
If you’re wondering which plywood grade to pair with your chosen thickness, that’s a separate but equally important decision. Grade affects face quality and structural integrity — both matter for subflooring.
📐 How Joist Spacing Changes Everything
This is the part most guides gloss over, and it’s where projects fail. Joist spacing isn’t just a number — it’s the single biggest variable in determining what thickness you actually need.
Here’s the physics in plain English: plywood spanning a greater distance between supports deflects more under load. Deflection causes bounce. Bounce causes squeaks in hardwood floors. And for tile? Deflection cracks the grout and eventually pops tiles loose entirely.
The IRC Code Requirements (What Your Inspector Looks For)
Joist Spacing
IRC Minimum Panel Thickness
Span Rating Needed
T&G Required?
12″ O.C.
19/32″ (5/8″)
20/0 or higher
No (but recommended)
16″ O.C.
19/32″ (5/8″)
24/16 or higher
No (but recommended)
19.2″ O.C.
23/32″ (3/4″)
32/16 or higher
Yes (edges must be supported)
24″ O.C.
7/8″
48/24 or higher
Yes, strongly required
Visual Guide: Joist Spacing and Required Subfloor Thickness
Here’s what those spacing numbers actually look like — and why the gap between supports matters so much for panel stiffness:
Joist Spacing Comparison — Why the Distance Between Supports Determines the Thickness
12″ 12″ O.C. 5/8″ OK • 3/4″ Best Minimal deflection under load
16″ 16″ O.C. 3/4″ T&G Recommended ⭐ Standard residential — most common
24″ 24″ O.C. 1-1/8″ T&G or Double Layer Significant deflection — do NOT use 3/4″ alone
= Deflection arc under load (exaggerated for clarity) = Subfloor plywood panel = Floor joists
Wider joist spacing = more distance between supports = more deflection = thicker panel required
💡 Pro Tip: Even where 5/8″ is technically allowed (12″ and 16″ O.C.), most experienced contractors and flooring pros use 3/4″ anyway. The cost difference per sheet is $8–15. On a 1,200-sq-ft floor, that’s maybe $300 extra. The cost to fix a bouncy floor or replace cracked tile? Easily $2,000–$8,000. Run the math.
Span ratings are stamped right on the panel. The first number is for the roof decking, the second is for the subfloor. A panel stamped 32/16 is rated for 16″ joist spacing. Look for this when buying — don’t just grab the thickest sheet without checking the stamp.
Learn more about reading plywood span ratings before your next trip to the lumber yard.
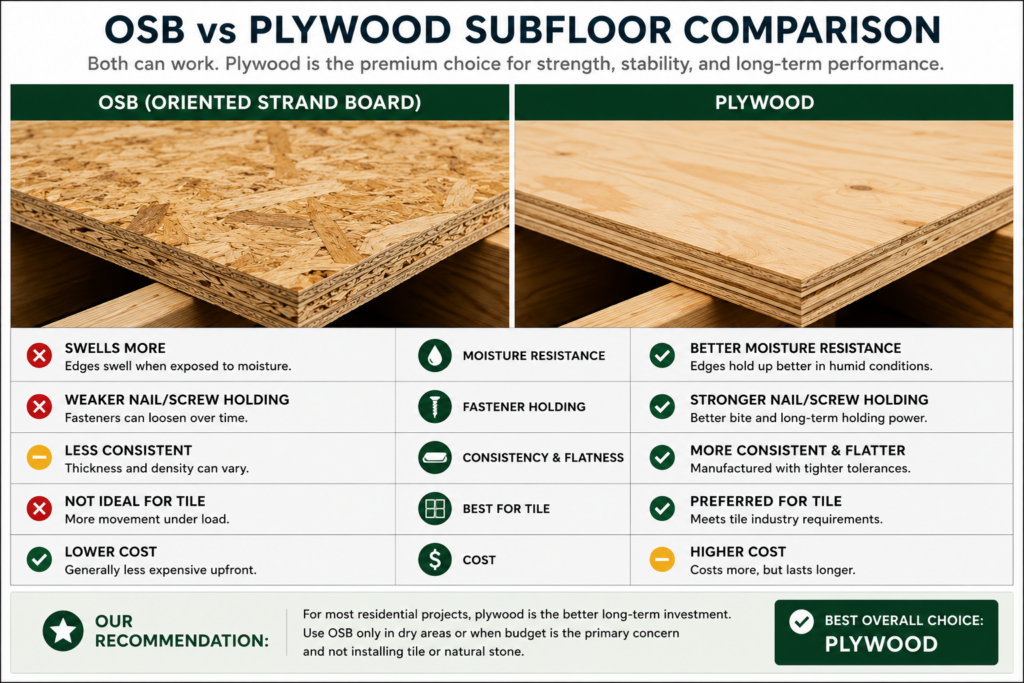
OSB vs Plywood Subfloor — Which Wins?
I get this question constantly. Short answer: for subflooring, OSB is fine if installed correctly — but plywood has important advantages that matter in specific situations.
Factor
Plywood
OSB
Winner
Cost (3/4″ sheet)
$48–$68
$32–$48
OSB
Moisture resistance
Better (especially exterior grade)
Swells badly when wet; edge swelling common
Plywood
Structural strength
Equal (span-rated)
Equal (span-rated)
Tie
Nail/screw holding
Excellent
Good (edge-nailing is weaker)
Plywood
Flatness
More consistent
Can be less flat (surface texture)
Plywood
Weight
Slightly lighter
Slightly heavier
Plywood
Tile-ready?
Yes (with backer)
Not recommended by most tile manufacturers
Plywood
Availability
Widely available
Widely available
Tie
Code acceptance
Universal
Universal (span-rated)
Tie
My honest take: If you’re in a dry climate, on a tight budget, and your inspector is fine with it, OSB at the right thickness works. But if there’s any chance of moisture (crawl space, basement-adjacent, bathroom-adjacent), or if you’re laying tile, go with plywood. The extra $15–20 per sheet is cheap insurance.
For a deeper dive, check out the full OSB vs plywood comparison on our site — we’ve tested both in real conditions.
Thickness Requirements by Flooring Type
Here’s something the big-box stores won’t tell you at checkout: the flooring you’re installing on top changes your subfloor requirements. Installing hardwood over a technically legal but marginal subfloor can void your flooring warranty. Tile is even stricter.
Flooring Type
Min. Subfloor Thickness
Additional Requirements
Warning Signs if Wrong
Solid Hardwood
3/4″
Flat within 3/16″ over 10 ft
Squeaking, nail pops, cupping
Engineered Hardwood
5/8″ min, 3/4″ recommended
Flat within 3/16″ over 10 ft
Bounce, joint separation
Ceramic/Porcelain Tile
3/4″ (plus cement board)
L/360 deflection, cement backer
Cracked grout, popped tiles
Natural Stone
3/4″ (plus uncoupling membrane)
L/720 deflection is often required
Cracked stone, failed adhesive
LVP / LVT
5/8″ min, 3/4″ recommended
Flat within 3/16″ over 10 ft
Hollow sound, edge lifting
Carpet
5/8″ technically OK
Low deflection still preferred
Soft spots, staple pull-out
Laminate
5/8″ min, 3/4″ recommended
Flat within 1/8″ over 6 ft
Joint gapping, locking failure
Vinyl Sheet
5/8″
Extremely flat surface required
Every subfloor defect shows through
⚠️ Tile Warning: The Tile Council of North America (TCNA) requires subfloor deflection of L/360 (the span divided by 360) or better. Over 24″ O.C. joists, even 3/4″ plywood, may not achieve this without additional layers. Always check the TCNA handbook for your specific span before laying any tile.
Thinking about what plywood species works best under different flooring types? We cover that in detail — species affects stability and fastener retention.
🏠 Real Project Examples: What I’ve Seen Work (and Fail)
“After decades of flooring installations, I’ve never met a homeowner who regretted upgrading from 5/8-inch to 3/4-inch subfloor. I have met plenty who regretted not doing it — usually right around the time their tile contractor hands them a repair estimate.”
— Senior flooring installer, 30+ years in residential construction
I’m going to share some real situations I’ve encountered personally or been called in to consult on. Names changed, lessons kept.
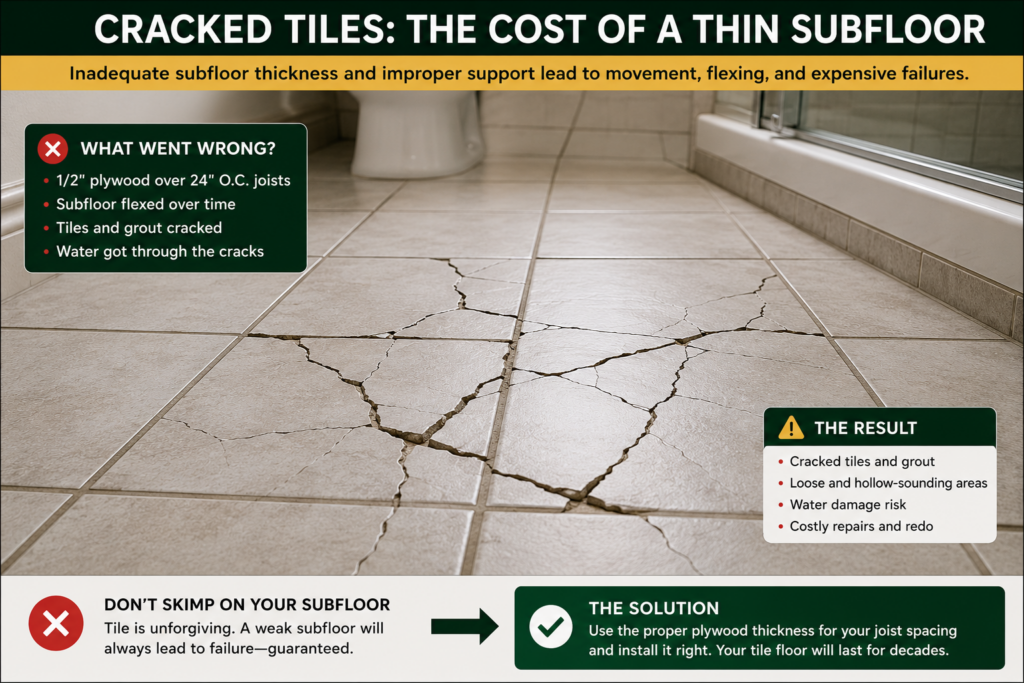
Project 1: The Tile Bathroom Disaster (Denver, CO — 2021)
A homeowner remodeled a master bathroom. The contractor used 5/8″ plywood subflooring on 16″ O.C. joists because “it’s what we had.” Cement board went on top, then 12×24 porcelain tile. Looked stunning at first.
By month 8, grout lines started cracking. By month 14, three tiles near the toilet had popped loose. The deflection under load was just enough to fracture the bond. The repair cost — including removing all tile, pulling the cement board, replacing the subfloor with proper 3/4″ material, and a Schluter uncoupling membrane — came to just over $4,200. The original “savings” on thinner plywood was about $180.
❌ Outcome: Completely avoidable. Wrong thickness for the application.
Project 2: The Whole-House Reno That Got It Right (Nashville, TN — 2022)
I consulted on a full gut renovation of a 1960s ranch home. The original subfloor was 1/2″ boards — original to the house. The contractor replaced everything with 23/32″ tongue-and-groove plywood on 16″ O.C. joists, glued and screwed to every joist, 8″ O.C. across the field.
Hardwood went down on top without a single squeak. The tile in the kitchen and two bathrooms has held up perfectly for three years. The homeowners have never called with a floor complaint. That is the result you’re paying for when you use the right thickness and install it correctly.
✅ Outcome: Zero callbacks. Right thickness + proper installation = no regrets.
Project 3: The 24″ O.C. Joist Problem (Rural Vermont, 2023)
An older farmhouse addition had 24″ O.C. floor joists — common in older construction. A previous owner had installed a 3/4″ OSB subfloor in the 1990s. The floor bounced noticeably, and the vinyl plank flooring installed over it was separating at the joints.
Solution: Add a second layer of 3/8″ plywood over the existing subfloor (glued down with construction adhesive), then re-float and re-level before new LVP installation. Total cost was about $900 in materials and labor for a 400 sq ft room — way less than pulling everything and starting over. The lesson? Wide joist spacing demands either thicker single-layer panels or a double-layer approach.
✅ Outcome: Floor stiffened up. LVP locked properly. No more bounce.
Project 4: The New Build That Passed Inspection — Barely (Phoenix, AZ — 2024)
A production builder used 19/32″ (5/8″) plywood on 16″ O.C. joists in a new build. Passed code minimum. The homeowner called me six months in about squeaking near a load-bearing wall. Turned out the subfloor was glued but not screwed in a section, and the 5/8″ was deflecting enough to release the adhesive bond.
The fix required screwing through the finished flooring and refinishing. Had they gone to 3/4″ — which is only about $320 more in materials on a 1,800 sq ft floor — the deflection differential would have likely prevented the squeak entirely.
❌ Outcome: Unnecessary callbacks from under-engineering a cheap fix.
💰 Cost Breakdown: What You Actually Pay
Let’s kill the “I’ll save money with thinner plywood” argument once and for all with real math.
Scenario
1,000 sq ft Floor
Cost Using 5/8″
Cost Using 3/4″
Difference
Material cost (sheets only)
~32 sheets
~$1,350
~$1,700
+$350
Labor (same either way)
—
$600–$900
$600–$900
$0
Cost to fix squeaks later
If it fails
$400–$2,500
Unlikely needed
—
Cost to re-tile from deflection
If tile used
$2,000–$6,000
Virtually zero risk
—
Flooring warranty (if voided)
If the MFR denies the claim
$3,000–$12,000+
Rarely voided
—
💵 Bottom line: Upgrading from 5/8″ to 3/4″ plywood on a 1,000 sq ft floor costs about $350 more. That’s the most valuable $350 in your entire flooring budget. It prevents the most common and expensive failure mode in residential flooring projects.
For standard subfloor plywood, Home Depot and Lowe’s are fine — just check the span rating stamp. For specialty thicknesses or large quantities, a local lumber yard will almost always beat the big box price on a per-sheet basis.
Amazon Picks for Subfloor Projects
These are affiliate links — they cost you nothing extra and help support this site.
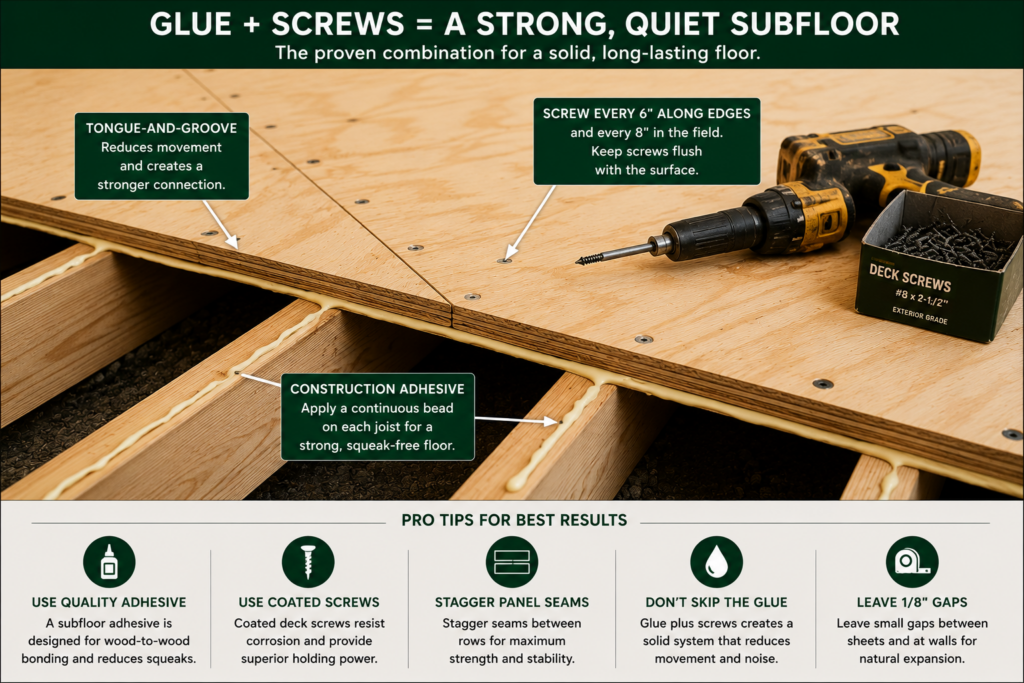
One thing I always recommend: don’t skimp on the adhesive. Gluing down subfloor panels in addition to screwing them is the single best thing you can do to eliminate squeaks — it’s not just about thickness. Use PL Premium or equivalent construction adhesive rated for subfloor applications. A few extra dollars in glue and it transforms the whole floor system.
Also, check out our breakdown of the best plywood panels for subfloor applications. Specifically, there are a few brands worth knowing about.
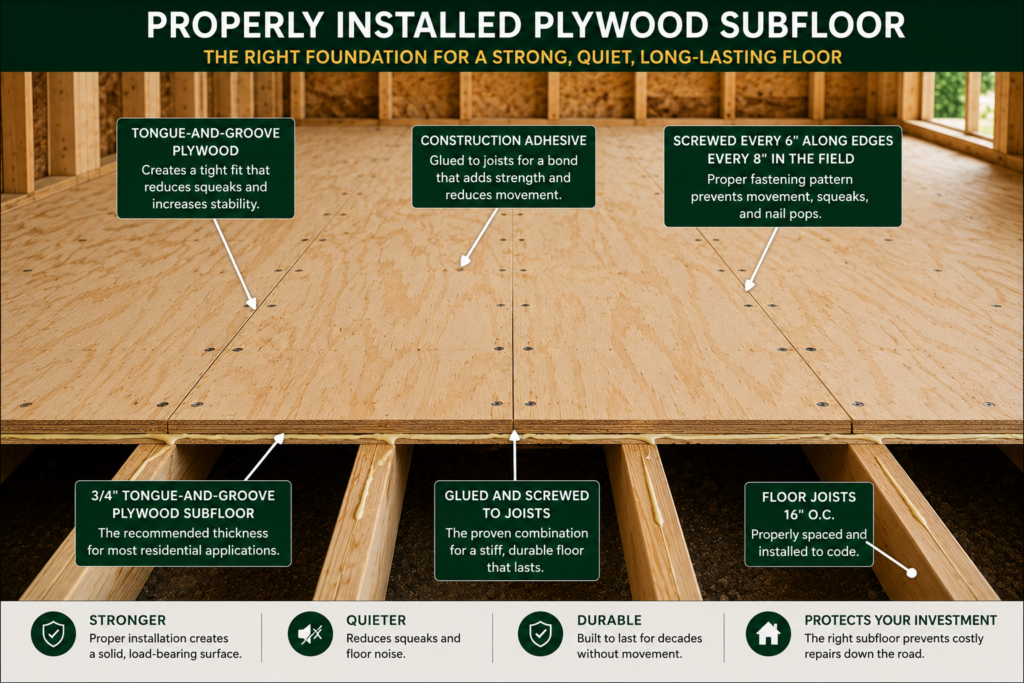
Installation Tips That Matter (Not the Usual Generic Advice)
Thickness alone doesn’t make a great subfloor. Here are the non-negotiables:
Always glue AND screw. Glue bonds the panel to the joist. Screws hold when the glue relaxes. Together, they’re bulletproof. Either alone isn’t enough.
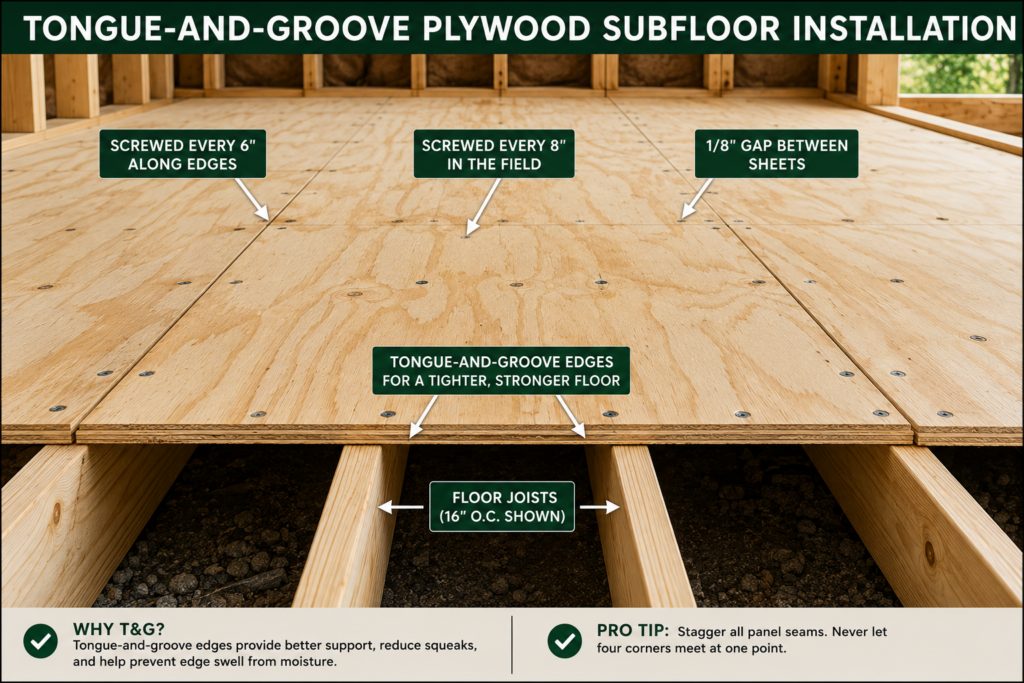
Leave a 1/8″ expansion gap between panels. Plywood expands with humidity. No gap means buckling. Tile or hardwood on top will show the damage.
Stagger your seams. Don’t align panel ends on the same joist. Offset by at least 32″ (half a sheet). This is code in most jurisdictions for good reason.
Screw every 8″ in the field, 6″ on edges. Most DIYers under-fasten. This is one area where more is genuinely better.
Check the moisture content before installing hardwood. Subfloor should be within 4% MC of the hardwood above it. This is more important than most people realize — we go deep on this in our plywood moisture content guide, including how to test on-site before flooring goes down.
Use tongue-and-groove panels on wider joist spacing. T&G edges transfer load between panels and prevent edge deflection — critical on 19.2″ and 24″ O.C. systems. If you’re unsure whether your panels are rated for your span, our span rating guide walks you through reading the APA stamp correctly.
If you’re working on a full renovation and considering other structural plywood applications, our structural plywood guide covers wall sheathing, roof decking, and more at the same level of depth.
💡 Test Before You Install: Before installing any finish flooring, walk every square foot of your new subfloor. Feel for soft spots, bouncy areas, and listen for any existing squeaks. Fix them now, before anything goes on top. Once the floor is down, repairs get 5x more expensive.
What is the best plywood thickness for a subfloor?
For most residential applications with 16″ O.C. joists, 3/4″ (23/32″) tongue-and-groove plywood is the best subfloor thickness. It meets or exceeds IRC code requirements, satisfies most flooring manufacturer warranty requirements, and provides the rigidity needed to prevent bounce, squeak, and tile failure. On 24″ O.C. joists, upgrade to 1-1/8″ T&G or use a double-layer approach.
Can I use 1/2″ plywood for a subfloor?
Technically, 1/2″ plywood is not an approved subfloor thickness under modern IRC code for typical joist spacing. Even at 12″ O.C., code requires 19/32″ (5/8″). Using 1/2″ as a primary subfloor is a code violation in most jurisdictions and will almost certainly cause problems — bounce, squeak, tile failure, and voided flooring warranties. Use 1/2″ only as an additional underlayment layer over an existing properly-rated subfloor.
Is 5/8″ plywood thick enough for a subfloor?
5/8″ (19/32″) plywood meets the IRC minimum for 12″ and 16″ O.C. joist spacing — but it’s the bare minimum, not the recommendation. For carpet or vinyl, 5/8″ is often fine. For hardwood, engineered flooring, or LVP, go 3/4″. For tile, 3/4″ is non-negotiable. The cost difference between 5/8″ and 3/4″ on an average room is $60–$100. Not worth the risk to save that amount.
What happens if the subfloor plywood is too thin?
If your subfloor plywood is too thin for the joist spacing or flooring type above it, you’ll likely experience: floor bounce or “trampoline” feel, squeaking (especially under hardwood), cracked grout lines in tile, popped or loose tiles, joint separation in LVP and laminate, voided manufacturer warranties on finish flooring, and eventually structural panel failure in extreme cases. Thin subfloors are among the most preventable and most expensive flooring problems.
Should I use plywood or OSB for subfloor?
Both work when installed at the correct thickness for your joist spacing. Plywood is preferred for wet areas, tile installations, and anywhere moisture is a concern. OSB is cheaper and works well in dry conditions when used with proper span ratings. For the small price difference, most experienced contractors default to plywood — the moisture resistance and nail-holding edge behavior are worth it. Read our full OSB vs plywood comparison for more details.
Do I need tongue-and-groove subfloor panels?
T&G panels are required or strongly recommended on wider joist spacing (19.2″ and 24″ O.C.) because the interlocking edges transfer loads between panels and prevent differential deflection at unsupported edges. On 16″ O.C. or tighter with blocking at all edges, T&G is optional — but it adds stability and is generally worth it. For tile on any joist spacing, T&G or blocking at all edges is critical.
How do I know what the joist spacing is?
Go to your basement or crawl space and measure center-to-center between joists. Common spacings are 12″, 16″, 19.2″, and 24″. If you can’t access the underside, remove a heat register or drill a small inspection hole to probe. Getting this number right is non-negotiable — everything else about your subfloor decision flows from it.
Can I add a second layer of plywood to stiffen a thin subfloor?
Yes, and in many renovation situations, this is the most practical solution. A second layer of 3/8″ or 1/2″ plywood glued and screwed perpendicular to the existing subfloor can meaningfully stiffen a marginal system — without having to tear out the existing floor. This is exactly what I recommended in the Vermont farmhouse project above. Make sure the combined thickness and span rating is appropriate for your joist spacing before relying on this approach for tile.
What subfloor plywood should I use under tile, specifically?
For ceramic or porcelain tile: 3/4″ plywood subfloor + 1/4″–1/2″ cement board (or Schluter Ditra uncoupling membrane). For natural stone: 3/4″ plywood + uncoupling membrane (Schluter Ditra or similar) to meet L/720 deflection requirements in many TCNA specs. Never tile directly over OSB without a decoupling membrane — most tile manufacturers’ warranties explicitly prohibit it.
What’s the difference between subfloor and underlayment?
The subfloor is the structural layer — it spans the joists and gives your floor system its rigidity. Underlayment is a thinner layer installed between the subfloor and finish flooring to create a smooth, flat, or resilient surface. For hardwood and LVP, underlayment may be thin foam or felt. For tile, it’s cement board or an uncoupling membrane. Don’t confuse the two — your subfloor thickness is the structural decision; underlayment doesn’t compensate for an undersized subfloor.
Final Verdict: Best Plywood Thickness for Subfloor
After everything above, here’s my no-hedging recommendation:
Use 3/4″ (23/32″) tongue-and-groove plywood, glued and screwed, on standard 16″ O.C. joists. This one decision eliminates the most common, most expensive, and most preventable subfloor failures in residential construction.
If you have 24″ O.C. joists, use 1-1/8″ T&G or double-layer. If you’re laying tile, add cement board or an uncoupling membrane on top. If you’re on a tight budget and want to use 5/8″ — at least use 12″ O.C. joist spacing and no tile. Everything else is a risk not worth taking.
The floor is the most-touched surface in your home. Every step you take, every chair you pull out, every kid who runs down the hall — it all loads that subfloor. Getting the thickness right is the cheapest insurance you’ll ever buy in a renovation project.
Have questions about your specific situation? Drop them in the comments or use our contact page. And if you’re heading into a full plywood project, our complete plywood buying guide walks you through grade, species, glue type, and sourcing quality material — everything you need before the lumber yard trip.
Marine Grade Plywood: Avoid This Costly Mistake by Admin April 7, 2026 DIY Marine grade plywood is a high-performance plywood made with waterproof phenolic glue, no internal voids, and multiple thin veneer layers. It is designed for high-moisture…