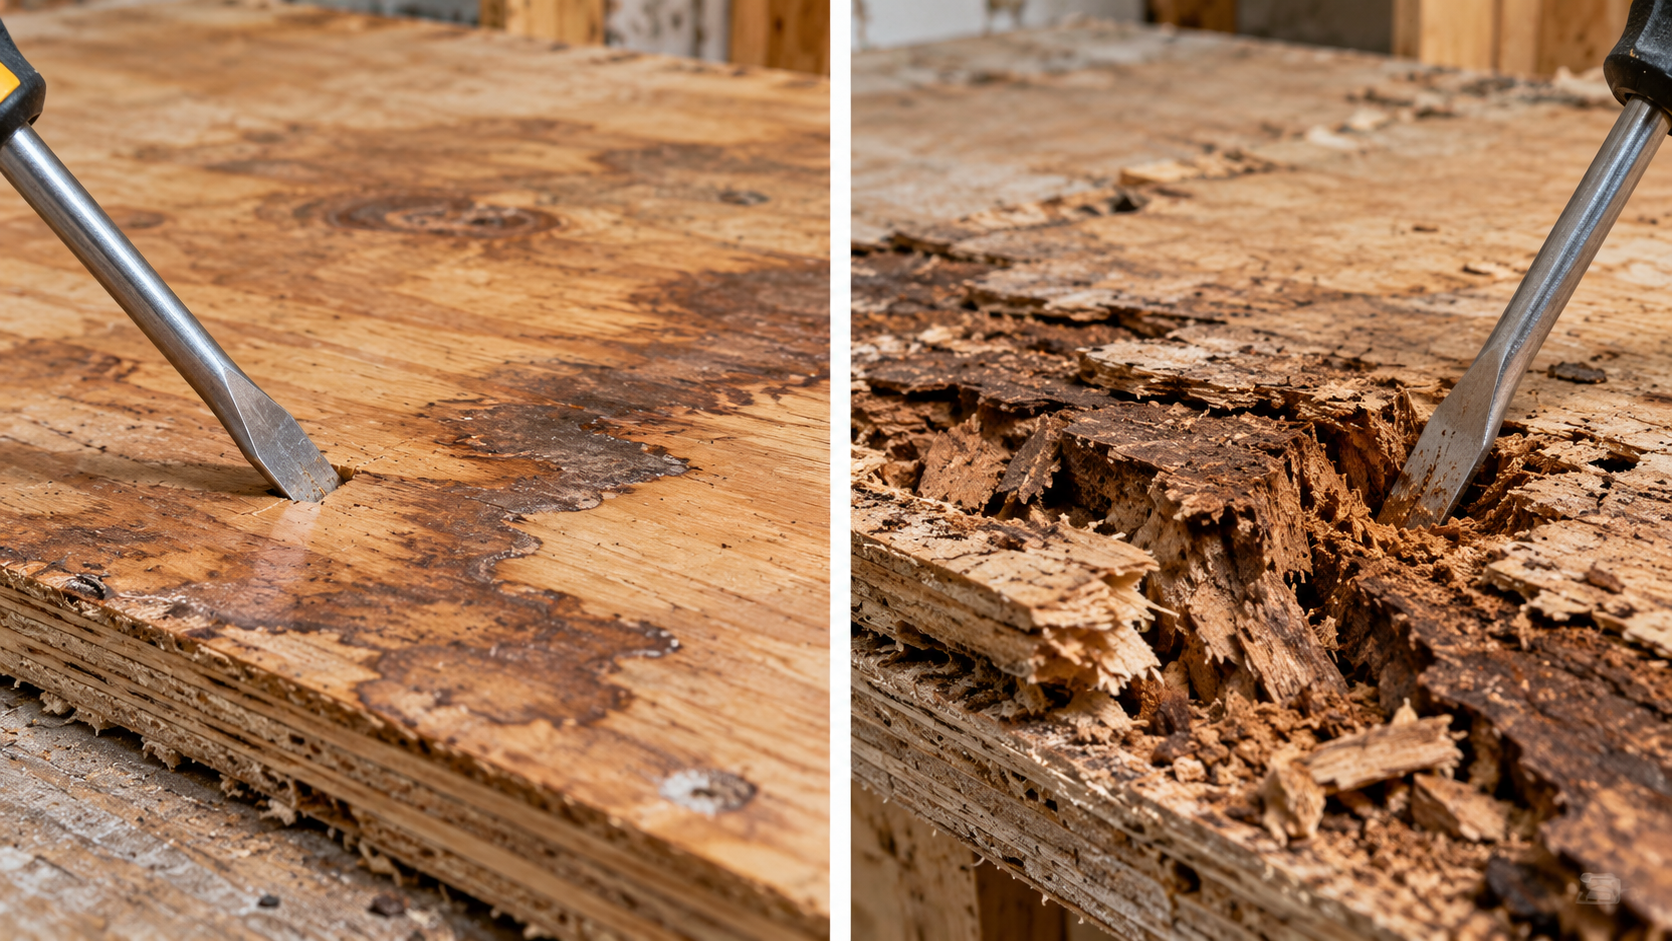
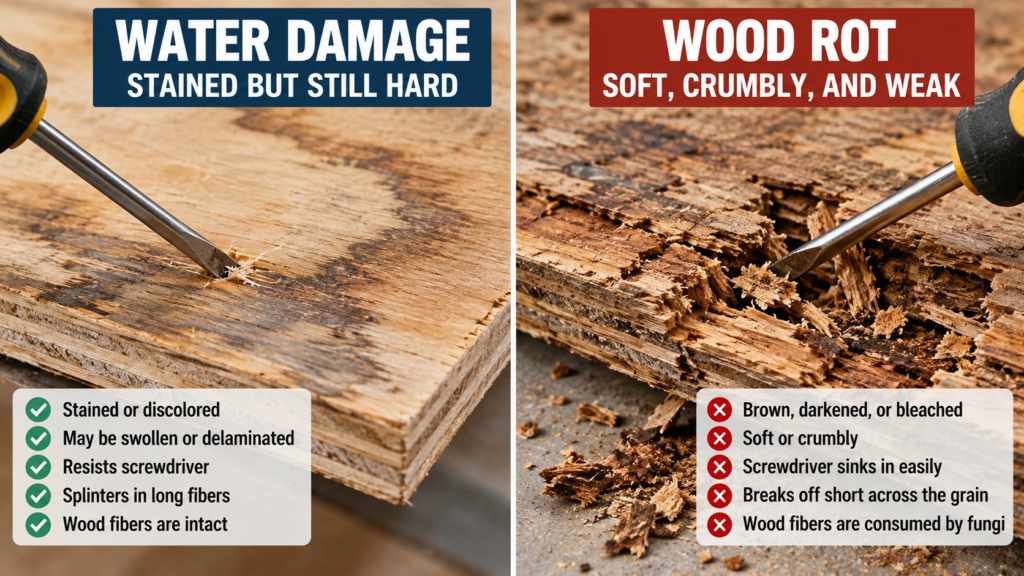
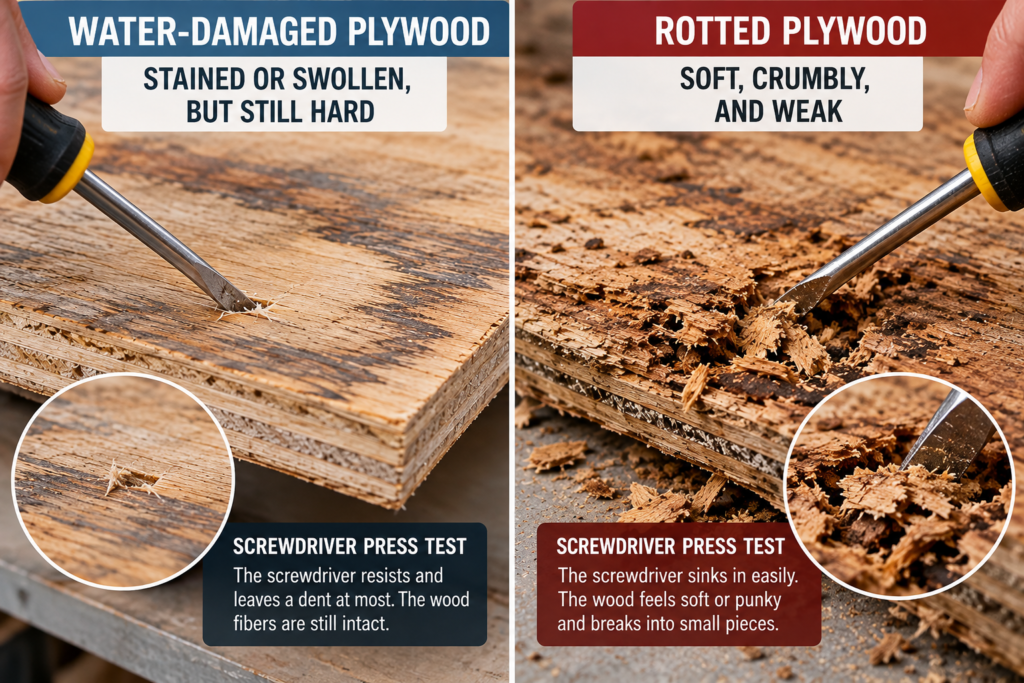
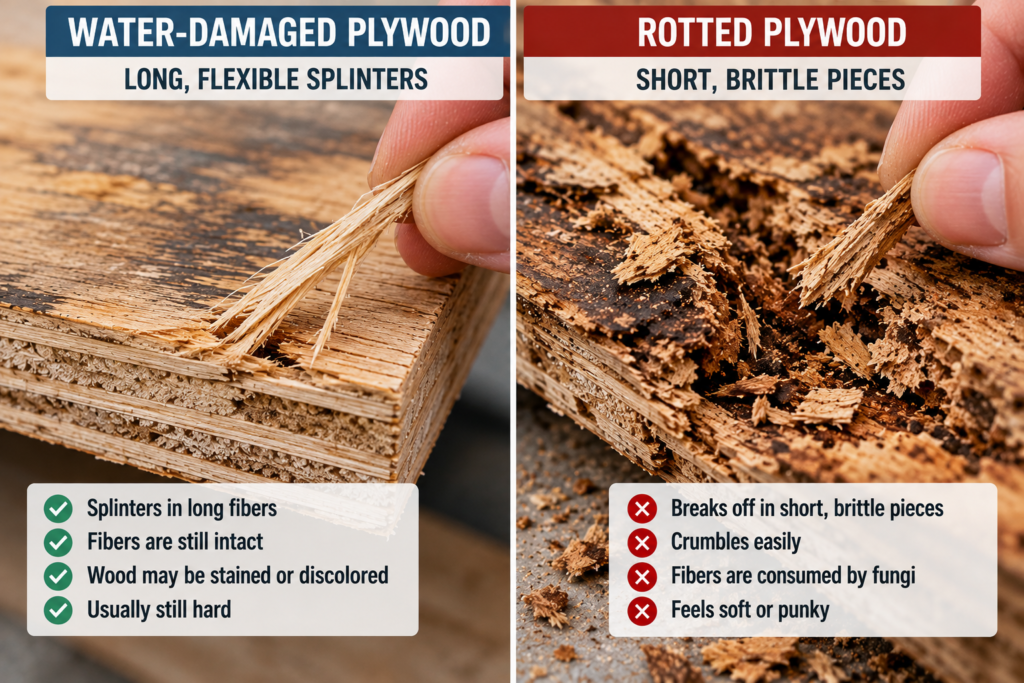
Water damage changes the plywood physically. Wood rot actually breaks down the wood fibers.
That difference decides whether you’re looking at a fan and a weekend, or a circular saw and a new sheet. The trouble is that both can look the same from a few feet away: dark stains, swollen edges, a surface that looks tired. You only see the difference when you push a tool into the wood.
⚡ Quick AnswerWater-damaged plywood is stained, swollen, or delaminated, but the wood stays hard when you press a screwdriver into it, and it splinters in long fibers. Rotted plywood is soft or crumbly. A screwdriver sinks in, and a lifted sliver snaps off short across the grain. Water damage can often be dried and kept. Rot means cutting out the decayed wood and fixing the moisture source. A moisture meter reading that stays above about 20% means conditions are right for rot to start, even if it hasn’t yet.
Water Damage vs Wood Rot: The Core Difference
What is water damage in plywood? Water damage is physical change caused by moisture. That includes swelling, staining, raised grain, warping, and glue-line failure (delamination). The wood fibers themselves are still intact, and many water-damaged panels are sound once they dry.
What is wood rot in plywood? Wood rot is decay caused by fungi that digest the wood’s cellulose and, in some cases, its lignin. The fibers are consumed, not just wet. Rotted wood loses strength and does not recover when it dries.
Can water damage turn into rot? Yes. Water damage is often the early stage of rot. If a panel stays wet long enough, decay fungi can colonize it. That’s why “it’s just a water stain” is only safe to say after you’ve tested it.
One point that trips people up: the glue in plywood and the wood in plywood are two separate issues. An Exposure 1 or Exterior bond classification tells you how well the glue holds up to moisture. It says nothing about whether the wood veneers resist decay. A CDX sheet can hold together perfectly while its plies rot. We cover that distinction in more depth in our pressure-treated vs exterior plywood comparison.
Side-by-Side: How Each One Looks, Feels, and Smells
Sign
Water damage (wood still sound)
Wood rot (active or past decay)
Screwdriver press
Resists; leaves a dent at most
Sinks in with little force; feels spongy or punky
Splinter (pick test)
Lifts a long, fibrous splinter
Breaks off short and abruptly across the grain
Color
Tide-line rings, gray or black stains, rust streaks at nails
Brown and darkened, or bleached white or pale yellow
Texture
Raised grain, surface bubbles, swollen edges
Cracked into small cubes, or stringy and spongy
Layers
Plies separate at the glue line, but each ply is hard
The plies themselves crumble or peel away in flakes
Smell
Damp, or no smell once dry
Earthy, mushroom-like, musty
Growth
Possibly surface mold (fuzzy, wipes off)
White or gray fungal strands in fan shapes; sometimes fruiting bodies
After drying
Mostly stable; stains remain
Stays weak; brown rot may crumble to powder
Delamination is the most common mix-up. When plies separate, it looks like the panel is falling apart, and people assume it has rotted. Push a screwdriver into a separated ply. If it’s hard, you’re looking at glue failure, not decay. The panel may still need replacing if it’s structural, but for a different reason and with a different follow-up.
🧪 Real Test: The 5-Minute Plywood Diagnosis
This takes a screwdriver, a sharp awl or utility knife, and ideally a pin-type moisture meter. Do the steps in order.
1. Press test
Push a flat screwdriver firmly into the worst-looking spot, then into a spot that looks fine a foot away. Compare how each one feels. Sound plywood, even when wet, pushes back. Rotted plywood lets the tip sink in, sometimes a quarter inch or more, with no crunch of fibers.
2. Pick test (the splinter test)
Wood scientists have used this for decades. Push the tip of an awl or knife into the wood at a shallow angle, then pry up a sliver across the grain.
Long splinter that bends and tears with fibers attached: sound wood.
Short piece that snaps off cleanly, like breaking a crumbly cracker: decay is present, even if the surface looks okay.
The pick test catches early rot that the press test misses, because decay fungi weaken wood well before it turns soft.
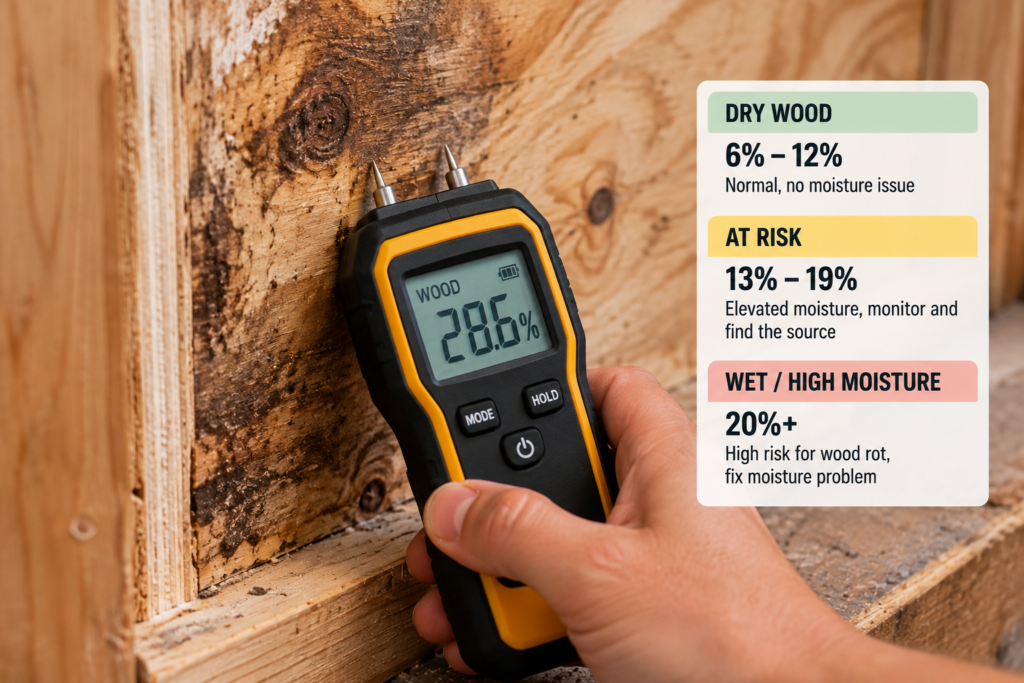
3. Moisture reading
Take readings on the damaged area and on a dry reference area of the same panel.
Pin meter reading
What it means for rot risk
Below ~15%
Dry. Any decay present is not active. Safe range for finishes and repairs.
~15–20%
Borderline. Not usually a decay range, but find out why it’s elevated.
Above ~20%, sustained
Conditions increasingly favor fungal decay. Find and stop the water source now.
~28–30% and above
Near fiber saturation. Moisture held at this level for a long time creates very favorable conditions for decay.
4. Check the edges and fasteners
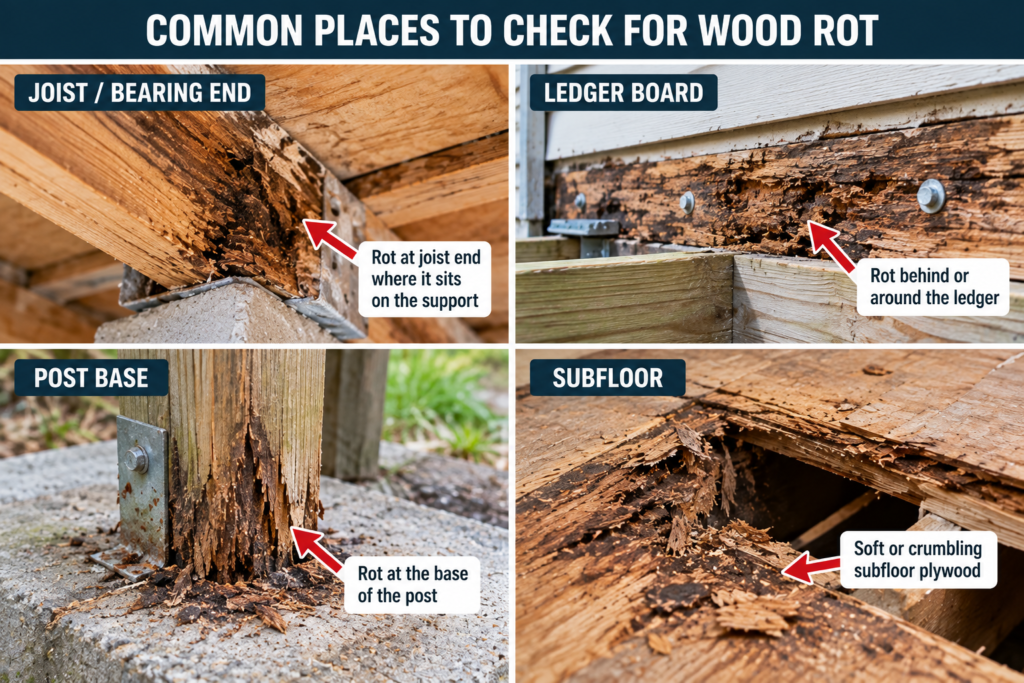
Rot in plywood usually starts where water gets in and stays: raw edges, end grain, around nail and screw holes, and low points where water collects. Probe there even if the center of the panel looks fine.
5. Look underneath (if you can)
Subfloor and roof sheathing often rot from the hidden side first. If you can reach the back through a basement, crawlspace, or attic, check it. The underside is often worse than the top.
✅ Quick Checklist: Is It Rot?
Check every box that applies:
☐ A screwdriver sinks in with light pressure
☐ The pick test breaks off short across the grain
☐ The wood is brown and cracked into cube-like pieces, or bleached and stringy
☐ You see white or gray fungal strands, or any mushroom-like growth
☐ There’s an earthy, mushroom-like smell
☐ Moisture reads above 20% and the area has been wet for weeks or longer
☐ The damage is concentrated at edges, fasteners, or a low spot
How to read your results: Some signs carry more weight than others, so don’t just count boxes.
If the plywood stays hard and gives long, fibrous splinters, rot is less likely.
If it crumbles, gives way easily under a probe, or breaks off short and brittle, decay is likely, even if that’s the only box you checked.
Several signs together, plus moisture that has lasted a long time, make the diagnosis stronger.
Structural plywood with significant softness, delamination, or flex should be inspected before any repair.
Decision Chart: What to Do Next
If you find…
It’s most likely…
Do this
Hard wood, stained or swollen, meter under 20%
Past water damage
Keep it. Seal the edges, fix the source, and treat stains cosmetically.
Hard wood, meter over 20%
Active wetting, no rot yet
Stop the leak. Dry with airflow or a dehumidifier. Retest in 1–2 weeks.
Hard plies but layers separated
Delamination
Non-structural: glue or replace it. Structural (subfloor, roof, shear wall): replace it.
Soft, but pick test gives long splinters
Swollen, saturated but sound wood
Dry fully, then run the test again. Wet wood always feels softer.
Soft and pick test breaks short, small area, non-structural
Localized rot
Dry it, remove the decayed wood, consolidate, fill with epoxy.
Soft and short breaks in structural sheathing or subfloor
Structural rot
Cut out and replace to sound framing. Check the joists and rafters behind it.
💸 The Cost Difference: Misdiagnosis Works Both Ways
People usually worry about only one mistake: missing rot. The opposite mistake costs money too.
Mistake
What you end up paying for
Calling rot “just water damage”
Flooring, paint, or trim installed over decay that keeps spreading. You pay for the finish work twice, plus a bigger tear-out later.
Calling water damage “rot”
Tearing out sound sheathing or subfloor, extra material, labor, and disposal, and sometimes pulling up finished flooring to get to it.
Treating wet rot like dry rot
Aggressive removal far past the damp zone, plus preservative treatment the job didn’t need.
Our dry rot vs wet rot guide explains why those two need different responses. The short version: wet rot generally stops when the wood dries, while true dry rot (Serpula lacrymans) can move moisture through its strands and spread past the wet zone.
❌ Four Mistakes That Turn a Small Problem Into a Tear-Out
❌ Painting over a soft spot. Painting over a soft or decayed area only hides the visible damage. If the moisture source remains, the deterioration can continue underneath the coating, where you can’t see it.
❌ Using wood hardener on wet wood. Consolidants need dry wood to soak in. On wet fibers they cure on the surface and never reach the decay. Most manufacturers want the wood at roughly 15–18% moisture content or lower first. Our wood hardener comparison covers the product-by-product details.
❌ Trusting the “Exterior” stamp to prevent rot. A bond classification rates the glue, not the wood’s resistance to decay. Exterior-glued plywood that stays wet can still rot.
❌ Fixing the damage but not the water. If the leak, splash-back, or condensation that caused the problem is still there, whatever repair you choose will fail. Find the source first.
😬 The Regret Scenario Most People Don’t See Coming
Here’s a common situation in bathroom remodels. The old vinyl comes up and the subfloor around the toilet flange is dark and stained. The stain looks old, the wood feels firm in the middle, and the schedule is tight, so new flooring goes down right over it.
What was never checked was the edge of the flange opening and the underside of the panel, where a slow wax-ring leak had kept the plywood wet for years. A year later the toilet starts to rock. By then the new floor, the underlayment, and possibly a section of joist all have to come out.
A two-minute press test at the flange edge, plus a look from the basement, would have caught it.
When to Repair and When to Replace
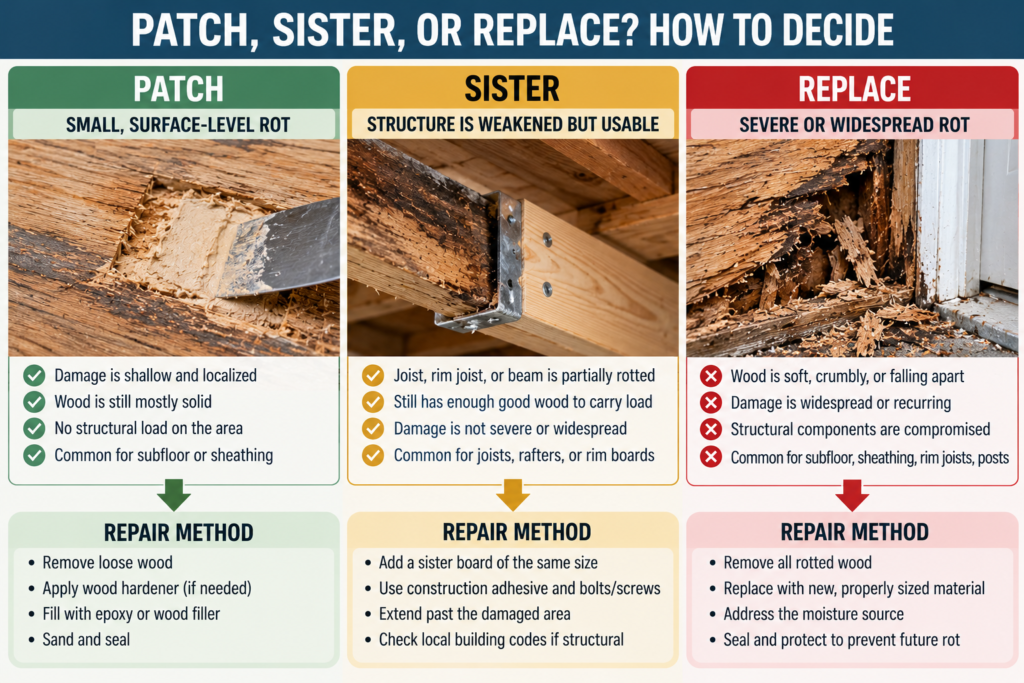
Keep and dry when the wood is hard, the plies are bonded, and the damage is cosmetic.
Repair with epoxy when rot is limited to a small area, the panel isn’t carrying structural load, and you can dry it and get back to sound wood. The typical sequence is to remove the decay, consolidate what’s left, then fill with a two-part epoxy. See our epoxy wood filler picks for products that hold up outdoors.
Replace when the rot runs through the panel’s thickness, covers more than a small patch, involves delamination in a structural panel, or sits over framing you haven’t checked yet. Our full guide to stopping wood rot before it spreadswalks through cutting out and replacing damaged plywood sections.
Tools That Make the Diagnosis Reliable
Affiliate disclosure: theplywood.com earns from qualifying Amazon purchases at no extra cost to you.
Pin-type moisture meter. This turns “it feels damp” into a number you can compare against the thresholds above. The General Tools MMD4E is inexpensive and good enough for occasional DIY spot checks. A pinless meter such as the Wagner Orion series costs more, but it scans larger areas without leaving holes, which is worth it if you’re checking finished floors or a whole run of sheathing.
Scratch awl. It works better than a knife for the pick test because the tip lifts a clean sliver. A basic scratch awl is enough.
Bright flashlight. Hold the light low and parallel to the surface to show raised grain, bubbles, and early cracking. A rechargeable LED work light is easier to work with than a phone light.
Dehumidifier. If a panel is wet but sound, drying it quickly is what keeps it from turning into rot. For enclosed spaces, a portable dehumidifier does more than fans alone.
Epoxy filler:Abatron WoodEpox can be shaped and sanded after it cures, which helps when you’re rebuilding a missing edge. PC-Woody is easy to find and works well for smaller patches.
Borate preservative:Bora-Care for bare wood next to a repair. Follow the label, since borates can leach out in wood exposed to repeated wetting.
⚠️ Limitations: When These Tests Can Mislead You
These methods work well, but each one has blind spots.
The pick test only checks the surface. Face veneers on plywood are thin. A clean splinter from the face ply tells you nothing about the core or the back ply. On any panel you suspect, probe a raw edge or a cut opening too.
Wet sound wood feels soft. Saturated fibers compress more easily than dry ones. If the press test says soft but the pick test gives long splinters, dry the panel and test again before you call it rot.
Moisture meters have calibration limits. Most pin meters are calibrated for a reference species, so plywood readings are approximate. Glue lines can affect the readings. Preservative-treated plywood often reads high because of salts in the treatment, and readings above fiber saturation (about 30%) are much less accurate. Use the meter for trends and comparisons, not as an exact measurement.
Frozen wood gives false readings. Don’t diagnose in freezing conditions. Frozen wet wood can feel hard and read low.
Paint and sealers hide the evidence. Film finishes can mask soft wood and block pin contact. Scrape a small test patch down to bare wood.
OSB is not plywood. Swelling and softening behave differently in strand-based panels. The table above is written for veneer plywood.
Don’t use this method alone when:
The soft area is structural and you have to stand on it to test it (stair treads, roof sheathing, deck or balcony surfaces). Test from below or from a ladder, and stay off it.
The subfloor around a toilet or tub has noticeable flex. Assume the framing is involved until you’ve looked.
Visible mold covers a large area. The U.S. EPA’s guidance suggests cleanups larger than about 10 square feet deserve more caution and possibly professional help.
The rot is in a load-bearing member rather than the sheathing. That’s a structural repair, and the fix may need a permit.
FAQ
How can you tell if plywood is rotted or just water damaged? Press a screwdriver into the damaged area. If the wood resists and a sliver lifts off as a long splinter, it’s water damage. If the screwdriver sinks in easily or the sliver breaks off short across the grain, the plywood has rotted.
Does water-damaged plywood always rot? No. Plywood that dries within a reasonable time usually doesn’t rot. Rot needs the wood to stay wet, generally above about 20% moisture content, for an extended period.
Is delaminated plywood rotten? Not necessarily. Delamination is the glue failing between plies. If each separated ply is still hard, it’s water damage. A structural panel with delamination usually still needs replacing.
Can you save water-damaged plywood? Often, yes, if the wood is still hard, the plies are still bonded, and you dry it quickly and fix the water source. Swollen edges may stay raised and need sanding or trimming.
What moisture level causes wood rot? Decay fungi generally need wood moisture above about 20%, and they grow best near fiber saturation, roughly 28–30%, when those conditions last over time.
Will “exterior” plywood rot? Yes. Exterior and Exposure 1 ratings describe the glue bond, not the wood’s resistance to decay. Exterior-glued plywood that stays wet can rot.