When standing in the lumber aisle, staring at rows of stacked sheet goods, making the right choice for an outdoor project can feel surprisingly high-stakes. Two options constantly dominate the conversation for exterior builds: Pressure-Treated Plywood and Exterior-Grade Plywood.
At a glance, they look similar, and both claim to withstand the elements. However, choosing the wrong one can lead to premature structural failure, warped surfaces, or wasted money.
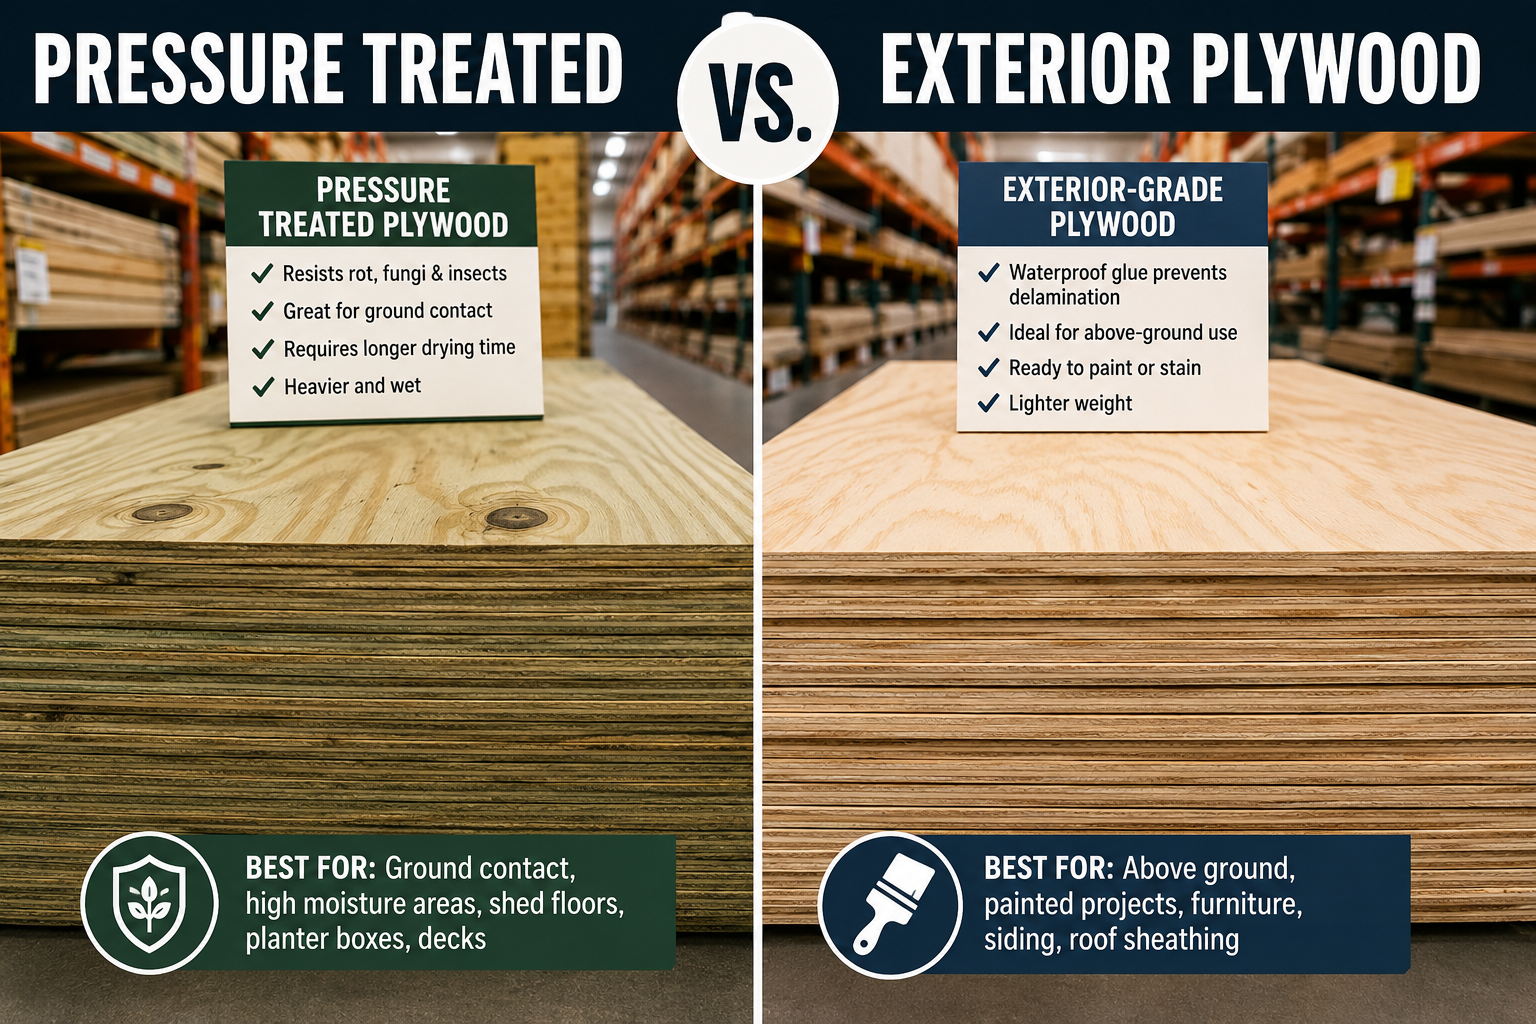
Pressure-treated plywood is best for ground-contact and high-moisture projects, while exterior plywood is better for painted outdoor projects that stay relatively dry.
The Quick Answer: Quick Reference Comparison
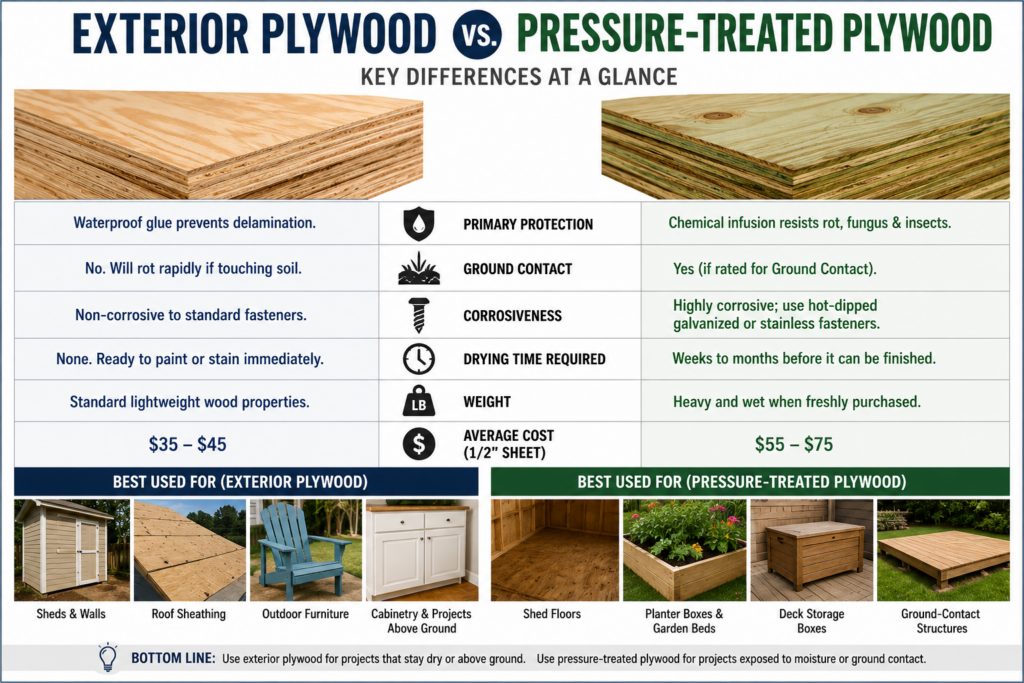
If you are at the lumber yard right now and need to make a quick decision, here is how the two materials stack up side by side.
Feature
Exterior-Grade Plywood
Pressure-Treated Plywood
Primary Protection
Waterproof glue prevents delamination.
Chemical infusion resists rot, fungus, and insects.
Ground Contact
No. Will rot rapidly if touching soil.
Yes (if rated for Ground Contact).
Corrosiveness
Non-corrosive to standard fasteners.
Highly corrosive; requires hot-dipped galvanized or stainless steel.
Drying Time Required
None. Ready to paint or stain immediately.
Weeks to months before it can be finished.
Weight
Standard lightweight wood properties.
Heavy and wet when freshly purchased.
Average Cost (1/2″ Sheet)
$35 – $45
$55 – $75
Which Exterior Plywood Grade Should You Buy?
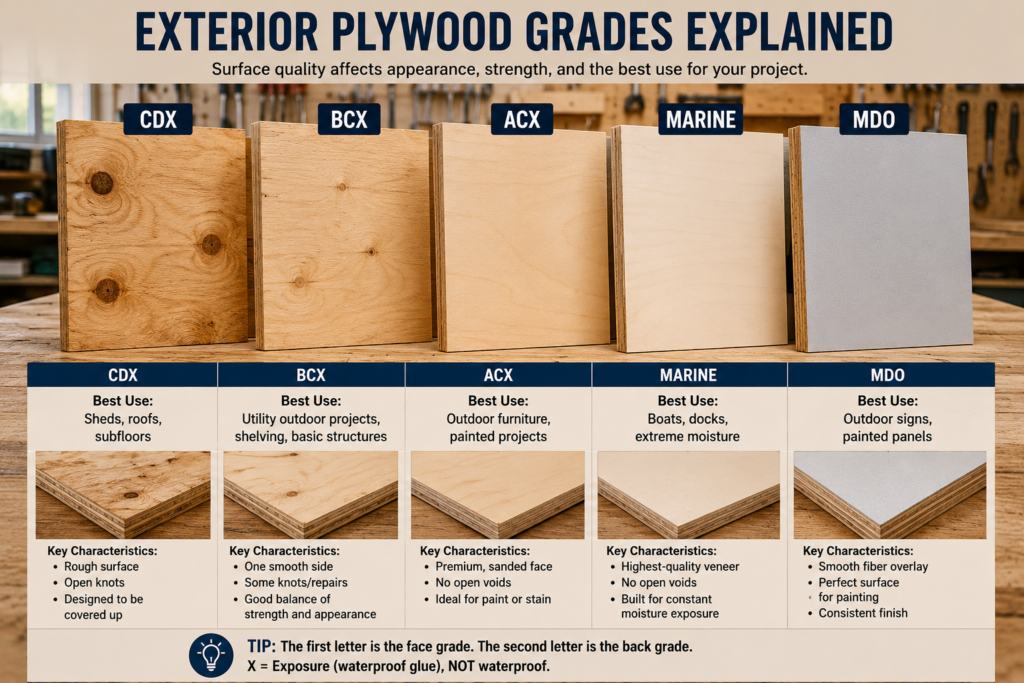
Not all exterior plywood is created equal. The face and back veneers are stamped with letters (A, B, C, or D) that denote the finish quality, smoothness, and presence of knots. Choosing the wrong grade can leave you with an ugly finish or structural weak points.
Ultra-premium plies with zero internal voids; uses the highest-grade wood.
If you are choosing a rougher utility-grade like CDX for your structural backing, it helps to understand the exact load-bearing differences before framing. Check out our comprehensive guide on understanding plywood weight factors to ensure your build stays rigid.
💸 Pressure-Treated vs Exterior Plywood Cost Calculator
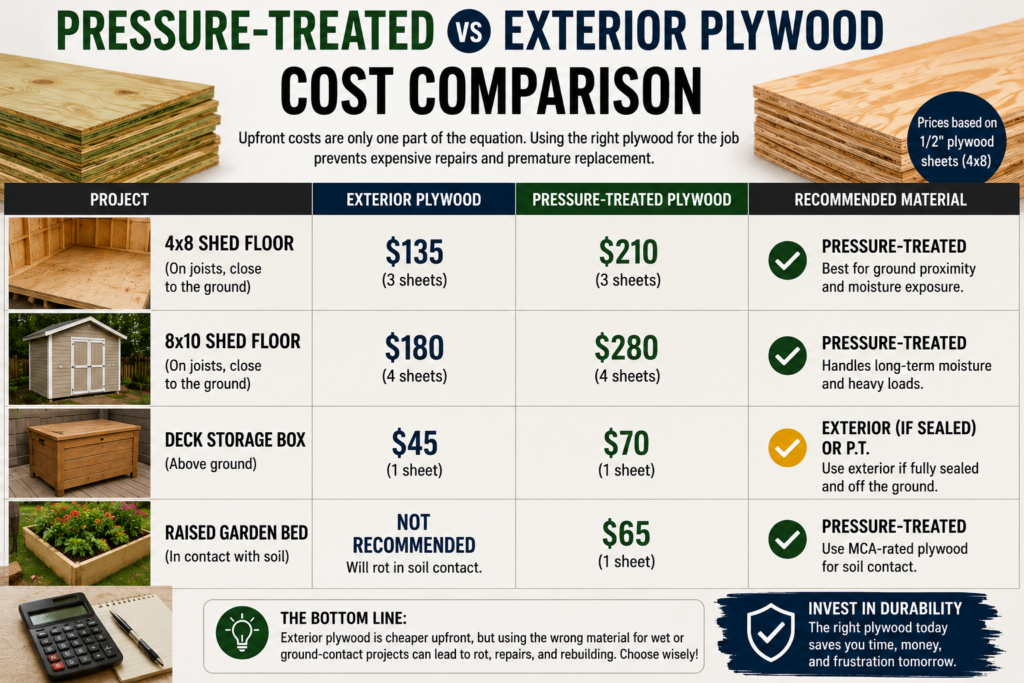
Let’s talk numbers, because the price tag on the shelf is incredibly deceptive. While a standard sheet of exterior plywood is cheaper upfront, building with the wrong material for the environment forces an expensive rebuild later.
Here is what you can expect to spend on raw sheet materials across common backyard projects:
Project
Exterior Plywood Cost
Pressure-Treated Cost
Recommended Material
4×8 Shed Floor
$135
$210
Pressure-Treated
8×10 Shed Floor
$180
$280
Pressure-Treated
Deck Storage Box
$45
$70
Exterior (if sealed) or PT
Raised Garden Bed
Not Recommended
$65
Pressure-Treated (MCA Rated)
❌ The #1 Mistake: Confusing “Exposure” with “Waterproof.”
The single biggest mistake home builders make is buying a sheet of wood stamped with a big bold “X”—usually CDX—and assuming the “X” stands for “Waterproof.”
⚠️ Critical Warning: The “X” in CDX stands for Exposure, not exterior durability.
This means the waterproof glue used between the wood veneers can handle temporary rain while a crew frames a house before the roof shingles and house wrap go up. It does not mean the raw wood fibers can withstand years of direct rain, morning dew, and snow.
If you leave raw CDX exterior plywood exposed to the elements, the layers won’t pull apart (delaminate), but the wood itself can deteriorate surprisingly quickly when exposed to repeated moisture and direct weather exposure.
😬 The True Story of My Deck Regret
A few years ago, I decided to build a large outdoor storage box that would double as a bench on my backyard deck. Trying to save a few bucks, I bought standard CDX exterior plywood instead of pressure-treated stock. I figured that since I was coating it with three thick layers of premium outdoor deck paint, it would be bulletproof.
It looked gorgeous for exactly one year.
What I didn’t account for was the bottom edge of the box. Every time it rained, water pooled slightly on the deck boards. The end grain of the exterior plywood sucked up that standing puddle from the bottom like a wick.
By season two, the paint began blistering and peeling off in giant sheets. Beneath the paint, the bottom three inches of the wood had turned into soft, spongy compost. I had to rip the entire thing apart, discard the rotten panels, and rebuild it from scratch using pressure-treated plywood. I wasted $90 in materials and a full weekend of labor simply because I picked the wrong sub-layer.
🧪 The Real-World Test: The Splash vs. The Soak
To understand which sheet you need, run your project through a simple mental test: Is it a “Splash” environment or a “Soak” environment?
The Splash Zone (Exterior Plywood)
Exterior plywood is an engineered panel glued together using fully waterproof phenol-formaldehyde resin adhesives. It is designed to handle high humidity, heavy condensation, and structural environments where the wood might get wet, yet it has ample airflow to dry out quickly.
If your wood is elevated off the ground, covered by a roof, or hidden behind siding, exterior plywood is your best choice. If you happen to encounter a warped panel during assembly, don’t panic—there are proven methods for fixing it. Learn exactly how to flatten warped panels safely without cracking the internal veneers.
The Soak Zone (Pressure-Treated Plywood)
Pressure-treated plywood goes through an entirely different structural gauntlet. Standard sheets are rolled into a massive, sealed steel cylinder called a retort.
First, a powerful vacuum sucks all the air out of the wood’s cellular structure. Then, the chamber is flooded with a chemical cocktail—usually ACQ (Alkaline Copper Quaternary) or MCA (Micronized Copper Azole). High hydrostatic pressure forces these copper-rich preservatives deep into the core of the wood grains.
The copper acts as a permanent shield against wood-destroying fungi, termites, and rot organisms. It doesn’t just resist water; it fundamentally alters the wood so that nature cannot break it down.
🛠️ Essential Tools & Materials for Construction
Outdoor construction demands specialized hardware, adhesives, and protective sealers to prevent premature failure.
Recommended Heavy-Duty Fasteners & Hardware
Modern pressure-treated chemicals are incredibly corrosive to standard steel. Standard steel or zinc-plated screws will corrode at an accelerated rate, turning into thin, rusted needles hidden inside your clean-looking wood.
Joist Protection: Protect the tops of your framing lumber by applying heavy-duty deck flashing tape on Amazon before dropping your plywood sheets down.
Waterproof Adhesives, Sealers & Safety Gear
Max-Strength Wood Glue: For raw exterior plies, use Titebond III Ultimate Wood Glue on Amazon, which offers an incredibly strong, waterproof bond.
Water Repellent Sealers: Protect raw exterior wood with Thompson’s WaterSeal on Amazon to block moisture penetration.
Premium Base Coatings: Ensure proper paint adhesion by prepping surfaces with a high-bonding exterior primer on Amazon.
N95 Professional Respirator Masks: Avoid breathing in toxic chemical dust by picking up apack of 3M N95 particulate respirators on Amazon.
🎨 Finishing Options: The Wet Wood Dilemma
One major point of friction with pressure-treated plywood is its moisture content when it comes out of the store. When you buy a fresh sheet of PT plywood, it is often incredibly heavy and cool to the touch because it is totally saturated with liquid chemicals from the treatment tank.
If you attempt to apply paint or a solid exterior stain to wet pressure-treated wood right away, the trapped moisture will try to escape as the sun warms the surface, completely blowing the paint film off the surface in ugly, blistered sheets.
The Water Droplet Test
To see if your pressure-treated panels are ready for a finish, drop a few splashes of water onto the surface:
If the water beads up and sits on top of the wood grain, the panel is still completely saturated. You must let it season in the sun.
If the water drops instantly sink down into the wood fibers and darken the color, the panel is ready to accept an exterior primer or clear sealer.
Depending on your local climate, this drying process can take anywhere from two weeks to three months. Conversely, untreated exterior plywood arrives completely bone-dry and is ready to paint, stain, or seal the exact same day you assemble it. If you need a completely unique finish, consider using an old-school recipe—read our guide on how to use vinegar and steel wool stains to safely age and patina your wood surfaces naturally.
🏆 Head-to-Head Category Winners
When matching performance to specific project characteristics, each material has clear structural and logistical advantages:
Category
Winner
Why It Wins
Rot Resistance
Pressure-Treated
Chemical infusion alters wood cells to actively reject fungal growth.
Ground Contact
Pressure-Treated
Only chemically treated wood can handle direct contact with soil.
Paintability
Exterior Plywood
Arrives completely dry; ready for primer and paint immediately.
Appearance
Exterior Plywood
Lacks the green/brown chemical tint; less prone to surface splitting.
Weight
Exterior Plywood
Lighter and easier to maneuver since it isn’t laden with tank fluid.
Cost
Exterior Plywood
Costs less per sheet upfront for situations away from ground moisture.
Wet Environment Lifespan
Pressure-Treated
Easily lasts decades longer under constant weather exposure.
🏠 My Recommendation
Use Exterior Plywood for shed walls, roof sheathing, soffits, signs, and outdoor furniture that will be painted or sealed immediately.
Use Pressure-Treated Plywood for shed floors, planter boxes, deck storage boxes, low deck platforms, and any project exposed to constant moisture or pooling water.
When in doubt, ask yourself: Will this panel stay dry, or will it stay wet? If it’s a soak environment, choose pressure-treated plywood.
❓ Frequently Asked Questions (FAQ)
Can pressure-treated plywood get wet?
Yes. Pressure-treated plywood is designed specifically for wet, high-moisture environments. It handles continuous exposure to rain, snow, and damp ground far better than untreated wood.
Is pressure-treated plywood waterproof?
No. Pressure-treated plywood is not waterproof; it still absorbs and releases water. However, the chemical treatment prevents the absorbed water from causing fungal decay, wood rot, and insect damage.
Can I paint pressure-treated plywood?
Yes, but you must wait for the wood to dry out completely. Perform the water droplet test; if the wood absorbs water quickly, it is dry enough to accept a high-quality exterior primer and paint.
In most situations where shed joists are close to the ground or exposed to persistent moisture, 3/4-inch pressure-treated plywood is the safest choice. If the floor framework is fully elevated and has excellent airflow beneath it, a thick CDX exterior plywood can be used if properly sealed.
Is exterior plywood good for outdoor furniture?
Yes, exterior plywood—specifically ACX—is excellent for outdoor furniture because it features a sanded, knot-free surface that takes paint and solid stains beautifully. It must be regularly sealed to protect the wood fibers from weather damage.
Timber vs. Lumber vs. Wood: The Critical Differences by Admin April 25, 2025 More About While often used interchangeably, Timber refers to the standing tree or unprocessed logs; Lumber refers to wood that has been sawn into standardized boards (like…


")
