The best wood hardener for rotted wood depends on the severity of the damage. For light surface rot, a single-part penetrating wood hardener is usually enough. For structural repairs, a two-part epoxy wood hardener provides a much stronger, longer-lasting repair. The key in either case is applying it only after the wood is completely dry.
I’ll save you some trial and error: not every soft, punky piece of wood needs to be torn out and replaced. If the rot is surface-level and the wood still has structure underneath the soft spot, a good wood hardener can rebuild that section so it holds a screw, takes paint, and doesn’t crumble under a fingernail again. But the product you grab matters more than most people realize, and the way you apply it matters even more than the product.
I’ve repaired dozens of porch posts, fascia boards, window sills, and deck rails over the years, and the biggest failures I’ve seen were caused by trapped moisture — not the hardener itself. Here’s what actually holds up, which products are worth buying, and where hardener simply isn’t the right tool.
J-B Weld Wood Restore (epoxy putty/hardener systems)
Combined hardening + rebuilding
Moderate
Varies by product
⭐⭐⭐⭐☆
Good for small-area structural patches
Smaller working time per batch
Our recommendation: For most homeowners repairing window sills, trim, or porch wood, a quality single-part hardener like Minwax or PC Petrifier is the best value. If you’re repairing load-bearing wood or deep rot, the extra cost of a two-part epoxy system like Abatron LiquidWood or Smith’s CPES is justified.
When NOT to Use Wood Hardener
Situation
Use Hardener?
Slightly soft trim
✅ Yes
Rotten window sill
✅ Usually
Deck board with surface rot
✅ Sometimes
Rotten structural beam
❌ Replace
Delaminated plywood
❌ Replace
If more than about a third of the wood’s cross-section is gone, or rot has reached a load-bearing connection point, hardener is treating a symptom on wood that’s already failed structurally. That’s not a savings situation anymore — that’s a liability.
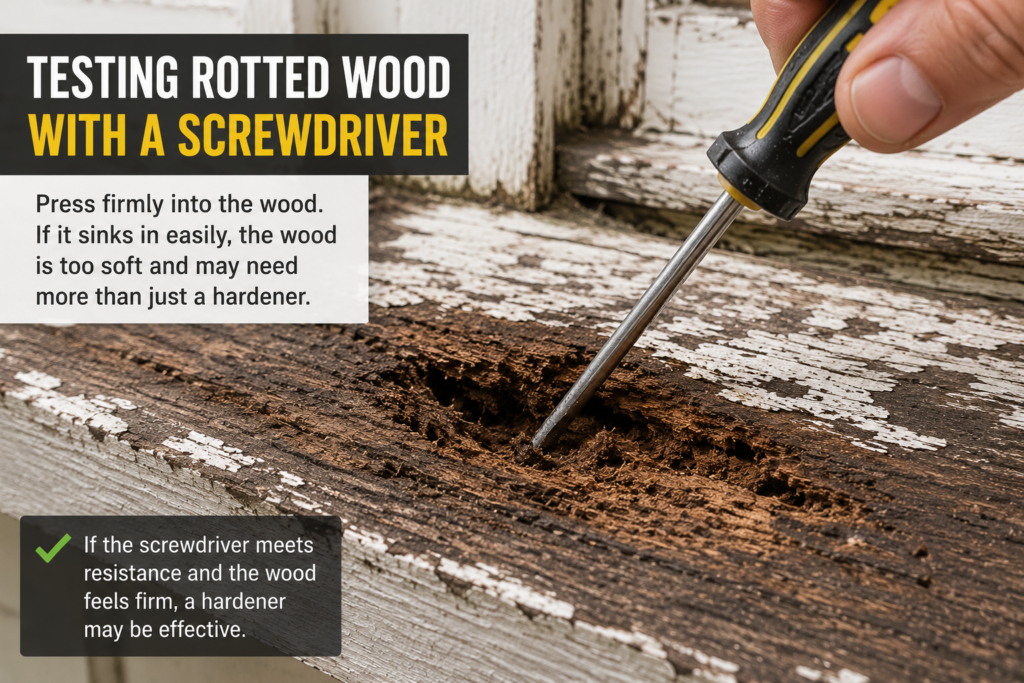
How to Tell If Hardener Will Even Work on Your Wood
Before you buy anything, do a quick field test. Press a screwdriver tip firmly into the suspect area. If it sinks in with light pressure and the wood feels crumbly or fibrous like wet cardboard, you’re likely dealing with advanced rot that’s gone past the point where hardener alone will help. If the screwdriver meets resistance and the wood feels merely soft or slightly spongy rather than mushy, that’s the sweet spot for a hardener repair.
Try to dig out material with the screwdriver tip. If you’re removing dust and small chunks but hit firmer wood within a half inch, hardener and filler will likely give you a solid, long-lasting repair. Depending on the wood species, moisture content, and degree of decay, repeated flood coats can penetrate several millimeters and sometimes approach about half an inch. If you’re hollowing out well beyond that before reaching anything solid, you’re looking at a structural repair, not a hardening job.
It also helps to know what caused the rot, since wet rot and dry rot behave differently. Wet rot remains localized to areas with consistent moisture exposure and tends to respond well to a hardener once dried out. Dry rot can spread through wood via fungal strands well beyond the visibly damaged area — meaning the soft spot you see might only be the edge of a larger problem hiding behind trim or siding. For more on telling the two apart, see our guide on dry rot vs. wet rot.
❌ The Mistake That Wastes an Entire Bottle of Hardener
The single biggest reason people think wood hardener “doesn’t work” is applying it to wood that isn’t fully dry. Most hardeners are solvent-based, and solvents don’t mix with water — they need wood fibers dry enough to actually absorb the product. Manufacturers generally recommend a moisture content of 15–18% or less before application. Apply hardener to wood that’s still wet from rot or recent rain, and the product sits on the surface, skins over, and never penetrates into the soft fibers underneath.
I made this mistake myself on a rotted deck railing years ago. I found the soft spot and applied hardener that same afternoon, right after a rainstorm. It looked fine for about two weeks, then the “hardened” wood crumbled the first time someone leaned on the rail. The wood had never actually dried out underneath; I’d just sealed moisture in.
The fix: let the affected area dry for 48–72 hours in good weather, or use a heat gun or a fan setup to speed drying in damp climates, before opening the hardener bottle.
How Wood Hardener Actually Works
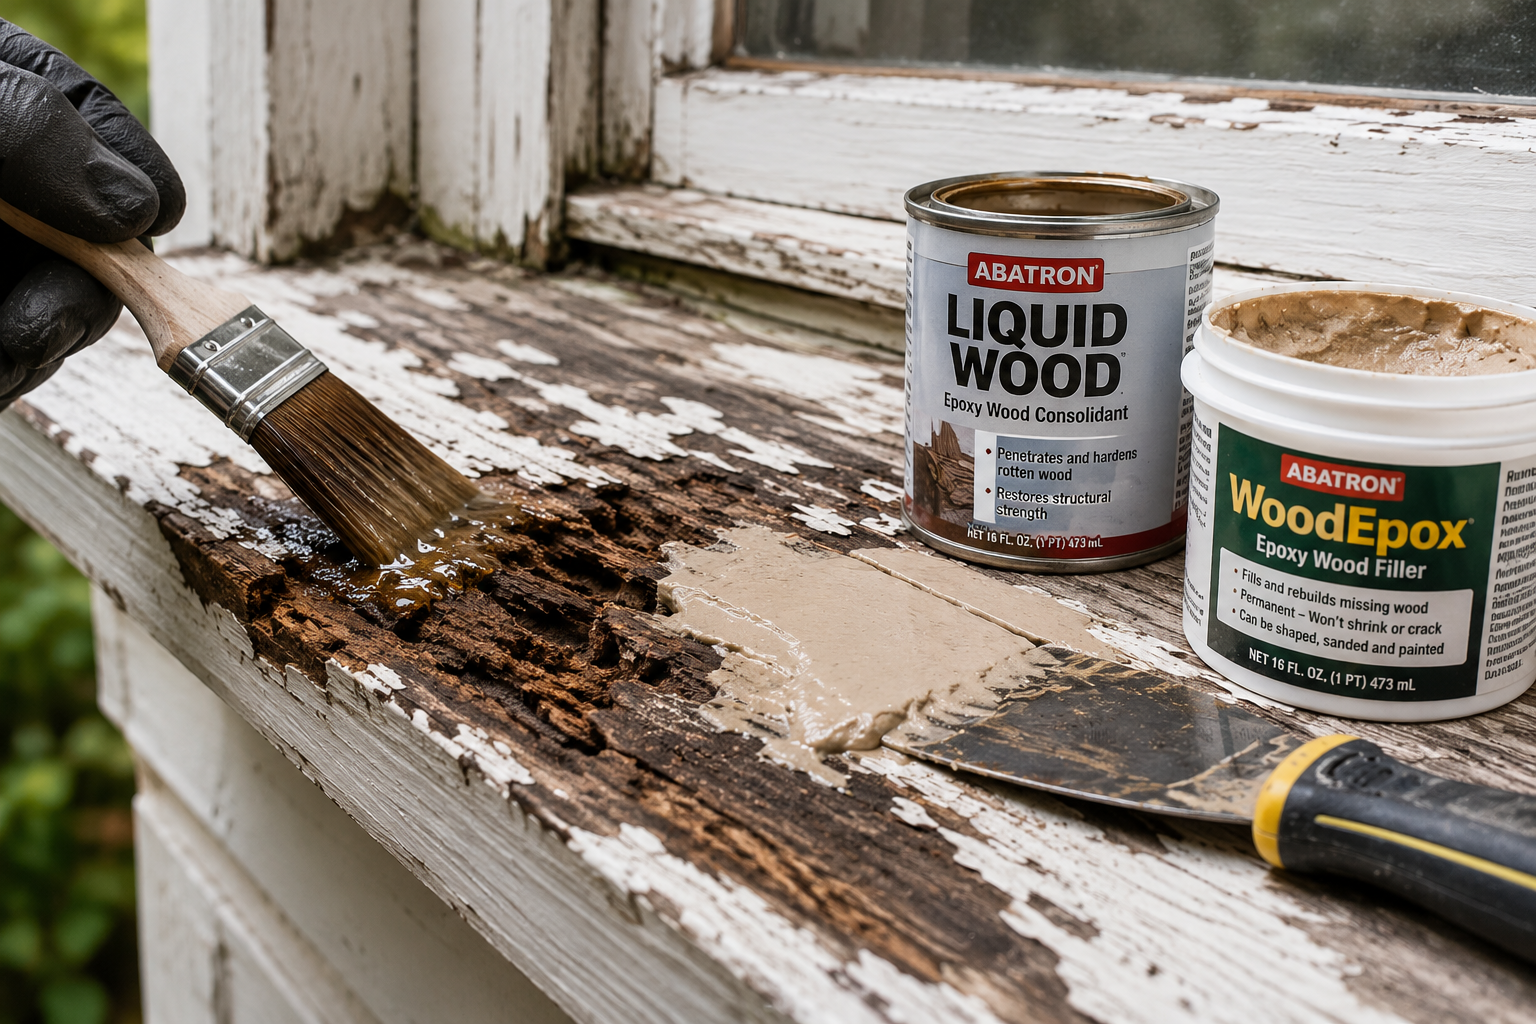
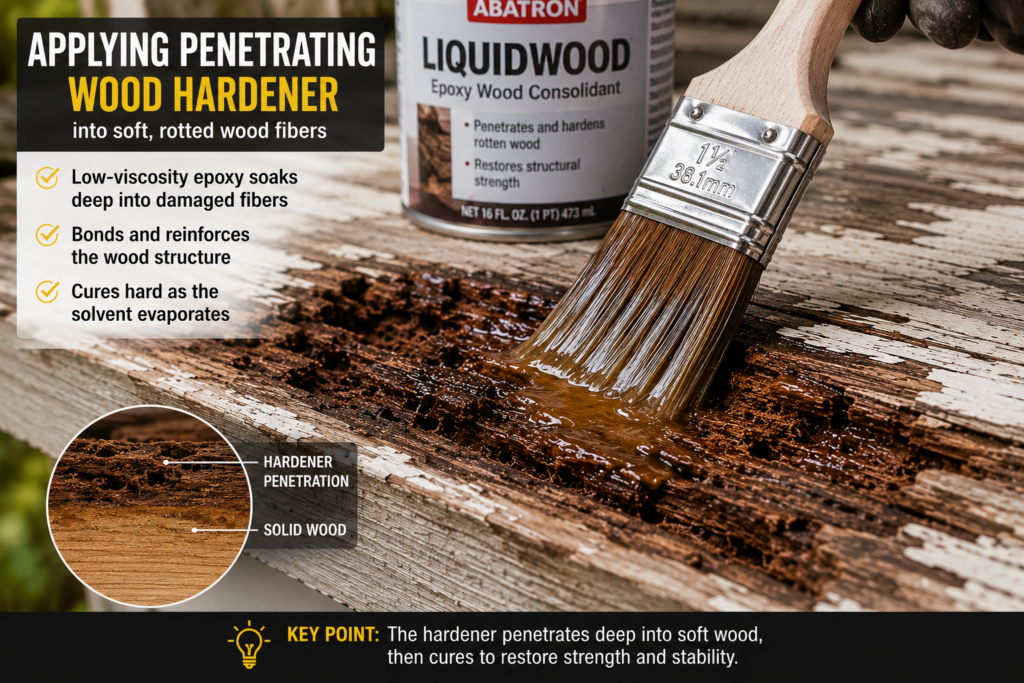
Wood hardener isn’t paint, and it isn’t glue. It’s a low-viscosity resin, usually suspended in a solvent carrier, designed to soak into punky, rot-softened wood fibers and cure into a rigid matrix once the solvent evaporates. Think of it less as a coating and more as resin infusing a sponge — the goal is for the liquid to travel as deep into the soft wood as possible before it sets.
That’s why one light coat almost never does the job. Most professional results come from multiple applications — flooding the area, letting it absorb, then flooding again — until the wood stops drinking it in. A typical 1-quart bottle covers roughly 15–25 square feet with a single coat, less on deeply punky wood that absorbs more product. If the wood “stops taking” hardener after the second or third coat, that’s your sign you’ve reached saturation, not a sign to stop early out of caution.
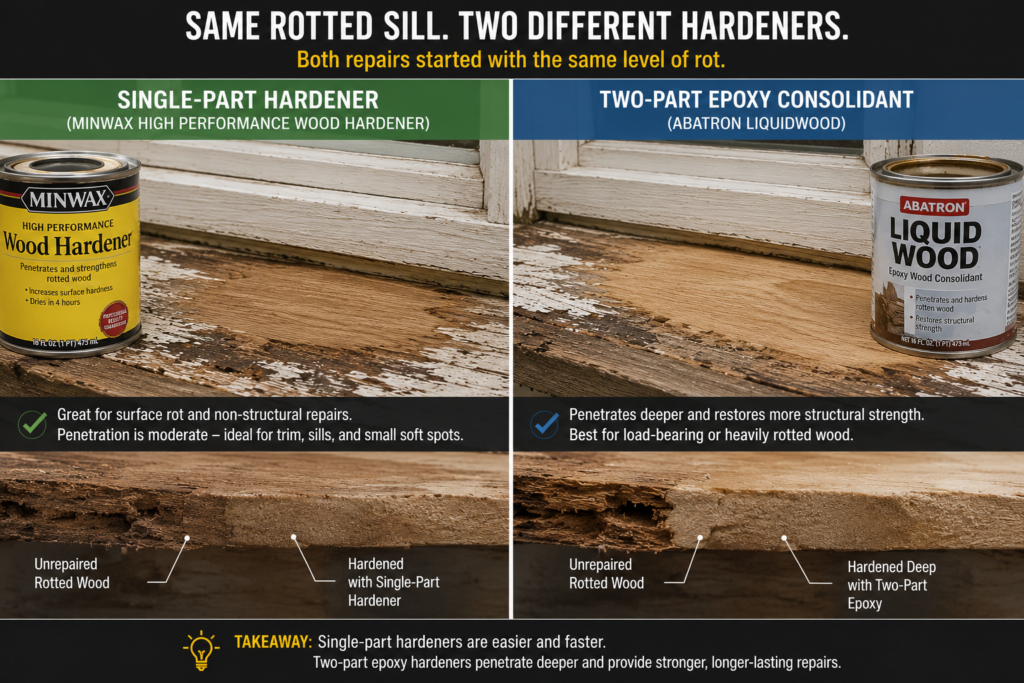
🧪 Real Test: Two Hardener Types, Same Rotted Sill
I ran an informal side-by-side a couple of years ago on a window sill that had two equally rotted sections about a foot apart — same exposure, same moisture history, same wood species. I used a single-part oil-based hardener (similar to Minwax) on one section and a two-part epoxy consolidant system (similar to Abatron LiquidWood) on the other.
The single-part hardener cured faster, in around 6–8 hours, and was easier to apply — just brush and wait. But it only penetrated about a quarter inch deep before it stopped absorbing. The two-part epoxy system took longer, with a full cure closer to 48 hours, but penetrated noticeably deeper and left a section that, several years later, still hasn’t shown any new softness.
For light surface rot, the single-part product is genuinely fine and a lot less hassle. For anything structural, or anywhere you’re loading weight onto the repair, the two-part epoxy system earns its higher price and longer cure time.
💸 Cost Difference: Hardener Repair vs. Full Replacement
This is where wood hardener earns its place in a toolbox. A bottle of hardener typically costs $20–$40 — roughly the price of a single replacement board or trim piece in material alone. The real savings show up in labor and disruption.
Replacing a rotted window sill usually means removing trim, possibly disturbing the window unit itself, fitting and finishing new wood, and repainting a larger area to match — often a multi-day job once you factor in cure and paint time. A hardener-and-filler repair on the same sill, done correctly, can often be finished in an afternoon with no demolition at all.
On a porch post or structural trim piece, the difference is even bigger, since structural carpentry work runs significantly more per hour than a repair-and-paint job. Replacement costs on a load-bearing post repair can easily run several hundred dollars in labor alone, versus a fraction of that for a hardener-and-filler approach when it’s an option.
Repair
Typical Cost
Hardener only
$20–40
Hardener + filler
$40–80
Replace trim
$150–400
Replace window sill
$300–800
Structural repair
$500+
⚠️ Warning: When Hardener Treats the Symptom, Not the Cause
Wood hardener consolidates and stiffens existing wood fiber. It does not replace missing wood, and it does not stop active moisture intrusion. If you harden a section of wood but the original water source — a failed gutter, missing flashing, grade sloped toward the foundation — is never fixed, the rot will simply start again next to the repair, often within a season or two.
I’ve seen this exact callback more than once: someone hardens and fills a sill or post, the repair looks great, and eighteen months later they’re calling about a “new” soft spot two inches from the old one. It’s almost never a new problem. It’s the same water source finding a new entry point.
Before you reach for hardener, find and fix whatever let water into the wood in the first place. Applying the hardener is often the easiest part of the repair. Diagnosing and fixing the water source is the harder part that actually prevents a repeat repair.
😬 Regret: Skipping the Filler Step
A lot of people treat hardener as the finish line. Apply it, let it cure, paint over it, done. That’s a mistake that shows up later, usually as a slightly sunken or uneven patch once the paint film ages and shrinks.
Hardener stiffens what’s there, but rotted wood has usually lost some volume and surface integrity even after hardening. Following the hardener with a two-part epoxy wood filler — Abatron’s WoodEpox is the standard pairing for their LiquidWood hardener — lets you rebuild the missing shape, sand it flush, and get a surface that actually holds paint the way the surrounding original wood does. Skip this step, and you’ll likely be back out there within a year or two, wondering why “the repair” looks worse than the rot did.
Common Mistakes Table
Mistake
Result
Applying to damp wood
Poor penetration
Only one coat
Weak repair
Skipping epoxy filler
Uneven surface
Painting before full cure
Paint failure
Ignoring moisture source
Rot returns
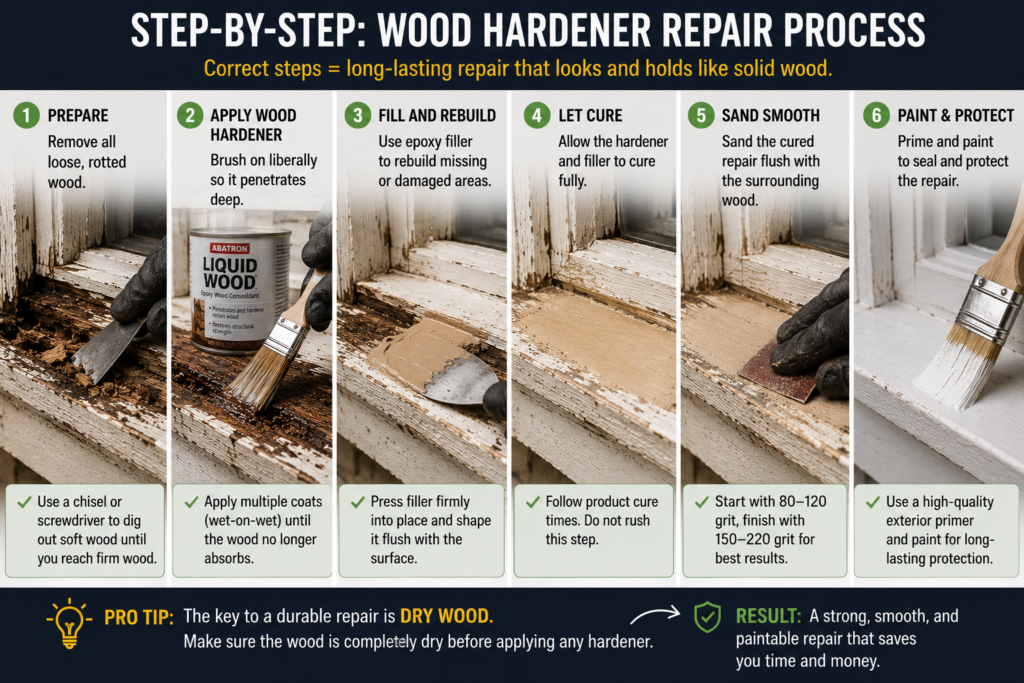
Step-by-Step: How to Apply Wood Hardener Correctly
Remove loose, crumbling material. Use a screwdriver, wire brush, or rotary tool to scrape out anything soft enough to flake away, exposing sound wood fiber even if the hole looks worse before it looks better.
Let the area dry fully. 48–72 hours minimum in dry weather, longer in humid climates, or use forced air/heat to speed it up. Aim for a moisture content under roughly 15–18%.
Apply the first coat generously. Brush or drip hardener directly into the punky area until it stops absorbing.
Wait, then reapply. Most products need a second or third flood coat once the wood stops visibly drinking in the liquid.
Let it cure fully per the product’s instructions, typically 24–48 hours for epoxy systems and as little as 6–8 hours for single-part hardeners.
Fill any remaining voids with a matched epoxy wood filler, shaping it slightly above the surrounding surface.
Sand flush, prime, and paint once the filler has fully cured — painting too early is one of the most common causes of repair failure.
FAQ
Can wood hardener fix completely rotted wood? No. A wood hardener works on punky, softened wood that still has structural fibers present. If a section has completely lost its wood structure — crumbling to dust or hollowed out — that area needs to be cut out and replaced rather than hardened.
Does wood hardener stop rot? No. Wood hardener strengthens weakened wood fibers but does not kill active fungus or eliminate the moisture causing the rot. Always fix the moisture source first before applying hardener.
How long does wood hardener last once applied? A properly applied hardener repair, especially when followed with epoxy filler and paint, can last as long as the surrounding original wood — often well over a decade — as long as the original moisture source has also been fixed.
Is two-part epoxy hardener better than single-part hardener? For structural repairs or load-bearing wood, yes — two-part epoxy systems like Abatron LiquidWood penetrate more deeply and cure more strongly. For light surface rot on trim or sills, a single-part hardener like Minwax or PC Petrifier is usually sufficient and far easier to apply.
Do I need to seal wood after using a hardener? Yes. Hardener and filler repairs should always be primed and painted, or sealed if it’s a natural-finish piece, to protect against future moisture intrusion. An unsealed repair is exposed to the same conditions that caused the original rot.
How many coats of wood hardener do I actually need? Most repairs need two to three flood coats, applied wet-on-wet until the wood stops absorbing the product. A single coat is rarely enough to fully saturate punky wood fiber, which is the most common reason people end up disappointed with the results.
Can I use a wood hardener on plywood, or only on solid lumber? Wood hardener works on plywood as well, though penetration behaves a little differently because of the layered grain structure. It’s especially useful on plywood subfloors, siding, or sheathing with isolated soft spots, as long as delamination between plies hasn’t progressed too far. If the plies themselves are separating, filler and hardener won’t restore structural integrity — that section needs to be cut out and patched with new exterior plywood instead.
Penetration depth — how deep the product travels into punky wood with repeated coats
Cure time — single-part hardeners cure faster; two-part epoxy systems take longer but build more strength
Indoor vs. outdoor use — some formulas are rated specifically for exterior exposure
Compatibility with epoxy fillers — using a matched hardener/filler system gives the most consistent results
Paintability — check whether the cured surface needs a specific primer type before topcoating; this matters for how the repair holds up once you move into exterior finishes and paint
VOC level — relevant if you’re working indoors or in an enclosed space with limited ventilation
For more on preventing rot before it starts, see our full guide to stoppingwood rot permanently. If you’re not sure whether your wood is salvageable at all, our article on can rotting wood be saved? walks through the decision in more detail. If the rotted section is structural, our comparison of marine plywood vs. pressure-treated wood covers which materials resist this kind of damage in the first place.
Final Thoughts
If the wood still has solid fibers beneath the surface, a quality wood hardener can extend its life for many years. But no hardener can repair wood that has already lost its structural strength. Fix the moisture source first, let the wood dry completely, then choose the right hardener for the repair. If done correctly, you’ll spend far less than it would cost to replace the entire piece.
Related Posts:
Best Practices for Using Mineral Spirits on Wood by Admin May 20, 2025 Finish . Looking to clean old wood or prepare it for stain? Mineral spirits offer an easy, safe, and effective method for refreshing wood without damage.…


")


")