Adding a deck to a home is one of the most effective ways of adding value to it. More of the cost of the deck is recouped upon resale, than just about any other remodeling project that can be done. At the same time, it offers a lot of enjoyment to the family, creating a space to relax, eat, have cookouts and a host of other outdoor activities.
Building a deck is not that complicated a project, making it possible for even a beginner do-it-yourselfer to complete this project. The biggest concern is getting the posts in place to act as footers and then attaching the floor joists level and parallel. Once that’s done, the decking is easy.
One thing that any deck builder should do, as part of their project planning, is check with the office in their city which issues building permits. Some municipalities require a building permit for the construction of a deck, because it contains structural elements. Even though it is outside the home, it is still attached to the home, triggering governmental interest in whether or not it is safe. If they do have a permitting requirement, make sure to ask what sorts of code requirements the city has for decks, to ensure that there aren’t some special requirements over and above the universal building code.
Other than that, the big concern for a lot of deck builders is building stairs. That’s understandable, as to many, how well a carpenter can build a staircase tells how good a carpenter they are. Yet building a staircase really isn’t all that hard, if one knows what they are doing. It’s even easier on a deck, where the staircase doesn’t have to be as finely finished as it is indoors.
Rise & Run, the Keys to Stair Construction
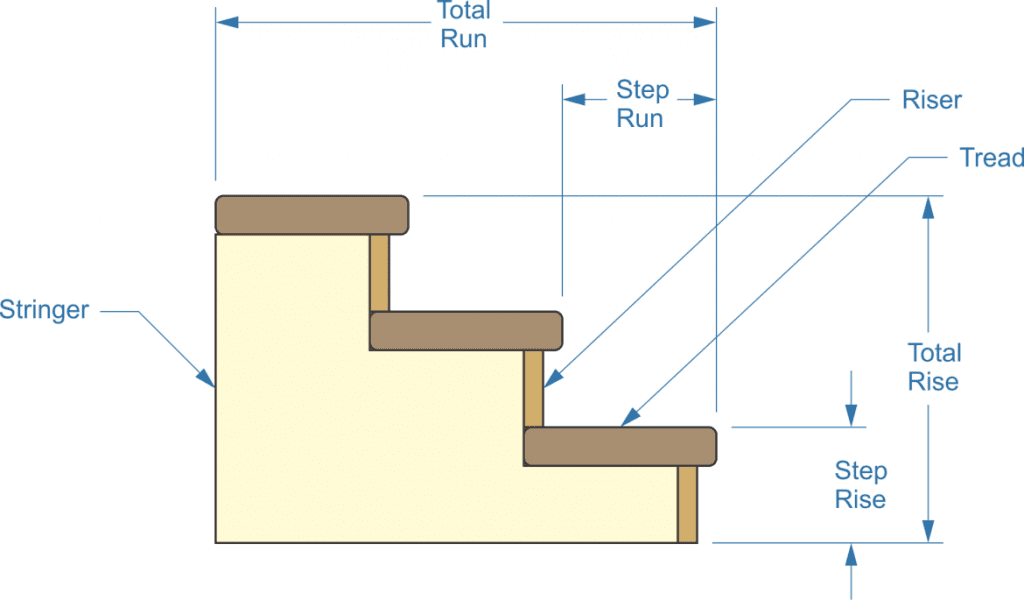
Regardless of the kind of stairs being built, the real key to designing and building any staircase is understanding rise and run, as these two items determine the staircase’s design. Simply put, the rise of any step is the height of one step above the next lower step. In a similar manner, the run of the step is the depth of each step in sequence. It is extremely important that the rise and run of each step in a staircase be the same, as variations in the rise or run can cause tripping hazards.
Stair rise & run
While it is theoretically possible to make stairs with any rise or run that might be desired, building code limits step rise to 7 ¾” and requires a minimum step run of at least 10”. Going farther than that, there is a limited range of rise and run combinations, which produce stairs that are easy to climb and don’t constitute a tripping hazard. Through the combined experience of many, it has been determined that a combined rise and run of 17” to 19” is idea. Any more or less can cause perception problems, leading to the steps being a trip hazard.
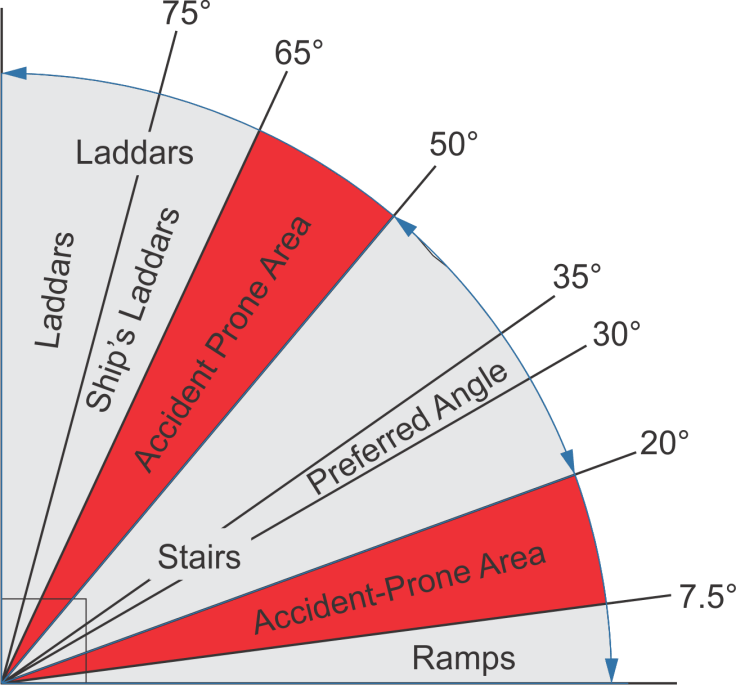
The diagram below shows the ideal angle for any stair, including deck stairs. Not all stair combinations that follow the “rule of 18” (rise and run equaling 18” ± 1”) fit into that area. Public buildings and open areas may have deep, shallow staircases which equal 18”, but don’t fit that area. But the “ideal” staircase with a 7” rise and 11” run fits perfectly into the preferred angle.
Ideal stair angle
When designing any stair, even if it is only two steps tall, start out by measuring the total rise and run. If tile or any other floor covering is to be added, be sure to include the thickness of that in the measurement of the rise. This information can be fed into an online step calculator, or you can divide this rise by 7. The answer will probably not work out to a whole number; but round it off, then take that number and divide it into the total rise. This will give you a rise for the stairs.
Example:
Total rise is 23”
23 ÷ 7 = 3.29
Round down to 3
23 ÷ 3 = 7.67” Step rise
That number we rounded down to, which is underlined in the example above, is the number of steps we will be using. To calculate the run for the steps, we take that number and divide it into the total run for the stairs.
With the rise and run calculated, it’s time to cut the stringers.
Using Commercial Staircase Stringers
The easy way to build a stair is to buy pre-made staircase stringers. The only problem with that is that unless the staircase being built fits the commercially manufactured stringers, the resulting staircase is going to end up with one step that has a rise that is either higher or lower than the others, creating a trip hazard. The other option with a commercial step stringer, if it is close to the desired height, is to mount it, allowing the steps to have a slight angle. Building code allows for a stair slope of up to 2°.
The other option is to pour a cement pad at the bottom of the stairs, which can be made to the desired thickness so that the commercial staircase stringers work out to the right height. If the stairs are leading from one level of a deck to another, then the deck can be designed to allow for that.
Cutting Patio Staircase Stringers
Stringers for the patio stair are normally cut from 2”x 12” dimensional lumber. If they are going to be in contact with the ground, use pressure-treated lumber, so that it doesn’t decay as quickly. Once the rise and run of the stairs is known, laying out the stringers is actually quite easy, if a framing square is available.
Stringer layout
Mark the run and rise on the legs of the framing square. There are special clamps that are made for this purpose, helping to maintain perfect repeatability. But with care, those don’t have to be used. With the square marked, the two points can be placed on the edge of the 2”x 12” to mark the cutout for one step. Moving the square so that the run mark on the square is at the point of the run mark and realigning the run mark with the edge allows another step to be marked. Repeat as necessary.
The ends of the stringer are the same angles as the rise and run, just terminating the pattern. At the top, the cutoff line can be made by extending the last rise line and at the bottom, the cutoff can be made by flipping the square around, to make the last rise perpendicular to the step run. The bottom of the stringer is parallel to the run.
Nevertheless, that last rise at the bottom should be shorter than the rest, by the thickness of the step tread, as shown by the red line in the diagram above. If 2” dimensional lumber is being used for the step tread, then the framing square can be laid on the ground line and a line marked on the opposite side, as the width of the framing square’s legs matches 2” dimensional lumber.
Cut out the stringer using a circular saw, stopping sort of the inside corner. Those will need to be cleaned out with a jigsaw. The first stringer can then be used as a template to lay out and cut more stringers. paint all the cut edges with a waterproofing compound, as the pressure treatment of the lumber probably won’t penetrate all the way through it.
Building the Stairs
The first step in building the stairs is to install the stringers. Stringers should not be more than 24” apart, but can be as close together as 12”. The ends of the steps can’t cantilever over the outermost stringers by more than 12”. Most people use standard construction divisions for installing their stringers, putting them every 16” or 24” apart. But if the width of the staircase is an unusual dimension, it might make more sense to just divide the width between the stringers in half and place a center stringer in the middle.
Stringers can be attached to the deck in one of two ways. If the edge of the deck provides exposed joists that the stringers can be attached to, they can be nailed directly to those joists. But if there is a header going around the perimeter, it is easier to use metal brackets, similar to joist hangers, but without the bottom, to hold the two together.
Cut all the step treads and dry fit them in place, before attaching any of them, especially if there is a corner and step treads must align with each other. Once fit is verified, then the treads can be attached to the stringers with deck screw, a wood screw with a hard, rustproof finish. Additional deck screws may need to be installed at corners, holding the tips of the corners together.
Related Posts:
Building Landings For Deck Stairs by Amy Reed February 28, 2023 DIY A landing is a flat pad, usually made of concrete, gravel, flagstone, bricks, or pavers, that appears at the bottom of deck stairs. It’s designed…
How to Make Stairs Less Slippery by Admin May 4, 2022 Installing Over one million accidents per year happen on home stairways. This accounts for up to 36 percent of all in-home accidents and includes 12,000 accidents…