One of the big things that make the difference between an average looking home and a rich looking one is the details. Choices in wood trim, whether or not to install crown molding, hardware, light switch plates and curtain brackets can make even a fairly ordinary home look like much more than it is. On the flip side of that coin, leaving those details out or choosing cheap variants can make even an expensive home look cheap.
While it can be expensive to buy all those details, there are some things that one can do themselves, saving us money, while still making out homes look fancy. For those of us who are woodworkers, this mostly means doing fancy things with wood. Fortunately, there are a lot of fancy things we can do with wood, even with low-cost wood, which will help us make our homes look better.
One such project is making wooden curtain brackets for the curtains in the home. Many people try to save money, sticking with the el cheapo metal curtain brackets we see everywhere. But, while those will hold the curtains up, they don’t do much to add to dressing up the window. But buying nice curtain rods and brackets can add up to quite a pretty penny, especially when we consider just how many windows there are in a home.
Doing a quick search on Google, it’s possible to find a lot of curtain rod brackets. Most of them are metal, but there’s a fair collection of wood ones as well. There is also a fair selection of wood curtain rod finials. Added to the ends of the curtain rods and used with wood brackets, they can do a lot to dress up any window.
But then, we’re not about buying something that comes from a store; we’re about making our own. Is this possible? Not only is it possible; but it is extremely easy, especially for the curtain rod brackets. Finials generally require a lathe to make, but it is even possible to make a few designs using nothing more than a router.
Making Wooden Curtain Brackets
Wooden curtain brackets can be made out of just about any type of wood, but I’d recommend an inexpensive hardwood, such as poplar; normal ¾” thick boards should do just fine. While softwoods can be used, it will be much harder to get a clean cut on the edges, especially if the edges are routed.
The process starts out by laying out a pattern for the brackets. I personally use an old version of Corel Draw for this; but it can be done with any vector drawing program, CAD program or even with pencil and paper.
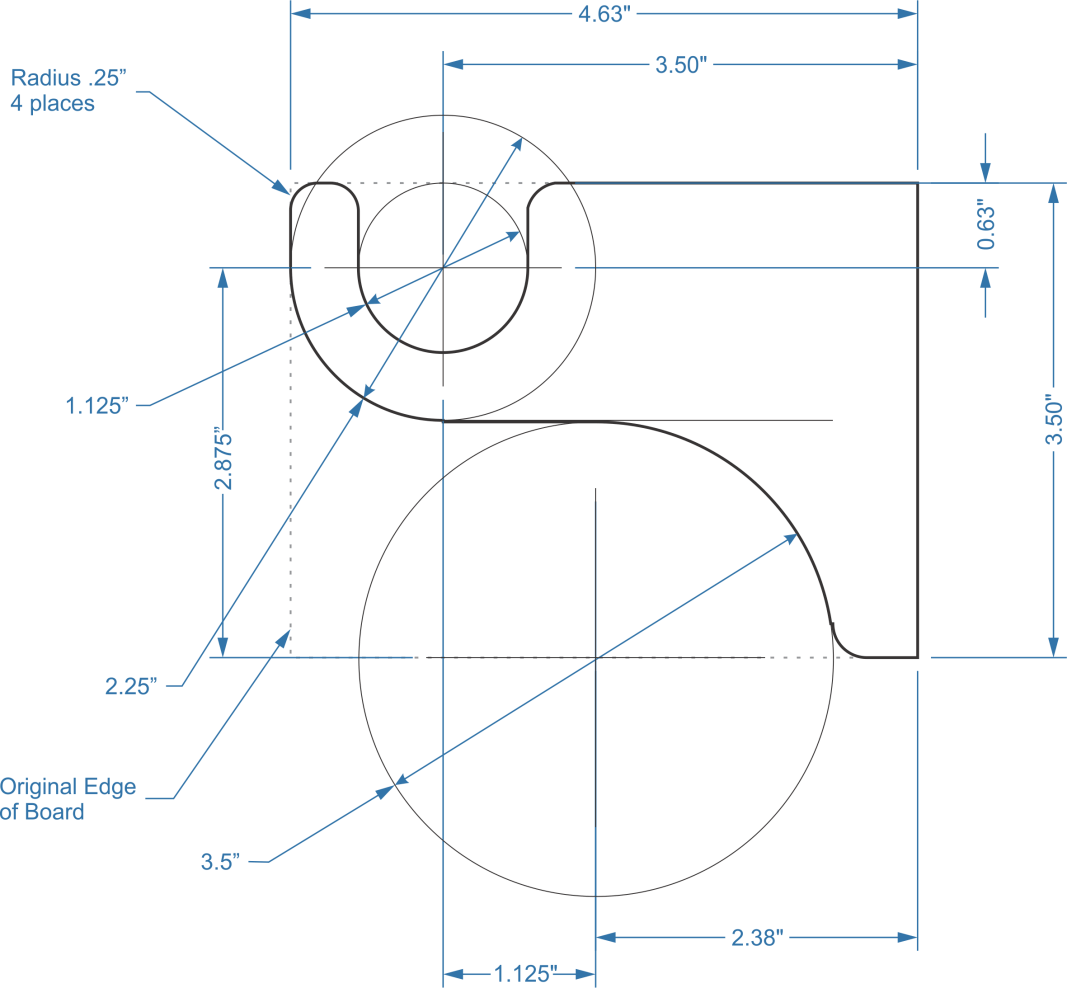
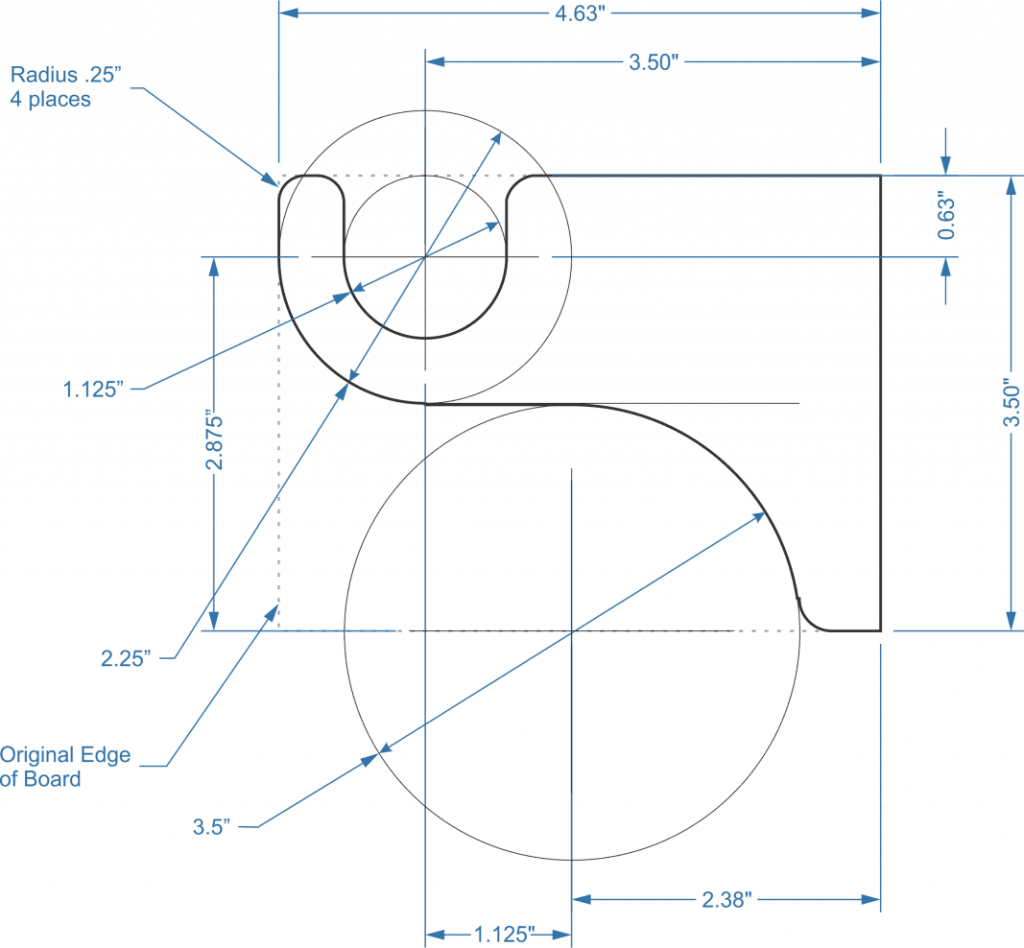
I’ve left the circles, guidelines and outline that I started with in the diagram below, to give an idea of the process of making such a diagram. This is a fairly simple, rather common design. It has a 1-1/8” round socket for the curtain rod to sit in, which is set 3-1/2” from the wall. The overall height is not significant, other than that I selected 3-1/2” as that is the width of a typical 4” board. The curves for the bracket are made by using two circles to cut away unnecessary parts of the original rectangle, one centered on the rod hole and another centered on the bottom edge of the board. A straight line connects the edges of these two circles, completing the outline.
Basic curtain bracket
For a simple bracket like this, the edges of the bracket merely need to be rounded over by sanding, although a 1/8” or ¼” roundover router bit can also be used. Another option might be to chamfer the edges. To make a more elegant looking bracket, without changing anything else, the roundover bit can be replaced by a cove and bead or other molding bit, cutting the workpiece from both sides.
The basic design is easily modified, such as in the drawing below. The only real difference between this one and the one above, is that the lower part of the bracket has been elongated; yet it provides a totally different look.
Elongated curtain bracket
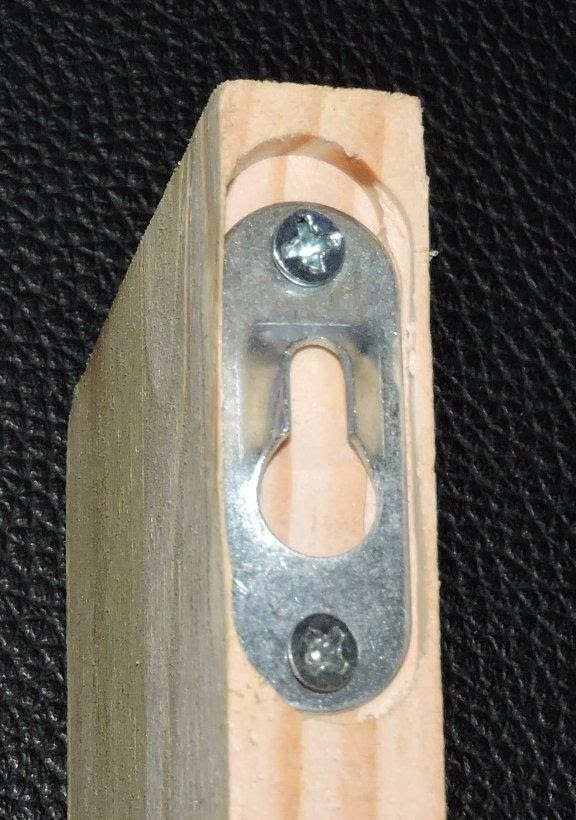
The other important part of these brackets is the hanger for the bracket itself. The easiest thing to use is keyhole hangers, which are readily available online or through the major home improvement centers. The keyhole hanger is normally installed into a ¼” deep slot, routed into the back edge of the wood curtain bracket. The trick here is that the hanger is 5/8” wide and it is being installed into a ¾” wide surface. So there isn’t much room for error.
As is obvious from the photo below, once the 5/8” slot is routed into the back of the bracket, there isn’t much wood left on either side. The slot is cut with a 5/8” straight bit on a router table. It is essential to use the fence, so as to ensure that the slot goes straight. As is obvious, I got this one a little off-center, mostly because I did it quickly.
If several brackets are being made at the same time, it’s a good idea to mark the router table’s fence with masking tape, showing where the bracket should be at the beginning and end of the cut. That’s important, because we want the keyhole hangers to be in the same location on the backs of all the wooden curtain brackets. Otherwise, it’s going to be very hard to hang them level.
Hanger bracket
If a router table is not available for cutting out the slot for the keyhole bracket, a simple dado can be cut across the grain of the wood, either on the table saw or by cutting the ends (sides) of the dado with a back saw and then removing the material with a mallet and chisel. This will make the keyhole hanger visible; but only to those who try pretty hard to see it.
The finished bracket can either be painted or stained and varnished to match the room’s décor.
Rounding Out the Design with Finials
While we’re making the brackets for the curtain, we may as well add some finials to the ends of the curtain rods. There are a wide variety of these available on the market, some which come with screw ends, allowing them to go into the end of a wood curtain rod and some which are designed for a slip fit into a metal curtain rod. Round drawer and cabinet pulls can also be used in this way.
For the woodworker who has a lathe, making their own finials is the ideal way to finish out any curtain. These are extremely easy to turn on the lathe and can be made as simple or ornate as desired. The only thing to be careful of is ensuring that there is an easy way to attach the finial to the curtain rod. Drilling a hole, the size of the curtain rod, into the base of the finial, with a forstner bit, while the finial is still on the lathe is the easiest way to do this. However, if that is going to be done, it should be done before the outside profile of the finial is turned, as the wood may not be strong enough for the drilling operation, once it has been thinned out and shaped.
Combining A Wooden Curtain Bracket with a Shelf
A modification to this basic style, which might want to be considered, is to add a board to the back and top, making a corbel out of it. The drawing below shows a bracket designed much like the one above, with the exception that it has two additional pieces, mitered together, that it is attached to. These two pieces are made of 1”x 3”, and provide the horizontal and vertical surfaces for the corbel. They have both had the edge routed with a cove and bead bit, giving a more formal appearance to the bracket.
With shelf bracket
To use these brackets for both the curtain and a shelf (or valance), a board is mounted to the tops of the two brackets. Closet rod hangers can be installed on the inner sides of the contoured piece (the one which replaces our original design) to hold the curtain rod. The entire thing can then be mounted to the wall, using either the same sort of keyhole hangers mentioned above or screws through the vertical surfaces of the brackets.
If a valance is used, it would be unnecessary to rout the edge of the shelf, as that would not be visible. In most cases, the valance material is stapled to the back edge of the shelf, with a staple gun, before the shelf is hung.
One of the biggest problems with hanging curtains for those who live in apartments or rental properties, is that the rental contract will not allow making holes in the wall. Unfortunately, the above sorts of brackets cannot be used in that case, unless they are attached to the wall with adhesive-backed foam. 3M manufactures a line of products called their “Command” adhesive strips. These are normally sold with plastic hooks; but it is possible to buy the adhesive strips alone. In that case, they can be attached to these brackets and used to hang the curtains. Just be sure to use enough of the strips to hold the weight of the brackets, curtain rods and curtains.
Another option is to use tension rods on the inside of the window opening. Most buildings have at least a couple of inches of drywall there, which is plenty for use with tension rods.
Related Posts:
Making Wooden Bathtubs Guide by Admin September 19, 2023 DIY Wooden bathtubs require planning, precise construction, and maintenance. However, they are an elegant and unique addition to your bathroom. Guide to Set Started Materials Needed:…
How to Make a Wooden Sword by Admin July 14, 2025 DIY 1. Why I Still Make Wooden Swords I wasn’t planning to make a wooden sword that day. I just needed something—anything—for my kid’s last-minute costume.…
How to Make Wooden Gears by Admin April 2, 2025 DIY Building Wooden Gears — My No-Nonsense Notes from the Garage If you've ever thought about building wooden gears for a clock, a jig, or just…